

Owners Manual
Page 2
...) You can expand the images approx. 16 times the screen size and compress them to focus on or operate the projector ONLY via the remote control. Keep the remote control securely at hand to cool down. (p. 20) ◆ Digital Zoom (for security. - The Logo page identifies... the owner of this manual are subject to change without waiting for the projector to minimize the risk of 16.77 million colors, and matrix liquid crystal display (LCD...
...) You can expand the images approx. 16 times the screen size and compress them to focus on or operate the projector ONLY via the remote control. Keep the remote control securely at hand to cool down. (p. 20) ◆ Digital Zoom (for security. - The Logo page identifies... the owner of this manual are subject to change without waiting for the projector to minimize the risk of 16.77 million colors, and matrix liquid crystal display (LCD...

Owners Manual
Page 3
... 7 Part Names and Functions 8 Front 8 Back 8 Bottom 8 Rear Terminal 9 Top Control 10 Antitheft Alarm Setting Buttons 11 Remote Control 12 Remote Control Battery Installation 13 Operating Range 13 Installation 14 Positioning the Projector 14 Adjustable Feet 14 Connecting the AC Power Cord 15 Connecting to a Computer 16 Connecting to Video Equipment 17 Connecting...
... 7 Part Names and Functions 8 Front 8 Back 8 Bottom 8 Rear Terminal 9 Top Control 10 Antitheft Alarm Setting Buttons 11 Remote Control 12 Remote Control Battery Installation 13 Operating Range 13 Installation 14 Positioning the Projector 14 Adjustable Feet 14 Connecting the AC Power Cord 15 Connecting to a Computer 16 Connecting to Video Equipment 17 Connecting...

Owners Manual
Page 8
... Vents CAUTION Hot air is for attaching) CAUTION Do not turn on the projector with putting the lens cover on. Attach the lens cover while the projector is a registered trademark of the projector. The light beam may damage lens cover and result in use to deter theft... of ACCO Brands Corporation. !6 8 y Infrared Remote Receiver u Indicators i Speaker o Air Intake Vent !0 Power Cord Connector !1 ...
... Vents CAUTION Hot air is for attaching) CAUTION Do not turn on the projector with putting the lens cover on. Attach the lens cover while the projector is a registered trademark of the projector. The light beam may damage lens cover and result in use to deter theft... of ACCO Brands Corporation. !6 8 y Infrared Remote Receiver u Indicators i Speaker o Air Intake Vent !0 Power Cord Connector !1 ...
Owners Manual
Page 9
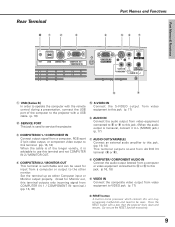
...) COMPUTER IN 2 / MONITOR OUT R AUDIO OUT VIDEO IN L (MONO) COMPUTER / COMPONENT S-VIDEO IN AUDIO IN o i q USB (Series B) In order to operate the computer with the remote control during a presentation, connect the USB port of the longer variety, it to L (MONO) jack.) (p. 17) u AUDIO OUT(VARIABLE) Connect an external audio amplifier to... the audio output from video equipment connected to t or o to this jack. (When the audio output is monaural, connect it is used to service the projector. r COMPUTER IN 2 / MONITOR OUT This terminal is of the computer to the...
...) COMPUTER IN 2 / MONITOR OUT R AUDIO OUT VIDEO IN L (MONO) COMPUTER / COMPONENT S-VIDEO IN AUDIO IN o i q USB (Series B) In order to operate the computer with the remote control during a presentation, connect the USB port of the longer variety, it to L (MONO) jack.) (p. 17) u AUDIO OUT(VARIABLE) Connect an external audio amplifier to... the audio output from video equipment connected to t or o to this jack. (When the audio output is monaural, connect it is used to service the projector. r COMPUTER IN 2 / MONITOR OUT This terminal is of the computer to the...
Owners Manual
Page 12
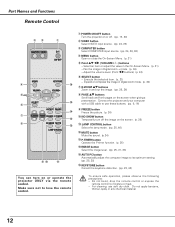
... !1 !5 AUTO PC button Automatically adjust the computer image to use soft dry cloth. Do not bend, drop the remote control or expose the remote control to lose the remote control. Connect the projector and your computer with a USB cable to its optimum setting. (pp. 25, 28) !6 KEYSTONE button Correct the ...keystone distortion. (pp. 23, 42) You can turn on or operate the projector ONLY via the remote control. Do not apply benzene, thinner, splay or any chemical material. 12 Expand or compress the image in Digital zoom mode. (p. 34) ...
... !1 !5 AUTO PC button Automatically adjust the computer image to use soft dry cloth. Do not bend, drop the remote control or expose the remote control to lose the remote control. Connect the projector and your computer with a USB cable to its optimum setting. (pp. 25, 28) !6 KEYSTONE button Correct the ...keystone distortion. (pp. 23, 42) You can turn on or operate the projector ONLY via the remote control. Do not apply benzene, thinner, splay or any chemical material. 12 Expand or compress the image in Digital zoom mode. (p. 34) ...

Owners Manual
Page 13
Operating Range Point the remote control toward the projector (Infrared Remote Receiver) when pressing any button. To insure safe operation, please observe the following precautions: ● Use (2) AA or LR6 type alkaline batteries. ● ... is replaced by an incorrect type. ● Dispose of used battery. ● Avoid contact with pins in front of the projector. 30° 30° 16.4' (5 m) 13 Part Names & Functions Remote Control Battery Installation Part Names and Functions 1 Open the battery compartment lid. 2 Install new batteries into the compartment. 3 Two ...
Operating Range Point the remote control toward the projector (Infrared Remote Receiver) when pressing any button. To insure safe operation, please observe the following precautions: ● Use (2) AA or LR6 type alkaline batteries. ● ... is replaced by an incorrect type. ● Dispose of used battery. ● Avoid contact with pins in front of the projector. 30° 30° 16.4' (5 m) 13 Part Names & Functions Remote Control Battery Installation Part Names and Functions 1 Open the battery compartment lid. 2 Install new batteries into the compartment. 3 Two ...

Owners Manual
Page 19
...PIN code, "PIN code" and the number turn red and disappear. Should the PIN code be started. Installation Basic Operation Turning On the Projector 1 Complete peripheral connections (with a PIN code, PIN code Input Dialog Box appear. The preparation display appears on the screen. Enter a ... the cooling fans start to "✳". "1234" is selected in Setting on the remote control. If you can start to complete entering a four-digit number. The number changes to operate the projector. Selected Input Source and Lamp Mode Lamp mode (See p. 46 for 3 minutes ...
...PIN code, "PIN code" and the number turn red and disappear. Should the PIN code be started. Installation Basic Operation Turning On the Projector 1 Complete peripheral connections (with a PIN code, PIN code Input Dialog Box appear. The preparation display appears on the screen. Enter a ... the cooling fans start to "✳". "1234" is selected in Setting on the remote control. If you can start to complete entering a four-digit number. The number changes to operate the projector. Selected Input Source and Lamp Mode Lamp mode (See p. 46 for 3 minutes ...
Owners Manual
Page 20
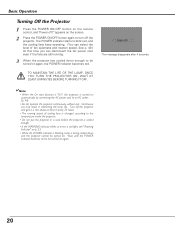
... the POWER ON-OFF button on the remote control, and "Power off the projector. appears on the screen. 2 Press the POWER ON-OFF button again to turn off ?" See p. 49.) At this projector is being cooled down enough to blink red, and the cooling fans keep operating. (You can ... the POWER indicator becomes red to be turned on automatically by connecting the AC power cord to the temperature inside the projector. • Do not put the projector in a case before the projector is cooled enough. • If the WARNING indicator blinks or emits a red light, see "Warning Indicator" on p. 53...
... the POWER ON-OFF button on the remote control, and "Power off the projector. appears on the screen. 2 Press the POWER ON-OFF button again to turn off ?" See p. 49.) At this projector is being cooled down enough to blink red, and the cooling fans keep operating. (You can ... the POWER indicator becomes red to be turned on automatically by connecting the AC power cord to the temperature inside the projector. • Do not put the projector in a case before the projector is cooled enough. • If the WARNING indicator blinks or emits a red light, see "Warning Indicator" on p. 53...
Owners Manual
Page 21
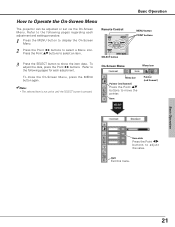
... the Point 7 8 buttons. Item Pointer (red framed ) SELECT button Item data Press the Point 7 8 buttons to Operate the On-Screen Menu The projector can be adjusted or set via the On-Screen Menu. Refer to the following pages for each adjustment and setting procedure. 1 Press the MENU button... ) Press the Point ed buttons to select a Menu icon. Refer to show the item data. Quit Exit this menu. Basic Operation 21 Remote Control SELECT button MENU button POINT buttons 3 Press the SELECT button to the following pages regarding each adjustment. On-Screen Menu Menu icon To close...
... the Point 7 8 buttons. Item Pointer (red framed ) SELECT button Item data Press the Point 7 8 buttons to Operate the On-Screen Menu The projector can be adjusted or set via the On-Screen Menu. Refer to the following pages for each adjustment and setting procedure. 1 Press the MENU button... ) Press the Point ed buttons to select a Menu icon. Refer to show the item data. Quit Exit this menu. Basic Operation 21 Remote Control SELECT button MENU button POINT buttons 3 Press the SELECT button to the following pages regarding each adjustment. On-Screen Menu Menu icon To close...
Owners Manual
Page 28
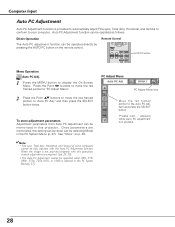
...On-Screen Menu. To store adjustment parameters Adjustment parameters from Auto PC Adjustment can be done just by pressing the AUTO PC button on the remote control. See "Store" on p. 30. ✔Note: • Fine sync, Total dots, Horizontal, and Vertical of some computers cannot... this operation, manual adjustments are memorized, the setting can be operated as follows. When the image is not provided properly with this projector. Computer Input Auto PC Adjustment Auto PC Adjustment function is provided to automatically adjust Fine sync, Total dots, Horizontal, and Vertical to...
...On-Screen Menu. To store adjustment parameters Adjustment parameters from Auto PC Adjustment can be done just by pressing the AUTO PC button on the remote control. See "Store" on p. 30. ✔Note: • Fine sync, Total dots, Horizontal, and Vertical of some computers cannot... this operation, manual adjustments are memorized, the setting can be operated as follows. When the image is not provided properly with this projector. Computer Input Auto PC Adjustment Auto PC Adjustment function is provided to automatically adjust Fine sync, Total dots, Horizontal, and Vertical to...
Owners Manual
Page 31
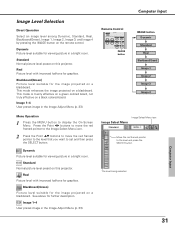
...board. Blackboard(Green) Picture level suitable for graphics. Standard Normal picture level preset on this projector. Standard Normal picture level preset on this projector. Image 1~4 User preset image in a bright room. Dynamic Picture level suitable for further ...description. Image Level Selection Direct Operation Select an image level among Dynamic, Standard, Real, Blackboard(Green), Image 1, Image 2, Image 3, and Image 4 by pressing the IMAGE button on the remote...
...board. Blackboard(Green) Picture level suitable for graphics. Standard Normal picture level preset on this projector. Standard Normal picture level preset on this projector. Image 1~4 User preset image in a bright room. Dynamic Picture level suitable for further ...description. Image Level Selection Direct Operation Select an image level among Dynamic, Standard, Real, Blackboard(Green), Image 1, Image 2, Image 3, and Image 4 by pressing the IMAGE button on the remote...
Owners Manual
Page 35
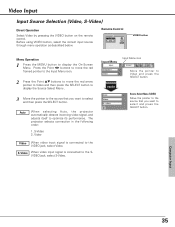
... the Source Select Menu . 3 Move the pointer to the source that you want to select and press the SELECT button. The projector selects connection in the following order: 1. S-Video When video input signal is connected to the SVIDEO jack, select S-Video. Auto When selecting... Auto, the projector automatically detects incoming video signal, and adjusts itself to display the On-Screen Menu. Computer Input 35 Remote Control VIDEO button Menu Operation 1 Press the MENU button to optimize its performance. Video...
... the Source Select Menu . 3 Move the pointer to the source that you want to select and press the SELECT button. The projector selects connection in the following order: 1. S-Video When video input signal is connected to the SVIDEO jack, select S-Video. Auto When selecting... Auto, the projector automatically detects incoming video signal, and adjusts itself to display the On-Screen Menu. Computer Input 35 Remote Control VIDEO button Menu Operation 1 Press the MENU button to optimize its performance. Video...

Owners Manual
Page 38
...an image level among Dynamic, Standard, Cinema, Blackboard (Green), Image 1, Image 2, Image 3, and Image 4 by pressing the IMAGE button on this projector. Image 1~4 User preset image in a bright room. Dynamic Picture level suitable for viewing picture in the Image Adjust Menu (pp. 39, 40). ...Standard Normal picture level preset on the remote control. See above for viewing picture in the Image Adjust Menu (pp. 39, 40). 38 Remote Control IMAGE button IMAGE button Dynamic Standard Cinema Blackboard(Green) Image 1 Image 2 Image 3 Image...
...an image level among Dynamic, Standard, Cinema, Blackboard (Green), Image 1, Image 2, Image 3, and Image 4 by pressing the IMAGE button on this projector. Image 1~4 User preset image in a bright room. Dynamic Picture level suitable for viewing picture in the Image Adjust Menu (pp. 39, 40). ...Standard Normal picture level preset on the remote control. See above for viewing picture in the Image Adjust Menu (pp. 39, 40). 38 Remote Control IMAGE button IMAGE button Dynamic Standard Cinema Blackboard(Green) Image 1 Image 2 Image 3 Image...

Owners Manual
Page 45
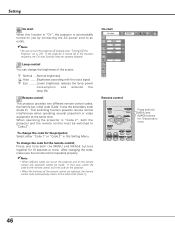
...Ceiling When this function is "On," the picture is used to project the image from a ceiling mounting the projector. Terminal The COMPUTER IN 2/MONITOR OUT terminal on the remote control is used to project the image to a rear projection screen. Change the input source to green blinking... Rear Power management For reducing power consumption as well as maintaining the lamp life, the Power management function turns off . Select one of the projector is pressed for computer input or monitor output. (p. 9) Select Computer 2 or Monitor Out with the Point 7 8 buttons. 45 Off Power...
...Ceiling When this function is "On," the picture is used to project the image from a ceiling mounting the projector. Terminal The COMPUTER IN 2/MONITOR OUT terminal on the remote control is used to project the image to a rear projection screen. Change the input source to green blinking... Rear Power management For reducing power consumption as well as maintaining the lamp life, the Power management function turns off . Select one of the projector is pressed for computer input or monitor output. (p. 9) Select Computer 2 or Monitor Out with the Point 7 8 buttons. 45 Off Power...
Owners Manual
Page 46
... does not operate properly. To change the brightness of the remote control are replaced, the remote control code automatically returns to the initial code (Code 1). On start Remote control Press and hold both the projector and the remote control must be made. Lamp control You can change the ...code for 10 seconds or more . the factory-set on the projector and on the projector. • When the batteries of the screen. This switching function prevents remote control interference when operating several projectors or video equipment at the same time. In that case, switch the ...
... does not operate properly. To change the brightness of the remote control are replaced, the remote control code automatically returns to the initial code (Code 1). On start Remote control Press and hold both the projector and the remote control must be made. Lamp control You can change the ...code for 10 seconds or more . the factory-set on the projector and on the projector. • When the batteries of the screen. This switching function prevents remote control interference when operating several projectors or video equipment at the same time. In that case, switch the ...
Owners Manual
Page 59
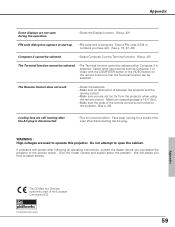
... European Community (EC). Fans keep running after the AC plug is disconnected. -This is between the projector and the remote control. -Make sure you purchased the projector or the service center. Give the model number and explain about the problem. If problems still persist...The Terminal function cannot be selected. -The Terminal function cannot be selected after Computer 2 is a Directive conformity mark of the remote control is conformed to the projector. (See p. 46) Cooling fans are still running for a certain time even after following all operating instructions, contact the dealer...
... European Community (EC). Fans keep running after the AC plug is disconnected. -This is between the projector and the remote control. -Make sure you purchased the projector or the service center. Give the model number and explain about the problem. If problems still persist...The Terminal function cannot be selected. -The Terminal function cannot be selected after Computer 2 is a Directive conformity mark of the remote control is conformed to the projector. (See p. 46) Cooling fans are still running for a certain time even after following all operating instructions, contact the dealer...

Owners Manual
Page 64
... Dimensions (W x H x D) Net Weight Feet Adjustment Multi-media Projector 10.50" x 4.86" x 9.58" (320mm x 148mm x 292mm) (Not including adjustable feet) 7.3 lb (3.3kg) 0˚ to 10.0˚ Panel Resolution LCD Panel System Panel Resolution Number of Pixels 0.6" TFT Active Matrix type, 3 panels 1,024 ... Temperature Storage Temperature 41 ˚F ~ 95 ˚F (5 ˚C ~ 35 ˚C) 14 ˚F ~ 140 ˚F (-10˚C ~ 60 ˚C) Remote Control Battery Operating Range Dimensions Net Weight AA or LR6 1.5V ALKALINE TYPE x 2 16.4' (5m) / ±30˚ 1.9"(W) x 0.87"(H) x 5.7"(D) (49mm...
... Dimensions (W x H x D) Net Weight Feet Adjustment Multi-media Projector 10.50" x 4.86" x 9.58" (320mm x 148mm x 292mm) (Not including adjustable feet) 7.3 lb (3.3kg) 0˚ to 10.0˚ Panel Resolution LCD Panel System Panel Resolution Number of Pixels 0.6" TFT Active Matrix type, 3 panels 1,024 ... Temperature Storage Temperature 41 ˚F ~ 95 ˚F (5 ˚C ~ 35 ˚C) 14 ˚F ~ 140 ˚F (-10˚C ~ 60 ˚C) Remote Control Battery Operating Range Dimensions Net Weight AA or LR6 1.5V ALKALINE TYPE x 2 16.4' (5m) / ±30˚ 1.9"(W) x 0.87"(H) x 5.7"(D) (49mm...


