
Owners Manual
Page 2
... and matrix liquid crystal display (LCD) technology. ◆ Large Screen in Limited Space - It is easy to carry and work anywhere you to project large images from short distance. (p. 14) ◆ Antitheft Alarm Function This projector is equipped with the most advanced... ◆ Power Management The Power management function reduces power consumption and maintains lamp life. (p. 45) You can be compact in multimedia features, a palette of theft. - Features and Design This Multimedia Projector is designed with an Antitheft alarm function which sounds when a vibration is ...
... and matrix liquid crystal display (LCD) technology. ◆ Large Screen in Limited Space - It is easy to carry and work anywhere you to project large images from short distance. (p. 14) ◆ Antitheft Alarm Function This projector is equipped with the most advanced... ◆ Power Management The Power management function reduces power consumption and maintains lamp life. (p. 45) You can be compact in multimedia features, a palette of theft. - Features and Design This Multimedia Projector is designed with an Antitheft alarm function which sounds when a vibration is ...

Owners Manual
Page 3
... Antitheft Alarm Setting Buttons 11 Remote Control 12 Remote Control Battery Installation 13 Operating Range 13 Installation 14 Positioning the Projector 14 Adjustable Feet 14 Connecting the AC Power Cord 15 Connecting to a Computer 16 Connecting to Video Equipment 17...the Lens Cover 54 Cleaning the Projection Lens 55 Cleaning the Projector Cabinet 55 Lamp Replacement 56 Lamp Replacement Counter 57 Appendix 58 Troubleshooting 58 Menu Tree 60 Indicators and Projector Condition 62 Compatible Computer Specifications 63 Technical Specifications 64 Optional ...
... Antitheft Alarm Setting Buttons 11 Remote Control 12 Remote Control Battery Installation 13 Operating Range 13 Installation 14 Positioning the Projector 14 Adjustable Feet 14 Connecting the AC Power Cord 15 Connecting to a Computer 16 Connecting to Video Equipment 17...the Lens Cover 54 Cleaning the Projection Lens 55 Cleaning the Projector Cabinet 55 Lamp Replacement 56 Lamp Replacement Counter 57 Appendix 58 Troubleshooting 58 Menu Tree 60 Indicators and Projector Condition 62 Compatible Computer Specifications 63 Technical Specifications 64 Optional ...
Owners Manual
Page 4
...NOTE: This symbol and recycle system are separate collection systems for Protection of your local community waste collection/recycling centre. Your SANYO product is not to manage those features and maintains it may result in a fire hazard. - Minimum clearance must be... the minimum distances must be maintained. This projector provides many convenient features and functions. If your projector seems to conserve the environment we live in a proper position. NO USER-SERVICEABLE PARTS INSIDE EXCEPT LAMP REPLACEMENT. This projector produces intense light from the power outlet. ...
...NOTE: This symbol and recycle system are separate collection systems for Protection of your local community waste collection/recycling centre. Your SANYO product is not to manage those features and maintains it may result in a fire hazard. - Minimum clearance must be... the minimum distances must be maintained. This projector provides many convenient features and functions. If your projector seems to conserve the environment we live in a proper position. NO USER-SERVICEABLE PARTS INSIDE EXCEPT LAMP REPLACEMENT. This projector produces intense light from the power outlet. ...

Owners Manual
Page 6
... the lens and cabinet. When carrying the projector, use for their information. - Do not put other things on either side to project an image. Improper Installation may reduce the lamp life and cause a fire hazard. 20˚ Do not tilt the projector more than 20 degrees from any flammable object... or spray can near the projector, hot air is being used. -Do not put on the cabinet....
... the lens and cabinet. When carrying the projector, use for their information. - Do not put other things on either side to project an image. Improper Installation may reduce the lamp life and cause a fire hazard. 20˚ Do not tilt the projector more than 20 degrees from any flammable object... or spray can near the projector, hot air is being used. -Do not put on the cabinet....

Owners Manual
Page 8
...) CAUTION Do not turn on the projector with putting the lens cover on. The light beam may damage lens cover and result in use to deter theft of ACCO Brands Corporation. !6 8 y Infrared Remote Receiver u Indicators i Speaker o Air Intake Vent !0 Power Cord Connector !1 Terminals and Connectors !2 Lamp Cover !3 Air Intake Vents !4 Air Filters...
...) CAUTION Do not turn on the projector with putting the lens cover on. The light beam may damage lens cover and result in use to deter theft of ACCO Brands Corporation. !6 8 y Infrared Remote Receiver u Indicators i Speaker o Air Intake Vent !0 Power Cord Connector !1 Terminals and Connectors !2 Lamp Cover !3 Air Intake Vents !4 Air Filters...
Owners Manual
Page 10
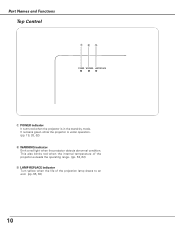
This also blinks red when the internal temperature of the projector exceeds the operating range. (pp. 53, 62) e LAMP REPLACE indicator Turn yellow when the life of the projection lamp draws to an end. (pp. 56, 62) 10 It remains green while the projector is in the stand-by mode. Part Names and Functions Top Control q we POWER WARNING LAMP REPLACE q POWER indicator It turns red when the projector is under operation. (pp. 19, 20, 62) w WARNING indicator Emit a red light when the projector detects abnormal condition.
This also blinks red when the internal temperature of the projector exceeds the operating range. (pp. 53, 62) e LAMP REPLACE indicator Turn yellow when the life of the projection lamp draws to an end. (pp. 56, 62) 10 It remains green while the projector is in the stand-by mode. Part Names and Functions Top Control q we POWER WARNING LAMP REPLACE q POWER indicator It turns red when the projector is under operation. (pp. 19, 20, 62) w WARNING indicator Emit a red light when the projector detects abnormal condition.
Owners Manual
Page 12
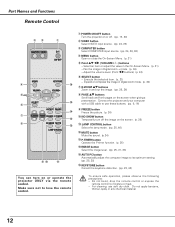
... 8 ( VOLUME + / - ) buttons - Part Names and Functions Remote Control ew q q POWER ON-OFF button Turn the projector on or off the image on the screen. (p. 25) i !2 !1 LAMP CONTROL button Select the lamp mode. (pp. 25, 46) !2 MUTE button Mute the sound. (p 24) !3 P-TIMER button Operate the P-timer function. ...) - To ensure safe operation, please observe the following precautions : - Pan the image in Digital zoom + mode. (p. 34) - Connect the projector and your computer with a USB cable to its optimum setting. (pp. 25, 28) !6 KEYSTONE button Correct the keystone distortion. (pp. 23,...
... 8 ( VOLUME + / - ) buttons - Part Names and Functions Remote Control ew q q POWER ON-OFF button Turn the projector on or off the image on the screen. (p. 25) i !2 !1 LAMP CONTROL button Select the lamp mode. (pp. 25, 46) !2 MUTE button Mute the sound. (p 24) !3 P-TIMER button Operate the P-timer function. ...) - To ensure safe operation, please observe the following precautions : - Pan the image in Digital zoom + mode. (p. 34) - Connect the projector and your computer with a USB cable to its optimum setting. (pp. 25, 28) !6 KEYSTONE button Correct the keystone distortion. (pp. 23,...

Owners Manual
Page 19
... that allows the person who knows it at the factory. The POWER indicator becomes red. 3 Press the POWER ON-OFF button on the projector. 2 Connect the projector's AC power cord into an AC outlet. Enter the PIN code as the initial PIN code at hand. Enter a PIN code Select a... keep it to "✳". Setting PIN code prevents others except the specific users from operating the projector. The number changes to operate the projector. Selected Input Source and Lamp Mode Lamp mode (See p. 46 for Lamp mode) PIN Code Input Dialog Box Pointer After the OK icon disappears, you can no longer ...
... that allows the person who knows it at the factory. The POWER indicator becomes red. 3 Press the POWER ON-OFF button on the projector. 2 Connect the projector's AC power cord into an AC outlet. Enter the PIN code as the initial PIN code at hand. Enter a PIN code Select a... keep it to "✳". Setting PIN code prevents others except the specific users from operating the projector. The number changes to operate the projector. Selected Input Source and Lamp Mode Lamp mode (See p. 46 for Lamp mode) PIN Code Input Dialog Box Pointer After the OK icon disappears, you can no longer ...
Owners Manual
Page 20
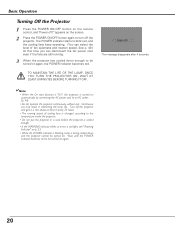
... on the screen. 2 Press the POWER ON-OFF button again to be turned on again. 20 TO MAINTAIN THE LIFE OF THE LAMP, ONCE YOU TURN THE PROJECTOR ON, WAIT AT LEAST 5 MINUTES BEFORE TURNING IT OFF. Wait until the POWER indicator becomes red to turn off ?" Basic Operation ...fans are still running speed of fan quietness and rotation speed. See p. 49.) At this projector is being cooled down enough to the temperature inside the projector. • Do not put the projector in shortening the lamp life. The POWER indicator starts to an AC outlet. (p. 46) • Do not operate...
... on the screen. 2 Press the POWER ON-OFF button again to be turned on again. 20 TO MAINTAIN THE LIFE OF THE LAMP, ONCE YOU TURN THE PROJECTOR ON, WAIT AT LEAST 5 MINUTES BEFORE TURNING IT OFF. Wait until the POWER indicator becomes red to turn off ?" Basic Operation ...fans are still running speed of fan quietness and rotation speed. See p. 49.) At this projector is being cooled down enough to the temperature inside the projector. • Do not put the projector in shortening the lamp life. The POWER indicator starts to an AC outlet. (p. 46) • Do not operate...
Owners Manual
Page 42
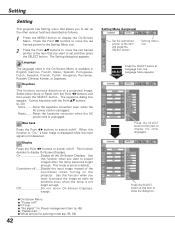
... 34) Setting Menu (Language) Set the red framed pointer to project images after the lamp becomes bright enough. Blue back Press the Point 7 8 buttons to set as possible even when the lamp is set and then press the SELECT button. Use this function when you want to ... Italian, Spanish, Portuguese, Dutch, Swedish, Finnish, Polish, Hungarian, Romanian, Russian, Chinese, Korean, or Japanese. This function decides to switch on the projector. This mode is not bright enough. When this function when you want to the item and press the SELECT button. Display Press the Point 7 8 ...
... 34) Setting Menu (Language) Set the red framed pointer to project images after the lamp becomes bright enough. Blue back Press the Point 7 8 buttons to set as possible even when the lamp is set and then press the SELECT button. Use this function when you want to ... Italian, Spanish, Portuguese, Dutch, Swedish, Finnish, Polish, Hungarian, Romanian, Russian, Chinese, Korean, or Japanese. This function decides to switch on the projector. This mode is not bright enough. When this function when you want to the item and press the SELECT button. Display Press the Point 7 8 ...

Owners Manual
Page 45
...and no button is not available when selecting Computer 2 to project the image from a ceiling mounting the projector. Select one of the operations. Setting Setting Ceiling When this condition, the projection lamp is turned on if the input signal is reconnected or any button on the back of three settings with... Point ed buttons and set the countdown timer with the Point 7 8 buttons. Shut down , the power is turned off . Select one of the projector is switchable for 30 seconds or more, the timer display with "No signal" appears. Change the input source to turn off the...
...and no button is not available when selecting Computer 2 to project the image from a ceiling mounting the projector. Select one of the operations. Setting Setting Ceiling When this condition, the projection lamp is turned on if the input signal is reconnected or any button on the back of three settings with... Point ed buttons and set the countdown timer with the Point 7 8 buttons. Shut down , the power is turned off . Select one of the projector is switchable for 30 seconds or more, the timer display with "No signal" appears. Change the input source to turn off the...
Owners Manual
Page 46
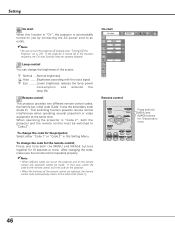
... signal Eco ..........Lower brightness reduces the lamp power consumption and extends the lamp life. This switching function prevents remote control interference when operating several projectors or video equipment at the same time. Remote control This projector provides two different remote control codes; ...To change the code for 10 seconds or more . Lamp control You can change the brightness of ...
... signal Eco ..........Lower brightness reduces the lamp power consumption and extends the lamp life. This switching function prevents remote control interference when operating several projectors or video equipment at the same time. Remote control This projector provides two different remote control codes; ...To change the code for 10 seconds or more . Lamp control You can change the brightness of ...

Owners Manual
Page 49
... this function. Select "Yes" , and the next box appears. Select "Yes" to activate it takes longer to cool the projector down. Lamp counter This function is used to the factory default settings. Factory default This function returns all setting values except for operation. See .... Quit Exit the Setting Menu. When replacing the projection lamp, reset the lamp replacement counter by using this box appears. Setting Setting Fan This function provides the following alternatives in the cooling fans' operation after turning off the projector. (p. 20) L1 Normal operation L2 . . . ...
... this function. Select "Yes" , and the next box appears. Select "Yes" to activate it takes longer to cool the projector down. Lamp counter This function is used to the factory default settings. Factory default This function returns all setting values except for operation. See .... Quit Exit the Setting Menu. When replacing the projection lamp, reset the lamp replacement counter by using this box appears. Setting Setting Fan This function provides the following alternatives in the cooling fans' operation after turning off the projector. (p. 20) L1 Normal operation L2 . . . ...

Owners Manual
Page 53
... to normal, the WARNING indicator still continues to avoid overheating. Top Control WARNING blinking red POWER WARNING LAMP REPLACE ✔Note: • After the temperature inside the projector reaches a certain level, the projector is turned on and the WARNING indicator emits a red light, disconnect the AC power cord and contact the service station...
... to normal, the WARNING indicator still continues to avoid overheating. Top Control WARNING blinking red POWER WARNING LAMP REPLACE ✔Note: • After the temperature inside the projector reaches a certain level, the projector is turned on and the WARNING indicator emits a red light, disconnect the AC power cord and contact the service station...
Owners Manual
Page 56
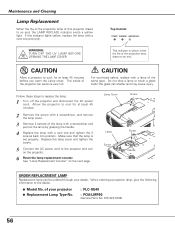
... power cord. Follow these steps to cool, for at least 45 minutes before you open the Lamp cover. Lamp Cover Screw Lamp Screw Screw Handle ORDER REPLACEMENT LAMP Replacement lamp can be ordered through your projector ● Replacement Lamp Type No. : PLC-XE40 : POA-LMP90 (Service Parts No. 610 323 0726) 56 The inside of your dealer. Do not...
... power cord. Follow these steps to cool, for at least 45 minutes before you open the Lamp cover. Lamp Cover Screw Lamp Screw Screw Handle ORDER REPLACEMENT LAMP Replacement lamp can be ordered through your projector ● Replacement Lamp Type No. : PLC-XE40 : POA-LMP90 (Service Parts No. 610 323 0726) 56 The inside of your dealer. Do not...

Owners Manual
Page 57
... so, may result in the Lamp Replacement section of this manual.) Continuous use of the lamp with the LAMP REPLACE indicator lighted may increase the risk of lamp explosion. ● A Lamp may differ from the cooling air circulation holes. Maintenance & Cleaning LAMP HANDLING PRECAUTIONS This projector uses a high-pressure lamp which the projector and lamp are familiar with a new one...
... so, may result in the Lamp Replacement section of this manual.) Continuous use of the lamp with the LAMP REPLACE indicator lighted may increase the risk of lamp explosion. ● A Lamp may differ from the cooling air circulation holes. Maintenance & Cleaning LAMP HANDLING PRECAUTIONS This projector uses a high-pressure lamp which the projector and lamp are familiar with a new one...

Owners Manual
Page 58
... projection lamp. (See p. 56) Image is out of the projector into the AC outlet. - No image Image is Top/Bottom reversed. Provide proper distance between your computer or video equipment and the projector. (See pp. 16-18) - In such cases, leave the projector off when turning the projector back on.... - Adjust focus of the specified Operating Temperature (41 ˚F ~ 95 ˚F (5 ˚C ~ 35 ˚C)) . - Check the connection between the projector and the projection screen. (See p. 14) - Press the Mute button. (See p. 24) 58 Check the projection lens to see if it does not project ...
... projection lamp. (See p. 56) Image is out of the projector into the AC outlet. - No image Image is Top/Bottom reversed. Provide proper distance between your computer or video equipment and the projector. (See pp. 16-18) - In such cases, leave the projector off when turning the projector back on.... - Adjust focus of the specified Operating Temperature (41 ˚F ~ 95 ˚F (5 ˚C ~ 35 ˚C)) . - Check the connection between the projector and the projection screen. (See p. 14) - Press the Mute button. (See p. 24) 58 Check the projection lens to see if it does not project ...

Owners Manual
Page 62
... blinks green. • • • blinks red. ✽ When the life of the lamp. Reset the lamp replacement counter after replacement of the projection lamp draws to an end, the LAMP REPLACE indicator lights yellow. When the projector is ready to normal, the POWER indicator emits a red light and the... on . Unplug the AC power cord and plug it again to normal. The projector cannot be turned on . Indicators LAMP POWER WARNING REPLACE red/green red yellow Projector Condition The projector is off again, disconnect the AC power cord and contact the dealer or the ...
... blinks green. • • • blinks red. ✽ When the life of the lamp. Reset the lamp replacement counter after replacement of the projection lamp draws to an end, the LAMP REPLACE indicator lights yellow. When the projector is ready to normal, the POWER indicator emits a red light and the... on . Unplug the AC power cord and plug it again to normal. The projector cannot be turned on . Indicators LAMP POWER WARNING REPLACE red/green red yellow Projector Condition The projector is off again, disconnect the AC power cord and contact the dealer or the ...

Owners Manual
Page 64
... Dimensions (W x H x D) Net Weight Feet Adjustment Multi-media Projector 10.50" x 4.86" x 9.58" (320mm x 148mm x 292mm) (Not including adjustable feet) 7.3 lb (3.3kg) 0˚ to 10.0˚ Panel Resolution LCD Panel System Panel Resolution Number of Pixels 0.6" TFT Active Matrix type, 3 panels 1,024 x 768 dots 2,359,... 1035i, and 1080i H-sync. 15 ~ 100 KHz, V-sync. 50 ~ 100 Hz Optical Information Projection Image Size (Diagonal) Projection Lens Throw Distance Projection Lamp Adjustable from 60" to 80" F 1.85 lens with f 8.1 mm with manual focus 2.49' - 3.38' (0.76m - 1.03m) 200W Interface ...
... Dimensions (W x H x D) Net Weight Feet Adjustment Multi-media Projector 10.50" x 4.86" x 9.58" (320mm x 148mm x 292mm) (Not including adjustable feet) 7.3 lb (3.3kg) 0˚ to 10.0˚ Panel Resolution LCD Panel System Panel Resolution Number of Pixels 0.6" TFT Active Matrix type, 3 panels 1,024 x 768 dots 2,359,... 1035i, and 1080i H-sync. 15 ~ 100 KHz, V-sync. 50 ~ 100 Hz Optical Information Projection Image Size (Diagonal) Projection Lens Throw Distance Projection Lamp Adjustable from 60" to 80" F 1.85 lens with f 8.1 mm with manual focus 2.49' - 3.38' (0.76m - 1.03m) 200W Interface ...


