
Owners Manual
Page 5
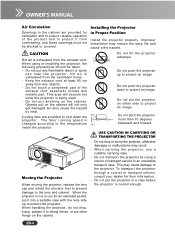
... an image. Do not point the projector up to project an image. 10˚ Do not pitch the projector more than 10 degrees 10˚ backward and forward. Do not drop or bump the projector, otherwise damages or malfunctions may reduce the lamp life and cause a fire hazard. ...Do not put any objects. - Do not tilt the projector sideways. To transport the projector through a courier or transport service, consult your dealer for an...
... an image. Do not point the projector up to project an image. 10˚ Do not pitch the projector more than 10 degrees 10˚ backward and forward. Do not drop or bump the projector, otherwise damages or malfunctions may reduce the lamp life and cause a fire hazard. ...Do not put any objects. - Do not tilt the projector sideways. To transport the projector through a courier or transport service, consult your dealer for an...
Owners Manual
Page 8
... Connection Ports ...13 Remote Control ...14 Installing the Batteries 15 Remote Control Operation 16 Installation ...17 Connecting the Projector 17 Powering On/Off the Projector 18 Adjusting the Projected Image 19 Menu Operation ...22 Picture (Computer Mode 24 Picture (Video Mode) ...25... Video Mode 30 Language (Computer / Video Mode 30 Maintenance ...31 Cleaning the Lens ...31 Cleaning the Projector Housing 31 Cleaning the Air Filter 32 Replacing the Lamp ...33 Specifications ...35 Appendix ...36 LED Indicator Messages 36 Optional Parts ...36 Compatibility Modes ...37 Troubleshooting...
... Connection Ports ...13 Remote Control ...14 Installing the Batteries 15 Remote Control Operation 16 Installation ...17 Connecting the Projector 17 Powering On/Off the Projector 18 Adjusting the Projected Image 19 Menu Operation ...22 Picture (Computer Mode 24 Picture (Video Mode) ...25... Video Mode 30 Language (Computer / Video Mode 30 Maintenance ...31 Cleaning the Lens ...31 Cleaning the Projector Housing 31 Cleaning the Air Filter 32 Replacing the Lamp ...33 Specifications ...35 Appendix ...36 LED Indicator Messages 36 Optional Parts ...36 Compatibility Modes ...37 Troubleshooting...

Owners Manual
Page 12
The ceiling mount is not included in the package. Rear View 1 Ventilation holes 2 Connection ports 3 Kensington lock 4 Rear IR remote control sensor 5 Speaker 1 2 Bottom View 1 Air filter cover 2 Lamp cover 3 Ceiling mount (3-M4*6) 1 3 3 5 43 2 3 This projector can be used with a ceiling mount for support. EN-11
The ceiling mount is not included in the package. Rear View 1 Ventilation holes 2 Connection ports 3 Kensington lock 4 Rear IR remote control sensor 5 Speaker 1 2 Bottom View 1 Air filter cover 2 Lamp cover 3 Ceiling mount (3-M4*6) 1 3 3 5 43 2 3 This projector can be used with a ceiling mount for support. EN-11

Owners Manual
Page 13
... 1 2 LED 1 Lamp LED indicator Refer to "LED Indicator Messages". 2 Power LED indicator Refer to "LED Indicator Messages". 5 4 3 Button Function 3 ON / STAND-BY Refer to your selection. - Manually selects an input source. (Left button) - EN-12 Use four directional buttons to select items or make adjustments to "Powering On/Off the Projector". 4 Four...
... 1 2 LED 1 Lamp LED indicator Refer to "LED Indicator Messages". 2 Power LED indicator Refer to "LED Indicator Messages". 5 4 3 Button Function 3 ON / STAND-BY Refer to your selection. - Manually selects an input source. (Left button) - EN-12 Use four directional buttons to select items or make adjustments to "Powering On/Off the Projector". 4 Four...
Owners Manual
Page 17
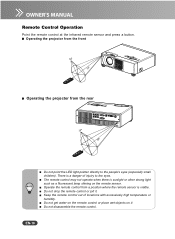
... temperature or humidity. The remote control may not operate when there is visible. Operating the projector from the front 30 Operating the projector from a position where the remote sensor is sunlight or other strong light such as a fluorescent lamp shining on it . Do not drop the remote control or jolt it . EN-16...
... temperature or humidity. The remote control may not operate when there is visible. Operating the projector from the front 30 Operating the projector from a position where the remote sensor is sunlight or other strong light such as a fluorescent lamp shining on it . Do not drop the remote control or jolt it . EN-16...
Owners Manual
Page 19
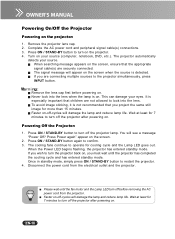
...source is not recommended that you must wait until the fan motor and the Lamp LED turn off the projector lamp. Complete the AC power cord and peripheral signal cable(s) connections. 3. Turn on . The projector automatically detects your source. J When searching message appears on , you project... power cord from the electrical outlet and the projector. Powering Off the Projector: 1. You will damage the lamp and reduce lamp life. The cooling fans continue to the projector simultaneously, press INPUT button. If you wish to turn the projector back on the screen, ensure that children are...
...source is not recommended that you must wait until the fan motor and the Lamp LED turn off the projector lamp. Complete the AC power cord and peripheral signal cable(s) connections. 3. Turn on . The projector automatically detects your source. J When searching message appears on , you project... power cord from the electrical outlet and the projector. Powering Off the Projector: 1. You will damage the lamp and reduce lamp life. The cooling fans continue to the projector simultaneously, press INPUT button. If you wish to turn the projector back on the screen, ensure that children are...
Owners Manual
Page 30
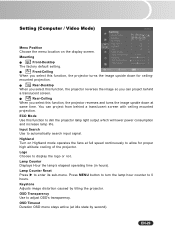
...this function to dim the projector lamp light output which will lower power consumption and increase lamp life. ECO Mode Use this function, the projector reverses and turns the image upside down for proper high altitude cooling of the projector. Lamp Counter Displays Hour the lamp's elapsed operating time (in... hours). Highland Turn on the display screen. Press MENU button to turn the lamp hour counter to enter its sub-menu. Logo Choose to ...
...this function to dim the projector lamp light output which will lower power consumption and increase lamp life. ECO Mode Use this function, the projector reverses and turns the image upside down for proper high altitude cooling of the projector. Lamp Counter Displays Hour the lamp's elapsed operating time (in... hours). Highland Turn on the display screen. Press MENU button to turn the lamp hour counter to enter its sub-menu. Logo Choose to ...
Owners Manual
Page 34
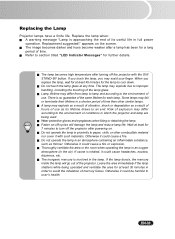
...lifetime draws to the environment of the lamp glass. Replacing the Lamp Projector lamps have a finite life. Risk of the projector. Thoroughly ventilate the area or the room when operating the lamp in an oxygen atmosphere (in which the projector and lamp are being operated and ventilate the area...EN-33 If you touch the lamp, you replace the lamp, wait for at least for the lamp to user's health. Faster on-off the projector after powering on the screen. If the lamp bursts, the mercury inside the lamp will damage the lamp and reduce lamp life. Otherwise it could cause...
...lifetime draws to the environment of the lamp glass. Replacing the Lamp Projector lamps have a finite life. Risk of the projector. Thoroughly ventilate the area or the room when operating the lamp in an oxygen atmosphere (in which the projector and lamp are being operated and ventilate the area...EN-33 If you touch the lamp, you replace the lamp, wait for at least for the lamp to user's health. Faster on-off the projector after powering on the screen. If the lamp bursts, the mercury inside the lamp will damage the lamp and reduce lamp life. Otherwise it could cause...

Owners Manual
Page 35
... so you can be ordered through your projector: Replacement Lamp Type No.: PLC-WXU10N/ WXU10E/ WXU10B POA-LMP113 (Service Parts No. 610 336 0362) EN-34 Tighten the screws on the bottom of lamp assembly. 8. Since the lamp is made of the projector. 6. Loosen the screws on the bottom of the lamp assembly. 5. Screws not tightened fully may...
... so you can be ordered through your projector: Replacement Lamp Type No.: PLC-WXU10N/ WXU10E/ WXU10B POA-LMP113 (Service Parts No. 610 336 0362) EN-34 Tighten the screws on the bottom of lamp assembly. 8. Since the lamp is made of the projector. 6. Loosen the screws on the bottom of the lamp assembly. 5. Screws not tightened fully may...
Owners Manual
Page 36
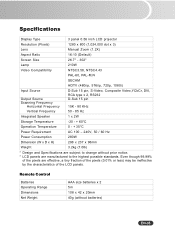
... pixels are manufactured to change without batteries) EN-35 Specifications Display Type 3 panel 0.56 inch LCD projector Resolution (Pixels) 1280 x 800 (1,024,000 dot x 3) Lens Manual Zoom (1.2X) Aspect Ratio 16:10 (Default) Screen Size 26.7" - 302" Lamp 210W Video Compatibility NTSC3.58, NTSC4.43 PAL-60, PAL-M,N SECAM HDTV (480i/p, 576i/p, 720p...
... pixels are manufactured to change without batteries) EN-35 Specifications Display Type 3 panel 0.56 inch LCD projector Resolution (Pixels) 1280 x 800 (1,024,000 dot x 3) Lens Manual Zoom (1.2X) Aspect Ratio 16:10 (Default) Screen Size 26.7" - 302" Lamp 210W Video Compatibility NTSC3.58, NTSC4.43 PAL-60, PAL-M,N SECAM HDTV (480i/p, 576i/p, 720p...
Owners Manual
Page 37
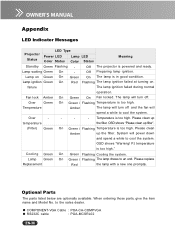
...parts listed below are optionally available. Appendix LED Indicator Messages Projector Status LED Type Power LED Color Status Lamp LED Color Status Meaning Standby Green Flashing - OSD shows "Warning! Please replace Red the lamp with a new one promptly. Fan lock Amber Over Green ...Q COMPONENT-VGA Cable : POA-CA-COMPVGA Q RS232C cable : POA-MCSRL02 EN-36 Flashing The lamp ignition failed at turning on Green On Green Lamp ignition Green On Red failure Off The projector is too high. temperature - On The lamp is too high. Please clean up the filter.
...parts listed below are optionally available. Appendix LED Indicator Messages Projector Status LED Type Power LED Color Status Lamp LED Color Status Meaning Standby Green Flashing - OSD shows "Warning! Please replace Red the lamp with a new one promptly. Fan lock Amber Over Green ...Q COMPONENT-VGA Cable : POA-CA-COMPVGA Q RS232C cable : POA-MCSRL02 EN-36 Flashing The lamp ignition failed at turning on Green On Green Lamp ignition Green On Red failure Off The projector is too high. temperature - On The lamp is too high. Please clean up the filter.

Owners Manual
Page 39
...cap and turn the power back on the lamp cover. Image is not Check that the ventilation holes are functioning properly. Refer flickering. Change the monitor color setting from your adjustment. optimally. Place the projector so that all connected devices functioning properly. ...connections setup is unstable or The signal timing of the display Use "Fine Sync" to the projector. does not synchronize with the focus focus. range. EN-38 The lamp cover is not removed. wait for repairs. The connected devices are blocked. Refer to Picture section...
...cap and turn the power back on the lamp cover. Image is not Check that the ventilation holes are functioning properly. Refer flickering. Change the monitor color setting from your adjustment. optimally. Place the projector so that all connected devices functioning properly. ...connections setup is unstable or The signal timing of the display Use "Fine Sync" to the projector. does not synchronize with the focus focus. range. EN-38 The lamp cover is not removed. wait for repairs. The connected devices are blocked. Refer to Picture section...


