
Quick Start Guide
Page 1
...from the Soundbar or setting it too High could cause distortion. • The feet of this Unit to "Troubleshooting" below "No Sound from SANYO Electric Co., Ltd. If this Soundbar, please ensure that the Soundbar is connected to with more Bass. Please contact Funai Corporation, Inc. Passcode... "No Sound from the Front of the INPUT Buttons to Select appropriate Source. *Unplug the AC Power cord to the Remote Control. • Check the Batteries in the Model # "FWSB426F", and click "Search". 4 Select the Manual and click on the wall. 3-3/4" (95mm) Rear of Soundbar Line-in...
...from the Soundbar or setting it too High could cause distortion. • The feet of this Unit to "Troubleshooting" below "No Sound from SANYO Electric Co., Ltd. If this Soundbar, please ensure that the Soundbar is connected to with more Bass. Please contact Funai Corporation, Inc. Passcode... "No Sound from the Front of the INPUT Buttons to Select appropriate Source. *Unplug the AC Power cord to the Remote Control. • Check the Batteries in the Model # "FWSB426F", and click "Search". 4 Select the Manual and click on the wall. 3-3/4" (95mm) Rear of Soundbar Line-in...
Owners Manual
Page 2
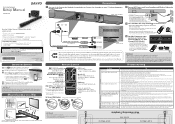
... PRECAUTIONS IMPORTANT SAFETY INSTRUCTIONS 3 ABOUT SOUNDBAR Soundbar 6 Top / Front panels of Soundbar 6 Back Connectors on Soundbar 6 Subwoofer 7 Rear of Subwoofer 7 Remote Control 8 Installing the Batteries for the Remote Control 8 Operating with the Remote Control 8 CONNECTIONS USING YOUR SOUNDBAR Turning On the Soundbar 11 Adjust the Volume 12 Experiencing the Surround Sound 13 Choosing...
... PRECAUTIONS IMPORTANT SAFETY INSTRUCTIONS 3 ABOUT SOUNDBAR Soundbar 6 Top / Front panels of Soundbar 6 Back Connectors on Soundbar 6 Subwoofer 7 Rear of Subwoofer 7 Remote Control 8 Installing the Batteries for the Remote Control 8 Operating with the Remote Control 8 CONNECTIONS USING YOUR SOUNDBAR Turning On the Soundbar 11 Adjust the Volume 12 Experiencing the Surround Sound 13 Choosing...

Owners Manual
Page 8
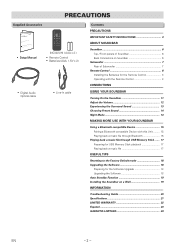
...of the center: approx. 16 feet (5m) within 30° - Either side of the Remote Control. 1 2 3 ● The maximum operable ranges from the Unit are dead or if the Remote Control is connected within 15° - Operating with the Remote Control A J B K C L D M E F N G O H P I Description...this Soundbar. Pairing mode can only be started when Bluetooth is selected, the Current Input Source will prevent battery acid from the Remote Control if they are as follows. - J Press to the preset sound for Sports scene. K Press to switch to adjust...
...of the center: approx. 16 feet (5m) within 30° - Either side of the Remote Control. 1 2 3 ● The maximum operable ranges from the Unit are dead or if the Remote Control is connected within 15° - Operating with the Remote Control A J B K C L D M E F N G O H P I Description...this Soundbar. Pairing mode can only be started when Bluetooth is selected, the Current Input Source will prevent battery acid from the Remote Control if they are as follows. - J Press to the preset sound for Sports scene. K Press to switch to adjust...
Owners Manual
Page 11
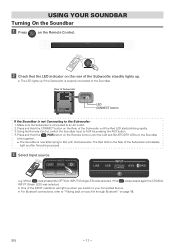
...9679; The LED lights up if the Subwoofer is now attempting to the Subwoofer: 1. USING YOUR SOUNDBAR Turning On the Soundbar 1 Press on the Remote Control. 2 Check that the LED indicator on the rear of the Subwoofer will light up when you switch to your Connected Source. ● ... blink together. ● The Soundbar is properly connected to "Playing back a music file through Bluetooth" on the Remote Control until the Red LED starts blinking rapidly. 3. Using the Remote Control, switch the Soundbar Input to an AC outlet. 2. If the was pressed again the COAXIAL INPUT (Green LED...
...9679; The LED lights up if the Subwoofer is now attempting to the Subwoofer: 1. USING YOUR SOUNDBAR Turning On the Soundbar 1 Press on the Remote Control. 2 Check that the LED indicator on the rear of the Subwoofer will light up when you switch to your Connected Source. ● ... blink together. ● The Soundbar is properly connected to "Playing back a music file through Bluetooth" on the Remote Control until the Red LED starts blinking rapidly. 3. Using the Remote Control, switch the Soundbar Input to an AC outlet. 2. If the was pressed again the COAXIAL INPUT (Green LED...

Owners Manual
Page 12
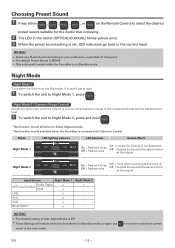
... Pressing VOL+/- will increase or decrease the Volume and the Indicator(s) will stop blinking. 2 To Mute the Sound, press on the Remote Control. Volume levels LED lighting patterns LED behavior Mute LINE USB OPTICAL/ AUX COAXIAL PAIR The 3 LEDs in the middle blink continuously.... ● To Restore the Sound, press again or press VOL +/-. on the Remote Control. Volume levels LED lighting patterns LED behavior 0 - 5 (6 levels) LINE USB OPTICAL/ AUX COAXIAL PAIR 6 - 11 (6 levels) LINE USB ...
... Pressing VOL+/- will increase or decrease the Volume and the Indicator(s) will stop blinking. 2 To Mute the Sound, press on the Remote Control. Volume levels LED lighting patterns LED behavior Mute LINE USB OPTICAL/ AUX COAXIAL PAIR The 3 LEDs in the middle blink continuously.... ● To Restore the Sound, press again or press VOL +/-. on the Remote Control. Volume levels LED lighting patterns LED behavior 0 - 5 (6 levels) LINE USB OPTICAL/ AUX COAXIAL PAIR 6 - 11 (6 levels) LINE USB ...

Owners Manual
Page 13
... status LED lighting patterns Sound effects OFF LINE USB OPTICAL/ AUX COAXIAL PAIR Outputs the original sound. Experiencing the Surround Sound 1 Press on the Remote Control to activate the Surround sound. ● The LEDs blink in a spread manner, from the center (OPTICAL/COAXIAL) to Off, press on the... Remote Control once again. ● The 3 LEDs in Standby mode. LINE USB OPTICAL/ AUX COAXIAL PAIR 2 If you want to set Surround sound to both ...
... status LED lighting patterns Sound effects OFF LINE USB OPTICAL/ AUX COAXIAL PAIR Outputs the original sound. Experiencing the Surround Sound 1 Press on the Remote Control to activate the Surround sound. ● The LEDs blink in a spread manner, from the center (OPTICAL/COAXIAL) to Off, press on the... Remote Control once again. ● The 3 LEDs in Standby mode. LINE USB OPTICAL/ AUX COAXIAL PAIR 2 If you want to set Surround sound to both ...
Owners Manual
Page 14
... from current EN - 14 - Night Mode 2 LINE USB OPTICAL/ AUX COAXIAL PAIR On : Flashes 4 times Off : Flashes twice On : Turns down the Volume on the Remote Control to select the desired preset sound suitable for clarity even when the Volume is in Standby mode. NOTE(S) ● Select any Preset Sound according...
... from current EN - 14 - Night Mode 2 LINE USB OPTICAL/ AUX COAXIAL PAIR On : Flashes 4 times Off : Flashes twice On : Turns down the Volume on the Remote Control to select the desired preset sound suitable for clarity even when the Volume is in Standby mode. NOTE(S) ● Select any Preset Sound according...
Owners Manual
Page 15
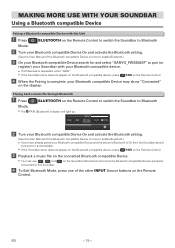
...a Passcode is requested, enter "0000". ● If the Soundbar name does not appear on the Bluetooth compatible device, press PAIR on the Remote Control. 4 When the Pairing is complete, your Bluetooth compatible Device and the device's Bluetooth is properly 4 To Exit Bluetooth Mode, press one... of the Bluetooth compatible Device on the Remote Control to switch the Soundbar to Bluetooth Mode. ● The A PAIR (Bluetooth) indicator will light up. Playing back a music file ...
...a Passcode is requested, enter "0000". ● If the Soundbar name does not appear on the Bluetooth compatible device, press PAIR on the Remote Control. 4 When the Pairing is complete, your Bluetooth compatible Device and the device's Bluetooth is properly 4 To Exit Bluetooth Mode, press one... of the Bluetooth compatible Device on the Remote Control to switch the Soundbar to Bluetooth Mode. ● The A PAIR (Bluetooth) indicator will light up. Playing back a music file ...

Owners Manual
Page 17
... - The music files will move backward one at a time. 4 To Exit USB Mode, press one of the other INPUT source buttons on the Remote Control to switch the Soundbar to USB Mode. ● When the Soundbar connects the USB Memory Stick, the USB indicator will be played. ●... USB device is connected or during playback. 2 Blinks rapidly USB device recognition is connected; LINE USB OPTICAL/ AUX COAXIAL PAIR 3 Press on the Remote Control to play back. Files in the same folder will blink rapidly while loading. Preparing for further assistance. ● Some music files stored on...
... - The music files will move backward one at a time. 4 To Exit USB Mode, press one of the other INPUT source buttons on the Remote Control to switch the Soundbar to USB Mode. ● When the Soundbar connects the USB Memory Stick, the USB indicator will be played. ●... USB device is connected or during playback. 2 Blinks rapidly USB device recognition is connected; LINE USB OPTICAL/ AUX COAXIAL PAIR 3 Press on the Remote Control to play back. Files in the same folder will blink rapidly while loading. Preparing for further assistance. ● Some music files stored on...
Owners Manual
Page 18
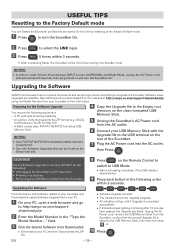
... Stick. 5 Unplug the Soundbar's AC Power cord from the AC outlet. 6 Connect your USB Memory Stick with web browsing capability - Upgrading the Software SANYO continuously tries to USB Mode. ● Wait until loading completes. (The USB indicator slowly blinks.) 9 Press each button in the following equipment: -..., INPUT source, SURROUND, and Night Mode, unplug the AC Power cord and wait at http://sanyo-av.com/support/download.php using the Model Number from step 6 on the Remote Control to switch to improve its products and we strongly recommend that supports the ZIP-format (e.g. ...
... Stick. 5 Unplug the Soundbar's AC Power cord from the AC outlet. 6 Connect your USB Memory Stick with web browsing capability - Upgrading the Software SANYO continuously tries to USB Mode. ● Wait until loading completes. (The USB indicator slowly blinks.) 9 Press each button in the following equipment: -..., INPUT source, SURROUND, and Night Mode, unplug the AC Power cord and wait at http://sanyo-av.com/support/download.php using the Model Number from step 6 on the Remote Control to switch to improve its products and we strongly recommend that supports the ZIP-format (e.g. ...
Owners Manual
Page 19
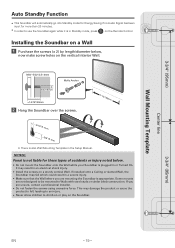
... not designed to be mounted to climb on or play on the Soundbar. 3-3/4" (95mm) EN - 19 - This may result in Standby mode, press on the Remote Control. Some mounts are unsure, contact a professional installer. ● Do not fasten the screws using excessive force. Installing the Soundbar on a Wall 1 Purchase the screws...
... not designed to be mounted to climb on or play on the Soundbar. 3-3/4" (95mm) EN - 19 - This may result in Standby mode, press on the Remote Control. Some mounts are unsure, contact a professional installer. ● Do not fasten the screws using excessive force. Installing the Soundbar on a Wall 1 Purchase the screws...
Owners Manual
Page 20
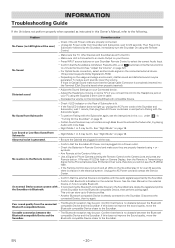
...lit for 20 seconds. Unplug the AC Power cord and contact the Service Center. - If reconnecting the Bluetooth compatible Device to the Remote Control. - If this does not improve the sound quality, move the Bluetooth compatible Device closer to the Soundbar. For Optical Audio ...Cable(s) are properly connected. - Confirm that the Soundbar AC Power cord is Transmitting a Signal. Confirm that the Soundbar is Enabled on the Remote Control to enable Bluetooth. Poor sound quality from Subwoofer - The Bluetooth reception may be poor. EN - 20 - Check if the AC ...
...lit for 20 seconds. Unplug the AC Power cord and contact the Service Center. - If reconnecting the Bluetooth compatible Device to the Remote Control. - If this does not improve the sound quality, move the Bluetooth compatible Device closer to the Soundbar. For Optical Audio ...Cable(s) are properly connected. - Confirm that the Soundbar AC Power cord is Transmitting a Signal. Confirm that the Soundbar is Enabled on the Remote Control to enable Bluetooth. Poor sound quality from Subwoofer - The Bluetooth reception may be poor. EN - 20 - Check if the AC ...

Leaflet
Page 1
... 4.1 offers faster 24Mbit/s data transfer than normal 3Mbit/s for better and clear sound reproduction. **A2DP:Advanced Audio Distribution Profile ***AVRCP: Audio / Video Remote Control Profile AUDIO SYSTEM ■ Output channel: 2.1ch ■ Front speakers: 80W (20W x 2 + 40W) SPEAKER SYSTEM ■ Speaker driver...and Spanish) ■ Remote Control & Batteries ■ Optical cable: 1x1.5m ■ 3.5mm jack and audio cable: 1x1.2m ■ Warranty Card Included SANYO is used by Funai Electric Co., Ltd. Any liability related to SANYO products: sanyo-av.com Manufactured under ...
... 4.1 offers faster 24Mbit/s data transfer than normal 3Mbit/s for better and clear sound reproduction. **A2DP:Advanced Audio Distribution Profile ***AVRCP: Audio / Video Remote Control Profile AUDIO SYSTEM ■ Output channel: 2.1ch ■ Front speakers: 80W (20W x 2 + 40W) SPEAKER SYSTEM ■ Speaker driver...and Spanish) ■ Remote Control & Batteries ■ Optical cable: 1x1.5m ■ 3.5mm jack and audio cable: 1x1.2m ■ Warranty Card Included SANYO is used by Funai Electric Co., Ltd. Any liability related to SANYO products: sanyo-av.com Manufactured under ...


