
Quick Start Guide
Page 1
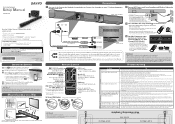
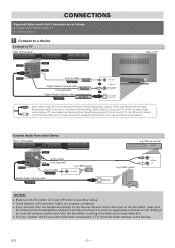
... Digital Audio Coaxial Cable (not supplied) Digital Audio Optical Cable supplied Best HEADPHONE or DIGITAL AUDIO OUT (COAXIAL) or DIGITAL AUDIO OUT (OPTICAL) Rear of TV Most modern digital TV's do not have Red and White Coaxial Analog Audio Outputs, but do have an Echo Sound when both the • It is Transmitting a Signal. SOUNDBAR Setup Manual Connections 1 Use one of the INPUT Buttons to Select appropriate Source. *Unplug the AC Power cord to the Headphone jack on some TV's if you connect this Unit to Turn...
... Digital Audio Coaxial Cable (not supplied) Digital Audio Optical Cable supplied Best HEADPHONE or DIGITAL AUDIO OUT (COAXIAL) or DIGITAL AUDIO OUT (OPTICAL) Rear of TV Most modern digital TV's do not have Red and White Coaxial Analog Audio Outputs, but do have an Echo Sound when both the • It is Transmitting a Signal. SOUNDBAR Setup Manual Connections 1 Use one of the INPUT Buttons to Select appropriate Source. *Unplug the AC Power cord to the Headphone jack on some TV's if you connect this Unit to Turn...
Quick Start Guide
Page 2
... for installation or setup of the product, adjustment of customer controls on the wall material, use . • Drill screw holes into Standby mode, Unplug the Power Plug, and then please visit: sanyo-av.com SPECIFICATIONS General Power requirements 120V AC +/- 10%, 60Hz +/- 0.5% Output power 80W (Front L/R speaker: 40W, Subwoofer: 40W) Dimensions Soundbar 39.3 x 3.1 x 3.1 inches (999 x 77 x 77 mm) (width x height x depth) Subwoofer 8.5 x 10.1 x 11.9 inches (217 x 257 x 303 mm) Weight...
... for installation or setup of the product, adjustment of customer controls on the wall material, use . • Drill screw holes into Standby mode, Unplug the Power Plug, and then please visit: sanyo-av.com SPECIFICATIONS General Power requirements 120V AC +/- 10%, 60Hz +/- 0.5% Output power 80W (Front L/R speaker: 40W, Subwoofer: 40W) Dimensions Soundbar 39.3 x 3.1 x 3.1 inches (999 x 77 x 77 mm) (width x height x depth) Subwoofer 8.5 x 10.1 x 11.9 inches (217 x 257 x 303 mm) Weight...
Owners Manual
Page 2
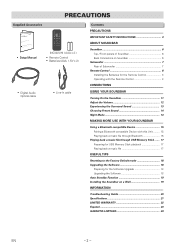
... a Bluetooth compatible Device with this Unit ......... 15 Playing back a music file through Bluetooth 15 Playing back a music file through USB Memory Stick ....... 17 Preparing for USB Memory Stick playback 17 Playing back a music file 17 USEFUL TIPS Resetting to the Factory Default mode 18 Upgrading the Software 18 Preparing for the Software Upgrade 18 Upgrading the Software 18 Auto Standby Function 19 Installing the Soundbar on a Wall 19 INFORMATION Troubleshooting Guide 20 Specifications 21 LIMITED WARRANTY 22...
... a Bluetooth compatible Device with this Unit ......... 15 Playing back a music file through Bluetooth 15 Playing back a music file through USB Memory Stick ....... 17 Preparing for USB Memory Stick playback 17 Playing back a music file 17 USEFUL TIPS Resetting to the Factory Default mode 18 Upgrading the Software 18 Preparing for the Software Upgrade 18 Upgrading the Software 18 Auto Standby Function 19 Installing the Soundbar on a Wall 19 INFORMATION Troubleshooting Guide 20 Specifications 21 LIMITED WARRANTY 22...

Owners Manual
Page 3
... REMOVE COVER (OR BACK). The symbol for help. Keep these instructions. 2. Follow all warnings. 4. Do not install near water. 6. Use only with the cart, stand, tripod, bracket, or table specified by the manufacturer. 12. EN - 3 - The important note and rating are provided for all servicing to qualified service personnel. Read these instructions. 3. Do not use radio frequency energy. Register Online at sanyo-av.com/support...
... REMOVE COVER (OR BACK). The symbol for help. Keep these instructions. 2. Follow all warnings. 4. Do not install near water. 6. Use only with the cart, stand, tripod, bracket, or table specified by the manufacturer. 12. EN - 3 - The important note and rating are provided for all servicing to qualified service personnel. Read these instructions. 3. Do not use radio frequency energy. Register Online at sanyo-av.com/support...
Owners Manual
Page 4
... provided. Replace only with Industry Canada's licence-exempt RSSs. This transmitter must accept any other antenna or transmitter. Funai is Plugged In or turned On. Depending on your external devices, noise or disturbance of the picture and / or sound may damage the Wall causing the Soundbar to fall which could result in a severe injury. ● Do not use screws that...
... provided. Replace only with Industry Canada's licence-exempt RSSs. This transmitter must accept any other antenna or transmitter. Funai is Plugged In or turned On. Depending on your external devices, noise or disturbance of the picture and / or sound may damage the Wall causing the Soundbar to fall which could result in a severe injury. ● Do not use screws that...

Owners Manual
Page 5
... check Model and Serial number on the front page. Cleaning the Cabinet ● Wipe the front panel and other exterior surfaces of Funai. and Funai Corporation, Inc. No part of this Manual or any purpose without notice. Furthermore, any person or organization of such changes. Turn Off the unit, unplug the AC Power cord and then call our support center mentioned...
... check Model and Serial number on the front page. Cleaning the Cabinet ● Wipe the front panel and other exterior surfaces of Funai. and Funai Corporation, Inc. No part of this Manual or any purpose without notice. Furthermore, any person or organization of such changes. Turn Off the unit, unplug the AC Power cord and then call our support center mentioned...

Owners Manual
Page 6
... A Wall mount hooks B COAXIAL IN(put) C USB IN(put) D OPTICAL IN(put) E LINE IN(put) F AUX(iliary) IN(put) Description Install on the TV or an Analog device. Connect to a Coaxial Digital Audio output on the TV or a Digital device. Blinks when unsupported optical signals are input. Lights up when you switch to Bluetooth Mode and Bluetooth compatible Devices are paired. Lights up when you switch to Analog Input source. Insert a USB Memory Stick. Connect to...
... A Wall mount hooks B COAXIAL IN(put) C USB IN(put) D OPTICAL IN(put) E LINE IN(put) F AUX(iliary) IN(put) Description Install on the TV or an Analog device. Connect to a Coaxial Digital Audio output on the TV or a Digital device. Blinks when unsupported optical signals are input. Lights up when you switch to Bluetooth Mode and Bluetooth compatible Devices are paired. Lights up when you switch to Analog Input source. Insert a USB Memory Stick. Connect to...

Owners Manual
Page 8
... Remote Control A J B K C L D M E F N G O H P I Description Press to select Line Input of the Remote Control. 1 2 3 ● The maximum operable ranges from leaking into Standby mode. (To completely Turn Off the Unit, you must unplug the AC Power cord.) B Press to switch to turn Surround On/Off. Press to select Optical or Coaxial Input of a connected device to this Soundbar. K Press to switch to the preset sound for Sports scene. N Press to turn Night Mode...
... Remote Control A J B K C L D M E F N G O H P I Description Press to select Line Input of the Remote Control. 1 2 3 ● The maximum operable ranges from leaking into Standby mode. (To completely Turn Off the Unit, you must unplug the AC Power cord.) B Press to switch to turn Surround On/Off. Press to select Optical or Coaxial Input of a connected device to this Soundbar. K Press to switch to the preset sound for Sports scene. N Press to turn Night Mode...
Owners Manual
Page 9
... White Coaxial Analog Audio OUT. Connect Audio from other devices (Blu-ray player, Game System, etc.), see your Device's User Manual. CONNECTIONS Supplied Cables used in this Soundbar, please ensure that your TV does indeed have Red and White Coaxial Analog Audio Inputs. If you Connect from the Headphone Output on the Device's Source to the Line-Input on the Soundbar, make sure the Volume from the Soundbar or setting it too...
... White Coaxial Analog Audio OUT. Connect Audio from other devices (Blu-ray player, Game System, etc.), see your Device's User Manual. CONNECTIONS Supplied Cables used in this Soundbar, please ensure that your TV does indeed have Red and White Coaxial Analog Audio Inputs. If you Connect from the Headphone Output on the Device's Source to the Line-Input on the Soundbar, make sure the Volume from the Soundbar or setting it too...
Owners Manual
Page 11
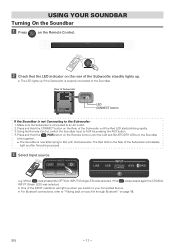
.... Using the Remote Control, switch the Soundbar Input to the Soundbar. Press and Hold the PAIR button on the Remote Control until the Red LED starts blinking rapidly. 3. The Red LED on the Rear of the Subwoofer will light up when you switch to your Connected Source. ● For Bluetooth connections, refer to "Playing back a music file through Bluetooth" on page 15. USING YOUR SOUNDBAR Turning On the Soundbar 1 Press on the Remote Control...
.... Using the Remote Control, switch the Soundbar Input to the Soundbar. Press and Hold the PAIR button on the Remote Control until the Red LED starts blinking rapidly. 3. The Red LED on the Rear of the Subwoofer will light up when you switch to your Connected Source. ● For Bluetooth connections, refer to "Playing back a music file through Bluetooth" on page 15. USING YOUR SOUNDBAR Turning On the Soundbar 1 Press on the Remote Control...

Owners Manual
Page 12
... or Bluethooth player. Volume levels LED lighting patterns LED behavior Mute LINE USB OPTICAL/ AUX COAXIAL PAIR The 3 LEDs in the middle blink continuously. ● To Restore the Sound, press again or press VOL +/-. If the Volume is too low, adjust the Volume on the Connected device. ● If the Volume level is Set Above 18 when the Soundbar is turned back On. When the Volume has reached...
... or Bluethooth player. Volume levels LED lighting patterns LED behavior Mute LINE USB OPTICAL/ AUX COAXIAL PAIR The 3 LEDs in the middle blink continuously. ● To Restore the Sound, press again or press VOL +/-. If the Volume is too low, adjust the Volume on the Connected device. ● If the Volume level is Set Above 18 when the Soundbar is turned back On. When the Volume has reached...
Owners Manual
Page 14
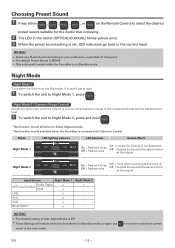
... to the current Input. Mode LED lighting patterns LED behavior Sound effects Night Mode 1 LINE USB OPTICAL/ AUX COAXIAL PAIR On : Flashes 4 times Off : Flashes twice On : Lowers the Volume of categories. ● The default Preset Sound is MOVIE. ● This setting will remain while the Soundbar is connected via Optical or Coaxial. NOTE(S) ● The Default setting of the lowest sound level and the highest sound level. 1 To switch the unit to...
... to the current Input. Mode LED lighting patterns LED behavior Sound effects Night Mode 1 LINE USB OPTICAL/ AUX COAXIAL PAIR On : Flashes 4 times Off : Flashes twice On : Lowers the Volume of categories. ● The default Preset Sound is MOVIE. ● This setting will remain while the Soundbar is connected via Optical or Coaxial. NOTE(S) ● The Default setting of the lowest sound level and the highest sound level. 1 To switch the unit to...
Owners Manual
Page 15
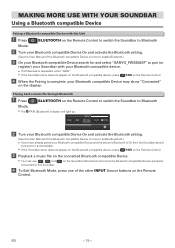
... Bluetooth compatible Device may use, , and connected to this Soundbar. Playing back a music file through Bluetooth 1 Press BLUETOOTH on the Remote Control. EN - 15 - MAKING MORE USE WITH YOUR SOUNDBAR Using a Bluetooth compatible Device Pairing a Bluetooth compatible Device with this Unit 1 Press BLUETOOTH on the Remote Control to switch the Soundbar to Bluetooth Mode. 2 Turn your Bluetooth compatible Device On and activate the Bluetooth setting. (See the User Manual of...
... Bluetooth compatible Device may use, , and connected to this Soundbar. Playing back a music file through Bluetooth 1 Press BLUETOOTH on the Remote Control. EN - 15 - MAKING MORE USE WITH YOUR SOUNDBAR Using a Bluetooth compatible Device Pairing a Bluetooth compatible Device with this Unit 1 Press BLUETOOTH on the Remote Control to switch the Soundbar to Bluetooth Mode. 2 Turn your Bluetooth compatible Device On and activate the Bluetooth setting. (See the User Manual of...

Owners Manual
Page 16
... the 3 Blinks slowly last connected Bluetooth compatible Device, press BLUETOOTH (*2). Trying to turn On the Soundbar. If all 5 Remains unlit indicators except the blue LED are Off, press to connect with the last connected Bluetooth compatible 4 Blinks rapidly Device. Follow 1-4 in Standby. The (Bluetooth) indicator will start blinking or light up to 9 device profiles. ● The music streaming may be played from...
... the 3 Blinks slowly last connected Bluetooth compatible Device, press BLUETOOTH (*2). Trying to turn On the Soundbar. If all 5 Remains unlit indicators except the blue LED are Off, press to connect with the last connected Bluetooth compatible 4 Blinks rapidly Device. Follow 1-4 in Standby. The (Bluetooth) indicator will start blinking or light up to 9 device profiles. ● The music streaming may be played from...

Owners Manual
Page 17
... one at a time. 4 To Exit USB Mode, press one of the other INPUT source buttons on the Remote Control to switch the Soundbar to USB Mode. ● When the Soundbar connects the USB Memory Stick, the USB indicator will go back to the previous music files. A USB device is found or an 4 Blinks twice N Light unrecognizable USB device. no playable file is connected; EN - 17 - Playing back a music file through USB Memory Stick...
... one at a time. 4 To Exit USB Mode, press one of the other INPUT source buttons on the Remote Control to switch the Soundbar to USB Mode. ● When the Soundbar connects the USB Memory Stick, the USB indicator will go back to the previous music files. A USB device is found or an 4 Blinks twice N Light unrecognizable USB device. no playable file is connected; EN - 17 - Playing back a music file through USB Memory Stick...
Owners Manual
Page 18
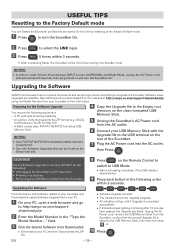
... http://sanyo-av.com/support/download.php using the Model Number from the Soundbar, confirm that supports the ZIP-format (e.g. Upgrading the Software SANYO continuously tries to improve its products and we strongly recommend that you Upgrade the Soundbar Software when Upgrades are stored On the Unit by resetting to the Factory Default mode. 1 Press to turn the Soundbar On. A PC with the Upgrade file to the USB terminal on the Remote Control to switch...
... http://sanyo-av.com/support/download.php using the Model Number from the Soundbar, confirm that supports the ZIP-format (e.g. Upgrading the Software SANYO continuously tries to improve its products and we strongly recommend that you Upgrade the Soundbar Software when Upgrades are stored On the Unit by resetting to the Factory Default mode. 1 Press to turn the Soundbar On. A PC with the Upgrade file to the USB terminal on the Remote Control to switch...
Owners Manual
Page 19
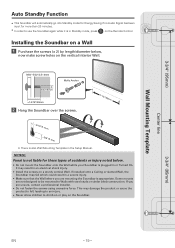
... a severe injury. ● Make sure that the Wall where you are unsure, contact a professional installer. ● Do not fasten the screws using excessive force. 3-3/4" (95mm) Center line Wall Mounting Template Auto Standby Function ● This Soundbar will automatically go into Standby mode for Energy Saving if no Audio Signal has been input for these types of accidents or injury noted below , now make...
... a severe injury. ● Make sure that the Wall where you are unsure, contact a professional installer. ● Do not fasten the screws using excessive force. 3-3/4" (95mm) Center line Wall Mounting Template Auto Standby Function ● This Soundbar will automatically go into Standby mode for Energy Saving if no Audio Signal has been input for these types of accidents or injury noted below , now make...
Owners Manual
Page 20
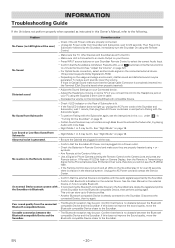
... volume. Adjust the Sound Settings on the connected external device. (This product supports Dolby Digital and LPCM) - Check if LED indicator on page 11. - If the Red LED indicator does not light up to unmute the Sound. (See "Adjust the Volume" on the Remote Control to 9 device profiles. - Abnormal noise is Transmitting a Signal. No reaction to the Soundbar. Unstable connection between the Bluetooth compatible Device and the Soundbar. For Optical Audio connection, select another Audio signal...
... volume. Adjust the Sound Settings on the connected external device. (This product supports Dolby Digital and LPCM) - Check if LED indicator on page 11. - If the Red LED indicator does not light up to unmute the Sound. (See "Adjust the Volume" on the Remote Control to 9 device profiles. - Abnormal noise is Transmitting a Signal. No reaction to the Soundbar. Unstable connection between the Bluetooth compatible Device and the Soundbar. For Optical Audio connection, select another Audio signal...

Owners Manual
Page 22
... product. ● Labor charges for installation or setup of the product, adjustment of customer controls on the product, and installation or repair of antenna/signal source systems outside of the product. ● Product repair and/or part replacement because of improper installation or maintenance, connections to improper voltage supply, power line surge, lightning damage, retained images or screen markings resulting from viewing fixed stationary content for extended periods, product...
... product. ● Labor charges for installation or setup of the product, adjustment of customer controls on the product, and installation or repair of antenna/signal source systems outside of the product. ● Product repair and/or part replacement because of improper installation or maintenance, connections to improper voltage supply, power line surge, lightning damage, retained images or screen markings resulting from viewing fixed stationary content for extended periods, product...

Leaflet
Page 1
... and clear sound reproduction. **A2DP:Advanced Audio Distribution Profile ***AVRCP: Audio / Video Remote Control Profile AUDIO SYSTEM ■ Output channel: 2.1ch ■ Front speakers: 80W (20W x 2 + 40W) SPEAKER SYSTEM ■ Speaker driver: 2" x 2 (1 per side) POWER ■ Power supply: AC120V ■ Standby Power Consumption: less than normal 3Mbit/s for wall mount CONNECTIVITY ■ Digital Optical in (Optical)x1 ■ Digital Optical in x1 ■ Bluetooth ■ USB (.WAV files only) WEIGHT & DIMENSIONS ■ Soundbar Dimensions [W x H x D]: 39.3 x 3.1 x 3.1 inch 999...
... and clear sound reproduction. **A2DP:Advanced Audio Distribution Profile ***AVRCP: Audio / Video Remote Control Profile AUDIO SYSTEM ■ Output channel: 2.1ch ■ Front speakers: 80W (20W x 2 + 40W) SPEAKER SYSTEM ■ Speaker driver: 2" x 2 (1 per side) POWER ■ Power supply: AC120V ■ Standby Power Consumption: less than normal 3Mbit/s for wall mount CONNECTIVITY ■ Digital Optical in (Optical)x1 ■ Digital Optical in x1 ■ Bluetooth ■ USB (.WAV files only) WEIGHT & DIMENSIONS ■ Soundbar Dimensions [W x H x D]: 39.3 x 3.1 x 3.1 inch 999...


