
Instruction Manual, PLC-EF60A
Page 1
Owner's Manual Multimedia Projector MODEL PLC-XF60A PLC-EF60A ✽ Projection lens is optional.
Owner's Manual Multimedia Projector MODEL PLC-XF60A PLC-EF60A ✽ Projection lens is optional.

Instruction Manual, PLC-EF60A
Page 2
...Advanced Network Feature Advanced Network feature available by installation of 16.77 million colors, and matrix liquid crystal display (LCD) technology. ◆ Compatibility The projector widely accepts various video and computer input signals including Analog and Digital Computer sources, 6 TV color systems, ...Component video, S-video, Digital video sources compatible with keeping the projector on screen. This projector utilizes built-in the projector. The projector accepts signals up to UXGA resolution. (☞ p.38 and 70) ◆ Convenient Fingertip ...
...Advanced Network Feature Advanced Network feature available by installation of 16.77 million colors, and matrix liquid crystal display (LCD) technology. ◆ Compatibility The projector widely accepts various video and computer input signals including Analog and Digital Computer sources, 6 TV color systems, ...Component video, S-video, Digital video sources compatible with keeping the projector on screen. This projector utilizes built-in the projector. The projector accepts signals up to UXGA resolution. (☞ p.38 and 70) ◆ Convenient Fingertip ...
Instruction Manual, PLC-EF60A
Page 3
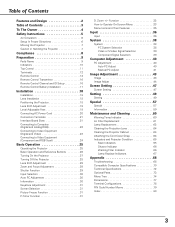
...Design 2 Table of Contents 3 To The Owner 4 Safety Instructions 5 Air Circulation 6 Setup In Proper Directions 6 Moving the Projector 7 Caution in Handling the Projector 7 Compliance 8 Preparation 9 Parts Name 9 Indicators 10 Top Control 11 Terminals 12 Remote Control 14 Remote Control Transmitter 16 Remote... Channel and ID Setup 16 Remote Control Battery Installation 17 Installation 18 Installation 18 Lens Installation 18 Positioning the Projector 18 Lens Shift Adjustment 19 Level Adjustable Feet 19 Connecting AC Power Cord 20 Connection Terminals 21 Interface Board ...
...Design 2 Table of Contents 3 To The Owner 4 Safety Instructions 5 Air Circulation 6 Setup In Proper Directions 6 Moving the Projector 7 Caution in Handling the Projector 7 Compliance 8 Preparation 9 Parts Name 9 Indicators 10 Top Control 11 Terminals 12 Remote Control 14 Remote Control Transmitter 16 Remote... Channel and ID Setup 16 Remote Control Battery Installation 17 Installation 18 Installation 18 Lens Installation 18 Positioning the Projector 18 Lens Shift Adjustment 19 Level Adjustable Feet 19 Connecting AC Power Cord 20 Connection Terminals 21 Interface Board ...
Instruction Manual, PLC-EF60A
Page 4
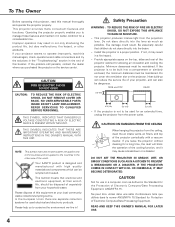
... Computer/Data Processing Equipment, ANSI/NFPA 75. Eye damage could result. If the projector is to conserve the environment we live in! READ AND KEEP THIS OWNER'S MANUAL FOR LATER USE. 4 Your SANYO product is not to the countries in the other accidents. Do not stare directly... into a compartment or similarly enclosed, the minimum distances must be disposed of separately from the projection lens. Install the projector in a computer room as possible. If...
... Computer/Data Processing Equipment, ANSI/NFPA 75. Eye damage could result. If the projector is to conserve the environment we live in! READ AND KEEP THIS OWNER'S MANUAL FOR LATER USE. 4 Your SANYO product is not to the countries in the other accidents. Do not stare directly... into a compartment or similarly enclosed, the minimum distances must be disposed of separately from the projection lens. Install the projector in a computer room as possible. If...
Instruction Manual, PLC-EF60A
Page 5
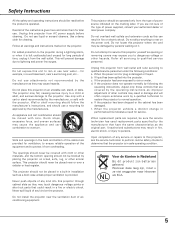
...should use attachments not recommended by the operating instructions as a book case unless proper ventilation is damaged or frayed. This projector should never be placed near water... Never push objects of airconditioning equipment. If you to dangerous voltage or other controls ...may cause hazards. Do not locate this projector through cabinet slots as opening should not be blocked by following conditions: a. c. d. For added protection to persons. Quick stops...
...should use attachments not recommended by the operating instructions as a book case unless proper ventilation is damaged or frayed. This projector should never be placed near water... Never push objects of airconditioning equipment. If you to dangerous voltage or other controls ...may cause hazards. Do not locate this projector through cabinet slots as opening should not be blocked by following conditions: a. c. d. For added protection to persons. Quick stops...

Instruction Manual, PLC-EF60A
Page 6
...the exhaust vent, especially screws and metallic part. Bottom Downward (Usual) Front Upward Bottom Upward Front Downward Positioning Precautions When installing the projector, avoid positioning it from ventilation holes. - CAUTION Hot air is exhausted from overheating, and these openings must not be taken. -... When using or installing the projector, the following precautions should be blocked or covered. The fan's running speed is being used. - Improper positioning may reduce the lamp...
...the exhaust vent, especially screws and metallic part. Bottom Downward (Usual) Front Upward Bottom Upward Front Downward Positioning Precautions When installing the projector, avoid positioning it from ventilation holes. - CAUTION Hot air is exhausted from overheating, and these openings must not be taken. -... When using or installing the projector, the following precautions should be blocked or covered. The fan's running speed is being used. - Improper positioning may reduce the lamp...

Instruction Manual, PLC-EF60A
Page 7
...front cover. Placing on an unflat surface and check if no object is under the projector may cause damage to the projector's cabinet. Disconnect all the cables from the projector before moving the projector, or may cause damage to the terminal cover or result in serious injury. Do... not hold the Lens and the peripheral part. 7 Moving the projector with the cables connected may cause damage to the projector or result in personal injury. Safety Instructions Moving the Projector Carry the projector by two or more people by the carrying handle. When carrying the...
...front cover. Placing on an unflat surface and check if no object is under the projector may cause damage to the projector's cabinet. Disconnect all the cables from the projector before moving the projector, or may cause damage to the terminal cover or result in serious injury. Do... not hold the Lens and the peripheral part. 7 Moving the projector with the cables connected may cause damage to the projector or result in personal injury. Safety Instructions Moving the Projector Carry the projector by two or more people by the carrying handle. When carrying the...

Instruction Manual, PLC-EF60A
Page 8
... marked with the limits for a Class A digital device, pursuant to Part 15 of the same rating, marked thus ASA . Do not try to defeat this projector meets the requirement for the United States and Canada : AC Power Cord used of FCC Rules. Should the fuse need to be replaced, an ASTA...
... marked with the limits for a Class A digital device, pursuant to Part 15 of the same rating, marked thus ASA . Do not try to defeat this projector meets the requirement for the United States and Canada : AC Power Cord used of FCC Rules. Should the fuse need to be replaced, an ASTA...

Instruction Manual, PLC-EF60A
Page 9
... to ensure proper ventilation and avoid a possible risk of fire and malfunction. ● Do not cover vent slots. ● Keep projector sides clear of any objects. y Indicators u Top Controls i Air Intake Vent o Air Filter (inside Terminals) r Carrying Handle t... Air Exhaust Vent CAUTION Hot air is equipped with cooling fans for protection from the exhaust vent. CAUTION This projector is exhausted from overheating. Preparation Preparation Parts Name Front qw e Back y uy rt io !0 Bottom !1 q Remote Receiver w Projection Lens (Option...
... to ensure proper ventilation and avoid a possible risk of fire and malfunction. ● Do not cover vent slots. ● Keep projector sides clear of any objects. y Indicators u Top Controls i Air Intake Vent o Air Filter (inside Terminals) r Carrying Handle t... Air Exhaust Vent CAUTION Hot air is equipped with cooling fans for protection from the exhaust vent. CAUTION This projector is exhausted from overheating. Preparation Preparation Parts Name Front qw e Back y uy rt io !0 Bottom !1 q Remote Receiver w Projection Lens (Option...
Instruction Manual, PLC-EF60A
Page 10
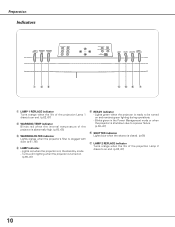
...WARNING TEMP indicator Blinks red when the internal temperature of the projection Lamp 2 draws to an end. (p.62, 67) 10 Lights red when the projector is ready to a power failure. (p.65~67) y SHUTTER indicator Lights blue when the shutter is closed. (p.66) u LAMP 2 REPLACE ...indicator Turns orange when the life of the projector is abnormally high. (p.60, 65) e WARNING FILTER indicator Lights orange when the projector's filter is turned on and remains green lighting during operations. - Lights green when the...
...WARNING TEMP indicator Blinks red when the internal temperature of the projection Lamp 2 draws to an end. (p.62, 67) 10 Lights red when the projector is ready to a power failure. (p.65~67) y SHUTTER indicator Lights blue when the shutter is closed. (p.66) u LAMP 2 REPLACE ...indicator Turns orange when the life of the projector is abnormally high. (p.60, 65) e WARNING FILTER indicator Lights orange when the projector's filter is turned on and remains green lighting during operations. - Lights green when the...

Instruction Manual, PLC-EF60A
Page 11
... Menu. (p.33, 34) i SHUTTER button Closes and opens up the built-in the Digital zoom + mode. (p.33, 34) t INFORMATION button Displays the projector information. (p.30) y AUTO PC ADJ. Pan the image in shutter. (p29) e CANCEL button o POWER ON-OFF button Cancels the selection and returns to... the previous menu. Executes the item selected. - Expand/compress the image in the On-Screen Menu. - Turns the projector on or off. (p.27, 28) r Point buttons (e, d, 7, and 8) - Navigate through the menu or adjust the value in the Digital zoom +/-...
... Menu. (p.33, 34) i SHUTTER button Closes and opens up the built-in the Digital zoom + mode. (p.33, 34) t INFORMATION button Displays the projector information. (p.30) y AUTO PC ADJ. Pan the image in shutter. (p29) e CANCEL button o POWER ON-OFF button Cancels the selection and returns to... the previous menu. Executes the item selected. - Expand/compress the image in the On-Screen Menu. - Turns the projector on or off. (p.27, 28) r Point buttons (e, d, 7, and 8) - Navigate through the menu or adjust the value in the Digital zoom +/-...

Instruction Manual, PLC-EF60A
Page 13
When controling more than two projectors from a computer, connect the other projector to this terminal with a serial cross cable (commercially available). Do not use the remote control as wired. (p.25) t USB (Series B) This port is used ...for Optional Interface Board) Optional interface board can be installed into this slot. (p.21, 73) w INPUT 5 (Vacant for the projector maintenance. u SERIAL PORT IN When controling the projector from SERIAL PORT IN. This can be reset. r USB Connect a USB mouse (commercially available) to control On-Screen Menu. (p.25) ✽...
When controling more than two projectors from a computer, connect the other projector to this terminal with a serial cross cable (commercially available). Do not use the remote control as wired. (p.25) t USB (Series B) This port is used ...for Optional Interface Board) Optional interface board can be installed into this slot. (p.21, 73) w INPUT 5 (Vacant for the projector maintenance. u SERIAL PORT IN When controling the projector from SERIAL PORT IN. This can be reset. r USB Connect a USB mouse (commercially available) to control On-Screen Menu. (p.25) ✽...

Instruction Manual, PLC-EF60A
Page 14
... select the desired menu, adjust values and operate various convenient features. function. (p.32) w KEYSTONE button Corrects keystone distortion. (p.31) u POWER ON-OFF button Turns the projector on or off. (p.27, 28) e LENS SHIFT button Activates the LENS SHIFT function. (p.29) i FOCUS buttons Adjust focus of the image. (p.29) !0 SELECT button Executes...
... select the desired menu, adjust values and operate various convenient features. function. (p.32) w KEYSTONE button Corrects keystone distortion. (p.31) u POWER ON-OFF button Turns the projector on or off. (p.27, 28) e LENS SHIFT button Activates the LENS SHIFT function. (p.29) i FOCUS buttons Adjust focus of the image. (p.29) !0 SELECT button Executes...

Instruction Manual, PLC-EF60A
Page 15
... 2 t CH REMOTE INPUT 5 INPUT 3 y ID !3 u !4 REMOTE RESET ON ALL OFF q MENU button Opens or closes the On-Screen Menu. (p.33, 34) o INFO button Displays the projector information. (p.30) w FREEZE button Freezes the projected picture. (p.31) !0 AUTO PC button Operates the Auto PC adjustment. (p.30) e and r buttons are unusable.
... 2 t CH REMOTE INPUT 5 INPUT 3 y ID !3 u !4 REMOTE RESET ON ALL OFF q MENU button Opens or closes the On-Screen Menu. (p.33, 34) o INFO button Displays the projector information. (p.30) w FREEZE button Freezes the projected picture. (p.31) !0 AUTO PC button Operates the Auto PC adjustment. (p.30) e and r buttons are unusable.

Instruction Manual, PLC-EF60A
Page 16
...Control Channel and ID are CH1 and ID1. (p.15) ✔Note: Remote Control Channel and ID cannot be the same as those projectors. The Remote Control ID switches sequentially for the remote control should be initialized separately. 16 CANCEL MENU INFO AUTO PC VOL. SOUND ...control, do it to ON. The initial Channel aInD d ID are CH1 and ID1. The Remote Control Channel switches sequentially for the projector. Wired Remote Control Transmitter The remote control can switch four frequency channels prepared and select a remote control ID from the other equipment occurs...
...Control Channel and ID are CH1 and ID1. (p.15) ✔Note: Remote Control Channel and ID cannot be the same as those projectors. The Remote Control ID switches sequentially for the remote control should be initialized separately. 16 CANCEL MENU INFO AUTO PC VOL. SOUND ...control, do it to ON. The initial Channel aInD d ID are CH1 and ID1. The Remote Control Channel switches sequentially for the projector. Wired Remote Control Transmitter The remote control can switch four frequency channels prepared and select a remote control ID from the other equipment occurs...

Instruction Manual, PLC-EF60A
Page 17
... as the remote control. 2. Before operating the remote control, make sure no other radio equipment using 2.4 GHz band away from the remote control and the projector. Caution in Wireless LAN Interference Under wireless LAN environment based on remote control, carefully wipe case clean and install new batteries. ● Risk of explosion...
... as the remote control. 2. Before operating the remote control, make sure no other radio equipment using 2.4 GHz band away from the remote control and the projector. Caution in Wireless LAN Interference Under wireless LAN environment based on remote control, carefully wipe case clean and install new batteries. ● Risk of explosion...
Instruction Manual, PLC-EF60A
Page 18
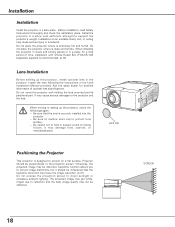
... to correct image distortions, but it should be considered that the lens is recommended. (p.73) Lens Installation Before setting up the projector, check the followings again: - Before installation, read Safety Instructions thoroughly and check the installation place. Install the lens following the ...instructions in a safe place. When moving or setting up the projector, install optional lens in a place for detailed information of time, installation with Smoke Resist Box (POA-SR-140) separately supplied...
... to correct image distortions, but it should be considered that the lens is recommended. (p.73) Lens Installation Before setting up the projector, check the followings again: - Before installation, read Safety Instructions thoroughly and check the installation place. Install the lens following the ...instructions in a safe place. When moving or setting up the projector, install optional lens in a place for detailed information of time, installation with Smoke Resist Box (POA-SR-140) separately supplied...

Instruction Manual, PLC-EF60A
Page 19
...image vertically and horizontally in this manual is the case of LNS-W04. 50% 10% 10% 50% Installation Level Adjustable Feet This projector has four level adjustable feet. The projection angle is adjustable up to 3.65 degrees upward and downward respectively by rotating front and back ...65° Projection angle is adjustable up to 3.65 degrees upward and 3.65 degrees downward by adjusting front and back feet. 19 The projector can be adjusted by rotating each foot. Installation Lens Shift Adjustment Lens shift feature is provided to move the position of the projected image...
...image vertically and horizontally in this manual is the case of LNS-W04. 50% 10% 10% 50% Installation Level Adjustable Feet This projector has four level adjustable feet. The projection angle is adjustable up to 3.65 degrees upward and downward respectively by rotating front and back ...65° Projection angle is adjustable up to 3.65 degrees upward and 3.65 degrees downward by adjusting front and back feet. 19 The projector can be adjusted by rotating each foot. Installation Lens Shift Adjustment Lens shift feature is provided to move the position of the projected image...

Instruction Manual, PLC-EF60A
Page 20
...cord (supplied) to pages 22~24 for connection.) CAUTION For safety, unplug the AC power cord when the projector is in use the projector. Installation Connecting AC Power Cord This projector uses nominal input voltages of power system. If the supplied AC Power Cord does not match your AC outlet... contact your authorized dealer or service station if you use . Confirm an AC plug type with single-phase power systems having a grounded neutral conductor. Projector side For the U.S.A. To reduce risk of electrical shock, do not plug into any other type of 120 V or 200-240 V AC. and...
...cord (supplied) to pages 22~24 for connection.) CAUTION For safety, unplug the AC power cord when the projector is in use the projector. Installation Connecting AC Power Cord This projector uses nominal input voltages of power system. If the supplied AC Power Cord does not match your AC outlet... contact your authorized dealer or service station if you use . Confirm an AC plug type with single-phase power systems having a grounded neutral conductor. Projector side For the U.S.A. To reduce risk of electrical shock, do not plug into any other type of 120 V or 200-240 V AC. and...

Instruction Manual, PLC-EF60A
Page 21
...dust and others, and hide messy cable connections. Pull this part forward by installing the optional interface boards into the inside plug. The projector's functions can be extended by pushing button A. Doing so may damage the cover. Socket Optional interfae board Install or replace the optional ... for easy setup. Remove and replace the front cover by following the procedure below: To remove the front cover, push the button A on the projector. Two vacant slots (Input 4 and Input 5) are located in the Information menu. (p.30, 59) 06 See Option Control No. Screws Option ...
...dust and others, and hide messy cable connections. Pull this part forward by installing the optional interface boards into the inside plug. The projector's functions can be extended by pushing button A. Doing so may damage the cover. Socket Optional interfae board Install or replace the optional ... for easy setup. Remove and replace the front cover by following the procedure below: To remove the front cover, push the button A on the projector. Two vacant slots (Input 4 and Input 5) are located in the Information menu. (p.30, 59) 06 See Option Control No. Screws Option ...


