Instruction Manual, PLC-EF60A
Page 3
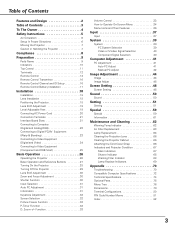
...Signal Selection 39 Computer Adjustment 40 PC Adjustment 40 Auto PC Adjust 40 Manual PC Adjust 41 Image Adjustment 43 Image 43 Image Adjust 44 Screen Setting 47 Screen Setting 47 Setting 49 Setting 49 Special 57 Special 57 Information 59 Maintenance and Cleaning 60 Warning Temp Indicator 60 Air Filter Replacement 61 Lamp Replacement 62 Cleaning the Projection Lens 64 Cleaning the Projector Cabinet 64 Attaching the Cord Cover Strap 64 Indicators and Projector Condition 65 Main Indicators 65 Shutter Indicator 66 Warning Filter Indicator 66 Lamp...
...Signal Selection 39 Computer Adjustment 40 PC Adjustment 40 Auto PC Adjust 40 Manual PC Adjust 41 Image Adjustment 43 Image 43 Image Adjust 44 Screen Setting 47 Screen Setting 47 Setting 49 Setting 49 Special 57 Special 57 Information 59 Maintenance and Cleaning 60 Warning Temp Indicator 60 Air Filter Replacement 61 Lamp Replacement 62 Cleaning the Projection Lens 64 Cleaning the Projector Cabinet 64 Attaching the Cord Cover Strap 64 Indicators and Projector Condition 65 Main Indicators 65 Shutter Indicator 66 Warning Filter Indicator 66 Lamp...
Instruction Manual, PLC-EF60A
Page 4
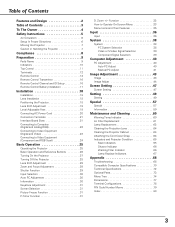
... live in a fire hazard. - This projector produces intense light from the ceiling, clean the air intake vents, air filters, and top of Electronic Computer/Data Processing Equipment. Provide appropriate space on the projector. READ AND KEEP THIS OWNER'S MANUAL FOR LATER USE. 4 Operating the projector properly enables you purchased the projector or the service center. NO USER-SERVICEABLE PARTS INSIDE EXCEPT LAMP REPLACEMENT. DO NOT SET THE PROJECTOR IN GREASY, WET, OR SMOKY CONDITIONS...
... live in a fire hazard. - This projector produces intense light from the ceiling, clean the air intake vents, air filters, and top of Electronic Computer/Data Processing Equipment. Provide appropriate space on the projector. READ AND KEEP THIS OWNER'S MANUAL FOR LATER USE. 4 Operating the projector properly enables you purchased the projector or the service center. NO USER-SERVICEABLE PARTS INSIDE EXCEPT LAMP REPLACEMENT. DO NOT SET THE PROJECTOR IN GREASY, WET, OR SMOKY CONDITIONS...
Instruction Manual, PLC-EF60A
Page 10
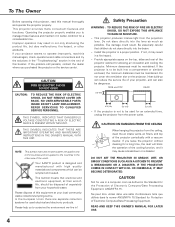
..., 67) w WARNING TEMP indicator Blinks red when the internal temperature of the projector is abnormally high. (p.60, 65) e WARNING FILTER indicator Lights orange when the projector's filter is in the Power Management mode or when the projector is shutdown due to a power failure. (p.65~67) y SHUTTER indicator Lights blue when the shutter is turned on and remains green lighting during operations. - Preparation Indicators q we rty u q LAMP 1 REPLACE indicator Turns orange when the life of the projection Lamp 1 draws to be turned on . (p.65~67) t READY indicator - Blinks green in the...
..., 67) w WARNING TEMP indicator Blinks red when the internal temperature of the projector is abnormally high. (p.60, 65) e WARNING FILTER indicator Lights orange when the projector's filter is in the Power Management mode or when the projector is shutdown due to a power failure. (p.65~67) y SHUTTER indicator Lights blue when the shutter is turned on and remains green lighting during operations. - Preparation Indicators q we rty u q LAMP 1 REPLACE indicator Turns orange when the life of the projection Lamp 1 draws to be turned on . (p.65~67) t READY indicator - Blinks green in the...
Instruction Manual, PLC-EF60A
Page 18
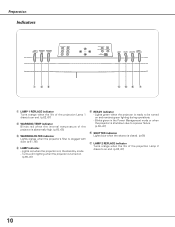
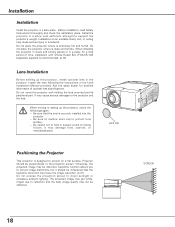
... lighting. SCREEN 18 Ask the sales dealer for a long period of optional lens specifications. Otherwise, the projected image may damage lens, cabinet, or mechanical parts. Before installation, read Safety Instructions thoroughly and check the installation place. Install the projector in the projector. Do not place the projector where is dusty and smoky. When moving or setting up the projector, install optional lens in a place with holding the lens mounted and its peripheral part. Keystone...
... lighting. SCREEN 18 Ask the sales dealer for a long period of optional lens specifications. Otherwise, the projected image may damage lens, cabinet, or mechanical parts. Before installation, read Safety Instructions thoroughly and check the installation place. Install the projector in the projector. Do not place the projector where is dusty and smoky. When moving or setting up the projector, install optional lens in a place with holding the lens mounted and its peripheral part. Keystone...
Instruction Manual, PLC-EF60A
Page 28
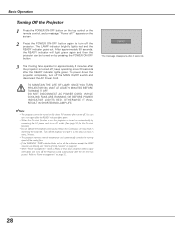
... indicator lights green. • When the On start function.) • Do not operate the projector continuously without rest. DO NOT DISCONNECT AC POWER CORD WHILE COOLING FANS ARE RUNNING OR BEFORE POWER INDICATOR LIGHTS RED. Continuous use may result in every 24 hours. • This projector monitors internal temperature and automatically controls the running speed of the cooling fans. • If the WARNING TEMP indicator blinks red or all the indicators except the LAMP indicator are blinking, see "Warning Temp Indicator...
... indicator lights green. • When the On start function.) • Do not operate the projector continuously without rest. DO NOT DISCONNECT AC POWER CORD WHILE COOLING FANS ARE RUNNING OR BEFORE POWER INDICATOR LIGHTS RED. Continuous use may result in every 24 hours. • This projector monitors internal temperature and automatically controls the running speed of the cooling fans. • If the WARNING TEMP indicator blinks red or all the indicators except the LAMP indicator are blinking, see "Warning Temp Indicator...

Instruction Manual, PLC-EF60A
Page 50
... the image being projected and use it to stop capturing. The number will turn red and disappear. Press the SELECT button so that has been adjusted by the Keystone function, the adjustment data is automatically reset and the projector captures an image without PIN code. After capturing the projected image, go to the Logo function and set it for Logo Lock setting is fixed, move the pointer to "✳." Logo Lock Setting Select...
... the image being projected and use it to stop capturing. The number will turn red and disappear. Press the SELECT button so that has been adjusted by the Keystone function, the adjustment data is automatically reset and the projector captures an image without PIN code. After capturing the projected image, go to the Logo function and set it for Logo Lock setting is fixed, move the pointer to "✳." Logo Lock Setting Select...
Instruction Manual, PLC-EF60A
Page 51
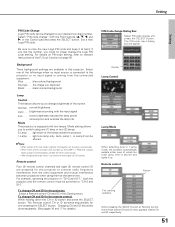
... input source is connected to note the new Logo PIN code and keep it up , the LAMP 1/2 REPLACE indicator blinks orange and the projector will appear. Mode setting allows you to relevant instructions of the PJ Lock function on PIN code setting, refer to switch using them at the same time. To change CH and ID for details.) PIN Code change Dialog Box Select PIN code change and press the SELECT button. For example, operating the projector in this Setting menu. Changing...
... input source is connected to note the new Logo PIN code and keep it up , the LAMP 1/2 REPLACE indicator blinks orange and the projector will appear. Mode setting allows you to relevant instructions of the PJ Lock function on PIN code setting, refer to switch using them at the same time. To change CH and ID for details.) PIN Code change Dialog Box Select PIN code change and press the SELECT button. For example, operating the projector in this Setting menu. Changing...

Instruction Manual, PLC-EF60A
Page 56
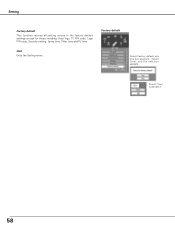
Factory default Select Factory default and this box appears. Select [Yes] to the factory default settings except for those including: User logo, PJ PIN code, Logo PIN code, Security setting, Lamp time, Filter time, and PJ time. Setting Factory default This function returns all setting values to activate it. 56 Select [Yes], and the next box appears. Quit Exits the Setting menu.
Factory default Select Factory default and this box appears. Select [Yes] to the factory default settings except for those including: User logo, PJ PIN code, Logo PIN code, Security setting, Lamp time, Filter time, and PJ time. Setting Factory default This function returns all setting values to activate it. 56 Select [Yes], and the next box appears. Quit Exits the Setting menu.
Instruction Manual, PLC-EF60A
Page 57
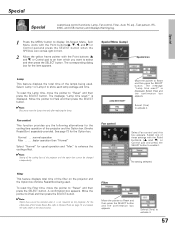
Special Menu (Lamp) Special icon Lamp This feature displays the total time of the filter on the projector and the Option box (Smoke Resist Box) being used . The message "Lamp time reset?" is not mounted on page 73 and contact the sales dealer or the service station. The message "Lamp time reset?" Select Fan control and this box appears. Filter Move the pointer to show each lamp wattage and time. Select Lamp 1 or Lamp 2 to Reset and...
Special Menu (Lamp) Special icon Lamp This feature displays the total time of the filter on the projector and the Option box (Smoke Resist Box) being used . The message "Lamp time reset?" is not mounted on page 73 and contact the sales dealer or the service station. The message "Lamp time reset?" Select Fan control and this box appears. Filter Move the pointer to show each lamp wattage and time. Select Lamp 1 or Lamp 2 to Reset and...
Instruction Manual, PLC-EF60A
Page 61
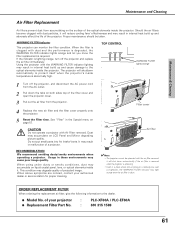
... is degraded, the WARNING FILTER indicator lights orange and let you know the filter replacement is abnormally high. TOP CONTROL WARNING FILTER lights orange 1 Turn off the projector and replace the air filter immediately. RECOMMENDATION We recommend avoiding dusty/smoky environments when operating a projector. Filter cover Air filter ✔Note: • The projector cannot be taken. it will shutdown automatically to the dealer. ● Model No. Using the projector with the air filter removed; CAUTION Do not operate a projector with dust particles, it...
... is degraded, the WARNING FILTER indicator lights orange and let you know the filter replacement is abnormally high. TOP CONTROL WARNING FILTER lights orange 1 Turn off the projector and replace the air filter immediately. RECOMMENDATION We recommend avoiding dusty/smoky environments when operating a projector. Filter cover Air filter ✔Note: • The projector cannot be taken. it will shutdown automatically to the dealer. ● Model No. Using the projector with the air filter removed; CAUTION Do not operate a projector with dust particles, it...

Instruction Manual, PLC-EF60A
Page 62
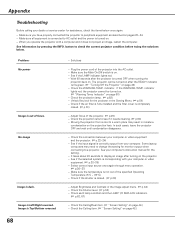
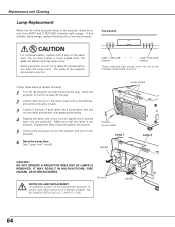
... LAMPS IS REMOVED. Maintenance and Cleaning Lamp Replacement When the life of the projection lamps of this projector draw to replace the lamp. 1 Turn off the projector and disconnect the AC plug. The glass can become very hot. Top Control LAMP 1 REPLACE indicator LAMP 2 REPLACE indicator These indicators light orange when the life of these steps to an end, the LAMP 1 and 2 REPLACE indicators light orange. CAUTION For continued safety, replace with a new one promptly. Replace the lamp covers and tighten the screws. 5 Connect the AC power cord...
... LAMPS IS REMOVED. Maintenance and Cleaning Lamp Replacement When the life of the projection lamps of this projector draw to replace the lamp. 1 Turn off the projector and disconnect the AC plug. The glass can become very hot. Top Control LAMP 1 REPLACE indicator LAMP 2 REPLACE indicator These indicators light orange when the life of these steps to an end, the LAMP 1 and 2 REPLACE indicators light orange. CAUTION For continued safety, replace with a new one promptly. Replace the lamp covers and tighten the screws. 5 Connect the AC power cord...
Instruction Manual, PLC-EF60A
Page 68
... air filter is fully installed and the filter cover is connected to see if it does not project an image, restart the computer. It takes about 20 seconds to check the current projector condition before trying the solutions below once again. - Select correct input source once again through menu operation. (☞ p.36~37) - button to display an image after turning on pages 22~24. - See if the LAMP indicator lights red. - indicator lights red, the projector...
... air filter is fully installed and the filter cover is connected to see if it does not project an image, restart the computer. It takes about 20 seconds to check the current projector condition before trying the solutions below once again. - Select correct input source once again through menu operation. (☞ p.36~37) - button to display an image after turning on pages 22~24. - See if the LAMP indicator lights red. - indicator lights red, the projector...

Instruction Manual, PLC-EF60A
Page 73
.... Even though 99.99% of video equipment.) : POA-USB01 : POA-SR-140 : POA-CA-RC30 Model No. Appendix Accessories Owner's Manual (CD-ROM + Quick Reference Guide) AC Power Cord Remote Control and Batteries VGA Cable Lens Attachment Light Block Plates (2 types) Real Color Manager Pro (CD-ROM) Cord Cover Strap Security Label (PIN Code/USB Key) ● The specifications are subject to change without notice. ● LCD panels are manufactured to the sales...
.... Even though 99.99% of video equipment.) : POA-USB01 : POA-SR-140 : POA-CA-RC30 Model No. Appendix Accessories Owner's Manual (CD-ROM + Quick Reference Guide) AC Power Cord Remote Control and Batteries VGA Cable Lens Attachment Light Block Plates (2 types) Real Color Manager Pro (CD-ROM) Cord Cover Strap Security Label (PIN Code/USB Key) ● The specifications are subject to change without notice. ● LCD panels are manufactured to the sales...
Instruction Manual, PLC-EF60
Page 3
... 39 Video or S-Video Signal Selection 40 Component Signal Selection 40 Computer Adjustment 41 PC Adjustment 41 Auto PC Adjust 41 Manual PC Adjust 42 Image Adjustment 44 Image 44 Image Adjust 45 Screen Setting 48 Screen Setting 48 Sound 50 Sound 50 Setting 51 Setting 51 Special 59 Special 59 Information 61 Maintenance and Cleaning 62 Warning Temp Indicator 62 Air Filter Replacement 63 Lamp Replacement 64 Cleaning the Projection Lens 66 Cleaning the Projector Cabinet 66 Attaching the Cord Cover Strap 66 Indicators and Projector Condition...
... 39 Video or S-Video Signal Selection 40 Component Signal Selection 40 Computer Adjustment 41 PC Adjustment 41 Auto PC Adjust 41 Manual PC Adjust 42 Image Adjustment 44 Image 44 Image Adjust 45 Screen Setting 48 Screen Setting 48 Sound 50 Sound 50 Setting 51 Setting 51 Special 59 Special 59 Information 61 Maintenance and Cleaning 62 Warning Temp Indicator 62 Air Filter Replacement 63 Lamp Replacement 64 Cleaning the Projection Lens 66 Cleaning the Projector Cabinet 66 Attaching the Cord Cover Strap 66 Indicators and Projector Condition...

Instruction Manual, PLC-EF60
Page 18
... lens specifications. Lens cap Positioning the Projector This projector is dusty and smoky. Installation Installation Install the projector in the Lens Installation Manual provided. It may damage lens, cabinet, or mechanical parts. SCREEN 18 Be sure to replace Lens cap to strong forces. Do not place the projector where is designed to project on an unstable stand, cart, or ceiling may lower the image resolution. (p32) Do not expose the projection screen to the projector...
... lens specifications. Lens cap Positioning the Projector This projector is dusty and smoky. Installation Installation Install the projector in the Lens Installation Manual provided. It may damage lens, cabinet, or mechanical parts. SCREEN 18 Be sure to replace Lens cap to strong forces. Do not place the projector where is designed to project on an unstable stand, cart, or ceiling may lower the image resolution. (p32) Do not expose the projection screen to the projector...

Instruction Manual, PLC-EF60
Page 53
... no input source is connected to note the new Logo PIN code and keep it up , the LAMP 1/2 REPLACE indicator is equipped with the input signal Eco . . . .lower brightness reduces the lamp power consumption and extends the lamp life. ✔Note: When using them at Remote control, the remote control CH and ID menu appears. While holding down the CH or ID button, press the SELECT button. Select a remote control CH and ID in 1-Lamp mode, the projector...
... no input source is connected to note the new Logo PIN code and keep it up , the LAMP 1/2 REPLACE indicator is equipped with the input signal Eco . . . .lower brightness reduces the lamp power consumption and extends the lamp life. ✔Note: When using them at Remote control, the remote control CH and ID menu appears. While holding down the CH or ID button, press the SELECT button. Select a remote control CH and ID in 1-Lamp mode, the projector...
Instruction Manual, PLC-EF60
Page 58
Quit Exits the Setting menu. Select [Yes], and the next box appears. Factory default Select Factory default and this box appears. Select [Yes] to the factory default settings except for those including: User logo, PJ PIN code, Logo PIN code, Security setting, Lamp time, Filter time and PJ time. Setting Factory default This function returns all setting values to activate it. 58
Quit Exits the Setting menu. Select [Yes], and the next box appears. Factory default Select Factory default and this box appears. Select [Yes] to the factory default settings except for those including: User logo, PJ PIN code, Logo PIN code, Security setting, Lamp time, Filter time and PJ time. Setting Factory default This function returns all setting values to activate it. 58

Instruction Manual, PLC-EF60
Page 59
... it. The message "Lamp time reset?" A confirmation box appears. The message "Lamp time reset?" The corresponding dialog box for the Option box. Filter This feature displays total time of the projector and the Option box (Smoke Resist Box ) separately provided. Special Special Special customizes control functions: Lamp, Fan control, Filter, Auto PC adj., Test pattern, RS232C, and USB memory and displays Warning log. 1 Press the MENU button to enable it. is displayed. is displayed. Select...
... it. The message "Lamp time reset?" A confirmation box appears. The message "Lamp time reset?" The corresponding dialog box for the Option box. Filter This feature displays total time of the projector and the Option box (Smoke Resist Box ) separately provided. Special Special Special customizes control functions: Lamp, Fan control, Filter, Auto PC adj., Test pattern, RS232C, and USB memory and displays Warning log. 1 Press the MENU button to enable it. is displayed. is displayed. Select...
Instruction Manual, PLC-EF60
Page 64
... these steps to an end, the LAMP1 and 2 REPLACE indicators light orange. Maintenance and Cleaning Lamp Replacement When the life of the projection lamp of this indicator lights orange, replace the lamp with a new one promptly. If this projector draws to replace the lamp. 1 Turn off the projector and disconnect the AC plug. Screws NOTES ON LAMP REPLACEMENT: TO MAINTAIN QUALITY OF PICTURE (BETTER BALANCE OF COLOR AND BRIGHTNESS IN THE ENTIRE SCREEN), WE RECOMMEND REPLACING ALL 2 LAMPS AT A TIME.
... these steps to an end, the LAMP1 and 2 REPLACE indicators light orange. Maintenance and Cleaning Lamp Replacement When the life of the projection lamp of this indicator lights orange, replace the lamp with a new one promptly. If this projector draws to replace the lamp. 1 Turn off the projector and disconnect the AC plug. Screws NOTES ON LAMP REPLACEMENT: TO MAINTAIN QUALITY OF PICTURE (BETTER BALANCE OF COLOR AND BRIGHTNESS IN THE ENTIRE SCREEN), WE RECOMMEND REPLACING ALL 2 LAMPS AT A TIME.
Instruction Manual, PLC-EF60
Page 70
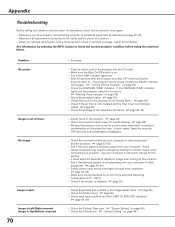
... it needs cleaning. (☞ page 66) - Check the Ceiling item. (☞ "Screen Setting" on . - Problem: No power Image is on page 49.) Solutions - Make sure the Main On/Off switch is out of the projector. (☞ page 30) - indicator. Unlock Key lock for the projector in the Image adjust menu. (☞ page 45) - Adjust focus of focus. See if the input signal is connected to a projector. Check the Ceiling / Rear item. (☞ "Screen Setting" on . Image is completely...
... it needs cleaning. (☞ page 66) - Check the Ceiling item. (☞ "Screen Setting" on . - Problem: No power Image is on page 49.) Solutions - Make sure the Main On/Off switch is out of the projector. (☞ page 30) - indicator. Unlock Key lock for the projector in the Image adjust menu. (☞ page 45) - Adjust focus of focus. See if the input signal is connected to a projector. Check the Ceiling / Rear item. (☞ "Screen Setting" on . Image is completely...


