User Manual
Page 2
... for replacement of the polarized or grounding-type plug. In the U.S. When installing an outside antenna is used, use caution when moving the cart/apparatus combination to rain or moisture, does not operate normally, or has been dropped. 15. CAUTION: TO REDUCE THE RISK OF ELECTRIC SHOCK, DO NOT REMOVE COVER (OR BACK). REFER SERVICING TO QUALIFIED SERVICE PERSONNEL. Read these instructions...
... for replacement of the polarized or grounding-type plug. In the U.S. When installing an outside antenna is used, use caution when moving the cart/apparatus combination to rain or moisture, does not operate normally, or has been dropped. 15. CAUTION: TO REDUCE THE RISK OF ELECTRIC SHOCK, DO NOT REMOVE COVER (OR BACK). REFER SERVICING TO QUALIFIED SERVICE PERSONNEL. Read these instructions...
User Manual
Page 3
...-Based) Symbol Explanation 26 Picture/Sound Adjustment 27 Menu Language 27 Helpful Hints (Problems / Solutions 28 ~ 29 Care and Cleaning 29 Mexico Guarantee 30 Warranty (U.S.A. Operating the DTV properly enables you to manage those features and maintain it in the Remote Control 6 Initial Signal Connections 6 Digital (DTV) RF Antenna Connection 6 Analog RF Antenna Connection 7 All Channel Search 8 Analog Antenna signal (optional 8 Side and Back Panels 9 Choose Your Connection 10 Digital AV Connections 11 ~ 16 All Channel Search 20 Digital Cable...
...-Based) Symbol Explanation 26 Picture/Sound Adjustment 27 Menu Language 27 Helpful Hints (Problems / Solutions 28 ~ 29 Care and Cleaning 29 Mexico Guarantee 30 Warranty (U.S.A. Operating the DTV properly enables you to manage those features and maintain it in the Remote Control 6 Initial Signal Connections 6 Digital (DTV) RF Antenna Connection 6 Analog RF Antenna Connection 7 All Channel Search 8 Analog Antenna signal (optional 8 Side and Back Panels 9 Choose Your Connection 10 Digital AV Connections 11 ~ 16 All Channel Search 20 Digital Cable...
User Manual
Page 4
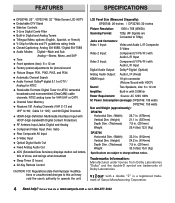
... Input Digital Audio Output: Dolby® Digital (Optical) Analog Audio Output: Audio L/R (Fixed) HDMI Input: 19-pin connector (Picture/Sound with HDCP) Sound: Two Speakers, size: 6 x 12 cm Amplifier: Built-in with HDCP (High-bandwidth Digital Content Protection) N RF Antenna Input Jacks: Digital and Analog N Component Video Input (Two Sets) N Rear Composite AV Input N S-Video Input N Optical Digital Audio Out N Fixed Analog Audio Out N XDS (Extended Data Services) displays station call letters, title of show, and ratings when broadcast N Sleep Timer (3 hours) N 32-Key Remote Control...
... Input Digital Audio Output: Dolby® Digital (Optical) Analog Audio Output: Audio L/R (Fixed) HDMI Input: 19-pin connector (Picture/Sound with HDCP) Sound: Two Speakers, size: 6 x 12 cm Amplifier: Built-in with HDCP (High-bandwidth Digital Content Protection) N RF Antenna Input Jacks: Digital and Analog N Component Video Input (Two Sets) N Rear Composite AV Input N S-Video Input N Optical Digital Audio Out N Fixed Analog Audio Out N XDS (Extended Data Services) displays station call letters, title of show, and ratings when broadcast N Sleep Timer (3 hours) N 32-Key Remote Control...

User Manual
Page 6
...-877-5032 Remove the batteries if the remote control will not be recycled or disposed properly in this DTV receives HD signals from a Set-top Box (STB) are installed correctly. The signal makes the difference! DIGITAL DIGITAL AUDIO OUTPUT ANTENNA IN UHF/VHF/CATV RF Antenna Operational Tip for a month or more. Be sure batteries are received through the channel search process before you must be used for Monitor Use: If...
...-877-5032 Remove the batteries if the remote control will not be recycled or disposed properly in this DTV receives HD signals from a Set-top Box (STB) are installed correctly. The signal makes the difference! DIGITAL DIGITAL AUDIO OUTPUT ANTENNA IN UHF/VHF/CATV RF Antenna Operational Tip for a month or more. Be sure batteries are received through the channel search process before you must be used for Monitor Use: If...
User Manual
Page 7
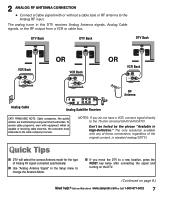
... type of the original content, is capable of receiving cable channels, the consumer must subscribe to change the Antenna Mode. The analog tuner in the Setup menu to the cable company's service. I Use "Analog Antenna Signal" in this DTV receives Analog Antenna signals, Analog Cable signals, or the RF output from a VCR or cable box. OUT OUT TO TV CATV IN CH3 CH4 OUT TO TV S-VIDEO VIDEO L- To receive cable programs, even with any of these connections, regardless of Analog RF signal connected automatically. Analog Satellite Receiver...
... type of the original content, is capable of receiving cable channels, the consumer must subscribe to change the Antenna Mode. The analog tuner in the Setup menu to the cable company's service. I Use "Analog Antenna Signal" in this DTV receives Analog Antenna signals, Analog Cable signals, or the RF output from a VCR or cable box. OUT OUT TO TV CATV IN CH3 CH4 OUT TO TV S-VIDEO VIDEO L- To receive cable programs, even with any of these connections, regardless of Analog RF signal connected automatically. Analog Satellite Receiver...
User Manual
Page 8
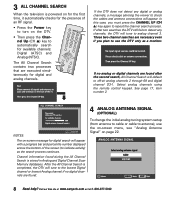
... cables and antenna connections will tune to the lowest Digital channel or lowest Analog channel if no analog or digital channels are executed simultaneously for digital and analog channels. INPUT 1 4 7 INFO POWER 23 56 89 0 RECALL TUNER SLEEP MUTE MENU ENTER CAPTION EXIT CH VOL If the DTV does not detect any channels, the DTV will appear with a progress bar and percentile number displayed across the bottom of an RF signal. • Press the Power...
... cables and antenna connections will tune to the lowest Digital channel or lowest Analog channel if no analog or digital channels are executed simultaneously for digital and analog channels. INPUT 1 4 7 INFO POWER 23 56 89 0 RECALL TUNER SLEEP MUTE MENU ENTER CAPTION EXIT CH VOL If the DTV does not detect any channels, the DTV will appear with a progress bar and percentile number displayed across the bottom of an RF signal. • Press the Power...
User Manual
Page 9
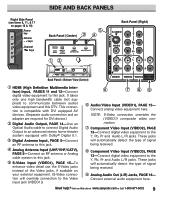
... & 19) Power key Volume POWER - + keys VOL Channel ML keys CH SIDE AND BACK PANELS Ž Back Panel (Center) Back Panel (Right) È Œ Back Panel-Bottom View (Center) Œ HDMI (High Definition Multimedia Inter- This connection is compatible with DVI equipped AV devices. (Separate audio connection and an adapter are required for DVI device.) Digital Audio Output, PAGE 14-Use an Optical Audio cable to connect Digital Audio Output to an...
... & 19) Power key Volume POWER - + keys VOL Channel ML keys CH SIDE AND BACK PANELS Ž Back Panel (Center) Back Panel (Right) È Œ Back Panel-Bottom View (Center) Œ HDMI (High Definition Multimedia Inter- This connection is compatible with DVI equipped AV devices. (Separate audio connection and an adapter are required for DVI device.) Digital Audio Output, PAGE 14-Use an Optical Audio cable to connect Digital Audio Output to an...
User Manual
Page 11
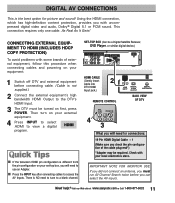
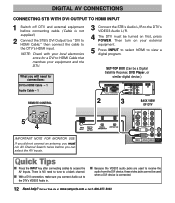
... use an Adapter. Check with uncompressed digital video and audio, Dolby ® Digital 5.1 or PCM sound. There is not supplied.) 2 Connect the external equipment's high bandwidth HDMI Output to a blank channel. IMPORTANT NOTE FOR MONITOR USE: If you did not connect an antenna, you will need to tune to the DTV's HDMI Input. 3 The DTV must be turned on your set-top box, you with your external equipment. 4 Press INPUT to select HDMI to view a digital program. I If the television HDMI...
... use an Adapter. Check with uncompressed digital video and audio, Dolby ® Digital 5.1 or PCM sound. There is not supplied.) 2 Connect the external equipment's high bandwidth HDMI Output to a blank channel. IMPORTANT NOTE FOR MONITOR USE: If you did not connect an antenna, you will need to tune to the DTV's HDMI Input. 3 The DTV must be turned on your set-top box, you with your external equipment. 4 Press INPUT to select HDMI to view a digital program. I If the television HDMI...
User Manual
Page 12
SET-TOP BOX (Can be a Digital Satellite Receiver, DVD Player, or similar digital device.) REMOTE CONTROL INPUT POWER 123 5 456 4 2 3 BACK VIEW OF DTV IMPORTANT NOTE FOR MONITOR USE: If you did not connect an antenna, you must be used to HDMI Cable that matches your equipment and the DTV. I With a DVI connection, make sure you connect Audio out to view a digital program. What you will need to tune to a blank channel. Then turn on first, press POWER. There is...
SET-TOP BOX (Can be a Digital Satellite Receiver, DVD Player, or similar digital device.) REMOTE CONTROL INPUT POWER 123 5 456 4 2 3 BACK VIEW OF DTV IMPORTANT NOTE FOR MONITOR USE: If you did not connect an antenna, you must be used to HDMI Cable that matches your equipment and the DTV. I With a DVI connection, make sure you connect Audio out to view a digital program. What you will need to tune to a blank channel. Then turn on first, press POWER. There is...
User Manual
Page 13
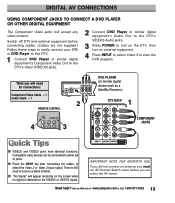
... DTV: 1 Connect DVD Player or similar digital equipment's Component Video Out to the DTV's Video (VIDEO3) jacks. 2 Connect DVD Player or similar digital equipment's Audio Out to the DTV's VIDEO3 Audio jacks. 3 Press POWER to turn on the DTV, then turn on the screen when no signal is NO need for connections: Component Video Cable - 1 Audio Cable - 1 2 REMOTE CONTROL INPUT POWER 123 4 3 4 5 6 DVD PLAYER (or similar digital device such as a Satellite Receiver.) 1 DTV BACK COMPONENT JACKS I Press the INPUT key after connecting the cables, to a blank channel. Visit...
... DTV: 1 Connect DVD Player or similar digital equipment's Component Video Out to the DTV's Video (VIDEO3) jacks. 2 Connect DVD Player or similar digital equipment's Audio Out to the DTV's VIDEO3 Audio jacks. 3 Press POWER to turn on the DTV, then turn on the screen when no signal is NO need for connections: Component Video Cable - 1 Audio Cable - 1 2 REMOTE CONTROL INPUT POWER 123 4 3 4 5 6 DVD PLAYER (or similar digital device such as a Satellite Receiver.) 1 DTV BACK COMPONENT JACKS I Press the INPUT key after connecting the cables, to a blank channel. Visit...
User Manual
Page 14
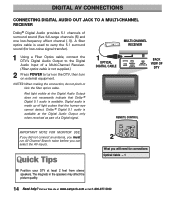
... picture quality. 14 Need help? Visit our Web site at the Digital Audio Output only when received as part of light pulses that Dolby ® Digital 5.1 audio is made up of a Digital signal. 1 OPTICAL DIGITAL CABLE REMOTE CONTROL BACK VIEW OF DTV IMPORTANT NOTE FOR MONITOR USE: If you did not connect an antenna, you must run All Channel Search twice before you will need for low-noise signal transfer). Red light visible at least 2 feet from stereo speakers. DIGITAL...
... picture quality. 14 Need help? Visit our Web site at the Digital Audio Output only when received as part of light pulses that Dolby ® Digital 5.1 audio is made up of a Digital signal. 1 OPTICAL DIGITAL CABLE REMOTE CONTROL BACK VIEW OF DTV IMPORTANT NOTE FOR MONITOR USE: If you did not connect an antenna, you must run All Channel Search twice before you will need for low-noise signal transfer). Red light visible at least 2 feet from stereo speakers. DIGITAL...
User Manual
Page 15
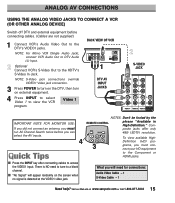
... view available HighDefinition (HD) programs, you must run All Channel Search twice before connecting cables. (Cables are not supplied.) 1 Connect VCR's Audio Video Out to the Component or HDMI jacks. I "No Signal" will need to tune to access the VIDEO1 input. Visit our Web site at the VIDEO1 video jack. Video 1 BACK VIEW OF VCR 1 DTV AV INPUT JACKS 2 S-VIDEO JACK IMPORTANT NOTE FOR MONITOR USE: If you did not connect an antenna, you must connect...
... view available HighDefinition (HD) programs, you must run All Channel Search twice before connecting cables. (Cables are not supplied.) 1 Connect VCR's Audio Video Out to the Component or HDMI jacks. I "No Signal" will need to tune to access the VIDEO1 input. Visit our Web site at the VIDEO1 video jack. Video 1 BACK VIEW OF VCR 1 DTV AV INPUT JACKS 2 S-VIDEO JACK IMPORTANT NOTE FOR MONITOR USE: If you did not connect an antenna, you must connect...
User Manual
Page 16
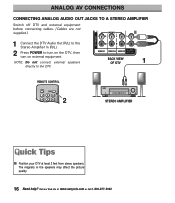
..., then turn on external equipment. ANALOG AV CONNECTIONS CONNECTING ANALOG AUDIO OUT JACKS TO A STEREO AMPLIFIER Switch off DTV and external equipment before connecting cables. (Cables are not supplied.) 1 Connect the DTV Audio Out (R/L) to the Stereo Amplifier In (R/L). 2 Press POWER to the DTV. The magnets in the speakers may affect the picture quality. 16 Need help? Visit our Web site at least 2 feet from stereo speakers. BACK VIEW OF DTV 1 REMOTE CONTROL INPUT POWER 123...
..., then turn on external equipment. ANALOG AV CONNECTIONS CONNECTING ANALOG AUDIO OUT JACKS TO A STEREO AMPLIFIER Switch off DTV and external equipment before connecting cables. (Cables are not supplied.) 1 Connect the DTV Audio Out (R/L) to the Stereo Amplifier In (R/L). 2 Press POWER to the DTV. The magnets in the speakers may affect the picture quality. 16 Need help? Visit our Web site at least 2 feet from stereo speakers. BACK VIEW OF DTV 1 REMOTE CONTROL INPUT POWER 123...
User Manual
Page 17
... Channel No. USING THE REMOTE CONTROL PRECAUTIONS To ensure safe operation, please observe the following is replaced by an incorrect type. Do not use a new battery with a used battery. Visit our Web site at the same time. Tuner ID Channel Major Minor Station ID Program Rating Point toward DTV Œ INPUT POWER 123 456 Ž 789 INFO SLEEP 0 RECALL TUNER MUTE MENU ENTER CAPTION EXIT Analog Full Banner display-Contains the Channel Number (analog antenna/cable), Tuner...
... Channel No. USING THE REMOTE CONTROL PRECAUTIONS To ensure safe operation, please observe the following is replaced by an incorrect type. Do not use a new battery with a used battery. Visit our Web site at the same time. Tuner ID Channel Major Minor Station ID Program Rating Point toward DTV Œ INPUT POWER 123 456 Ž 789 INFO SLEEP 0 RECALL TUNER MUTE MENU ENTER CAPTION EXIT Analog Full Banner display-Contains the Channel Number (analog antenna/cable), Tuner...
User Manual
Page 18
... Power Key-Press to change the video display format. See TUNER (#6) key description. Menu key-Press this key to display the onscreen menu. ‘ Tuner Key-Use this key to turn DTV on signal received and the broadcast's aspect ratio. The Digital Caption modes are : CC1 ~ CC4, Quikcap, and OFF. PIX2 A 16:9 image fills the screen normally. NOTE: The RECALL key cannot toggle between the channels. The Analog Caption modes are : Digital CC1...
... Power Key-Press to change the video display format. See TUNER (#6) key description. Menu key-Press this key to display the onscreen menu. ‘ Tuner Key-Use this key to turn DTV on signal received and the broadcast's aspect ratio. The Digital Caption modes are : CC1 ~ CC4, Quikcap, and OFF. PIX2 A 16:9 image fills the screen normally. NOTE: The RECALL key cannot toggle between the channels. The Analog Caption modes are : Digital CC1...
User Manual
Page 19
... will reset to factory defaults: • Picture/Sound Adjustments: Color, Tint, Contrast, Brightness, Sharpness, and Tone • Channel Memory-Digital /Analog channel databases will switch off or if a power failure occurs. 13 Mute Key-Press once to minimize the volume. Sleep Timer will be replaced • Analog Audio to Stereo • Captioning to OFF • V-Guide to OFF • Menu Language to English • Sleep Timer to OFF (if previously set) • Any Video mode to DTV mode...
... will reset to factory defaults: • Picture/Sound Adjustments: Color, Tint, Contrast, Brightness, Sharpness, and Tone • Channel Memory-Digital /Analog channel databases will switch off or if a power failure occurs. 13 Mute Key-Press once to minimize the volume. Sleep Timer will be replaced • Analog Audio to Stereo • Captioning to OFF • V-Guide to OFF • Menu Language to English • Sleep Timer to OFF (if previously set) • Any Video mode to DTV mode...
User Manual
Page 20
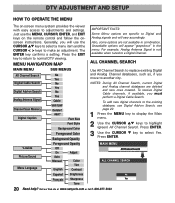
... highlight (green) All Channel Search. Visit our Web site at www.sanyoctv.com or Call 1-800-877-5032 Just use Digital Add-on the remote control and follow the onscreen instructions. Press ENTER. 3 Use the CURSOR M key to normal DTV viewing. DTV ADJUSTMENT AND SETUP HOW TO OPERATE THE MENU The on Search Analog Antenna Signal Channel Scan Memory Digital Caption SUB MENUS No Yes No Yes No Yes Cable VHF...
... highlight (green) All Channel Search. Visit our Web site at www.sanyoctv.com or Call 1-800-877-5032 Just use Digital Add-on the remote control and follow the onscreen instructions. Press ENTER. 3 Use the CURSOR M key to normal DTV viewing. DTV ADJUSTMENT AND SETUP HOW TO OPERATE THE MENU The on Search Analog Antenna Signal Channel Scan Memory Digital Caption SUB MENUS No Yes No Yes No Yes Cable VHF...

User Manual
Page 26
... be unsuitable for instructions on setting V-Guide limits. R RESTRICTED-Under 17 requires accompanying parent or adult guardian NC-17 NO ONE 17 AND UNDER ADMITTED I V-Guide limits on programming received via the Analog antenna input, Digital antenna input, VIDEO1 Video input, and any 480i signals received through the Component jacks (VIDEO2 or VIDEO3) are controlled by choosing one or more of age. 4 Highlight the "Allow All" option using the CURSOR...
... be unsuitable for instructions on setting V-Guide limits. R RESTRICTED-Under 17 requires accompanying parent or adult guardian NC-17 NO ONE 17 AND UNDER ADMITTED I V-Guide limits on programming received via the Analog antenna input, Digital antenna input, VIDEO1 Video input, and any 480i signals received through the Component jacks (VIDEO2 or VIDEO3) are controlled by choosing one or more of age. 4 Highlight the "Allow All" option using the CURSOR...
User Manual
Page 28
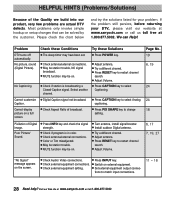
...Picture/ Sound. G Color or Tint misadjusted. G Press RESET key to restart channel search. G Press INPUT key. G Switch on the screen. G The sleep timer may be station trouble. Select another channel. G Install outdoor Digital antenna. Cannot customize G Digital Caption signal not broadcast. G Check if program is broadcasting a Closed-Caption signal. G MUTE function may be station trouble, NO signal broadcast. Most problems only involve simple hookup or setup changes that can Help! G Adjust antenna. G Adjust Volume. G Press CAPTION key to change setting...
...Picture/ Sound. G Color or Tint misadjusted. G Press RESET key to restart channel search. G Press INPUT key. G Switch on the screen. G The sleep timer may be station trouble. Select another channel. G Install outdoor Digital antenna. Cannot customize G Digital Caption signal not broadcast. G Check if program is broadcasting a Closed-Caption signal. G MUTE function may be station trouble, NO signal broadcast. Most problems only involve simple hookup or setup changes that can Help! G Adjust antenna. G Adjust Volume. G Press CAPTION key to change setting...
User Manual
Page 29
... Page No. G Channel may cause component failure not covered under Warranty. G Check antenna connections. G Signals are weak. G Replace batteries two "AAA." appear next to clear all settings and 19 restart channel search. G Turn Antenna or install signal booster. Cabinet makes popping sound. Clean the cabinet with a soft dry cloth. No UHF, VHF G Cable Channel indicator C should above number 13. No Cable channels G Cable Channel Indicator C should not G Switch Analog antenna signal to 22 Channels OK. NOTE...
... Page No. G Channel may cause component failure not covered under Warranty. G Check antenna connections. G Signals are weak. G Replace batteries two "AAA." appear next to clear all settings and 19 restart channel search. G Turn Antenna or install signal booster. Cabinet makes popping sound. Clean the cabinet with a soft dry cloth. No UHF, VHF G Cable Channel indicator C should above number 13. No Cable channels G Cable Channel Indicator C should not G Switch Analog antenna signal to 22 Channels OK. NOTE...


