Print Specs
Page 1
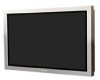
...LCD MONITOR CE42LM4N-NA Robust LCD Monitor ROBUST LCD MONITOR SANYO has used all of environments for dusty and oily circumstance such as a network monitor, using your internet browser to 13, 124ft (4,000m) 41.3" x 25.7" x 5.9" (w/o Option) 78 lbs. (w/o Option) Owner's Manual; NON GLARE ACRYLIC PANEL The 42LM4N has a non glare acrylic panel... mounting must be used in a dusty or oily environment. There are also jacks for High definition signals. Because its expertise in creating a lightweight aluminum framed LCD monitor which protects against mischief in the public display ...
...LCD MONITOR CE42LM4N-NA Robust LCD Monitor ROBUST LCD MONITOR SANYO has used all of environments for dusty and oily circumstance such as a network monitor, using your internet browser to 13, 124ft (4,000m) 41.3" x 25.7" x 5.9" (w/o Option) 78 lbs. (w/o Option) Owner's Manual; NON GLARE ACRYLIC PANEL The 42LM4N has a non glare acrylic panel... mounting must be used in a dusty or oily environment. There are also jacks for High definition signals. Because its expertise in creating a lightweight aluminum framed LCD monitor which protects against mischief in the public display ...
Owner's Manual
Page 2
..., stoves and other hazards. Heat build up will often require extensive work by a qualified technician to restore the LCD monitor receiver to normal operation. Always mount using basic tools. You must NOT be covered or the 2 Serious injury to an individual, and damage to the... the operating instructions. Never spill liquids of original spare parts can recommend approved wall mounting kit. This unit has been engineered and manufactured to an authorised service technician. This LCD monitor should have not been specifically designed for your personal safety, but improper use...
..., stoves and other hazards. Heat build up will often require extensive work by a qualified technician to restore the LCD monitor receiver to normal operation. Always mount using basic tools. You must NOT be covered or the 2 Serious injury to an individual, and damage to the... the operating instructions. Never spill liquids of original spare parts can recommend approved wall mounting kit. This unit has been engineered and manufactured to an authorised service technician. This LCD monitor should have not been specifically designed for your personal safety, but improper use...
Owner's Manual
Page 4
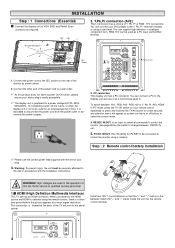
...Wall mount fixing positions Switch HDMI Services AV3 IN/Out BNC AV2 IN/ Out BNC AV2 audio IN Audio monitor Out PC RS232C Serial ports IN/ Out IEC Socket Serial port PJ-net Service Serial Port-IN Peritel (Scart) Serial Port-OUT 1. To completely switch off the mains, or when the display..... 3. Install two "AA" 1.5 volt batteries so that the "+" and "-" marks on the rear of time, it as shown above 2. Y,Pb,Pr connection (AV2) This LCD monitor has a choice of using the remote control, there is located at a much higher resolution. Connect the other end of the TV set next to...
...Wall mount fixing positions Switch HDMI Services AV3 IN/Out BNC AV2 IN/ Out BNC AV2 audio IN Audio monitor Out PC RS232C Serial ports IN/ Out IEC Socket Serial port PJ-net Service Serial Port-IN Peritel (Scart) Serial Port-OUT 1. To completely switch off the mains, or when the display..... 3. Install two "AA" 1.5 volt batteries so that the "+" and "-" marks on the rear of time, it as shown above 2. Y,Pb,Pr connection (AV2) This LCD monitor has a choice of using the remote control, there is located at a much higher resolution. Connect the other end of the TV set next to...
Owner's Manual for POA-LN01
Page 4
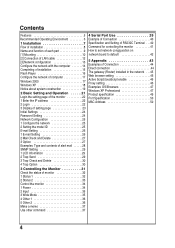
... Name and function of each part 9 [1] Mounting 10 [2] Connection of LAN cable 12 [3] ... page of the monitor 22 1 Enter the IP address 22 2 Login 22 3 Display of setting page 23 Initial Settings 24 Password Setting 24 Network Configuration 25 1 Configure...Examples: Type and contents of alert mail . . . . . .28 SNMP Setting 29 1 LCD Information 29 2 Trap Send 29 3 Trap Check and Delete 30 4 Trap Option 30 3 ...the monitor 41 How to set network congiguration on network board to default 42 5 Appendix 43 Examples of Connection 44 Direct connection 44 The gateway ...
... Name and function of each part 9 [1] Mounting 10 [2] Connection of LAN cable 12 [3] ... page of the monitor 22 1 Enter the IP address 22 2 Login 22 3 Display of setting page 23 Initial Settings 24 Password Setting 24 Network Configuration 25 1 Configure...Examples: Type and contents of alert mail . . . . . .28 SNMP Setting 29 1 LCD Information 29 2 Trap Send 29 3 Trap Check and Delete 30 4 Trap Option 30 3 ...the monitor 41 How to set network congiguration on network board to default 42 5 Appendix 43 Examples of Connection 44 Direct connection 44 The gateway ...
Owner's Manual for POA-LN01
Page 8
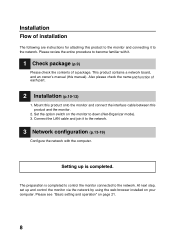
... instructions for attaching this product to the network. At next step, set up is completed to control the monitor connected to down (Net-Organizer mode). 3. Mount this product onto the monitor and connect the interface cable between this manual). Setting up and control the monitor via the network by using the...
... instructions for attaching this product to the network. At next step, set up is completed to control the monitor connected to down (Net-Organizer mode). 3. Mount this product onto the monitor and connect the interface cable between this manual). Setting up and control the monitor via the network by using the...
Owner's Manual for POA-LN01
Page 9
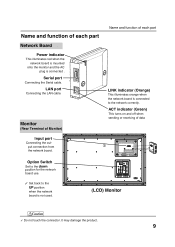
...) This turns on and off when sending or receiving of each part Network Board Power indicator This illuminates red when the network board is mounted onto the monitor and the AC plug is connected . Serial port Connecting the Serial cable. Monitor (Rear Terminal of each part LINK indicator... (Orange) This illuminates orange when the network board is not used. (LCD) Monitor ! Caution ✐ Do not touch the connector. LAN port Connecting the LAN cable. Name and function of data Option Switch Set to...
...) This turns on and off when sending or receiving of each part Network Board Power indicator This illuminates red when the network board is mounted onto the monitor and the AC plug is connected . Serial port Connecting the Serial cable. Monitor (Rear Terminal of each part LINK indicator... (Orange) This illuminates orange when the network board is not used. (LCD) Monitor ! Caution ✐ Do not touch the connector. LAN port Connecting the LAN cable. Name and function of data Option Switch Set to...
Owner's Manual for POA-LN01
Page 10
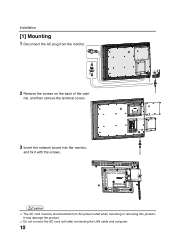
Caution ✐ The AC cord must be disconnected from the monitor. 2 Remove the screws on the back of the cabi- It may damage the product. ✐ Do not connect the AC cord until after connecting the LAN cable and computer. 10 net, and then remove the terminal covers. 3 Insert the network board into the monitor, and fix it with the screws. ! Installation [1] Mounting 1 Disconnect the AC plug from AC power outlet when mounting or removing this product.
Caution ✐ The AC cord must be disconnected from the monitor. 2 Remove the screws on the back of the cabi- It may damage the product. ✐ Do not connect the AC cord until after connecting the LAN cable and computer. 10 net, and then remove the terminal covers. 3 Insert the network board into the monitor, and fix it with the screws. ! Installation [1] Mounting 1 Disconnect the AC plug from AC power outlet when mounting or removing this product.
Owner's Manual for POA-LN01
Page 11
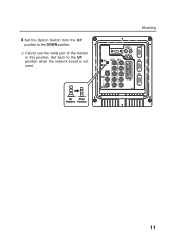
IN R R SERIAL PORT-IN SERVICE G YG Y AV3 VIDEO-IN AV3 VIDEO-OUT B PB B PB AV1 H/V H/V V V N4JF SERIAL PORT-OUT 11 Set back to the DOWN position. ✐ Cannot use the serial port of the monitor in this position. Up Down Position Position Mounting L H D M I L SERIAL PORT NET Organizer AV2-OUT AV2-IN R PR R PR PC - 4 Set the Option Switch from the UP position to the UP position when the network board is not used.
IN R R SERIAL PORT-IN SERVICE G YG Y AV3 VIDEO-IN AV3 VIDEO-OUT B PB B PB AV1 H/V H/V V V N4JF SERIAL PORT-OUT 11 Set back to the DOWN position. ✐ Cannot use the serial port of the monitor in this position. Up Down Position Position Mounting L H D M I L SERIAL PORT NET Organizer AV2-OUT AV2-IN R PR R PR PC - 4 Set the Option Switch from the UP position to the UP position when the network board is not used.


