
User Manual Ver.1.0 (English)
Page 17
... Compensating for backlighting (ACB 79 Changing the metering option 79 Selecting a White Balance setting 80 Using burst modes 83 Capturing continuous photos 83 Using the timer ...84 Capturing bracketed photos 84 Adjusting images ...85 Reducing the sound of the zoom 86 16
... Compensating for backlighting (ACB 79 Changing the metering option 79 Selecting a White Balance setting 80 Using burst modes 83 Capturing continuous photos 83 Using the timer ...84 Capturing bracketed photos 84 Adjusting images ...85 Reducing the sound of the zoom 86 16
User Manual Ver.1.0 (English)
Page 22
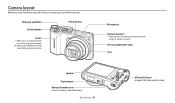
AF-assist light/Timer lamp Lens Speaker Tripod mount Battery chamber cover Insert a memory card and battery Basic functions 21 USB and A/V port Accepts USB cable and A/V cable Power button Microphone Internal antenna* * Avoid contact with your camera. Forcing to open the flash unit may cause damage to prevent damage. Flash pop-up button Shutter button Flash* * While not in use, keep the flash unit closed to your camera's parts and their functions. Camera layout Before you start, familiarize yourself with the internal antenna while using the wireless network.
AF-assist light/Timer lamp Lens Speaker Tripod mount Battery chamber cover Insert a memory card and battery Basic functions 21 USB and A/V port Accepts USB cable and A/V cable Power button Microphone Internal antenna* * Avoid contact with your camera. Forcing to open the flash unit may cause damage to prevent damage. Flash pop-up button Shutter button Flash* * While not in use, keep the flash unit closed to your camera's parts and their functions. Camera layout Before you start, familiarize yourself with the internal antenna while using the wireless network.

User Manual Ver.1.0 (English)
Page 24
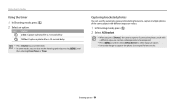
...] to activate the Wi-Fi function that you press [DIRECT LINK]. 1 Rotate the mode dial to the previous mode. Access options or menus. Change the timer and burst options. Press [DIRECT LINK] again to return to n. 2 Select General “ DIRECT LINK (Wi-Fi Button). 3 Select a Wi-Fi feature. (p. 136) Basic functions...
...] to activate the Wi-Fi function that you press [DIRECT LINK]. 1 Rotate the mode dial to the previous mode. Access options or menus. Change the timer and burst options. Press [DIRECT LINK] again to return to n. 2 Select General “ DIRECT LINK (Wi-Fi Button). 3 Select a Wi-Fi feature. (p. 136) Basic functions...
User Manual Ver.1.0 (English)
Page 29
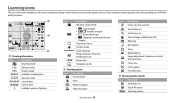
... sensitivity Flash Photo resolution Video resolution Icon Description Frame rate (per second) Sound Alive on Intelli zoom on Optical Image Stabilization (OIS) Metering Burst option Timer White balance Image adjustment (sharpness, contrast, and saturation) Focus area Focus option Face detection 3 Shooting option (touch) Icon Description AutoShare On Touch AF option m Shooting...
... sensitivity Flash Photo resolution Video resolution Icon Description Frame rate (per second) Sound Alive on Intelli zoom on Optical Image Stabilization (OIS) Metering Burst option Timer White balance Image adjustment (sharpness, contrast, and saturation) Focus area Focus option Face detection 3 Shooting option (touch) Icon Description AutoShare On Touch AF option m Shooting...
User Manual Ver.1.0 (English)
Page 33
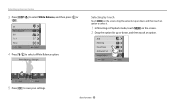
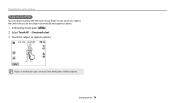
EV White Balance ISO Flash Focus Exit Select 4 Press [F/t] to save your settings. ACB Metering Drive/Timer AE Bracket Set Image Adjust Exit Select Back Adjust 5 Press [o] to select a White Balance option. White Balance : Daylight Selecting by touch Touch m on the screen. 2 Drag the option list up or down, and then touch an option. Selecting options or menus 3 Press [D/c] to select it. 1 In Shooting or Playback mode, touch m on the screen, drag the option list up or down, and then touch an option to select White Balance, and then press [t] or [o]. Basic functions 32
EV White Balance ISO Flash Focus Exit Select 4 Press [F/t] to save your settings. ACB Metering Drive/Timer AE Bracket Set Image Adjust Exit Select Back Adjust 5 Press [o] to select a White Balance option. White Balance : Daylight Selecting by touch Touch m on the screen. 2 Drag the option list up or down, and then touch an option. Selecting options or menus 3 Press [D/c] to select it. 1 In Shooting or Playback mode, touch m on the screen, drag the option list up or down, and then touch an option to select White Balance, and then press [t] or [o]. Basic functions 32
User Manual Ver.1.0 (English)
Page 34
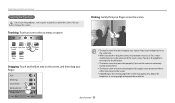
... touch or drag the screen, discolorations may not work properly if you apply screen protection film or other accessories to select a menu or option. Drive/Timer AE Bracket Set Image Adjust Exit Select Basic functions 33 Flicking: Gently flick your finger. Touching: Touch an icon to the screen. • Depending on...
... touch or drag the screen, discolorations may not work properly if you apply screen protection film or other accessories to select a menu or option. Drive/Timer AE Bracket Set Image Adjust Exit Select Basic functions 33 Flicking: Gently flick your finger. Touching: Touch an icon to the screen. • Depending on...
User Manual Ver.1.0 (English)
Page 64
... Compensating for backlighting (ACB 79 Changing the metering option 79 Selecting a White Balance setting 80 Using burst modes 83 Capturing continuous photos 83 Using the timer 84 Capturing bracketed photos 84 Adjusting images 85 Reducing the sound of the zoom 86 Selecting a resolution and quality 64 Selecting a resolution 64 Selecting a photo...
... Compensating for backlighting (ACB 79 Changing the metering option 79 Selecting a White Balance setting 80 Using burst modes 83 Capturing continuous photos 83 Using the timer 84 Capturing bracketed photos 84 Adjusting images 85 Reducing the sound of the zoom 86 Selecting a resolution and quality 64 Selecting a resolution 64 Selecting a photo...
User Manual Ver.1.0 (English)
Page 75
As you cannot set Timer, Intelli zoom, and Burst options. If you use this function, you touch on a subject, the camera focuses on the subject automatically and captures a photo. 1 In Shooting mode, press [m]. 2 Select Touch AF “ One touch shot. 3 Touch the subject to capture a photo. Changing the camera's focus Using One Touch Shot You can capture a photo with the touch of your finger. Shooting options 74
As you cannot set Timer, Intelli zoom, and Burst options. If you use this function, you touch on a subject, the camera focuses on the subject automatically and captures a photo. 1 In Shooting mode, press [m]. 2 Select Touch AF “ One touch shot. 3 Touch the subject to capture a photo. Changing the camera's focus Using One Touch Shot You can capture a photo with the touch of your finger. Shooting options 74
User Manual Ver.1.0 (English)
Page 84
.... Shooting options 83 Icon Description Continuous (8 fps): Capture 8 photos per second continuously. (You can also set the shooting option by pressing [m], and then selecting Drive/Timer. You can capture up to 6 photos in one burst.) Continuous (3 fps): Capture 3 photos per second continuously. (You can capture up to 6 photos in one of... options may take longer to save the photos depending on the memory card capacity and performance. • In some modes, you can also set the timer to adjust the exposure correctly and select a proper light source.
.... Shooting options 83 Icon Description Continuous (8 fps): Capture 8 photos per second continuously. (You can also set the shooting option by pressing [m], and then selecting Drive/Timer. You can capture up to 6 photos in one burst.) Continuous (3 fps): Capture 3 photos per second continuously. (You can capture up to 6 photos in one of... options may take longer to save the photos depending on the memory card capacity and performance. • In some modes, you can also set the timer to adjust the exposure correctly and select a proper light source.
User Manual Ver.1.0 (English)
Page 85
... exposure: normal, underexposed, and overexposed. • Press [m], and then select AE Bracket Set to select exposure values. • It may take longer to cancel the timer. • In some modes, you can also set the shooting option by pressing [m], and then selecting Drive...
... exposure: normal, underexposed, and overexposed. • Press [m], and then select AE Bracket Set to select exposure values. • It may take longer to cancel the timer. • In some modes, you can also set the shooting option by pressing [m], and then selecting Drive...
User Manual Ver.1.0 (English)
Page 119
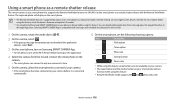
...'s firmware and update it is supported by Galaxy series smart phones or Galaxy Tab models with the Android 2.2 OS or higher or iOS devices with Samsung camera models manufactured in 2013 or later. 1 On the camera, rotate the mode dial to w. 2 On the camera, select . • If the ...pop-up message that supports the Remote Viewfinder feature via a WLAN. Icon Description Flash option Timer option Photo size Saving location Zoom ratio • While using this feature, some buttons are not available on your camera. • The zoom button and...
...'s firmware and update it is supported by Galaxy series smart phones or Galaxy Tab models with the Android 2.2 OS or higher or iOS devices with Samsung camera models manufactured in 2013 or later. 1 On the camera, rotate the mode dial to w. 2 On the camera, select . • If the ...pop-up message that supports the Remote Viewfinder feature via a WLAN. Icon Description Flash option Timer option Photo size Saving location Zoom ratio • While using this feature, some buttons are not available on your camera. • The zoom button and...
User Manual Ver.1.0 (English)
Page 154
..., Light Trace), Best Face, Magic Plus (My Magic Frame, Split Shot, Motion Photo, Photo Filter) • Burst: Single, Continuous (3 fps), Continuous (8 fps), AE Bracket • Timer: Off, 10 Sec, 2 Sec • Modes: Smart Scene Detection (Landscape, Blue Sky, Natural Green, Sunset), Magic Plus (Movie Filter) • Format: MP4 (H.264) (Max recording...
..., Light Trace), Best Face, Magic Plus (My Magic Frame, Split Shot, Motion Photo, Photo Filter) • Burst: Single, Continuous (3 fps), Continuous (8 fps), AE Bracket • Timer: Off, 10 Sec, 2 Sec • Modes: Smart Scene Detection (Landscape, Blue Sky, Natural Green, Sunset), Magic Plus (Movie Filter) • Format: MP4 (H.264) (Max recording...
User Manual Ver.1.0 (English)
Page 164
... recording mode 59 Smart mode 50 Smart Scene Detection mode 61 Smile Shot 76 Sound settings 35 Start Image 133 Status lamp 22 T Thumbnails 90 Timer 84 Time settings 26 Time zone settings 26, 135 Touch screen Dragging 33 Flicking 33 Touching 33 Tracking AF 73 Transferring files Auto Backup 120...
... recording mode 59 Smart mode 50 Smart Scene Detection mode 61 Smile Shot 76 Sound settings 35 Start Image 133 Status lamp 22 T Thumbnails 90 Timer 84 Time settings 26 Time zone settings 26, 135 Touch screen Dragging 33 Flicking 33 Touching 33 Tracking AF 73 Transferring files Auto Backup 120...


