
User Manual Ver.1.0 (English)
Page 1
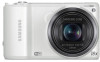
Basic troubleshooting Basic functions Playback/Editing Appendixes Quick reference Extended functions Wireless network Index Contents Shooting options Settings USER MANUAL WB250F/WB251F/WB252F/WB280F Click a topic This user manual includes detailed usage instructions for your camera. Please read this manual thoroughly.
Basic troubleshooting Basic functions Playback/Editing Appendixes Quick reference Extended functions Wireless network Index Contents Shooting options Settings USER MANUAL WB250F/WB251F/WB252F/WB280F Click a topic This user manual includes detailed usage instructions for your camera. Please read this manual thoroughly.
User Manual Ver.1.0 (English)
Page 6
...how to set the options in this manual are the property of their respective owners. • Camera specifications or contents of this manual may be changed without prior notice due to an upgrade of the camera's functions. • We recommend using your camera's layout, icons, and basic functions ... configure your computer or TV. Appendixes 137 Get information about your camera within the country where you purchased it. • Use this camera responsibly and adhere to reuse or distribute any part of this manual without prior permission. Wireless network 111 Learn how to connect to...
...how to set the options in this manual are the property of their respective owners. • Camera specifications or contents of this manual may be changed without prior notice due to an upgrade of the camera's functions. • We recommend using your camera's layout, icons, and basic functions ... configure your computer or TV. Appendixes 137 Get information about your camera within the country where you purchased it. • Use this camera responsibly and adhere to reuse or distribute any part of this manual without prior permission. Wireless network 111 Learn how to connect to...
User Manual Ver.1.0 (English)
Page 7
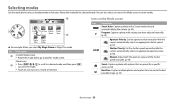
...). * Annotation 6 For example: Available in Program, Aperture Priority, and Shutter Priority modes Icons used in this manual Mode Smart Auto Program Aperture Priority, Shutter Priority, Manual Smart Best Face Magic Plus Settings Wi-Fi Indicator T p G s i g n w Shooting mode icons These... icons appear in the text when a function is available in this manual Icon Function Additional information Safety warnings and precautions [ ] Camera buttons. Indicators used in a mode. For example, [Shutter] represents the shutter button. ( ) Page number of ...
...). * Annotation 6 For example: Available in Program, Aperture Priority, and Shutter Priority modes Icons used in this manual Mode Smart Auto Program Aperture Priority, Shutter Priority, Manual Smart Best Face Magic Plus Settings Wi-Fi Indicator T p G s i g n w Shooting mode icons These... icons appear in the text when a function is available in this manual Icon Function Additional information Safety warnings and precautions [ ] Camera buttons. Indicators used in a mode. For example, [Shutter] represents the shutter button. ( ) Page number of ...

User Manual Ver.1.0 (English)
Page 8
Half-press [Shutter] Press [Shutter] Subject, background, and composition • Subject: The main object in this manual Pressing the shutter • Half-press [Shutter]: Press the shutter halfway down • Press [Shutter]: Press the shutter all the way down Exposure (Brightness) The ... will be darker or lighter. You can alter the exposure by changing the shutter speed, aperture value, or ISO sensitivity. By altering the exposure, your camera determines the exposure.
Half-press [Shutter] Press [Shutter] Subject, background, and composition • Subject: The main object in this manual Pressing the shutter • Half-press [Shutter]: Press the shutter halfway down • Press [Shutter]: Press the shutter all the way down Exposure (Brightness) The ... will be darker or lighter. You can alter the exposure by changing the shutter speed, aperture value, or ISO sensitivity. By altering the exposure, your camera determines the exposure.
User Manual Ver.1.0 (English)
Page 16
... Selecting by touch 32 Setting the display and sound 34 Setting the display type 34 Setting the sound 35 Capturing photos ...36 Zooming ...37 Reducing camera shake (OIS 39 Tips for getting a clearer photo 40 Extended functions ...42 Using the Smart Auto mode 43 Using the Program mode 45 Using the... Aperture Priority, Shutter Priority, or Manual mode 46 Using the Aperture Priority mode 47 Using the Shutter Priority mode 48 Using the Manual mode 49 Using the Smart mode 50 Using the Panorama mode 51 Using the Best Face mode...
... Selecting by touch 32 Setting the display and sound 34 Setting the display type 34 Setting the sound 35 Capturing photos ...36 Zooming ...37 Reducing camera shake (OIS 39 Tips for getting a clearer photo 40 Extended functions ...42 Using the Smart Auto mode 43 Using the Program mode 45 Using the... Aperture Priority, Shutter Priority, or Manual mode 46 Using the Aperture Priority mode 47 Using the Shutter Priority mode 48 Using the Manual mode 49 Using the Smart mode 50 Using the Panorama mode 51 Using the Best Face mode...

User Manual Ver.1.0 (English)
Page 17
...in the dark 66 Preventing red-eye 66 Using the flash ...66 Setting a flash option 67 Adjusting the ISO sensitivity 69 Changing the camera's focus 70 Using macro ...70 Using auto focus ...70 Adjusting the focus area 72 Adjusting the focus by touch 72 Using Face ...portrait shot 75 Capturing a smile shot 76 Detecting eye blinking 76 Tips for detecting faces 77 Adjusting brightness and color 78 Adjusting the exposure manually (EV 78 Compensating for backlighting (ACB 79 Changing the metering option 79 Selecting a White Balance setting 80 Using burst modes 83 Capturing continuous...
...in the dark 66 Preventing red-eye 66 Using the flash ...66 Setting a flash option 67 Adjusting the ISO sensitivity 69 Changing the camera's focus 70 Using macro ...70 Using auto focus ...70 Adjusting the focus area 72 Adjusting the focus by touch 72 Using Face ...portrait shot 75 Capturing a smile shot 76 Detecting eye blinking 76 Tips for detecting faces 77 Adjusting brightness and color 78 Adjusting the exposure manually (EV 78 Compensating for backlighting (ACB 79 Changing the metering option 79 Selecting a White Balance setting 80 Using burst modes 83 Capturing continuous...
User Manual Ver.1.0 (English)
Page 30
...have adjusted manually. (p. 45) G Aperture Priority: Set the aperture value manually while the camera automatically selects an appropriate shutter speed. (p. 47) Shutter Priority: Set the shutter speed manually while the camera automatically selects an appropriate aperture value. (p. 48) Manual: Adjust both... the aperture value and the shutter speed manually. (p. 49) s Smart: Capture a photo with settings you select...
...have adjusted manually. (p. 45) G Aperture Priority: Set the aperture value manually while the camera automatically selects an appropriate shutter speed. (p. 47) Shutter Priority: Set the shutter speed manually while the camera automatically selects an appropriate aperture value. (p. 48) Manual: Adjust both... the aperture value and the shutter speed manually. (p. 49) s Smart: Capture a photo with settings you select...
User Manual Ver.1.0 (English)
Page 47
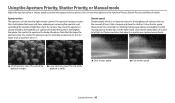
...related to 11. On the other hand, a fast shutter speed allows less time to let light in the Aperture Priority, Shutter Priority, and Manual modes. Photos are darker, but fast moving objects tend to control the exposure of a photo: the larger the aperture, the brighter the photo.... All things being equal, photos are captured more clearly. The aperture housing contains thin, metal plates that enters the camera. Using the Aperture Priority, Shutter Priority, or Manual mode Adjust the aperture value or shutter speed to blur. S Small aperture value (The size of the S Large aperture...
...related to 11. On the other hand, a fast shutter speed allows less time to let light in the Aperture Priority, Shutter Priority, and Manual modes. Photos are darker, but fast moving objects tend to control the exposure of a photo: the larger the aperture, the brighter the photo.... All things being equal, photos are captured more clearly. The aperture housing contains thin, metal plates that enters the camera. Using the Aperture Priority, Shutter Priority, or Manual mode Adjust the aperture value or shutter speed to blur. S Small aperture value (The size of the S Large aperture...
User Manual Ver.1.0 (English)
Page 48
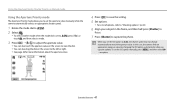
In this case, the camera finds an appropriate exposure value by changing the ISO option automatically when you capture a photo. OK: Change aperture Extended functions 47 To set the ISO option manually, press [m], and then select ISO “ an option. When you set the ISO ...not change automatically to capture the photo. Using the Aperture Priority, Shutter Priority, or Manual mode Using the Aperture Priority mode The Aperture Priority mode allows you to set the aperture value manually while the camera automatically selects an appropriate shutter speed. 1 Rotate the mode dial to G. 2 ...
In this case, the camera finds an appropriate exposure value by changing the ISO option automatically when you capture a photo. OK: Change aperture Extended functions 47 To set the ISO option manually, press [m], and then select ISO “ an option. When you set the ISO ...not change automatically to capture the photo. Using the Aperture Priority, Shutter Priority, or Manual mode Using the Aperture Priority mode The Aperture Priority mode allows you to set the aperture value manually while the camera automatically selects an appropriate shutter speed. 1 Rotate the mode dial to G. 2 ...

User Manual Ver.1.0 (English)
Page 49
In this case, the camera finds an appropriate exposure value by changing the ISO option automatically when you set the ISO option manually, press [m], and then select ISO “ an option. OK: Change shutter speed Extended functions 48 To set the ISO option to ... may not change automatically to capture the photo. Using the Aperture Priority, Shutter Priority, or Manual mode Using the Shutter Priority mode The Shutter Priority mode allows you to set the shutter speed manually while the camera automatically selects an appropriate aperture value. 1 Rotate the mode dial to G. 2 Select . ...
In this case, the camera finds an appropriate exposure value by changing the ISO option automatically when you set the ISO option manually, press [m], and then select ISO “ an option. OK: Change shutter speed Extended functions 48 To set the ISO option to ... may not change automatically to capture the photo. Using the Aperture Priority, Shutter Priority, or Manual mode Using the Shutter Priority mode The Shutter Priority mode allows you to set the shutter speed manually while the camera automatically selects an appropriate aperture value. 1 Rotate the mode dial to G. 2 Select . ...
User Manual Ver.1.0 (English)
Page 64
... the dark 66 Preventing red-eye 66 Using the flash 66 Setting a flash option 67 Adjusting the ISO sensitivity 69 Changing the camera's focus 70 Using macro 70 Using auto focus 70 Adjusting the focus area 72 Adjusting the focus by touch 72 Using Face Detection...portrait shot 75 Capturing a smile shot 76 Detecting eye blinking 76 Tips for detecting faces 77 Adjusting brightness and color 78 Adjusting the exposure manually (EV 78 Compensating for backlighting (ACB 79 Changing the metering option 79 Selecting a White Balance setting 80 Using burst modes 83 Capturing continuous...
... the dark 66 Preventing red-eye 66 Using the flash 66 Setting a flash option 67 Adjusting the ISO sensitivity 69 Changing the camera's focus 70 Using macro 70 Using auto focus 70 Adjusting the focus area 72 Adjusting the focus by touch 72 Using Face Detection...portrait shot 75 Capturing a smile shot 76 Detecting eye blinking 76 Tips for detecting faces 77 Adjusting brightness and color 78 Adjusting the exposure manually (EV 78 Compensating for backlighting (ACB 79 Changing the metering option 79 Selecting a White Balance setting 80 Using burst modes 83 Capturing continuous...
User Manual Ver.1.0 (English)
Page 72
...• You can also set the focus option by adjusting the focus distance manually. (p. 71) Macro: Focus on a subject that is 2-31 in. (5-80 cm) from the camera. 71-138 in. (180-350 cm) when you adjust the focus distance manually and the subject is set automatically in . (80 cm) away. to ...save your settings. Manual Focus : 50 Back Set 4 Press [o] to adjust the focus distance. When you...
...• You can also set the focus option by adjusting the focus distance manually. (p. 71) Macro: Focus on a subject that is 2-31 in. (5-80 cm) from the camera. 71-138 in. (180-350 cm) when you adjust the focus distance manually and the subject is set automatically in . (80 cm) away. to ...save your settings. Manual Focus : 50 Back Set 4 Press [o] to adjust the focus distance. When you...

User Manual Ver.1.0 (English)
Page 79
... exposure manually (EV) p A h Depending on an appropriate exposure, select the AE Bracket (Auto Exposure Bracket) option. You may be too bright or dark. In these cases, you adjust the exposure, the setting will capture 3 consecutive photos, each with a different exposure: normal, underexposed, and overexposed. (p. 84) Shooting options 78 The camera will be...
... exposure manually (EV) p A h Depending on an appropriate exposure, select the AE Bracket (Auto Exposure Bracket) option. You may be too bright or dark. In these cases, you adjust the exposure, the setting will capture 3 consecutive photos, each with a different exposure: normal, underexposed, and overexposed. (p. 84) Shooting options 78 The camera will be...
User Manual Ver.1.0 (English)
Page 98
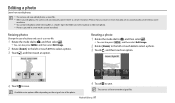
Editing a photo Learn how to edit photos. • The camera will save edited photos as new files. • When you rotate or resize manually are not automatically converted to a lower resolution. • You cannot edit photos while viewing files as a new file. 1 Rotate the mode dial to...a photo. 3 Touch , and then touch an option. Resizing photos Change the size of the photo. 4 Touch to save. Photos that you edit photos, the camera will overwrite the original file. Rotate : Right 90˚ 4 Touch to select a photo. 3 Touch , and then touch an option. Open the folder and select...
Editing a photo Learn how to edit photos. • The camera will save edited photos as new files. • When you rotate or resize manually are not automatically converted to a lower resolution. • You cannot edit photos while viewing files as a new file. 1 Rotate the mode dial to...a photo. 3 Touch , and then touch an option. Resizing photos Change the size of the photo. 4 Touch to save. Photos that you edit photos, the camera will overwrite the original file. Rotate : Right 90˚ 4 Touch to select a photo. 3 Touch , and then touch an option. Open the folder and select...
User Manual Ver.1.0 (English)
Page 113
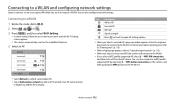
...8226; When a login page appears, refer to "Using the login browser". (p. 113) • When you select an unsecured AP, the camera will connect to add an AP manually. Your AP name must be in a range of a WLAN. You can also configure network settings. Back • Select Refresh to refresh ...supported AP, select “ WPS PIN connection, and then enter a PIN on -screen instructions until the Wi-Fi Setting screen appears. • The camera automatically searches for available AP devices. 4 Select an AP. Connecting to a WLAN 1 Rotate the mode dial to the WLAN. Enter the required passwords...
...8226; When a login page appears, refer to "Using the login browser". (p. 113) • When you select an unsecured AP, the camera will connect to add an AP manually. Your AP name must be in a range of a WLAN. You can also configure network settings. Back • Select Refresh to refresh ...supported AP, select “ WPS PIN connection, and then enter a PIN on -screen instructions until the Wi-Fi Setting screen appears. • The camera automatically searches for available AP devices. 4 Select an AP. Connecting to a WLAN 1 Rotate the mode dial to the WLAN. Enter the required passwords...
User Manual Ver.1.0 (English)
Page 129
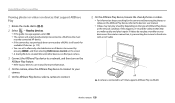
...other devices can set to allow only selected devices or all devices to the device's user manual. • Videos may not play smoothly depending on your device over the wireless connection, try connecting the camera to a TV that support AllShare Play 1 Rotate the mode dial to w. 2 Select ... then turn on the AllShare Play feature. • Refer to your device's user manual for more information. 4 On the camera, allow the AllShare Play device to connect to your camera. 5 On the AllShare Play device, select a camera to connect. 6 On the AllShare Play device, browse the shared photos or videos....
...other devices can set to allow only selected devices or all devices to the device's user manual. • Videos may not play smoothly depending on your device over the wireless connection, try connecting the camera to a TV that support AllShare Play 1 Rotate the mode dial to w. 2 Select ... then turn on the AllShare Play feature. • Refer to your device's user manual for more information. 4 On the camera, allow the AllShare Play device to connect to your camera. 5 On the AllShare Play device, select a camera to connect. 6 On the AllShare Play device, browse the shared photos or videos....
User Manual Ver.1.0 (English)
Page 149
... forces. • Avoid exposing the battery to come in the battery, immediately discontinue use of excessive heat such as dropping it in this user manual. Disposal guidelines • Dispose of the battery with care. • Do not dispose of the battery in accordance with moisture or liquids. •... battery Charge the battery only by the methods described in hot, humid places, such as spas or shower enclosures. • Do not rest the camera on flammable surfaces, such as the inside of an enclosed car in the summertime. • Do not place the battery in a microwave oven. ...
... forces. • Avoid exposing the battery to come in the battery, immediately discontinue use of excessive heat such as dropping it in this user manual. Disposal guidelines • Dispose of the battery with care. • Do not dispose of the battery in accordance with moisture or liquids. •... battery Charge the battery only by the methods described in hot, humid places, such as spas or shower enclosures. • Do not rest the camera on flammable surfaces, such as the inside of an enclosed car in the summertime. • Do not place the battery in a microwave oven. ...
User Manual Ver.1.0 (English)
Page 154
Camera specifications Flash Mode Range Auto, Red-eye, Fill in, Slow Sync, Off, Red-eye Fix • Wide: 11.81-133.07 in. (0.3-3.38 m) (ISO Auto) &#..., White, Natural Green, Blue Sky, Sunset, Macro, Macro text, Macro Color, Tripod, Action, Fireworks, Candle, Spotlight, Spotlight (Macro), Spotlight (Portrait)), Program, Aperture Priority, Shutter Priority, Manual, Smart (Beauty Face, Continuous Shot, Landscape, Macro, Action Freeze, Rich Tones, Panorama, Waterfall, Silhouette, Sunset, Low Light Shot, Fireworks, Light Trace), Best Face, Magic Plus...
Camera specifications Flash Mode Range Auto, Red-eye, Fill in, Slow Sync, Off, Red-eye Fix • Wide: 11.81-133.07 in. (0.3-3.38 m) (ISO Auto) &#..., White, Natural Green, Blue Sky, Sunset, Macro, Macro text, Macro Color, Tripod, Action, Fireworks, Candle, Spotlight, Spotlight (Macro), Spotlight (Portrait)), Program, Aperture Priority, Shutter Priority, Manual, Smart (Beauty Face, Continuous Shot, Landscape, Macro, Action Freeze, Rich Tones, Panorama, Waterfall, Silhouette, Sunset, Low Light Shot, Fireworks, Light Trace), Best Face, Magic Plus...


