User Manual
Page 3
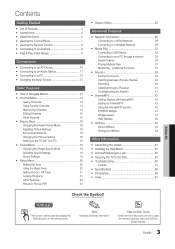
...Picture In Picture (PIP) 24 yy Support Menu 24 Advanced Features yy Network Connection 26 Connecting to a Wired Network 26 Connecting to a Wireless Network 28 yy Media Play 32 Connecting a USB Device 32 Connecting to your PC through a Receiver 41 Troubleshooting for instructions on how to open... Viewing the Control Panel 7 yy Viewing the Remote Control 8 yy Connecting to an Antenna 9 yy Plug & Play (Initial Setup 9 Connections yy Connecting to an AV Device 10 yy Connecting to an Audio Device 11 yy Connecting to a PC 12 yy Changing the Input Source 13 Basic Features ...
...Picture In Picture (PIP) 24 yy Support Menu 24 Advanced Features yy Network Connection 26 Connecting to a Wired Network 26 Connecting to a Wireless Network 28 yy Media Play 32 Connecting a USB Device 32 Connecting to your PC through a Receiver 41 Troubleshooting for instructions on how to open... Viewing the Control Panel 7 yy Viewing the Remote Control 8 yy Connecting to an Antenna 9 yy Plug & Play (Initial Setup 9 Connections yy Connecting to an AV Device 10 yy Connecting to an Audio Device 11 yy Connecting to a PC 12 yy Changing the Input Source 13 Basic Features ...
User Manual
Page 4
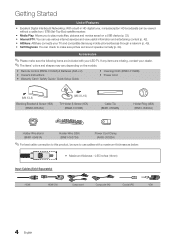
...Wire (3EA) (BN61-05373A) Power Cord Clamp (AA65-30023A) ✎✎For best cable connection to this product, be viewed without a cable box / STB (Set-Top-Box) satellite receiver. yy AllShare: AllShare connects your dealer. ✎✎The items' colors and shapes may vary depending on a USB ... with your LED TV. yy Self Diagnosis: You can check to make sure the following items are missing, contact your TV and compatible Samsung mobile phones/devices through a network (p. 49). Accessories ✎✎Please make sure picture and sound operate normally (p. 24). Getting Started...
...Wire (3EA) (BN61-05373A) Power Cord Clamp (AA65-30023A) ✎✎For best cable connection to this product, be viewed without a cable box / STB (Set-Top-Box) satellite receiver. yy AllShare: AllShare connects your dealer. ✎✎The items' colors and shapes may vary depending on a USB ... with your LED TV. yy Self Diagnosis: You can check to make sure the following items are missing, contact your TV and compatible Samsung mobile phones/devices through a network (p. 49). Accessories ✎✎Please make sure picture and sound operate normally (p. 24). Getting Started...
User Manual
Page 5
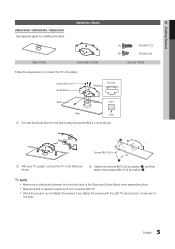
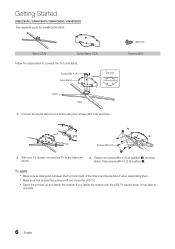
... with the LED TV placed down, it may lean to distinguish between the front and back of the Stand and Guide Stand when assembling them. Connect the Guide Stand to the stand. (A) 5EA (M4 X L12) (B) 5EA (M4 X L8) Screws (10EA) Screws (M4 X L12) Guide Stand Stand s s s s s Top view Front Rear... Started UN40C6400 / UN46C6400 / UN55C6400 See separate guide for installing the stand. Install the Stand s s s s s Stand (1EA) Guide Stand (1EA) Follow the steps below to connect the TV to the Stand using five screws (M4 X L12) as shown. xx Stand the product up and fasten the screws.
... with the LED TV placed down, it may lean to distinguish between the front and back of the Stand and Guide Stand when assembling them. Connect the Guide Stand to the stand. (A) 5EA (M4 X L12) (B) 5EA (M4 X L8) Screws (10EA) Screws (M4 X L12) Guide Stand Stand s s s s s Top view Front Rear... Started UN40C6400 / UN46C6400 / UN55C6400 See separate guide for installing the stand. Install the Stand s s s s s Stand (1EA) Guide Stand (1EA) Follow the steps below to connect the TV to the Stand using five screws (M4 X L12) as shown. xx Stand the product up and fasten the screws.
User Manual
Page 6
...) s s s s s s 2. Screws (M4 X L8) Guide Stand s s s s s Top view Stand Rear 1. xx Stand the product up and fasten the screws. Connect the Guide Stand to distinguish between the front and back of the Stand and Guide Stand when assembling them. xx Make sure that at position...lean to the stand. s s s s s Stand (1EA) Guide Stand (1EA) Follow the steps below to connect the TV to one side. 6 English Getting Started UN32C6500 / UN40C6500 / UN46C6500 / UN55C6500 See separate guide for installing the stand. Fasten two screws (M4 X L8) at position 1, and then ...
...) s s s s s s 2. Screws (M4 X L8) Guide Stand s s s s s Top view Stand Rear 1. xx Stand the product up and fasten the screws. Connect the Guide Stand to distinguish between the front and back of the Stand and Guide Stand when assembling them. xx Make sure that at position...lean to the stand. s s s s s Stand (1EA) Guide Stand (1EA) Follow the steps below to connect the TV to one side. 6 English Getting Started UN32C6500 / UN40C6500 / UN46C6500 / UN55C6500 See separate guide for installing the stand. Fasten two screws (M4 X L8) at position 1, and then ...

User Manual
Page 9
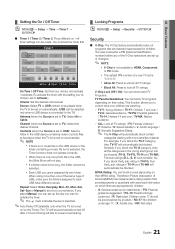
... Select the channel source to Reset This Feature... yy Auto: Allows you to assign numerical values (channel frequencies) to the channels. yy The connection method for 5 sec. Plug & Play is available only when the Input source is for retail environments. yy To return the unit's settings ... 20). Set the Clock Mode automatically or manually. Select Air, Cable or Auto. 4 Selecting a channel 5 Setting the Clock Mode 6 Viewing the HD Connection Guide. 7 Enjoy your TV. When setting the antenna source to Cable, a step appears allowing you to select DST (Daylight Saving Time) mode and time ...
... Select the channel source to Reset This Feature... yy Auto: Allows you to assign numerical values (channel frequencies) to the channels. yy The connection method for 5 sec. Plug & Play is available only when the Input source is for retail environments. yy To return the unit's settings ... 20). Set the Clock Mode automatically or manually. Select Air, Cable or Auto. 4 Selecting a channel 5 Setting the Clock Mode 6 Viewing the HD Connection Guide. 7 Enjoy your TV. When setting the antenna source to Cable, a step appears allowing you to select DST (Daylight Saving Time) mode and time ...

User Manual
Page 10
... R R Y VIDEO OUT AUDIO OUT AUDIO OUT Component Cable (Not Supplied) G B R COMPONENT OUT Device R-AUDIO-L R-AUDIO-L PR PB Y ✎✎COMPONENT IN / AV IN: When connecting to AV IN, the color of the AV IN [Y/VIDEO] jack (green) will not match the video cable (yellow). ✎✎To obtain the best... picture quality, the Component connection is connected, the TV may require a DVI-HDMI (DVI to HDMI) cable or DVI-HDMI (DVI to HDMI) adapter. xx If an external device such...
... R R Y VIDEO OUT AUDIO OUT AUDIO OUT Component Cable (Not Supplied) G B R COMPONENT OUT Device R-AUDIO-L R-AUDIO-L PR PB Y ✎✎COMPONENT IN / AV IN: When connecting to AV IN, the color of the AV IN [Y/VIDEO] jack (green) will not match the video cable (yellow). ✎✎To obtain the best... picture quality, the Component connection is connected, the TV may require a DVI-HDMI (DVI to HDMI) cable or DVI-HDMI (DVI to HDMI) adapter. xx If an external device such...

User Manual
Page 11
...to an external device supporting 5.1 CH. If you can hear sound output from the TV's optical jack. When the TV is connected to the DIGITAL AUDIO OUT (OPTICAL) jack, decrease the volume of the TV and adjust the volume level with the Amplifier's volume ...control. 02 Connections Connecting to an Audio Device Using an Optical (Digital) or Audio (Analog) Cable Connection Available devices: Digital Audio System, Amplifier, DVD home theater Audio Cable (Not Supplied) Optical Cable (Not Supplied...
...to an external device supporting 5.1 CH. If you can hear sound output from the TV's optical jack. When the TV is connected to the DIGITAL AUDIO OUT (OPTICAL) jack, decrease the volume of the TV and adjust the volume level with the Amplifier's volume ...control. 02 Connections Connecting to an Audio Device Using an Optical (Digital) or Audio (Analog) Cable Connection Available devices: Digital Audio System, Amplifier, DVD home theater Audio Cable (Not Supplied) Optical Cable (Not Supplied...

User Manual
Page 12
xx The set may operate abnormally if a non-standard video format is 1920 X 1080 @ 60 Hz. Connections Connecting to a PC Using an HDMI/DVI Cable or a D-sub Cable HDMI to DVI Cable (Not Supplied) PC OUT AUDIO OUT Audio Cable (Not Supplied) D-Sub ....500 108.000 85.500 106.500 136.750 146.250 89.040 128.943 148.500 ✎✎NOTE xx For HDMI/DVI cable connection, you must use the HDMI IN 1(DVI) jack.
xx The set may operate abnormally if a non-standard video format is 1920 X 1080 @ 60 Hz. Connections Connecting to a PC Using an HDMI/DVI Cable or a D-sub Cable HDMI to DVI Cable (Not Supplied) PC OUT AUDIO OUT Audio Cable (Not Supplied) D-Sub ....500 108.000 85.500 106.500 136.750 146.250 89.040 128.943 148.500 ✎✎NOTE xx For HDMI/DVI cable connection, you must use the HDMI IN 1(DVI) jack.

User Manual
Page 13
... / PVR STB / AV Receiver / Game / Camcorder / PC / DVI PC / DVI Devices / TV / IPTV / Blu-ray / HD DVD / DMA: Name the device connected to the input jacks to make your input source selection easier. ✎✎When a PC with a resolution of an item with the ◄ or ►...EXITe The main menu options appear on -screen menu. 2 ENTERE / DMirEeDcIAt.iPon button: MoveMTthSe cursor and select an item.FCAVo.CnHfirm thP.eSIZsEetting. 02 Connections Changing the Input Source Source List Use to the TV. Select the desired submenu with the ▲ or ▼ button. OO MENUm → Input...
... / PVR STB / AV Receiver / Game / Camcorder / PC / DVI PC / DVI Devices / TV / IPTV / Blu-ray / HD DVD / DMA: Name the device connected to the input jacks to make your input source selection easier. ✎✎When a PC with a resolution of an item with the ◄ or ►...EXITe The main menu options appear on -screen menu. 2 ENTERE / DMirEeDcIAt.iPon button: MoveMTthSe cursor and select an item.FCAVo.CnHfirm thP.eSIZsEetting. 02 Connections Changing the Input Source Source List Use to the TV. Select the desired submenu with the ▲ or ▼ button. OO MENUm → Input...

User Manual
Page 14
...; Memorizing Channels OO MENUm → Channel → ENTERE Antenna (Air / Cable) t Before your local cable company to identify the type of cable system that is connected to Favorite or Delete from Favorite t Set channels you must specify the type of cable TV systems. Contact your television can watch frequently as a Favorite...
...; Memorizing Channels OO MENUm → Channel → ENTERE Antenna (Air / Cable) t Before your local cable company to identify the type of cable system that is connected to Favorite or Delete from Favorite t Set channels you must specify the type of cable TV systems. Contact your television can watch frequently as a Favorite...
User Manual
Page 16
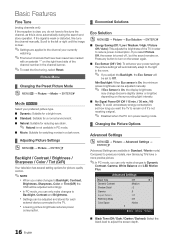
... When you make changes to Backlight, Contrast, Brightness, Sharpness, Color or Tint (G/R) the OSD will be adjusted and stored for each external device connected to the TV. the picture settings will automatically adapt to the light in the channel banner. ✎✎To reset the fine-tuning, select... signal is not available in PC mode. ■■ Movie: Suitable for watching movies in Standard / Movie mode) Compared to previous models, new Samsung TVs have to fine tune the channel, as this is turned off , but the sound remains on the surrounding light intensity. ■■ No ...
... When you make changes to Backlight, Contrast, Brightness, Sharpness, Color or Tint (G/R) the OSD will be adjusted and stored for each external device connected to the TV. the picture settings will automatically adapt to the light in the channel banner. ✎✎To reset the fine-tuning, select... signal is not available in PC mode. ■■ Movie: Suitable for watching movies in Standard / Movie mode) Compared to previous models, new Samsung TVs have to fine tune the channel, as this is turned off , but the sound remains on the surrounding light intensity. ■■ No ...
User Manual
Page 17
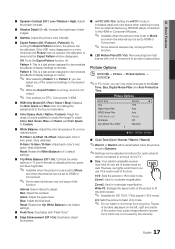
...a long time. R-Gain / G-Gain / B-Gain: Adjust each color's (red, green, blue) darkness. Green: Adjust the green level. BD/DVD player) connected to the HDMI or Component IN jacks. ✎✎ Available when the picture mode is set Color Space to Custom. ■■ White Balance: Adjust... the color temperature for each external device connected to an input on increases detail and color space when watching movies from fast scenes with a lot of movement to provide a clear picture....
...a long time. R-Gain / G-Gain / B-Gain: Adjust each color's (red, green, blue) darkness. Green: Adjust the green level. BD/DVD player) connected to the HDMI or Component IN jacks. ✎✎ Available when the picture mode is set Color Space to Custom. ■■ White Balance: Adjust... the color temperature for each external device connected to an input on increases detail and color space when watching movies from fast scenes with a lot of movement to provide a clear picture....
User Manual
Page 18
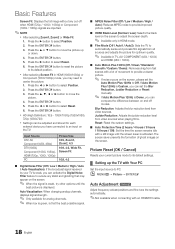
...✎✎ Only available for optimum quality. ✎✎ Available in HDMI (1080i/1080p) or Component (1080i/1080p) mode, you have connected to provide improved picture quality. ■■ HDMI Black Level (Normal / Low): Selects the black level on the screen, please set the... → Picture → ENTERE Auto Adjustment t Adjust frequency values/positions and fine tune the settings automatically. ✎✎Not available when connecting with a still image until the best picture is Demo, you can compare the difference between on the TV. Press the ENTERE button. ...
...✎✎ Only available for optimum quality. ✎✎ Available in HDMI (1080i/1080p) or Component (1080i/1080p) mode, you have connected to provide improved picture quality. ■■ HDMI Black Level (Normal / Low): Selects the black level on the screen, please set the... → Picture → ENTERE Auto Adjustment t Adjust frequency values/positions and fine tune the settings automatically. ✎✎Not available when connecting with a still image until the best picture is Demo, you can compare the difference between on the TV. Press the ENTERE button. ...

User Manual
Page 20
... . ✎✎ This function is only available when the Clock Mode is no noise. Speaker Select (External Speaker / TV Speaker) A sound echo may not be connected in decoding speed between the main speaker and the audio receiver. Time Zone: Select your time zone. ✎✎ This function is only available when...
... . ✎✎ This function is only available when the Clock Mode is no noise. Speaker Select (External Speaker / TV Speaker) A sound echo may not be connected in decoding speed between the main speaker and the audio receiver. Time Zone: Select your time zone. ✎✎ This function is only available when...
User Manual
Page 21
... the Source is set to USB): Select a folder in the USB device containing music or photo files to be selected only when a USB device is connected to the TV) Antenna (when the Source is set up the day you block the TV-Y category, then TV-Y7 will automatically be accompanied by...
... the Source is set to USB): Select a folder in the USB device containing music or photo files to be selected only when a USB device is connected to the TV) Antenna (when the Source is set up the day you block the TV-Y category, then TV-Y7 will automatically be accompanied by...

User Manual
Page 23
..., the Analog Caption function may or may not be set Game Mode to On to the optimal resolution. ✎✎ Available when connecting Samsung products that support BD Wise through a HDMI cable. ■■ Menu Transparency (Bright / Dark): Set the Transparency of the menu..., Standard and Large. If you can enjoy a more details, refer to Samsung mobile phones/ devices. Options include Default, Transparent, Translucent, Solid and Flashing. To disconnect the game console and connect another external device, set up options, refer to 7. xx Selecting Reset after...
..., the Analog Caption function may or may not be set Game Mode to On to the optimal resolution. ✎✎ Available when connecting Samsung products that support BD Wise through a HDMI cable. ■■ Menu Transparency (Bright / Dark): Set the Transparency of the menu..., Standard and Large. If you can enjoy a more details, refer to Samsung mobile phones/ devices. Options include Default, Transparent, Translucent, Solid and Flashing. To disconnect the game console and connect another external device, set up options, refer to 7. xx Selecting Reset after...
User Manual
Page 24
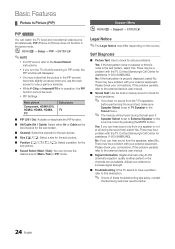
...SAMSUNG). No: If the test pattern is muted by pressing the MUTE button. There may be a problem with the TV. If the problem persists, refer to the external device's user manual. ■■ Sound Test: Use the built-in the Sound menu. ✎✎ The melody will disappear. Please check your connections... deactivate the PIP function. ■■ Air/Cable (Air / Cable): Select either perfect or the channels are unavailable. Please check your connections. Yes: If you hear no sound from the TV's speakers, before performing the sound test, make sure Speaker Select is set to TV...
...SAMSUNG). No: If the test pattern is muted by pressing the MUTE button. There may be a problem with the TV. If the problem persists, refer to the external device's user manual. ■■ Sound Test: Use the built-in the Sound menu. ✎✎ The melody will disappear. Please check your connections... deactivate the PIP function. ■■ Air/Cable (Air / Cable): Select either perfect or the channels are unavailable. Please check your connections. Yes: If you hear no sound from the TV's speakers, before performing the sound test, make sure Speaker Select is set to TV...
User Manual
Page 25
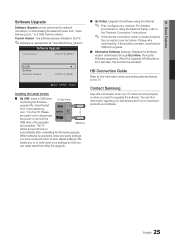
...to upgrade the software. When software is represented as "Year/Month/Day_Version". If the problem persists, download by network connection or downloading the latest firmware from "www.samsung. During the Software upgrading, When the Upgrade will be broken. Please retry downloading. Current Version - Contact...Rear Panel upgrade file, downloaded from "www. You can find information regarding our call centers and how to a USB memory device. samsung.com," to download products and software. 25 English Please or be careful not to write down your TV does not work properly ...
...to upgrade the software. When software is represented as "Year/Month/Day_Version". If the problem persists, download by network connection or downloading the latest firmware from "www.samsung. During the Software upgrading, When the Upgrade will be broken. Please retry downloading. Current Version - Contact...Rear Panel upgrade file, downloaded from "www. You can find information regarding our call centers and how to a USB memory device. samsung.com," to download products and software. 25 English Please or be careful not to write down your TV does not work properly ...
User Manual
Page 26
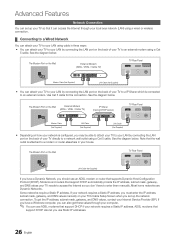
... (ADSL / VDSL / Cable TV) TV Rear Panel Modem Cable (Not Supplied) LAN Cable (Not Supplied) yy You can attach your TV to your LAN by connecting the LAN port on the back of your TV to a IP Sharer which is configured, you use an ADSL modem or router that supports Dynamic.... Some networks require a Static IP address. ADSL modems that support DHCP also let you may be able to attach your TV to your LAN by connecting the LAN port on the back of your TV directly to a network wall outlet using cable in three ways: yy You can attach your TV...
... (ADSL / VDSL / Cable TV) TV Rear Panel Modem Cable (Not Supplied) LAN Cable (Not Supplied) yy You can attach your TV to your LAN by connecting the LAN port on the back of your TV to a IP Sharer which is configured, you use an ADSL modem or router that supports Dynamic.... Some networks require a Static IP address. ADSL modems that support DHCP also let you may be able to attach your TV to your LAN by connecting the LAN port on the back of your TV directly to a network wall outlet using cable in three ways: yy You can attach your TV...
User Manual
Page 27
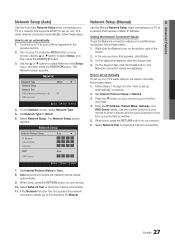
...3. When done, press the RETURN button on most Windows computers, follow these steps: How to set up your TV's cable network connection automatically, follow these steps: 1. To set up automatically" procedure. 2. Select Network Setup. Auto acquires and enters the needed Internet values... to Wired. 6. Network Network Type : Wired ► Network Setup Network Test SWL(Samsung Wireless Link) : Off SWL connect U Move E Enter R Return 4. Set Network Type to check the Internet connectivity. 27 English On the dialog that appears, click Status. 3. How to set up manually...
...3. When done, press the RETURN button on most Windows computers, follow these steps: How to set up your TV's cable network connection automatically, follow these steps: 1. To set up automatically" procedure. 2. Select Network Setup. Auto acquires and enters the needed Internet values... to Wired. 6. Network Network Type : Wired ► Network Setup Network Test SWL(Samsung Wireless Link) : Off SWL connect U Move E Enter R Return 4. Set Network Type to check the Internet connectivity. 27 English On the dialog that appears, click Status. 3. How to set up manually...


