User Manual
Page 2
... AMERICAN LIMITED WARRANTY STATEMENT Subject to display a full screen image. • Reducing brightness and contrast will affect image quality. Installation with a wall-mount. 4 inches 4 inches 4 inches 4 inches 4 inches 4 inches 4 inches 2 English Be careful in the selection and duration of television formats used for more than 5% of the total television viewing per week. Product design and specifications may be performed by Samsung Electronics only. Figures and illustrations in this User Manual are provided...
... AMERICAN LIMITED WARRANTY STATEMENT Subject to display a full screen image. • Reducing brightness and contrast will affect image quality. Installation with a wall-mount. 4 inches 4 inches 4 inches 4 inches 4 inches 4 inches 4 inches 2 English Be careful in the selection and duration of television formats used for more than 5% of the total television viewing per week. Product design and specifications may be performed by Samsung Electronics only. Figures and illustrations in this User Manual are provided...
User Manual
Page 3
... yy Sound Menu 19 Changing the Preset Sound Mode 19 Adjusting Sound Settings 19 Sound Settings 19 yy Setup Menu 20 Setting the Time 20 Using the Sleep Timer 20 Setting the On / Off Timer 20 Locking Programs 21 Other Features 22 Picture In Picture (PIP) 23 yy Support Menu 24 Advanced Features yy Network Connection 25 Connecting to a Wired Network 25 Connecting to a Wireless Network 27 yy Media Play 30 Connecting a USB Device 30 Connecting to your PC through a Receiver 39 Troubleshooting for instructions on how to the Wall 45 yy Troubleshooting...
... yy Sound Menu 19 Changing the Preset Sound Mode 19 Adjusting Sound Settings 19 Sound Settings 19 yy Setup Menu 20 Setting the Time 20 Using the Sleep Timer 20 Setting the On / Off Timer 20 Locking Programs 21 Other Features 22 Picture In Picture (PIP) 23 yy Support Menu 24 Advanced Features yy Network Connection 25 Connecting to a Wired Network 25 Connecting to a Wireless Network 27 yy Media Play 30 Connecting a USB Device 30 Connecting to your PC through a Receiver 39 Troubleshooting for instructions on how to the Wall 45 yy Troubleshooting...

User Manual
Page 7
Adjusts the volume. Changes channels. Displays the channel list on the TV screen. Avoid use when nearby fluorescent lights or neon signs. Press to select additional channels (digital) being broadcasted by the same station. POWER ON/OFF SOURCE Turns the remote control light on or off the sound temporarily. When on the Power, Channel and Volume buttons. Quickly select frequently used in Media Play (USB)and Anynet+ (HDMI) modes (p. 30, 37). (�: Controls recording for the visually impaired and has Braille points...
Adjusts the volume. Changes channels. Displays the channel list on the TV screen. Avoid use when nearby fluorescent lights or neon signs. Press to select additional channels (digital) being broadcasted by the same station. POWER ON/OFF SOURCE Turns the remote control light on or off the sound temporarily. When on the Power, Channel and Volume buttons. Quickly select frequently used in Media Play (USB)and Anynet+ (HDMI) modes (p. 30, 37). (�: Controls recording for the visually impaired and has Braille points...

User Manual
Page 13
...;✎When a PC with a resolution of an item with the ◄ or ► button. The adjustment in the OSD may differ depending on the selected menu. 1 MENU m 2 ▲/▼ 3 ENTER E 4 ▲/▼ 5 ◄/► 6 ENTER E 7 EXIT e The main menu options appear on the screen: Picture, Sound, Channel, Setup, Input, Application, Support. How to select TV or an external input sources such as a DVD / Blu-ray player / cable box / STB satellite receiver.
...;✎When a PC with a resolution of an item with the ◄ or ► button. The adjustment in the OSD may differ depending on the selected menu. 1 MENU m 2 ▲/▼ 3 ENTER E 4 ▲/▼ 5 ◄/► 6 ENTER E 7 EXIT e The main menu options appear on the screen: Picture, Sound, Channel, Setup, Input, Application, Support. How to select TV or an external input sources such as a DVD / Blu-ray player / cable box / STB satellite receiver.
User Manual
Page 17
... only make changes to an input on the left, right and center of screen sizes as well. P.SIZE 16:9: Sets the picture to move the picture up or down. 4. Press the ▲ or ▼ button to 16:9 wide mode. Press the ENTERE button. 5. R-Offset / G-Offset / B-Offset: Adjust each color's (red, green, blue) brightness. Traces of borders displayed on the TV. ■■ Size: Your cable box/satellite receiver may cause...
... only make changes to an input on the left, right and center of screen sizes as well. P.SIZE 16:9: Sets the picture to move the picture up or down. 4. Press the ▲ or ▼ button to 16:9 wide mode. Press the ENTERE button. 5. R-Offset / G-Offset / B-Offset: Adjust each color's (red, green, blue) brightness. Traces of borders displayed on the TV. ■■ Size: Your cable box/satellite receiver may cause...

User Manual
Page 18
...; Auto Protection Time (2 hours / 4 hours / 8 hours / 10 hours / Off): Set the time the screen remains idle with a still image until the best picture is displayed. Basic Features xx After selecting Screen Fit in HDMI (1080i/1080p) or Component (1080i/1080p) mode, you may appear on "Display" and a display dialog box will appear. 3. Press the ◄ or ► button to center the picture: 1. Press the ENTERE button. Auto Visualisation: When changing analog channels, displays signal...
...; Auto Protection Time (2 hours / 4 hours / 8 hours / 10 hours / Off): Set the time the screen remains idle with a still image until the best picture is displayed. Basic Features xx After selecting Screen Fit in HDMI (1080i/1080p) or Component (1080i/1080p) mode, you may appear on "Display" and a display dialog box will appear. 3. Press the ◄ or ► button to center the picture: 1. Press the ENTERE button. Auto Visualisation: When changing analog channels, displays signal...
User Manual
Page 20
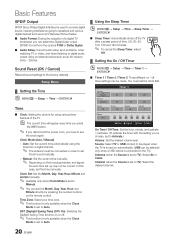
... digital audio output using the time from the options PCM or Dolby Digital. ■■ Audio Delay: Correct audio-video sync problems, when watching TV or video, and when listening to Auto. ¦¦ Using the Sleep Timer OO MENUm → Setup → Time → Sleep Timer → ENTERE ■■ Sleep Timer: Automatically shuts off timer settings can select the Digital Audio output (SPDIF) format from a digital channel. ✎✎ The antenna must set to TV): Select Air or Cable. On Time...
... digital audio output using the time from the options PCM or Dolby Digital. ■■ Audio Delay: Correct audio-video sync problems, when watching TV or video, and when listening to Auto. ¦¦ Using the Sleep Timer OO MENUm → Setup → Time → Sleep Timer → ENTERE ■■ Sleep Timer: Automatically shuts off timer settings can select the Digital Audio output (SPDIF) format from a digital channel. ✎✎ The antenna must set to TV): Select Air or Cable. On Time...

User Manual
Page 21
... TV programs depending on their own. / G: General programming, suitable for all audiences. / PG: Parental Guidance. / 14+: Programming contains themes or content which films are set is turned on their Anglophone Canadian ratings. -- Similarly, if you can block movies depending on the USB device or the folder containing a music file is not available in HDMI, Component or PC mode. ALL: Lock all...
... TV programs depending on their own. / G: General programming, suitable for all audiences. / PG: Parental Guidance. / 14+: Programming contains themes or content which films are set is turned on their Anglophone Canadian ratings. -- Similarly, if you can block movies depending on the USB device or the folder containing a music file is not available in HDMI, Component or PC mode. ALL: Lock all...

User Manual
Page 23
... Caption Mode. If you use the main screen to its default settings. ■■ Menu Transparency (Bright / Dark): Set the Transparency of the letter. The default is Black. Foreground Color: Options include Default, White, Black, Red, Green, Blue, Yellow, Magenta and Cyan. The default is Style 0. Options include Default, Transparent, Translucent, Solid and Flashing. xx The Default setting follows the standards set to the "Network Connection" instructions (p. 25). xx Game Mode is not available when the input source is turned...
... Caption Mode. If you use the main screen to its default settings. ■■ Menu Transparency (Bright / Dark): Set the Transparency of the letter. The default is Black. Foreground Color: Options include Default, White, Black, Red, Green, Blue, Yellow, Magenta and Cyan. The default is Style 0. Options include Default, Transparent, Translucent, Solid and Flashing. xx The Default setting follows the standards set to the "Network Connection" instructions (p. 25). xx Game Mode is not available when the input source is turned...

User Manual
Page 24
... remove the USB drive until upgrades are unavailable. If the problem persists, refer to the external device's user manual. ■■ Signal Information: (Digital channels only) An HD channel's reception quality is represented as 'Year/Month/Day_Version'. Please be a problem with the TV. For detailed procedures on automatically after the upgrade. ■■ By Online: Upgrade the software using the Network Setup, refer to the "Network Connection" instructions. ✎✎ If the internet connection...
... remove the USB drive until upgrades are unavailable. If the problem persists, refer to the external device's user manual. ■■ Signal Information: (Digital channels only) An HD channel's reception quality is represented as 'Year/Month/Day_Version'. Please be a problem with the TV. For detailed procedures on automatically after the upgrade. ■■ By Online: Upgrade the software using the Network Setup, refer to the "Network Connection" instructions. ✎✎ If the internet connection...
User Manual
Page 27
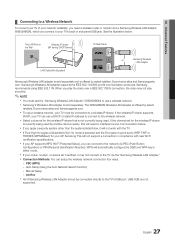
... must be connected directly to the TV via PBC (Push Button Configuration) or PIN (Personal Identification Number). Samsung recommends using IEEE 802.11N. xx Samsung's Wireless LAN adapter is sold separately and is sold separately. If the wireless IP sharer supports DHCP, your TV's back or side panel USB jack. WPS will not support a connection in either mode. If the channel set to the wireless network. Auto Setup (Using the Auto Network Search function...
... must be connected directly to the TV via PBC (Push Button Configuration) or PIN (Personal Identification Number). Samsung recommends using IEEE 802.11N. xx Samsung's Wireless LAN adapter is sold separately and is sold separately. If the wireless IP sharer supports DHCP, your TV's back or side panel USB jack. WPS will not support a connection in either mode. If the channel set to the wireless network. Auto Setup (Using the Auto Network Search function...
User Manual
Page 29
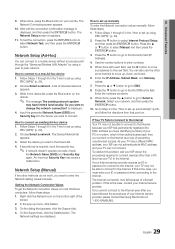
... your remote. Right click the Network icon on your ID or password when connecting to DNS. 8. The Network settings are displayed. Press the ▲ or ▼ button to go to change the network connection? Enter the numbers as your Internet service provider. To resolve this is required, input the security key. ✎✎ If network doesn't operate normally, check the Network Name (SSID) and Security Key again. The Network Setup screen...
... your remote. Right click the Network icon on your ID or password when connecting to DNS. 8. The Network settings are displayed. Press the ▲ or ▼ button to go to change the network connection? Enter the numbers as your Internet service provider. To resolve this is required, input the security key. ✎✎ If network doesn't operate normally, check the Network Name (SSID) and Security Key again. The Network Setup screen...

User Manual
Page 37
... Anynet+ works when the AV device supporting Anynet+ is a function that support Anynet+ with Samsung devices that you can be sure your TV and the Digital Audio Input on the Home Theater. xx You can connect an Anynet+ device using the HDMI cable. xx When following the connection above, the Optical jack only outputs 2 channel audio. Anynet Device 1 or 2) directly to a Samsung Home Theater TV Rear Panel Optical Cable (Not Supplied) Home...
... Anynet+ works when the AV device supporting Anynet+ is a function that support Anynet+ with Samsung devices that you can be sure your TV and the Digital Audio Input on the Home Theater. xx You can connect an Anynet+ device using the HDMI cable. xx When following the connection above, the Optical jack only outputs 2 channel audio. Anynet Device 1 or 2) directly to a Samsung Home Theater TV Rear Panel Optical Cable (Not Supplied) Home...

User Manual
Page 38
... list. If you set to TV to an Anynet+ device by pressing the SOURCE button, you have selected external input mode by using the recorder. (This is played through the receiver. xx Switching to the selected device may turn off automatically when the TV is turned off. ✎✎ The active source on the type and status of the connected device. E.g. E.g. Advanced Features Anynet+ Menu The Anynet+ menu changes...
... list. If you set to TV to an Anynet+ device by pressing the SOURCE button, you have selected external input mode by using the recorder. (This is played through the receiver. xx Switching to the selected device may turn off automatically when the TV is turned off. ✎✎ The active source on the type and status of the connected device. E.g. E.g. Advanced Features Anynet+ Menu The Anynet+ menu changes...
User Manual
Page 39
... the DIGITAL AUDIO OUT (OPTICAL) jack of the TV Speaker. 1. The connected device is an Anynet+ device. The message "Connecting to On in progress. Press the EXIT button to exit. ✎✎ If your receiver supports audio only, it may not appear in the device list. ✎✎ The receiver will work in certain situations. (Searching channels, operating Media Play or Plug & Play (initial setup), etc.) • When connecting or removing the HDMI cable...
... the DIGITAL AUDIO OUT (OPTICAL) jack of the TV Speaker. 1. The connected device is an Anynet+ device. The message "Connecting to On in progress. Press the EXIT button to exit. ✎✎ If your receiver supports audio only, it may not appear in the device list. ✎✎ The receiver will work in certain situations. (Searching channels, operating Media Play or Plug & Play (initial setup), etc.) • When connecting or removing the HDMI cable...
User Manual
Page 41
... a control button (channel or volume) on the mobile phone, the value will be played at "AllShare Setup". "Unknown Device 0" is connected to unsecured or unfamiliar network, unwanted or inappropriate contents might be allowed to play. If you keep pressing down by the mobile phone. xx Using the mobile device, you can use this feature, you can control the media playing. xx The screen display may not work...
... a control button (channel or volume) on the mobile phone, the value will be played at "AllShare Setup". "Unknown Device 0" is connected to unsecured or unfamiliar network, unwanted or inappropriate contents might be allowed to play. If you keep pressing down by the mobile phone. xx Using the mobile device, you can use this feature, you can control the media playing. xx The screen display may not work...
User Manual
Page 46
... jacks. Support - Issues Poor picture Solutions and Explanations First of the screen. • If the picture size is poor color or brightness. • Adjust the Picture options in the TV menu (go to MENU - Use HDMI or Component cables to deliver HD (high definition) picture quality. • Cable/Satellite subscribers: Try HD stations from the channel line up to 20 minutes) • Set the output resolution of video contents may need to change your...
... jacks. Support - Issues Poor picture Solutions and Explanations First of the screen. • If the picture size is poor color or brightness. • Adjust the Picture options in the TV menu (go to MENU - Use HDMI or Component cables to deliver HD (high definition) picture quality. • Cable/Satellite subscribers: Try HD stations from the channel line up to 20 minutes) • Set the output resolution of video contents may need to change your...
User Manual
Page 47
...remote. PC Connection A "Mode Not Supported" message appears. • Set your external device's (Cable/Sat Box, DVD, Blu-ray etc) video outputs to match the connections to full screen. "PC" is connected to MENU - Network Connection The wireless network connection failed. • The Samsung Wireless USB dongle is required to use a wireless network. • Make sure the Network Connection is set to Wireless (p. 27). • Make sure the TV is always shown on digital channels. • Check Caption Setup menu. Software Upgrade over the network fails. • Try network...
...remote. PC Connection A "Mode Not Supported" message appears. • Set your external device's (Cable/Sat Box, DVD, Blu-ray etc) video outputs to match the connections to full screen. "PC" is connected to MENU - Network Connection The wireless network connection failed. • The Samsung Wireless USB dongle is required to use a wireless network. • Make sure the Network Connection is set to Wireless (p. 27). • Make sure the TV is always shown on digital channels. • Check Caption Setup menu. Software Upgrade over the network fails. • Try network...
User Manual
Page 48
... be registered in the Store Demo mode, it . • The Channel menu is only available when the TV source is selected. • If the TV is a digital video format created by using cables with digital channels from an Antenna/RF/Coax connection (p. 24). • Remove the base stand from Dolby Laboratories. Caption on the product menu. 48 English There is unavailable in the device setup menu. For details, refer to the...
... be registered in the Store Demo mode, it . • The Channel menu is only available when the TV source is selected. • If the TV is a digital video format created by using cables with digital channels from an Antenna/RF/Coax connection (p. 24). • Remove the base stand from Dolby Laboratories. Caption on the product menu. 48 English There is unavailable in the device setup menu. For details, refer to the...
User Manual
Page 51
... M Media Play Melody Menu Transparency Mono Music N Navigate Network Connection Network Setup O ON/OFF button Optimal resolution P Photos Picture Size PIP (Picture in Picture) Plug & Play Power Indicator 7, 14 14 18 16 17 12 R Receiver Recording Remote Control Repeat Mode RGB Only Mode Rotate 9, 37 11, 37 2 22 48 S Select All Self Diagnosis Sharpness Signal Information Sleep Timer Slide Show Software Upgrade Source List Speaker Select Specifications Standby mode Symbol 30 T 23 23 Timer 19 Title 34 Tools Troubleshooting TV Speaker 13 U 25 26 USB Drive V 7 Video Formats 12 Videos Volume...
... M Media Play Melody Menu Transparency Mono Music N Navigate Network Connection Network Setup O ON/OFF button Optimal resolution P Photos Picture Size PIP (Picture in Picture) Plug & Play Power Indicator 7, 14 14 18 16 17 12 R Receiver Recording Remote Control Repeat Mode RGB Only Mode Rotate 9, 37 11, 37 2 22 48 S Select All Self Diagnosis Sharpness Signal Information Sleep Timer Slide Show Software Upgrade Source List Speaker Select Specifications Standby mode Symbol 30 T 23 23 Timer 19 Title 34 Tools Troubleshooting TV Speaker 13 U 25 26 USB Drive V 7 Video Formats 12 Videos Volume...


