
User Manual (user Manual) (ver.1.0) (English)
Page 7
... Your VCR or DVD 40 Setting Up Your Remote Control to Operate Your Cable Box . . . 42 Fine Tuning Channels 43 Changing the Screen Size 44 Digital Noise Reduction 45 Tilt 46 Using the Surf Feature 47 Setting the On/Off Timer 48 Setting the Sleep Timer 49 Sound Features 50 Choosing...
... Your VCR or DVD 40 Setting Up Your Remote Control to Operate Your Cable Box . . . 42 Fine Tuning Channels 43 Changing the Screen Size 44 Digital Noise Reduction 45 Tilt 46 Using the Surf Feature 47 Setting the On/Off Timer 48 Setting the Sleep Timer 49 Sound Features 50 Choosing...
User Manual (user Manual) (ver.1.0) (English)
Page 28
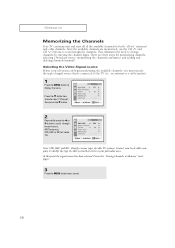
... must specify the type of signal source that exists in Memory" (next page). 3 Press the MENU button twice to change channels by entering the channel digits. Press the M button two times to select "Channel", then press the √ button. 2 Repeatedly press the œ or √ button to display the menu...
... must specify the type of signal source that exists in Memory" (next page). 3 Press the MENU button twice to change channels by entering the channel digits. Press the M button two times to select "Channel", then press the √ button. 2 Repeatedly press the œ or √ button to display the menu...
User Manual (user Manual) (ver.1.0) (English)
Page 31
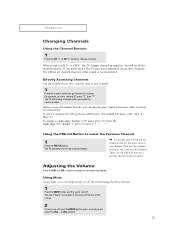
... channel viewed. To select a channel over 100, press the +100 button. (For channel 122, press "+100", then "2", then "2".) To change to single-digit channels (0-9) faster, press "0" before the single digit. (For channel "4", press "0", then "4".) Using the PRE-CH Button to increase or decrease the volume. You will see all the channels that...
... channel viewed. To select a channel over 100, press the +100 button. (For channel 122, press "+100", then "2", then "2".) To change to single-digit channels (0-9) faster, press "0" before the single digit. (For channel "4", press "0", then "4".) Using the PRE-CH Button to increase or decrease the volume. You will see all the channels that...
User Manual (user Manual) (ver.1.0) (English)
Page 32
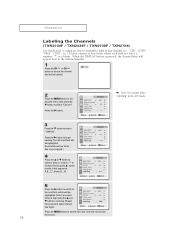
Press the √ button to select the last two digits. The left-most field will be highlighted. Repeat the process to begin labeling. M Note: You cannot select "Labeling" in this feature to assign an ...3 Press the M button to select "Channel". When the DISPLAY button is a letter, a number, "*" or a blank. Select a second letter or digit using the L and M buttons, as above. OPERATION Labeling the Channels (TXN2734F / TXN2434F / TXN2730F / TXN2726) Use this sequence: A,B,...Z,*, blank,0,1,...9). 5 Press the √ button to switch to the next field, which will be highlighted...
Press the √ button to select the last two digits. The left-most field will be highlighted. Repeat the process to begin labeling. M Note: You cannot select "Labeling" in this feature to assign an ...3 Press the M button to select "Channel". When the DISPLAY button is a letter, a number, "*" or a blank. Select a second letter or digit using the L and M buttons, as above. OPERATION Labeling the Channels (TXN2734F / TXN2434F / TXN2730F / TXN2726) Use this sequence: A,B,...Z,*, blank,0,1,...9). 5 Press the √ button to switch to the next field, which will be highlighted...

User Manual (user Manual) (ver.1.0) (English)
Page 33
After the hour is entered, press the √ button. (at this point the minutes digits will appear on -screen menu. You can change the hours by pressing L or M repeatedly (or by holding down either of day (AM or PM). Press ... these buttons). Press the M button three times to display the on the screen, and "Clock" will be selected. 3 Press the √ button again (the hours digits will appear every time you press INFO. 33 OPERATION Setting the Clock 1 Press the MENU button to select "Function".
After the hour is entered, press the √ button. (at this point the minutes digits will appear on -screen menu. You can change the hours by pressing L or M repeatedly (or by holding down either of day (AM or PM). Press ... these buttons). Press the M button three times to display the on the screen, and "Clock" will be selected. 3 Press the √ button again (the hours digits will appear every time you press INFO. 33 OPERATION Setting the Clock 1 Press the MENU button to select "Function".
User Manual (user Manual) (ver.1.0) (English)
Page 40
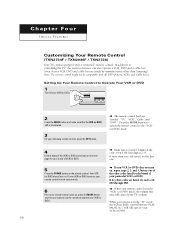
...DVD) mode, the volume buttons still control your brand of the code, even if the first digit is in the "TV" mode, the VCR(or DVD) control buttons (PLAY, PAUSE, etc.) will still operate your Samsung remote control, press the SET button. Note: The remote control might not be compatible with a ...one of the VCR (or DVD) code listed on . M Make sure you want to use the remote to the "VCR" (or DVD) mode. 4 Enter 3 digits of the other codes listed for your TV's volume. Chapter Four SPECIAL FEATURES Customizing Your Remote Control (TXN2734F / TXN2036F / TXN2726) Your TV comes equipped with...
...DVD) mode, the volume buttons still control your brand of the code, even if the first digit is in the "TV" mode, the VCR(or DVD) control buttons (PLAY, PAUSE, etc.) will still operate your Samsung remote control, press the SET button. Note: The remote control might not be compatible with a ...one of the VCR (or DVD) code listed on . M Make sure you want to use the remote to the "VCR" (or DVD) mode. 4 Enter 3 digits of the other codes listed for your TV's volume. Chapter Four SPECIAL FEATURES Customizing Your Remote Control (TXN2734F / TXN2036F / TXN2726) Your TV comes equipped with...
User Manual (user Manual) (ver.1.0) (English)
Page 42
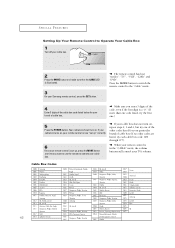
... turns on, your remote control is now "set up" correctly. 6 Once your remote control is set up, press the MODE button any time you enter 3 digits of cable box (If no other codes listed for your TV's volume. M M If your cable box does not turn on , repeat steps 2, 3 and 4, but ... turn on . M The remote control has four "modes": "TV", "VCR", "Cable" and "DVD". Press the MODE button to switch the remote control to operate your Samsung remote control, press the SET button. Cable Box Codes 42 When your remote control is a "0." (If more than one code listed, try each cable box...
... turns on, your remote control is now "set up" correctly. 6 Once your remote control is set up, press the MODE button any time you enter 3 digits of cable box (If no other codes listed for your TV's volume. M M If your cable box does not turn on , repeat steps 2, 3 and 4, but ... turn on . M The remote control has four "modes": "TV", "VCR", "Cable" and "DVD". Press the MODE button to switch the remote control to operate your Samsung remote control, press the SET button. Cable Box Codes 42 When your remote control is a "0." (If more than one code listed, try each cable box...

User Manual (user Manual) (ver.1.0) (English)
Page 45
Press the √ button to select the "Picture" menu. 2 Press the M button to select "Digital NR". 3 Press the œ or √ button to exit. Press the MENU button to select Digital NR "On". M Pressing the œ or √ button will alternate between "On" and "Off". 45 SPECIAL FEATURES Digital Noise Reduction If the broadcast signal received by your TV is weak, you can activate the Digital Noise Reduction feature to help reduce any static and ghosting that may appear on the screen. 1 Press the MENU button to display the menu.
Press the √ button to select the "Picture" menu. 2 Press the M button to select "Digital NR". 3 Press the œ or √ button to exit. Press the MENU button to select Digital NR "On". M Pressing the œ or √ button will alternate between "On" and "Off". 45 SPECIAL FEATURES Digital Noise Reduction If the broadcast signal received by your TV is weak, you can activate the Digital Noise Reduction feature to help reduce any static and ghosting that may appear on the screen. 1 Press the MENU button to display the menu.

User Manual (user Manual) (ver.1.0) (English)
Page 48
... the MENU button to select "Function" menu, then press the √ button. Press the √ button to select the "On time" hours. (The hours digits will be highlighted.) Press the L or M button repeatedly to select the appropriate hours (i.e., the hour when the TV will turn on.) 4 Press √ to... select the "On time" minutes. (The minutes digits will be highlighted.) Press L or M to select the appropriate minutes. 48 M When you must set the hours, make sure the correct time of the ...
... the MENU button to select "Function" menu, then press the √ button. Press the √ button to select the "On time" hours. (The hours digits will be highlighted.) Press the L or M button repeatedly to select the appropriate hours (i.e., the hour when the TV will turn on.) 4 Press √ to... select the "On time" minutes. (The minutes digits will be highlighted.) Press L or M to select the appropriate minutes. 48 M When you must set the hours, make sure the correct time of the ...

User Manual (user Manual) (ver.1.0) (English)
Page 53
...ID Number (PIN) 1 Press the MENU button to select the "Function" menu. As soon as the 4 digits are entered, the "Confirm new pin" screen appears. The user must first enter a PIN (personal ID number) before any...memorized. Press the √ button. 2 Press the M button three times to exit. 53 Re-enter the same 4 digits. Press the MENU button three times to select the "Vchip" menu. SPECIAL FEATURES Using the V-Chip The V-Chip feature ...While the "Change pin" field is "0-0-0-0." 3 After entering a valid PIN number, the "V-chip" screen will appear. Enter your 4-digit PIN number.
...ID Number (PIN) 1 Press the MENU button to select the "Function" menu. As soon as the 4 digits are entered, the "Confirm new pin" screen appears. The user must first enter a PIN (personal ID number) before any...memorized. Press the √ button. 2 Press the M button three times to exit. 53 Re-enter the same 4 digits. Press the MENU button three times to select the "Vchip" menu. SPECIAL FEATURES Using the V-Chip The V-Chip feature ...While the "Change pin" field is "0-0-0-0." 3 After entering a valid PIN number, the "V-chip" screen will appear. Enter your 4-digit PIN number.

