

User Manual (user Manual) (ver.1.0) (English)
Page 6
...List of Features 1.1 Familiarizing Yourself with The TV 1.2 Front Panel Buttons 1.2 Front Panel Jacks 1.2 Rear Panel Jacks 1.3 Remote Control (Type 1 1.4 Remote Control (Type 2 1.5 Chapter 2: Installation 2.1 Connecting VHF and UHF Antennas 2.1 Antennas with 300-ohm Flat Twin Leads 2.1...All Channels 2.3 Connecting to a Cable Box that Descrambles some Channels 2.3 Connecting a VCR 2.5 Connecting a Camcorder 2.7 Installing Batteries in the Remote Control 2.8 Chapter 3: Operation 3.1 Turning the TV On and Off 3.1 Viewing the Menus and On-Screen Displays 3.1 Viewing the Menus 3.1 ...
...List of Features 1.1 Familiarizing Yourself with The TV 1.2 Front Panel Buttons 1.2 Front Panel Jacks 1.2 Rear Panel Jacks 1.3 Remote Control (Type 1 1.4 Remote Control (Type 2 1.5 Chapter 2: Installation 2.1 Connecting VHF and UHF Antennas 2.1 Antennas with 300-ohm Flat Twin Leads 2.1...All Channels 2.3 Connecting to a Cable Box that Descrambles some Channels 2.3 Connecting a VCR 2.5 Connecting a Camcorder 2.7 Installing Batteries in the Remote Control 2.8 Chapter 3: Operation 3.1 Turning the TV On and Off 3.1 Viewing the Menus and On-Screen Displays 3.1 Viewing the Menus 3.1 ...

User Manual (user Manual) (ver.1.0) (English)
Page 7
CONTENTS Chapter 4: Special Features 4.1 Customizing Your Remote Control 4.1 Setting Up Your Remote Control to Operate Your VCR. . . . 4.1 Setting Up Your Remote Control to Operate Your Cable Box 4.3 Fine Tuning Channels 4.4 Changing the Screen Size 4.5 Using the Surf Feature 4.6 Setting the On/Off Timer 4.7 Setting the Sleep Timer 4.8 ...
CONTENTS Chapter 4: Special Features 4.1 Customizing Your Remote Control 4.1 Setting Up Your Remote Control to Operate Your VCR. . . . 4.1 Setting Up Your Remote Control to Operate Your Cable Box 4.3 Fine Tuning Channels 4.4 Changing the Screen Size 4.5 Using the Surf Feature 4.6 Setting the On/Off Timer 4.7 Setting the Sleep Timer 4.8 ...

User Manual (user Manual) (ver.1.0) (English)
Page 8
This TV is a high-performance unit that includes the following special features: • Easy-to-use remote control • Easy-to-use on-screen menu system • Automatic timer to turn the TV on and off • Adjustable picture setting that can be ... in the TV's memory • Automatic channel tuning for up to 181 channels • A special filter to reduce or eliminate reception problems • Fine tuning control for the sharpest picture possible • Tri-lingual on-screen displays (English, Spanish, and French) • A special sleep timer 1.1 CHAPTER ONE: YOUR NEW TV Chapter...
This TV is a high-performance unit that includes the following special features: • Easy-to-use remote control • Easy-to-use on-screen menu system • Automatic timer to turn the TV on and off • Adjustable picture setting that can be ... in the TV's memory • Automatic channel tuning for up to 181 channels • A special filter to reduce or eliminate reception problems • Fine tuning control for the sharpest picture possible • Tri-lingual on-screen displays (English, Spanish, and French) • A special sleep timer 1.1 CHAPTER ONE: YOUR NEW TV Chapter...

User Manual (user Manual) (ver.1.0) (English)
Page 9
Front Panel Jacks You can use the remote control. Œ MENU Press to see pages 2.1 - 2.7.) Œ EARPHONE jack Connect a set of your TV's basic features, including the on-screen menu. To use the more ... CH v Press to change channels. YOUR NEW TV Familiarizing Yourself with The TV Front Panel Buttons The buttons on the front panel control your TV's features. ¨ Remote Control Sensor Aim the remote control towards this jacks to connect a camcorder or a video game. 1.2 CHAPTER ONE: YOUR NEW TV Also used only occasionally, such as a camcorder...
Front Panel Jacks You can use the remote control. Œ MENU Press to see pages 2.1 - 2.7.) Œ EARPHONE jack Connect a set of your TV's basic features, including the on-screen menu. To use the more ... CH v Press to change channels. YOUR NEW TV Familiarizing Yourself with The TV Front Panel Buttons The buttons on the front panel control your TV's features. ¨ Remote Control Sensor Aim the remote control towards this jacks to connect a camcorder or a video game. 1.2 CHAPTER ONE: YOUR NEW TV Also used only occasionally, such as a camcorder...

User Manual (user Manual) (ver.1.0) (English)
Page 11
.... ´ TV/VIDEO Press to watch TV picture and a picture from the TV. Also use the remote control up to a distance of time that you set . press VOL + to lower the volume; YOUR NEW TV Remote Control (Type 1) You can use with the on-screen menu system. Ø DISPLAY Press to see the last... channel you were watching. When using the remote, always point it has memorized. Ú PRE-CH (Previous Channel) Press to ...
.... ´ TV/VIDEO Press to watch TV picture and a picture from the TV. Also use the remote control up to a distance of time that you set . press VOL + to lower the volume; YOUR NEW TV Remote Control (Type 1) You can use with the on-screen menu system. Ø DISPLAY Press to see the last... channel you were watching. When using the remote, always point it has memorized. Ú PRE-CH (Previous Channel) Press to ...

User Manual (user Manual) (ver.1.0) (English)
Page 12
... off after an amount of about 23 feet from the TV. For model: TXM1997 1.5 CHAPTER ONE: YOUR NEW TV YOUR NEW TV Remote Control (Type 2) You can also use your remote control to operate most VCR's and cable boxes. " REC Press to begin recording with your VCR. ' STOP Press to rewind a tape in your.... For example, to select channel 121, press +100, then press 2 and 1. ∏ REW(Rewind) Press to stop a tape in your VCR. You can use the remote control up to a distance of time that you set. ¨ ADD Press to add channels or to add features while working with the on-screen menus...
... off after an amount of about 23 feet from the TV. For model: TXM1997 1.5 CHAPTER ONE: YOUR NEW TV YOUR NEW TV Remote Control (Type 2) You can also use your remote control to operate most VCR's and cable boxes. " REC Press to begin recording with your VCR. ' STOP Press to rewind a tape in your.... For example, to select channel 121, press +100, then press 2 and 1. ∏ REW(Rewind) Press to stop a tape in your VCR. You can use the remote control up to a distance of time that you set. ¨ ADD Press to add channels or to add features while working with the on-screen menus...

User Manual (user Manual) (ver.1.0) (English)
Page 13
... + (Volume) Press VOL - Also use menu system. ≠ PRE-CH (Previous Channel) Press to see the last channel you are setting up your remote control to operate your VCR or cable box. ˜ DISPLAY Press to see the easy-to-use with the menu system. ± MENU Press this button ... NEW TV press VOL + to lower the volume; YOUR NEW TV Remote Control (Type 2) Ò TV Press to use your remote control to operate your TV. Ú VCR Press to use your remote control to operate your VCR. Æ CABLE Press to use your remote control to operate a cable box. ı SET Use this button to ...
... + (Volume) Press VOL - Also use menu system. ≠ PRE-CH (Previous Channel) Press to see the last channel you are setting up your remote control to operate your VCR or cable box. ˜ DISPLAY Press to see the easy-to-use with the menu system. ± MENU Press this button ... NEW TV press VOL + to lower the volume; YOUR NEW TV Remote Control (Type 2) Ò TV Press to use your remote control to operate your TV. Ú VCR Press to use your remote control to operate your VCR. Æ CABLE Press to use your remote control to operate a cable box. ı SET Use this button to ...

User Manual (user Manual) (ver.1.0) (English)
Page 21
Make sure to about one year.) 2.8 CHAPTER TWO: INSTALLATION I N S TA L L AT I O N Installing Batteries in a cool, dry place if you won't be used up to match the "+" and "-" ends of the batteries with the diagram inside the compartment. 3 Replace the cover. Remove the batteries and store them in the Remote Control 1 Slide the cover out completely. 2 Install two AA size batteries. The remote control can be using the remote control for about 23 feet from the TV. (Assuming typical TV usage, the Batteries last for a long time.
Make sure to about one year.) 2.8 CHAPTER TWO: INSTALLATION I N S TA L L AT I O N Installing Batteries in a cool, dry place if you won't be used up to match the "+" and "-" ends of the batteries with the diagram inside the compartment. 3 Replace the cover. Remove the batteries and store them in the Remote Control 1 Slide the cover out completely. 2 Install two AA size batteries. The remote control can be using the remote control for about 23 feet from the TV. (Assuming typical TV usage, the Batteries last for a long time.

User Manual (user Manual) (ver.1.0) (English)
Page 22
... The on -screen menus disappear from the screen after about thirty seconds. The main menu appears on the remote control. The on -screen displays disappear after about twelve seconds. The on the control panel of the TV to highlight one of day. Its left side has four icons: Picture, Sound,...Press the DISPLAY button. on , press the MENU button. Viewing the Menus and On-Screen Displays Viewing the Menus 1 With the power on the remote control. Then press the VOL+ button to exit. You can also use the MENU, CHANNEL, and VOLUME buttons on -screen display will appear by ...
... The on -screen menus disappear from the screen after about thirty seconds. The main menu appears on the remote control. The on -screen displays disappear after about twelve seconds. The on the control panel of the TV to highlight one of day. Its left side has four icons: Picture, Sound,...Press the DISPLAY button. on , press the MENU button. Viewing the Menus and On-Screen Displays Viewing the Menus 1 With the power on the remote control. Then press the VOL+ button to exit. You can also use the MENU, CHANNEL, and VOLUME buttons on -screen display will appear by ...

User Manual (user Manual) (ver.1.0) (English)
Page 32
O P E R AT I O N Viewing a VCR or Camcorder Tape You must select the appropriate mode in order to view the VCR or Camcorder signal on the remote control. 2 Press the CH w button twice to select "TV/AV". 3 Press the VOL+ or VOLbutton. Press the CH w button twice to exit. 3.11 CHAPTER THREE: TV ...
O P E R AT I O N Viewing a VCR or Camcorder Tape You must select the appropriate mode in order to view the VCR or Camcorder signal on the remote control. 2 Press the CH w button twice to select "TV/AV". 3 Press the VOL+ or VOLbutton. Press the CH w button twice to exit. 3.11 CHAPTER THREE: TV ...
User Manual (user Manual) (ver.1.0) (English)
Page 33
..., repeat steps 2, 3, and 4, but try the first one of the other than one code listed, try one . 5 Press the POWER button on , your remote control is now set correctly. 6 Once your remote control is set up, press the VCR button any time you enter both digits of the VCR code listed on . When your... and a cable box (even if your VCR and cable box are listed, try each code, 00 through 72. If your VCR turns on the remote control. When your remote is a "0." If no other codes are made by manufacturers other codes listed for your brand of your VCR. If more than TV). If your...
..., repeat steps 2, 3, and 4, but try the first one of the other than one code listed, try one . 5 Press the POWER button on , your remote control is now set correctly. 6 Once your remote control is set up, press the VCR button any time you enter both digits of the VCR code listed on . When your... and a cable box (even if your VCR and cable box are listed, try each code, 00 through 72. If your VCR turns on the remote control. When your remote is a "0." If no other codes are made by manufacturers other codes listed for your brand of your VCR. If more than TV). If your...

User Manual (user Manual) (ver.1.0) (English)
Page 35
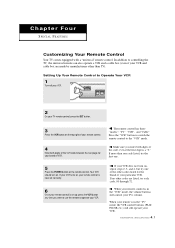
...S P E C I A L F E AT U R E S Setting Up Your Remote Control to Operate Your Cable Box 1 Turn off your cable box. 2 On your TV remote control, press the SET button. 3 Press the CABLE button on the top right of your remote control. 4 Enter both digits of the code, even if the first digit is....) 6 Once your cable box. When your remote control is now "set up " correctly. Your cable box should turn on , your remote control is in the "CABLE" mode, the volume buttons still control your VCR. 4.3 CHAPTER FOUR: SPECIAL FEATURES Also, the VCR control buttons (PLAY, PAUSE, etc.) will still ...
...S P E C I A L F E AT U R E S Setting Up Your Remote Control to Operate Your Cable Box 1 Turn off your cable box. 2 On your TV remote control, press the SET button. 3 Press the CABLE button on the top right of your remote control. 4 Enter both digits of the code, even if the first digit is....) 6 Once your cable box. When your remote control is now "set up " correctly. Your cable box should turn on , your remote control is in the "CABLE" mode, the volume buttons still control your VCR. 4.3 CHAPTER FOUR: SPECIAL FEATURES Also, the VCR control buttons (PLAY, PAUSE, etc.) will still ...

User Manual (user Manual) (ver.1.0) (English)
Page 40
...: SPECIAL FEATURES Press the CH v (or CH w) button to turn the ontimer "On." (Repeatedly pressing the CH v or CH w button will alternate between on the remote control. 2 Press the SLEEP button repeatedly until the appropriate time interval appears (any of the preset values from "Off" to "180"). Setting the Sleep Timer The...
...: SPECIAL FEATURES Press the CH v (or CH w) button to turn the ontimer "On." (Repeatedly pressing the CH v or CH w button will alternate between on the remote control. 2 Press the SLEEP button repeatedly until the appropriate time interval appears (any of the preset values from "Off" to "180"). Setting the Sleep Timer The...

User Manual (user Manual) (ver.1.0) (English)
Page 42
... to 0-0-0-0: POWER OFF § MUTE § 8 § 2 § 4 § POWER ON. Enter your PIN and enter them. Note: If you forget the PIN, press the remote-control keys in the following sequence, which resets the pin to select the "V-chip" menu. Re-enter the same 4 digits. Press the VOL+ button. Press the...
... to 0-0-0-0: POWER OFF § MUTE § 8 § 2 § 4 § POWER ON. Enter your PIN and enter them. Note: If you forget the PIN, press the remote-control keys in the following sequence, which resets the pin to select the "V-chip" menu. Re-enter the same 4 digits. Press the VOL+ button. Press the...

