User Manual
Page 3
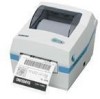
...; Operator's Manual & CD ⑨ Label (Paper) ⑦ Power Cord ⑥ Cushion (TOP) ⑤ Printer (SRP-770) ③ Power Supply ② Cushion (Bottom) ④ Pe-bag ① Printer Box ※ You can repack the printer package in above numeric order(①~⑨) 5 Installing or Replacing the Paper Roll 9 6. Samsung Label Printer 6 3. Using Fan Fold Paper 13 10. Cleaning Head 15 12.
...; Operator's Manual & CD ⑨ Label (Paper) ⑦ Power Cord ⑥ Cushion (TOP) ⑤ Printer (SRP-770) ③ Power Supply ② Cushion (Bottom) ④ Pe-bag ① Printer Box ※ You can repack the printer package in above numeric order(①~⑨) 5 Installing or Replacing the Paper Roll 9 6. Samsung Label Printer 6 3. Using Fan Fold Paper 13 10. Cleaning Head 15 12.

User Manual
Page 4
... do not plug in the power supply's cable as shown below. Plug in the power cord. Samsung Label Printer Feed Button Cover Peel-off Cover Open/Close Printer Head Paper Holder Paper Guide Paper(gap) Sensor Peel-off , and the power supply's power cord is not plugged into an electrical... sure that the voltage required by the power supply matches that the printer's power switch is turned off Sensor Power Connector Status Indicator Power Switch (Option) Auto Cutter Paper Adjuster Dip Switch Interface Connectors [RS-232C, IEEE1284, USB] 6 3. Connecting the Power Supply CAUTIONS: When ...
... do not plug in the power supply's cable as shown below. Plug in the power cord. Samsung Label Printer Feed Button Cover Peel-off Cover Open/Close Printer Head Paper Holder Paper Guide Paper(gap) Sensor Peel-off , and the power supply's power cord is not plugged into an electrical... sure that the voltage required by the power supply matches that the printer's power switch is turned off Sensor Power Connector Status Indicator Power Switch (Option) Auto Cutter Paper Adjuster Dip Switch Interface Connectors [RS-232C, IEEE1284, USB] 6 3. Connecting the Power Supply CAUTIONS: When ...
User Manual
Page 5
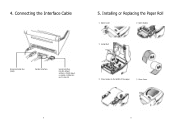
Connecting the Interface Cable 5. Installing or Replacing the Paper Roll ① Open Cover ② Open Guides ③ Install Roll Universal Serial Bus (USB) Parallel Interface Serial Interface RS-232 default setting is 19200 baud, no parity, 8 data bits and 1 stop bit ④ Close Guides to the Width of the paper ⑤ Close Cover 8 9 4.
Connecting the Interface Cable 5. Installing or Replacing the Paper Roll ① Open Cover ② Open Guides ③ Install Roll Universal Serial Bus (USB) Parallel Interface Serial Interface RS-232 default setting is 19200 baud, no parity, 8 data bits and 1 stop bit ④ Close Guides to the Width of the paper ⑤ Close Cover 8 9 4.
User Manual
Page 6
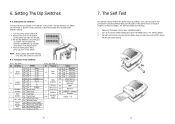
...Off On On Off 0(Low) 7 13 On On 20(High) 5 Exhibition Off Normal mode Selection On Demo mode 6 Media Off Label Paper Selection On Normal Paper 7 Auto Cutter Off Without Auto Cuter On With Auto Cutter 3 Media Off Detection On Detect Gap only Detect Gap and Black-mark Memory... Off 4 Selection for Image Store On SRAM Flash Rom 5 Emulation Off SAMSUNG command On Emulation 6~8 Developer Mode Default --- Turn on when down the FEED button. The Dip Switches are located on the printer. Remove the screw on the bottom of next page With Off Back Feeding printing...
...Off On On Off 0(Low) 7 13 On On 20(High) 5 Exhibition Off Normal mode Selection On Demo mode 6 Media Off Label Paper Selection On Normal Paper 7 Auto Cutter Off Without Auto Cuter On With Auto Cutter 3 Media Off Detection On Detect Gap only Detect Gap and Black-mark Memory... Off 4 Selection for Image Store On SRAM Flash Rom 5 Emulation Off SAMSUNG command On Emulation 6~8 Developer Mode Default --- Turn on when down the FEED button. The Dip Switches are located on the printer. Remove the screw on the bottom of next page With Off Back Feeding printing...

User Manual
Page 7
The Peel-off Printers can Peel-off cover and turn on peeler switch. ② Remove the one a paper and insert the paper through both the rear slot and guides. 8. You must remove the label before the printer prints the next label. ① Open the peel-off a single label. remove 12 9. Open the Dust Cover and Insert paper Dust Cover Adjust holders papers and paper Fixed Adjust Guides Paper Fixed 13 Using Fan Fold Paper Insert paper through slot. ③ Adjust the paper guides and close the cover. Adjust holders and guides to the width of the paper.
The Peel-off Printers can Peel-off cover and turn on peeler switch. ② Remove the one a paper and insert the paper through both the rear slot and guides. 8. You must remove the label before the printer prints the next label. ① Open the peel-off a single label. remove 12 9. Open the Dust Cover and Insert paper Dust Cover Adjust holders papers and paper Fixed Adjust Guides Paper Fixed 13 Using Fan Fold Paper Insert paper through slot. ③ Adjust the paper guides and close the cover. Adjust holders and guides to the width of the paper.
User Manual
Page 8
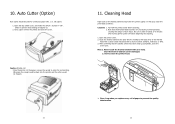
... hand, then the thermal element can be used for continuous paper only. ( i.e. Otherwise the receipt could be back into the printer and close the cover-open. Be sure to printer mode setting at Chapter 6.) 2. roll paper) 1. Note 1. Cleaning Head Paper dust on the heating elements may lower the printer quality. Put a paper roll into the printer and the cutter...
... hand, then the thermal element can be used for continuous paper only. ( i.e. Otherwise the receipt could be back into the printer and close the cover-open. Be sure to printer mode setting at Chapter 6.) 2. roll paper) 1. Note 1. Cleaning Head Paper dust on the heating elements may lower the printer quality. Put a paper roll into the printer and the cutter...
User Manual
Page 16
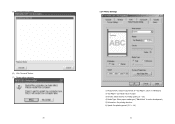
(5) Select printer to remove. 12.4 Printer Settings (6) Click "Uninstall" Button. (7) Please reboot computer. 30 1) Measurement: Select measurement of "Top Margin". (Inch or millimeters) 2) Top Margin: top margin value of paper 3) Density: Select density of printing quality. (0 ~ 20) 4) Media Type: Select paper media type. ("Black Mark" is under development) 5) Orientation: Set printing direction. 6) Speed: Set printing speed. (2.5 ~ 3.0) 31
(5) Select printer to remove. 12.4 Printer Settings (6) Click "Uninstall" Button. (7) Please reboot computer. 30 1) Measurement: Select measurement of "Top Margin". (Inch or millimeters) 2) Top Margin: top margin value of paper 3) Density: Select density of printing quality. (0 ~ 20) 4) Media Type: Select paper media type. ("Black Mark" is under development) 5) Orientation: Set printing direction. 6) Speed: Set printing speed. (2.5 ~ 3.0) 31
User Manual
Page 17
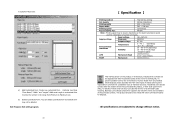
Exit Program: Exit utility program. 32 【 Specification 】 Printing method Thermal line printing Dot density 203 dpi (8 dot/mm) Printing width 25.4 ~ 101.6 mm Paper width 38.1 ~ 104 mm Printing speed 127 mm/sec Receive Buffer Size 4K Byte ※ Note : Printing ...Humidity 5 ~ 45 ℃ (Operating) -25 ~ 70 ℃ (Storage) 30 ~ 80 % RH (Operating) 10 ~ 90 % RH (Storage) ; 7) Customer Paper Size a) Add Customized Form: Create new customized form. Customer must be disposed with other types of wastes and recycle it responsibly to change without notice...
Exit Program: Exit utility program. 32 【 Specification 】 Printing method Thermal line printing Dot density 203 dpi (8 dot/mm) Printing width 25.4 ~ 101.6 mm Paper width 38.1 ~ 104 mm Printing speed 127 mm/sec Receive Buffer Size 4K Byte ※ Note : Printing ...Humidity 5 ~ 45 ℃ (Operating) -25 ~ 70 ℃ (Storage) 30 ~ 80 % RH (Operating) 10 ~ 90 % RH (Storage) ; 7) Customer Paper Size a) Add Customized Form: Create new customized form. Customer must be disposed with other types of wastes and recycle it responsibly to change without notice...


