User Manual
Page 1
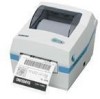
USER'S MANUAL SRP-770 LABEL PRINTER JE68-00131B Rev. 1.05 www.samsungminiprinters.com 1
USER'S MANUAL SRP-770 LABEL PRINTER JE68-00131B Rev. 1.05 www.samsungminiprinters.com 1
User Manual
Page 2
... set from the printer, unplug it can be electrocuted. Do not bend the cable by force or leave it for yourself. It is the origin of a fire or a breakdown of children's reach. Safety Precautions In using the present appliance, please keep the following instructions can cause slight wound or damage the appliance. PROHIBITED If you need these services...
... set from the printer, unplug it can be electrocuted. Do not bend the cable by force or leave it for yourself. It is the origin of a fire or a breakdown of children's reach. Safety Precautions In using the present appliance, please keep the following instructions can cause slight wound or damage the appliance. PROHIBITED If you need these services...
User Manual
Page 3
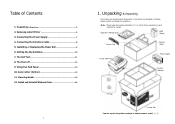
Using Fan Fold Paper 13 10. Connecting the Power Supply 7 4. Installing or Replacing the Paper Roll 9 6. Table of Contents 1. The Self Test 11 8. Cleaning Head 15 12. The Peel-off 12 9. Auto Cutter (Option 14 11. Note : Please keep the packing materials for future repacking to send a printer for assistance. Setting the Dip Switches 10 7. Samsung Label Printer 6 3. Unpacking & Repacking Your printer box should include these items. If any items...
Using Fan Fold Paper 13 10. Connecting the Power Supply 7 4. Installing or Replacing the Paper Roll 9 6. Table of Contents 1. The Self Test 11 8. Cleaning Head 15 12. The Peel-off 12 9. Auto Cutter (Option 14 11. Note : Please keep the packing materials for future repacking to send a printer for assistance. Setting the Dip Switches 10 7. Samsung Label Printer 6 3. Unpacking & Repacking Your printer box should include these items. If any items...

User Manual
Page 4
... flat side of your dealer for assistance. And the power supply's rated voltage and your outlet's voltage do not plug in the power supply's cable as shown below. Make sure that the power supply is turned off Sensor Power Connector Status Indicator Power Switch (Option) Auto Cutter Paper Adjuster Dip Switch Interface Connectors [RS-232C, IEEE1284, USB] 6 3. Otherwise, you may damage the power supply or the printer. 1. 2. Check the...
... flat side of your dealer for assistance. And the power supply's rated voltage and your outlet's voltage do not plug in the power supply's cable as shown below. Make sure that the power supply is turned off Sensor Power Connector Status Indicator Power Switch (Option) Auto Cutter Paper Adjuster Dip Switch Interface Connectors [RS-232C, IEEE1284, USB] 6 3. Otherwise, you may damage the power supply or the printer. 1. 2. Check the...
User Manual
Page 5
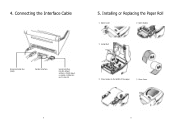
Installing or Replacing the Paper Roll ① Open Cover ② Open Guides ③ Install Roll Universal Serial Bus (USB) Parallel Interface Serial Interface RS-232 default setting is 19200 baud, no parity, 8 data bits and 1 stop bit ④ Close Guides to the Width of the paper ⑤ Close Cover 8 9 Connecting the Interface Cable 5. 4.
Installing or Replacing the Paper Roll ① Open Cover ② Open Guides ③ Install Roll Universal Serial Bus (USB) Parallel Interface Serial Interface RS-232 default setting is 19200 baud, no parity, 8 data bits and 1 stop bit ④ Close Guides to the Width of the paper ⑤ Close Cover 8 9 Connecting the Interface Cable 5. 4.
User Manual
Page 6
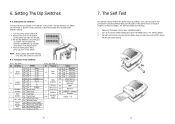
... mode 6 Media Off Label Paper Selection On Normal Paper 7 Auto Cutter Off Without Auto Cuter On With Auto Cutter 3 Media Off Detection On Detect Gap only Detect Gap and Black-mark Memory Off 4 Selection for Image Store On SRAM Flash Rom 5 Emulation Off SAMSUNG command On Emulation 6~8 Developer Mode Default --- Turn on the bottom of the printer. Make sure that paper roll has been installed properly. 2. Dip S/W 1 6-2-2. Flip the Dip Switches using...
... mode 6 Media Off Label Paper Selection On Normal Paper 7 Auto Cutter Off Without Auto Cuter On With Auto Cutter 3 Media Off Detection On Detect Gap only Detect Gap and Black-mark Memory Off 4 Selection for Image Store On SRAM Flash Rom 5 Emulation Off SAMSUNG command On Emulation 6~8 Developer Mode Default --- Turn on the bottom of the printer. Make sure that paper roll has been installed properly. 2. Dip S/W 1 6-2-2. Flip the Dip Switches using...

User Manual
Page 7
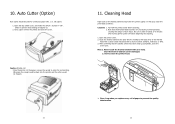
Open the Dust Cover and Insert paper Dust Cover Adjust holders papers and paper Fixed Adjust Guides Paper Fixed 13 Using Fan Fold Paper Insert paper through slot. ③ Adjust the paper guides and close the cover. The Peel-off Printers can Peel-off cover and turn on peeler switch. ② Remove the one a paper and insert the paper through both the rear slot and guides. 8. You must remove the label before the printer prints the next label. ① Open the peel-off a single label. remove 12 9. Adjust holders and guides to the width of the paper.
Open the Dust Cover and Insert paper Dust Cover Adjust holders papers and paper Fixed Adjust Guides Paper Fixed 13 Using Fan Fold Paper Insert paper through slot. ③ Adjust the paper guides and close the cover. The Peel-off Printers can Peel-off cover and turn on peeler switch. ② Remove the one a paper and insert the paper through both the rear slot and guides. 8. You must remove the label before the printer prints the next label. ① Open the peel-off a single label. remove 12 9. Adjust holders and guides to the width of the paper.
User Manual
Page 8
... Dip switch cover, and make the switch 1 number 7 "On". (Refer to prevent the quality deterioration. 15 Auto Cutter (Option) Auto cutter should be damaged. 2. Caution (Partial cut) : Once the printer cut it up completely, close the cover. Otherwise the receipt could be back into the printer and close the cover-open. Cleaning Head Paper dust on the heating elements may lower the printer quality. Turn Off the printer power...
... Dip switch cover, and make the switch 1 number 7 "On". (Refer to prevent the quality deterioration. 15 Auto Cutter (Option) Auto cutter should be damaged. 2. Caution (Partial cut) : Once the printer cut it up completely, close the cover. Otherwise the receipt could be back into the printer and close the cover-open. Cleaning Head Paper dust on the heating elements may lower the printer quality. Turn Off the printer power...
User Manual
Page 9
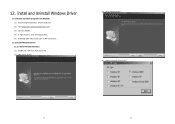
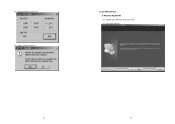
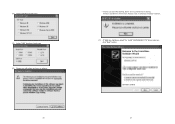
Install and Uninstall Windows Driver 12.1 Download install-program from Website (1) Execute web-browser.(Ex: Internet Explorer) (2) Type http://www.samsungminiprinters.com (3) Connect website. (4) In "Quick menu", click download button. (5) Download "SRP-770_V3.X.X.exe" in SRP-770 section. 12.2 Install Windows Driver 12.2.1 Serial Parallel interface (1) Double click "SRP-770_V3.X.X.exe" file. (2) Click "Next" Button. (3) Click "Install" Button. (4) Select operating system type. 16 17 12.
Install and Uninstall Windows Driver 12.1 Download install-program from Website (1) Execute web-browser.(Ex: Internet Explorer) (2) Type http://www.samsungminiprinters.com (3) Connect website. (4) In "Quick menu", click download button. (5) Download "SRP-770_V3.X.X.exe" in SRP-770 section. 12.2 Install Windows Driver 12.2.1 Serial Parallel interface (1) Double click "SRP-770_V3.X.X.exe" file. (2) Click "Next" Button. (3) Click "Install" Button. (4) Select operating system type. 16 17 12.
User Manual
Page 10
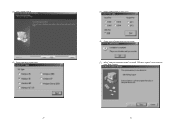
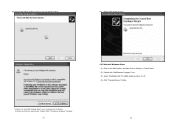
(5) Select interface (port) type. (6) Please reboot computer. 12.2.2 USB interface A. Windows 95/98/ME (1) Double click "SRP-770_V3.X.X.exe" file. (2) Click "Next" Button. 18 19
(5) Select interface (port) type. (6) Please reboot computer. 12.2.2 USB interface A. Windows 95/98/ME (1) Double click "SRP-770_V3.X.X.exe" file. (2) Click "Next" Button. 18 19
User Manual
Page 11
(3) Click "Install" Button. (4) Select operating system type. 20 (5) Select "USB" interface (port) type. (6) Please turn-off printer and turn-on printer. (7) When "Add new hardware wizard" for install "USB print support" driver pops up, click "Next" button. 21
(3) Click "Install" Button. (4) Select operating system type. 20 (5) Select "USB" interface (port) type. (6) Please turn-off printer and turn-on printer. (7) When "Add new hardware wizard" for install "USB print support" driver pops up, click "Next" button. 21
User Manual
Page 12
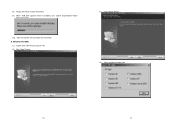
B. Windows NT/2000 (1) Double click "SRP-770_V3.X.X.exe" file. (2) Click "Next" Button. (3) Click "Install" Button. (4) Select operating system type. 22 23 (8) Please click "Next" button three times. (9) When "USB print support" driver is installed, your system automatically restart after 10 seconds. (10) After the system restart, please turn-on printer.
B. Windows NT/2000 (1) Double click "SRP-770_V3.X.X.exe" file. (2) Click "Next" Button. (3) Click "Install" Button. (4) Select operating system type. 22 23 (8) Please click "Next" button three times. (9) When "USB print support" driver is installed, your system automatically restart after 10 seconds. (10) After the system restart, please turn-on printer.
User Manual
Page 13
Windows XP/2003 Server (1) Double click "SRP-770_V3.X.X.exe" file. (2) Click "Next" Button. (3) Click "Install" Button. 25 Printer and driver work well. Please click "Yes" button. 24 C. (5) Select "USB" interface (port) type. (6) Please turn-off printer and turn-on printer. * If you can see this dialog, don't worry comment in dialog.
Windows XP/2003 Server (1) Double click "SRP-770_V3.X.X.exe" file. (2) Click "Next" Button. (3) Click "Install" Button. 25 Printer and driver work well. Please click "Yes" button. 24 C. (5) Select "USB" interface (port) type. (6) Please turn-off printer and turn-on printer. * If you can see this dialog, don't worry comment in dialog.
User Manual
Page 14
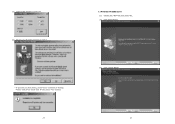
(4) Select operating system type. (5) Select "USB" interface (port) type. (6) Please turn-off printer and turn-on printer. 26 * If you can see this dialog, don't worry comment in dialog. Printer and driver work well. Please click "Continue Anyway" button. (7) If "Add new hardware wizard" for install "SAMSUNGSRP-770" driver pops up, click "Next" button. 27
(4) Select operating system type. (5) Select "USB" interface (port) type. (6) Please turn-off printer and turn-on printer. 26 * If you can see this dialog, don't worry comment in dialog. Printer and driver work well. Please click "Continue Anyway" button. (7) If "Add new hardware wizard" for install "SAMSUNGSRP-770" driver pops up, click "Next" button. 27
User Manual
Page 15
Please click "Continue Anyway" button. 28 29 (8) Please click "Next" button until you can see "Finish" button. (9) Please click "Finish" button. 12.3 Uninstall Windows Driver (1) Click on the Start button, and then click on Settings > Control Panel. (2) Double click "Add/Remove Programs" icon. (3) Select "SAMSUNG SRP-770 LABEL Windows Driver 3.X.X". (4) Click "Change/Remove" button. *If you can see this dialog, don't worry comment in dialog. Printer and driver work well.
Please click "Continue Anyway" button. 28 29 (8) Please click "Next" button until you can see "Finish" button. (9) Please click "Finish" button. 12.3 Uninstall Windows Driver (1) Click on the Start button, and then click on Settings > Control Panel. (2) Double click "Add/Remove Programs" icon. (3) Select "SAMSUNG SRP-770 LABEL Windows Driver 3.X.X". (4) Click "Change/Remove" button. *If you can see this dialog, don't worry comment in dialog. Printer and driver work well.
User Manual
Page 16
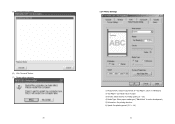
(5) Select printer to remove. 12.4 Printer Settings (6) Click "Uninstall" Button. (7) Please reboot computer. 30 1) Measurement: Select measurement of "Top Margin". (Inch or millimeters) 2) Top Margin: top margin value of paper 3) Density: Select density of printing quality. (0 ~ 20) 4) Media Type: Select paper media type. ("Black Mark" is under development) 5) Orientation: Set printing direction. 6) Speed: Set printing speed. (2.5 ~ 3.0) 31
(5) Select printer to remove. 12.4 Printer Settings (6) Click "Uninstall" Button. (7) Please reboot computer. 30 1) Measurement: Select measurement of "Top Margin". (Inch or millimeters) 2) Top Margin: top margin value of paper 3) Density: Select density of printing quality. (0 ~ 20) 4) Media Type: Select paper media type. ("Black Mark" is under development) 5) Orientation: Set printing direction. 6) Speed: Set printing speed. (2.5 ~ 3.0) 31
User Manual
Page 17
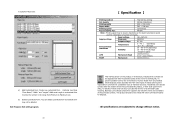
7) Customer Paper Size a) Add Customized Form: Create new customized form. Exit Program: Exit utility program. 32 【 Specification 】 Printing method Thermal line printing Dot density 203 dpi (8 dot/mm) Printing width 25.4 ~ 101.6 mm Paper width 38.1 ~ 104 mm Printing speed 127 mm/sec Receive Buffer Size 4K Byte ※ Note : Printing speed may not be deleted. Customer must be slower, depending on the...
7) Customer Paper Size a) Add Customized Form: Create new customized form. Exit Program: Exit utility program. 32 【 Specification 】 Printing method Thermal line printing Dot density 203 dpi (8 dot/mm) Printing width 25.4 ~ 101.6 mm Paper width 38.1 ~ 104 mm Printing speed 127 mm/sec Receive Buffer Size 4K Byte ※ Note : Printing speed may not be deleted. Customer must be slower, depending on the...


