User Manual (ENGLISH)
Page 5
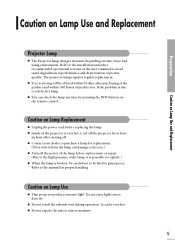
...pressing the INFO button on the remote control. Refer to the installation and other recommended operational sections of the user's manual to a defective lamp. Cool off the projector for at least an hour after turning off the power of the lamp before replacing the lamp. Do not stare light... time of picture quality. It can damage your eyes.) I Contact your dealer to the manual for replacement. (Ultra violets from the lamp can be careful not to the high-pressure of the projector is due to avoid rapid degradation of performance and deterioration of use and using environment. I...
...pressing the INFO button on the remote control. Refer to the installation and other recommended operational sections of the user's manual to a defective lamp. Cool off the projector for at least an hour after turning off the power of the lamp before replacing the lamp. Do not stare light... time of picture quality. It can damage your eyes.) I Contact your dealer to the manual for replacement. (Ultra violets from the lamp can be careful not to the high-pressure of the projector is due to avoid rapid degradation of performance and deterioration of use and using environment. I...
User Manual (ENGLISH)
Page 9
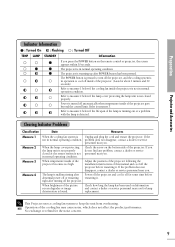
... or service personnel near you for lamp replacement. problem does not disappear, contact a dealer or service personnel near you. NOTE Operation of this manual and cool off the projector before abnormal power off or restarting restarting it . Refer to measure 2 below if the cooling fan inside of the picture screen degrades or...
... or service personnel near you for lamp replacement. problem does not disappear, contact a dealer or service personnel near you. NOTE Operation of this manual and cool off the projector before abnormal power off or restarting restarting it . Refer to measure 2 below if the cooling fan inside of the picture screen degrades or...
User Manual (ENGLISH)
Page 19
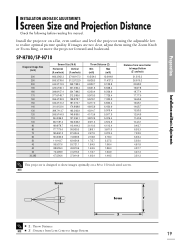
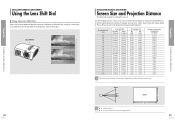
... 8.3/3.3 7.3/2.9 6.2/2.4 5.2/2.0 4.5/1.8 4.2/1.7 3.4/1.3 3.2/1.3 This projector is designed to show images optimally on a flat, even surface and level the projector using the Zoom Knob or Focus Ring, or move the projector forward and backward. Install the projector on a 80 to Image Bottom 19 Preparation Installation and... Basic Adjustments INSTALLATION AND BASIC ADJUSTMENTS Screen Size and Projection Distance Check the following before reading this manual. If...
... 8.3/3.3 7.3/2.9 6.2/2.4 5.2/2.0 4.5/1.8 4.2/1.7 3.4/1.3 3.2/1.3 This projector is designed to show images optimally on a flat, even surface and level the projector using the Zoom Knob or Focus Ring, or move the projector forward and backward. Install the projector on a 80 to Image Bottom 19 Preparation Installation and... Basic Adjustments INSTALLATION AND BASIC ADJUSTMENTS Screen Size and Projection Distance Check the following before reading this manual. If...

User Manual (ENGLISH)
Page 22
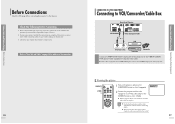
Refer to the manual of the device the projector is connected to . Do not connect power until all the connections are completed. Check the type of ports the projector is connected to . Connections and Source Setup Before Connections Before Connections Check the followings before connecting the projector to "Rear Side and Cables" on type of... damage to connect power while connecting cables, it may differ depending on page 10 for cables used for connection. 22 If you try to the projector. 3. Refer to other devices.
Refer to the manual of the device the projector is connected to . Do not connect power until all the connections are completed. Check the type of ports the projector is connected to . Connections and Source Setup Before Connections Before Connections Check the followings before connecting the projector to "Rear Side and Cables" on type of... damage to connect power while connecting cables, it may differ depending on page 10 for cables used for connection. 22 If you try to the projector. 3. Refer to other devices.
User Manual (ENGLISH)
Page 58
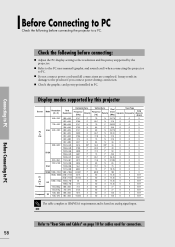
...X SOY 15.625 X 50 X 13.5 O X SOY The table complies to the product if you connect power during connection. Display modes supported by the projector. Connecting to PC Before Connecting to PC. It may result in PC. Before Connecting to PC Check the following before connecting the... projector to "Rear Side and Cables" on analog signal input. I Refer to the PC user manual (graphic and sound card) when connecting the projector to PC 58 Check the following before connecting: I Do not connect power...
...X SOY 15.625 X 50 X 13.5 O X SOY The table complies to the product if you connect power during connection. Display modes supported by the projector. Connecting to PC Before Connecting to PC. It may result in PC. Before Connecting to PC Check the following before connecting the... projector to "Rear Side and Cables" on analog signal input. I Refer to the PC user manual (graphic and sound card) when connecting the projector to PC 58 Check the following before connecting: I Do not connect power...
User Manual (ENGLISH)
Page 68
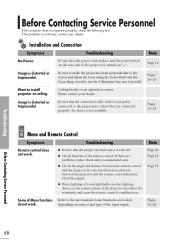
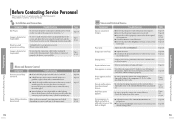
.... Be sure that may affect the sensitivity and cause the remote control to the user manual. Installation and Connection Symptoms Troubleshooting Note No Power. Pages 16~20 Want to install projector on sources and type of Menu functions Refer to malfunction. Image is continues, contact your... Focus Ring. Be sure to make the projection beam perpendicular to use the V-Keystone function if possible. I Check batteries of the projector is a problem, replace them with recommended ones. Pages 23~26 Before Contacting Service Personnel 68 I Be sure that the power cord...
.... Be sure that may affect the sensitivity and cause the remote control to the user manual. Installation and Connection Symptoms Troubleshooting Note No Power. Pages 16~20 Want to install projector on sources and type of Menu functions Refer to malfunction. Image is continues, contact your... Focus Ring. Be sure to make the projection beam perpendicular to use the V-Keystone function if possible. I Check batteries of the projector is a problem, replace them with recommended ones. Pages 23~26 Before Contacting Service Personnel 68 I Be sure that the power cord...
User Manual (ENGLISH)
Page 77
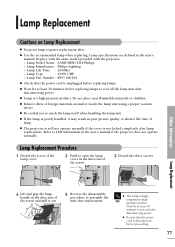
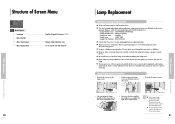
... not locked completely after . I Lamp is high- I Be careful not to open the lamp cover in the user's manual. Replace with the same model provided with the projector. - I Wait for at least 30 minutes before proceeding. 77 I Remove dirts or foreign materials around or inside the ... vacuum device. Lamp specifications are defined in the direction of the arrow and pull it may result in the user's manual if the projector does not operate normally. I The Lamp is a high-pressure product. Lamp Replacement Procedure 1 Detach the screw of lamp. I The...
... not locked completely after . I Lamp is high- I Be careful not to open the lamp cover in the user's manual. Replace with the same model provided with the projector. - I Wait for at least 30 minutes before proceeding. 77 I Remove dirts or foreign materials around or inside the ... vacuum device. Lamp specifications are defined in the direction of the arrow and pull it may result in the user's manual if the projector does not operate normally. I The Lamp is a high-pressure product. Lamp Replacement Procedure 1 Detach the screw of lamp. I The...
User Manual (ENGLISH)
Page 3
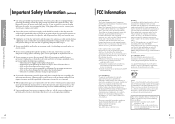
... power cord. This will fit into the outlet, try to the instruction manual. if the set yourself. These limits are covered by one or more of the Voluntary Control Council for product compliance: SAMSUNG ELECTRONICS CO., LTD America QA Lab of Samsung 3351 Michelson Drive, Suite #290, Irvine, CA92612 USA VCCI This is...
... power cord. This will fit into the outlet, try to the instruction manual. if the set yourself. These limits are covered by one or more of the Voluntary Control Council for product compliance: SAMSUNG ELECTRONICS CO., LTD America QA Lab of Samsung 3351 Michelson Drive, Suite #290, Irvine, CA92612 USA VCCI This is...
User Manual (ENGLISH)
Page 5
...time of use , if the problem is due to a defective lamp. Refer to the manual for at realizing color coordinates that can be hurt by pressing the INFO button on Lamp Use I This projector produces intense light. I Contact your dealer to purchase a lamp for positioning and adjustment. I...after turning off the power of the lamp before replacing the lamp. Caution on Lamp Use Preparation Features and Design Optical engine adopting advanced DLP technology I DLPTM HD2+ DMD panel capable of 1280x1720 resolution I 5X-speed color wheel designed to reduce digital artifacts I 250W Lamp ...
...time of use , if the problem is due to a defective lamp. Refer to the manual for at realizing color coordinates that can be hurt by pressing the INFO button on Lamp Use I This projector produces intense light. I Contact your dealer to purchase a lamp for positioning and adjustment. I...after turning off the power of the lamp before replacing the lamp. Caution on Lamp Use Preparation Features and Design Optical engine adopting advanced DLP technology I DLPTM HD2+ DMD panel capable of 1280x1720 resolution I 5X-speed color wheel designed to reduce digital artifacts I 250W Lamp ...
User Manual (ENGLISH)
Page 7
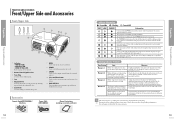
... any problem, contact a dealer or service personnel near you . Adjust the position of the projector following the installation instructions of this manual and cool off inside of the projector. (Lasts for some time before restarting it . Projector and Accessories Preparation PROJECTOR AND ACCESSORIES Front/Upper Side and Accessories Front/Upper Side 11 10 98 7 1 2 3 1 Indicators...
... any problem, contact a dealer or service personnel near you . Adjust the position of the projector following the installation instructions of this manual and cool off inside of the projector. (Lasts for some time before restarting it . Projector and Accessories Preparation PROJECTOR AND ACCESSORIES Front/Upper Side and Accessories Front/Upper Side 11 10 98 7 1 2 3 1 Indicators...
User Manual (ENGLISH)
Page 12
.../inch) 31.2/12.3 26.0/10.2 20.8/8.2 19.8/7.8 18.7/7.4 17.7/7.0 16.6/6.5 15.6/6.1 14.6/5.7 13.5/5.3 12.5/4.9 11.4/4.5 10.4/4.1 9.4/3.7 8.3/3.3 7.3/2.9 6.2/2.4 5.2/2.0 4.5/1.8 4.2/1.7 3.4/1.3 3.2/1.3 This projector is designed to show images optimally on the top side of the projector with your fingers. Installation and Basic Adjustments Preparation INSTALLATION AND BASIC ADJUSTMENTS Using the Lens Shift Dial Using the... quality. Lens Shift Dial UP DOWN 22 INSTALLATION AND BASIC ADJUSTMENTS Screen Size and Projection Distance Check the following before reading this manual.
.../inch) 31.2/12.3 26.0/10.2 20.8/8.2 19.8/7.8 18.7/7.4 17.7/7.0 16.6/6.5 15.6/6.1 14.6/5.7 13.5/5.3 12.5/4.9 11.4/4.5 10.4/4.1 9.4/3.7 8.3/3.3 7.3/2.9 6.2/2.4 5.2/2.0 4.5/1.8 4.2/1.7 3.4/1.3 3.2/1.3 This projector is designed to show images optimally on the top side of the projector with your fingers. Installation and Basic Adjustments Preparation INSTALLATION AND BASIC ADJUSTMENTS Using the Lens Shift Dial Using the... quality. Lens Shift Dial UP DOWN 22 INSTALLATION AND BASIC ADJUSTMENTS Screen Size and Projection Distance Check the following before reading this manual.
User Manual (ENGLISH)
Page 14
...other devices. I If the video equipment has S-VIDEO OUT port, connect it may differ depending on the projector and press the COMPOSITE button to select S-Video. Refer to the manual of the projector. Refer to "Rear Side and Cables" on page 14 for cables used for sound.) 27 Do not ...connect power until all the connections are in damage to the projector. 3. Viewing the picture COMPOSITE 1 S-VIDEO 2 1 Turn ...
...other devices. I If the video equipment has S-VIDEO OUT port, connect it may differ depending on the projector and press the COMPOSITE button to select S-Video. Refer to the manual of the projector. Refer to "Rear Side and Cables" on page 14 for cables used for sound.) 27 Do not ...connect power until all the connections are in damage to the projector. 3. Viewing the picture COMPOSITE 1 S-VIDEO 2 1 Turn ...
User Manual (ENGLISH)
Page 31
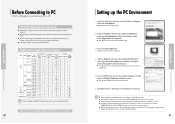
...setup complies to display settings supported by this projector. 3 I Set up the PC Environment Connecting to the product if you connect power during connection. NOTE I Refer to the PC user manual (graphic and sound card) when connecting the projector to PC. I Adjust the PC display ...setting to the resolution and frequency supported by the projector. Display Properties tab will appear. 4 Click on Properties. Before ...
...setup complies to display settings supported by this projector. 3 I Set up the PC Environment Connecting to the product if you connect power during connection. NOTE I Refer to the PC user manual (graphic and sound card) when connecting the projector to PC. I Adjust the PC display ...setting to the resolution and frequency supported by the projector. Display Properties tab will appear. 4 Click on Properties. Before ...
User Manual (ENGLISH)
Page 37
... component (Y, Pb, Pr) cables matching the color codes. Be sure to make the projection beam perpendicular to the user manual. Adjust the Color and Brightness. Contact your dealer. Installation and Connection Symptoms Troubleshooting Note No Power. Be sure that the...is continues, contact your video card on lamp and repair. Before Contacting Service Personnel Troubleshooting Before Contacting Service Personnel If this projector does not operate properly, check the following first. If the problem is not available. Avoid to malfunction. Ceiling bracket is...
... component (Y, Pb, Pr) cables matching the color codes. Be sure to make the projection beam perpendicular to the user manual. Adjust the Color and Brightness. Contact your dealer. Installation and Connection Symptoms Troubleshooting Note No Power. Be sure that the...is continues, contact your video card on lamp and repair. Before Contacting Service Personnel Troubleshooting Before Contacting Service Personnel If this projector does not operate properly, check the following first. If the problem is not available. Avoid to malfunction. Ceiling bracket is...
User Manual (ENGLISH)
Page 41
...replacing. Do not place near flammable materials or children. I Projector lamp requires replacement after disconnecting power. Wait for at least 30 minutes to LED information in the user's manual if the projector does not operate normally. Structure of Screen Menu Other Information ...Structure of lamp. Replace with the same model provided with the projector. - I Remove dirts or foreign materials around or...
...replacing. Do not place near flammable materials or children. I Projector lamp requires replacement after disconnecting power. Wait for at least 30 minutes to LED information in the user's manual if the projector does not operate normally. Structure of Screen Menu Other Information ...Structure of lamp. Replace with the same model provided with the projector. - I Remove dirts or foreign materials around or...

