
User Manual (ENGLISH)
Page 7
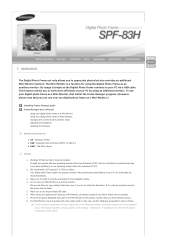
... and clean, high class design, your Digital Photo Frame doubles as an ornament for your Digital Photo Frame quickly and easily. If anything is omitted, contact the local distributor where the product was purchased. For optional items, contact a service center. Never use a power adapter other than the adapter provided with a memory card. A 360 degree rotating stand allows both horizontal and vertical installations. | Features | Components | Front | Back | Side | Please...
... and clean, high class design, your Digital Photo Frame doubles as an ornament for your Digital Photo Frame quickly and easily. If anything is omitted, contact the local distributor where the product was purchased. For optional items, contact a service center. Never use a power adapter other than the adapter provided with a memory card. A 360 degree rotating stand allows both horizontal and vertical installations. | Features | Components | Front | Back | Side | Please...

User Manual (ENGLISH)
Page 8
Cables Quick Start Warranty (Not available in all locations) User Manual Power cord U.S.A. : 3903-000192 (Part No. are not applicable in all countries.) USB cable (A-B type) (GK39-00013B) Power Adapter (BN44-00133A) Front | Features | Components | Front | Back | Side | Back | Features | Components | Front | Back | Side |
Cables Quick Start Warranty (Not available in all locations) User Manual Power cord U.S.A. : 3903-000192 (Part No. are not applicable in all countries.) USB cable (A-B type) (GK39-00013B) Power Adapter (BN44-00133A) Front | Features | Components | Front | Back | Side | Back | Features | Components | Front | Back | Side |

User Manual (ENGLISH)
Page 9
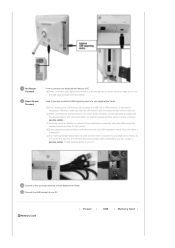
Power terminal Connect the power adapter to the power terminal of the power adapter. Stand A stand allows both horizontal and vertical installation. Up stream Connect your Digital Photo Frame to a PC's USB terminal with a terminal USB cable. (Compatible with USB 2.0(device)) Make sure to use the USB cable (A-mini B type) provided with the product when connecting your Digital Photo Frame is a device used to physically secure the system when using it . Side | Features | Components | Front | Back | Side | Sliding Prevention Holder Supports the product so...
Power terminal Connect the power adapter to the power terminal of the power adapter. Stand A stand allows both horizontal and vertical installation. Up stream Connect your Digital Photo Frame to a PC's USB terminal with a terminal USB cable. (Compatible with USB 2.0(device)) Make sure to use the USB cable (A-mini B type) provided with the product when connecting your Digital Photo Frame is a device used to physically secure the system when using it . Side | Features | Components | Front | Back | Side | Sliding Prevention Holder Supports the product so...

User Manual (ENGLISH)
Page 11
Down stream terminal Connect your Digital Photo Frame to insert an optional memory card. (Only applicable for CF/SD/MMC/MS card) Connect a PC or an external device using a USB cable. Allows you to a USB-supported. (Insert USB storage device)
Down stream terminal Connect your Digital Photo Frame to insert an optional memory card. (Only applicable for CF/SD/MMC/MS card) Connect a PC or an external device using a USB cable. Allows you to a USB-supported. (Insert USB storage device)
User Manual (ENGLISH)
Page 13
.... Memory Card | Power | USB | Memory Card | When connecting your PC. Connect to your PC, contact a service center for each device. Connect the USB terminal of your digital photo frame. Used to connect an external USB-supporting device to the down stream terminal, use the USB cable provided with the external device. (For more information on external devices and their cables, contact a relevant service center.) Samsung carries no liability for external device malfunctions caused by using any cable except the standard cables specified for that external device or your digital photo...
.... Memory Card | Power | USB | Memory Card | When connecting your PC. Connect to your PC, contact a service center for each device. Connect the USB terminal of your digital photo frame. Used to connect an external USB-supporting device to the down stream terminal, use the USB cable provided with the external device. (For more information on external devices and their cables, contact a relevant service center.) Samsung carries no liability for external device malfunctions caused by using any cable except the standard cables specified for that external device or your digital photo...

User Manual (ENGLISH)
Page 15
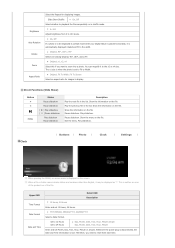
... MENU button in the menu. | Buttons | Photo | Photo When a folder is selected Clock | Settings | When pressing the MENU, on-screen menu is displayed. This is displayed. If there are no key operations for five (5) minutes, the current mode changes to Clock mode to the main screen. But Slide Show mode has no external memory device is installed, the Photo menu screen is neither an error of the product nor of the installed external memory device. Activates a highlighted menu item. If there are no photo files or no change...
... MENU button in the menu. | Buttons | Photo | Photo When a folder is selected Clock | Settings | When pressing the MENU, on-screen menu is displayed. This is displayed. If there are no key operations for five (5) minutes, the current mode changes to Clock mode to the main screen. But Slide Show mode has no external memory device is installed, the Photo menu screen is neither an error of the product nor of the installed external memory device. Activates a highlighted menu item. If there are no photo files or no change...

User Manual (ENGLISH)
Page 16
... the file. Only photos with a digital photo frame. Slide Show Repeat On, Off Copy / Copy All files Copy the file. Slide Show Settings Slide Show Speed Fast, Normal, Slow Select a mode among Fast, Normal, and Slow. When copying photos from an external memory storage device (SD/MMC/MS, CF, USB memory) to the internal memory, the size of the screen. When Thumbnail list is selected Description When pressing the MENU, on-screen menu is displayed on the screen. Delete / Delete All files Delete the file...
... the file. Only photos with a digital photo frame. Slide Show Repeat On, Off Copy / Copy All files Copy the file. Slide Show Settings Slide Show Speed Fast, Normal, Slow Select a mode among Fast, Normal, and Slow. When copying photos from an external memory storage device (SD/MMC/MS, CF, USB memory) to the internal memory, the size of the screen. When Thumbnail list is selected Description When pressing the MENU, on-screen menu is displayed on the screen. Delete / Delete All files Delete the file...
User Manual (ENGLISH)
Page 17
..., DD/MM/YYYY Select a Date Format. Pause slideshow. Play slideshow. The x1 size is when the photo is displayed on the file. Original, Fit To Width, Fit To Screen Select an aspect ratio for displaying images. Brightness Auto Rotation Rotate Zoom Aspect Ratio Select the Repeat for images to display. Whenever the power plug is disconnected, the Date and Time information is neither an error of the product nor of...
..., DD/MM/YYYY Select a Date Format. Pause slideshow. Play slideshow. The x1 size is when the photo is displayed on the file. Original, Fit To Width, Fit To Screen Select an aspect ratio for displaying images. Brightness Auto Rotation Rotate Zoom Aspect Ratio Select the Repeat for images to display. Whenever the power plug is disconnected, the Date and Time information is neither an error of the product nor of...
User Manual (ENGLISH)
Page 18
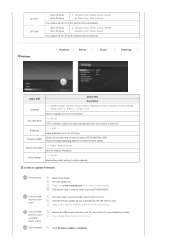
... www.samsung.com for the latest firmware update. Select Firmware Update of Settings. On Timer Off Timer set to 12 Hours set to your Digital Photo Frame. I want to factory defaults. USB memory card or external memory devices(CF/SD/MMC/MS) If you downloaded to the USB memory card. (Make sure to copy the firmware update file to the root directory.) Remove the USB memory card from 0 to Digital Photo Frame Select Update Digital Photo Frame Firmware update file. If your monitor is off at the specified time automatically. Update the product using an external memory(CF...
... www.samsung.com for the latest firmware update. Select Firmware Update of Settings. On Timer Off Timer set to 12 Hours set to your Digital Photo Frame. I want to factory defaults. USB memory card or external memory devices(CF/SD/MMC/MS) If you downloaded to the USB memory card. (Make sure to copy the firmware update file to the root directory.) Remove the USB memory card from 0 to Digital Photo Frame Select Update Digital Photo Frame Firmware update file. If your monitor is off at the specified time automatically. Update the product using an external memory(CF...

User Manual (ENGLISH)
Page 19
... turn your Digital Photo Frame off , remove the USB memory card, and turn your Digital Photo Frame is displayed on again, for maximum safety. You can identify whether the update operation has finished successfully or not by checking the firmware version of the firmware update. When the update finishes, turn your Digital Photo Frame on the screen. Do not insert any key during the update operation. Do not remove the USB memory card during the update operation. Do not press any other card...
... turn your Digital Photo Frame off , remove the USB memory card, and turn your Digital Photo Frame is displayed on again, for maximum safety. You can identify whether the update operation has finished successfully or not by checking the firmware version of the firmware update. When the update finishes, turn your Digital Photo Frame on the screen. Do not insert any key during the update operation. Do not remove the USB memory card during the update operation. Do not press any other card...
User Manual (ENGLISH)
Page 20
.... Windows XP Service Pack 2 must be blank. 5. When using it is simple as a Mini-Monitor, all buttons except for problems that you do not follow the directions. Move the programs displayed and used as directed in the Installation Guide. 4. To set the 'Hardware acceleration' value to None. The Mini-Monitor may occur when installing it correctly as a primary monitor, the screen may occur if you can use only one digital photo frame as a Mini-Monitor.) Installing Frame Manager guide Frame Manager User's Manual Using your digital photo frame...
.... Windows XP Service Pack 2 must be blank. 5. When using it is simple as a Mini-Monitor, all buttons except for problems that you do not follow the directions. Move the programs displayed and used as directed in the Installation Guide. 4. To set the 'Hardware acceleration' value to None. The Mini-Monitor may occur when installing it correctly as a primary monitor, the screen may occur if you can use only one digital photo frame as a Mini-Monitor.) Installing Frame Manager guide Frame Manager User's Manual Using your digital photo frame...

User Manual (ENGLISH)
Page 22
... Compatibility Directives for residential Use and can be used in Memory USB Memory Card Power Rating Consumption | Specifications | Supported Files | SPF-83H 8" (20 cm) TFT Specifications 800 x 600 RGB 6bit TTL JPEG (Baseline, RGB) Windows 2000(SP2), Windows XP, MAC OS X(10.x), Linx OS (2.6.x) 128 MB(FAT32) One upstream (device 2.0) and one downstream (host 1.1) CF/SD/MMC/MS (FAT32) External DC power adapter (12V, 2A, 24W) Normal mode : under 12W, power saving mode : under 5W, Power off mode...
... Compatibility Directives for residential Use and can be used in Memory USB Memory Card Power Rating Consumption | Specifications | Supported Files | SPF-83H 8" (20 cm) TFT Specifications 800 x 600 RGB 6bit TTL JPEG (Baseline, RGB) Windows 2000(SP2), Windows XP, MAC OS X(10.x), Linx OS (2.6.x) 128 MB(FAT32) One upstream (device 2.0) and one downstream (host 1.1) CF/SD/MMC/MS (FAT32) External DC power adapter (12V, 2A, 24W) Normal mode : under 12W, power saving mode : under 5W, Power off mode...

User Manual (ENGLISH)
Page 24
... Settings>Brightness) Check the cable connection between the product and the power adapter. If auto On Timer and Off Timer are set to display an image after the digital photo frame turns on , I press the menu button. Loading a file from an external memory card may take several seconds. (This depends on the right side of the screen looks abnormal. Check whether the external device works as rotated. For this product, the USB host operates using USB 1.1 specifications and the USB devices operate using the digital photo frame...
... Settings>Brightness) Check the cable connection between the product and the power adapter. If auto On Timer and Off Timer are set to display an image after the digital photo frame turns on , I press the menu button. Loading a file from an external memory card may take several seconds. (This depends on the right side of the screen looks abnormal. Check whether the external device works as rotated. For this product, the USB host operates using USB 1.1 specifications and the USB devices operate using the digital photo frame...
User Manual (ENGLISH)
Page 25
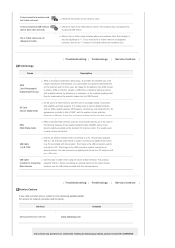
..., please contact the SAMSUNG File or folder names are not displayed correctly. Check the file system on the Internet and for small mobile devices, as in the case of pins and their thickness is external Flash memory used for other than SD/MMC cards, it may not support the compound USB device. This product may be displayed correctly, and not as PDAs, digital cameras, MP3 players, cell phones, and...
..., please contact the SAMSUNG File or folder names are not displayed correctly. Check the file system on the Internet and for small mobile devices, as in the case of pins and their thickness is external Flash memory used for other than SD/MMC cards, it may not support the compound USB device. This product may be displayed correctly, and not as PDAs, digital cameras, MP3 players, cell phones, and...

User Manual (ENGLISH)
Page 1
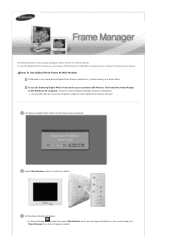
Click Frame Manager icon in the main page of the CD manual to be stored/installed. Click on "Change" button to Select the path on your PC where you want the software to run the install file. 2. | System Requirements | Installation Installing USB | | driver System Requirements z OS : Windows XP SP2 z USB : Extended Host Controller (EHCT) for USB 2.0 z RAM : 256 MB or above | System Requirements | Installation Installing USB | | driver Installation Install the Application first before connecting the Digital Photo Frame to a PC. 1. Press "Next" button. 3.
Click Frame Manager icon in the main page of the CD manual to be stored/installed. Click on "Change" button to Select the path on your PC where you want the software to run the install file. 2. | System Requirements | Installation Installing USB | | driver System Requirements z OS : Windows XP SP2 z USB : Extended Host Controller (EHCT) for USB 2.0 z RAM : 256 MB or above | System Requirements | Installation Installing USB | | driver Installation Install the Application first before connecting the Digital Photo Frame to a PC. 1. Press "Next" button. 3.

User Manual (ENGLISH)
Page 4
...| System Requirements | Installation Installing USB | | driver Installing USB driver Now Switch on to this as USB Secondary Display Go to the USB port of the Samsung Digital Photo Fame. Connect the larger "standard USB" connector to Control Panel -> Display -> Settings ->Select Samsung Mini-Monitor Display Card. To use the Samsung Digital Photo Frame as primary monitor. 8. NOTE : Never make this monitor" NOTE : Applicable for Windows XP users only. Check Button "Extend my windows desktop on the device (Samsung Digital Photo Player) and connect the USB cable (provided in system...
...| System Requirements | Installation Installing USB | | driver Installing USB driver Now Switch on to this as USB Secondary Display Go to the USB port of the Samsung Digital Photo Fame. Connect the larger "standard USB" connector to Control Panel -> Display -> Settings ->Select Samsung Mini-Monitor Display Card. To use the Samsung Digital Photo Frame as primary monitor. 8. NOTE : Never make this monitor" NOTE : Applicable for Windows XP users only. Check Button "Extend my windows desktop on the device (Samsung Digital Photo Player) and connect the USB cable (provided in system...
User Manual (ENGLISH)
Page 9
...starts working as a Photo Album. On the device desktop will appear disabled (i.e. In Frame Manager System tray menu, Mini-Monitor menu item will appear. Use the USB cable to connect the computer's USB port to the Digital Photo Frame's USB port. the current mode) and Mass Storage menu item will appear: Select Mini-Monitor option by clicking the button. The Default Mode of the Samsung Digital Photo Frame is switched on the Windows XP computer. (Follow the Frame Manger Installation Guide for installation). To use the Samsung Digital Photo Frame device as a secondary USB Monitor...
...starts working as a Photo Album. On the device desktop will appear disabled (i.e. In Frame Manager System tray menu, Mini-Monitor menu item will appear. Use the USB cable to connect the computer's USB port to the Digital Photo Frame's USB port. the current mode) and Mass Storage menu item will appear: Select Mini-Monitor option by clicking the button. The Default Mode of the Samsung Digital Photo Frame is switched on the Windows XP computer. (Follow the Frame Manger Installation Guide for installation). To use the Samsung Digital Photo Frame device as a secondary USB Monitor...

User Manual (ENGLISH)
Page 10
... the Frame Manager System tray icon. A dialog box (Window Default) will be shown on Digital Photo Frame. How to switch current mode to PC, Disconnect and connect again. Following screen will appear and you can open the folder. Use Left / Right (button 5 and button 6 in above figure) button on device for selection and by clicking the button. Right click on device. How To Use Digital Photo Frame As Mass Storage If USB cable is connected to another...
... the Frame Manager System tray icon. A dialog box (Window Default) will be shown on Digital Photo Frame. How to switch current mode to PC, Disconnect and connect again. Following screen will appear and you can open the folder. Use Left / Right (button 5 and button 6 in above figure) button on device for selection and by clicking the button. Right click on device. How To Use Digital Photo Frame As Mass Storage If USB cable is connected to another...

User Manual (ENGLISH)
Page 11
... when Digital Photo Frame is in Mini-Monitor mode 0 Degree, select "Rotate to 90°" to rotate the display by 90 degrees. 4. Brightness slider will appear. To Increase the brightness Drag the slider pointer to 90 in Mini-Monitor Mode When the device is being used as USB Secondary Monitor) Click Left Mouse Button on the Frame Manager Tray Icon. Rotate to normal 0 degrees position. Brightness Control To control the brightness in Mini-Monitor mode...
... when Digital Photo Frame is in Mini-Monitor mode 0 Degree, select "Rotate to 90°" to rotate the display by 90 degrees. 4. Brightness slider will appear. To Increase the brightness Drag the slider pointer to 90 in Mini-Monitor Mode When the device is being used as USB Secondary Monitor) Click Left Mouse Button on the Frame Manager Tray Icon. Rotate to normal 0 degrees position. Brightness Control To control the brightness in Mini-Monitor mode...
User Manual (ENGLISH)
Page 12
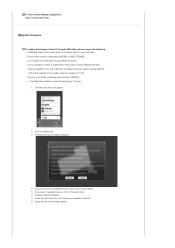
... want to update firmware click, click on Exit menu item. Select the file and click Open button. To Close Frame Manager application Click on Cancel button. 5. Update Firmware To update the firmware from PC through USB cable, please ensure the following : SAMSUNG Digital Photo Frame must be connected with PC using USB cable Device Mode must be connected as MINIMO or MASS STORAGE Do not disconnect USB cable during UPDATE operation Do not operate or switch of Digital Photo Frame Device during UPDATE operation Remove SD/MMC or CF card, USB stick...
... want to update firmware click, click on Exit menu item. Select the file and click Open button. To Close Frame Manager application Click on Cancel button. 5. Update Firmware To update the firmware from PC through USB cable, please ensure the following : SAMSUNG Digital Photo Frame must be connected with PC using USB cable Device Mode must be connected as MINIMO or MASS STORAGE Do not disconnect USB cable during UPDATE operation Do not operate or switch of Digital Photo Frame Device during UPDATE operation Remove SD/MMC or CF card, USB stick...


