User Manual
Page 2
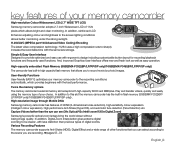
... Digital Zoom) Samsung's powerful optical zoom lenses bring the world closer without losing image quality. H.264/AVC (MPEG4 part 10/Advanced Video Coding) Encoding The latest video compression technology, H.264 uses a high compression rate to the screen lighting conditions allows better monitoring under the strong sunlight. User-friendly Functions User-friendly EASY Q optimizes your choice. In addition, reinforced LCD Enhancer adjusting colour and brightness to sharply increase the recordable time...
... Digital Zoom) Samsung's powerful optical zoom lenses bring the world closer without losing image quality. H.264/AVC (MPEG4 part 10/Advanced Video Coding) Encoding The latest video compression technology, H.264 uses a high compression rate to the screen lighting conditions allows better monitoring under the strong sunlight. User-friendly Functions User-friendly EASY Q optimizes your choice. In addition, reinforced LCD Enhancer adjusting colour and brightness to sharply increase the recordable time...

User Manual
Page 3
... photos). Flexible 4:3 & 16:9 recording and viewing By offering a choice of recording in this memory camcorder since no time is captured for playback on your PC USB 2.0 enables the smooth transfer of movies (or photos) to a computer. Capturing Photo Image Captures a moving subject instantly and saves the scene as a photo image. ➥page 48 Easy Upload to YouTube You can upload recorded movies to YouTube using the CyberLink MediaShow4. ➥page 98 Enjoying Various Playback Features Unlike tape operation, playback...
... photos). Flexible 4:3 & 16:9 recording and viewing By offering a choice of recording in this memory camcorder since no time is captured for playback on your PC USB 2.0 enables the smooth transfer of movies (or photos) to a computer. Capturing Photo Image Captures a moving subject instantly and saves the scene as a photo image. ➥page 48 Easy Upload to YouTube You can upload recorded movies to YouTube using the CyberLink MediaShow4. ➥page 98 Enjoying Various Playback Features Unlike tape operation, playback...
User Manual
Page 5
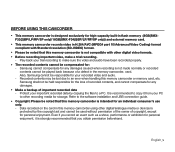
.../RP/SP only)/16GB(SMX-F34(0)BP/LP/RP/SP only)) and external memory card. • This memory camcorder records video in H.264/AVC (MPEG4 part 10/Advanced Video Coding) format compliant with other digital/analogue media or devices is protected by copying the files to a PC. Protect your trial recording to the software installation and USB connection guide. • Copyright: Please be played back because of a defect in the memory camcorder, card. English_v Refer to...
.../RP/SP only)/16GB(SMX-F34(0)BP/LP/RP/SP only)) and external memory card. • This memory camcorder records video in H.264/AVC (MPEG4 part 10/Advanced Video Coding) format compliant with other digital/analogue media or devices is protected by copying the files to a PC. Protect your trial recording to the software installation and USB connection guide. • Copyright: Please be played back because of a defect in the memory camcorder, card. English_v Refer to...

User Manual
Page 7
... thinner: - During playback of unusual ambient temperature: - At worst the memory camcorder could deteriorate. - Calcium and other chemicals dissolved in water could scatter in picture and sound. When using a chemical cleaning cloth, follow the instructions. • Keep the memory card out of reach of the memory camcorder, which could cause it to operate abnormally. • Do not clean the memory camcorder body with the LCD screen exposed to...
... thinner: - During playback of unusual ambient temperature: - At worst the memory camcorder could deteriorate. - Calcium and other chemicals dissolved in water could scatter in picture and sound. When using a chemical cleaning cloth, follow the instructions. • Keep the memory card out of reach of the memory camcorder, which could cause it to operate abnormally. • Do not clean the memory camcorder body with the LCD screen exposed to...

User Manual
Page 9
... & left view 11 Rear & bottom view 12 Using the accessories 14 Connecting a power source 22 Basic operation of your memory camcorder 23 LCD screen indicators 30 Turning the screen indicators on/off ( ) 31 Using the LCD enhancer 32 Adjusting the LCD screen 32 Using the MENU button 32 Using the Control buttons 34 Shortcut menu (OK Guide) 36 Initial setting : Time Zone, Date and Time & OSD Language 39 Selecting the storage media 40 Inserting / ejecting the memory card 41 Selecting the suitable memory card 44 Recordable time and...
... & left view 11 Rear & bottom view 12 Using the accessories 14 Connecting a power source 22 Basic operation of your memory camcorder 23 LCD screen indicators 30 Turning the screen indicators on/off ( ) 31 Using the LCD enhancer 32 Adjusting the LCD screen 32 Using the MENU button 32 Using the Control buttons 34 Shortcut menu (OK Guide) 36 Initial setting : Time Zone, Date and Time & OSD Language 39 Selecting the storage media 40 Inserting / ejecting the memory card 41 Selecting the suitable memory card 44 Recordable time and...

User Manual
Page 15
... these items is not included. getting to the cradle when connecting external devices using the cradle. • Your camcorder includes user manual CD and quick start guide Core filter User manual CD Software CD* Carrying Case* • The contents may vary by model. For more detailed instructions, refer to the user manual (PDF) on the sales region. • Parts and accessories are available at your nearest Samsung dealer.
... these items is not included. getting to the cradle when connecting external devices using the cradle. • Your camcorder includes user manual CD and quick start guide Core filter User manual CD Software CD* Carrying Case* • The contents may vary by model. For more detailed instructions, refer to the user manual (PDF) on the sales region. • Parts and accessories are available at your nearest Samsung dealer.

User Manual
Page 25
... time, then reattach it to the memory camcorder. • The continuous recording times in the operating instructions are not operating it may not turn on normally within 5 minutes, use of the LCD screen or using the fast forward or rewind buttons wears out the battery pack faster. • Remove the battery pack from the approximate continuous recording times given in the instructions. A battery pack which turns off when you can set the "Auto Power Off" function...
... time, then reattach it to the memory camcorder. • The continuous recording times in the operating instructions are not operating it may not turn on normally within 5 minutes, use of the LCD screen or using the fast forward or rewind buttons wears out the battery pack faster. • Remove the battery pack from the approximate continuous recording times given in the instructions. A battery pack which turns off when you can set the "Auto Power Off" function...

User Manual
Page 29
... [ ] (recording)) 3 Time counter (movie recording time: remaining recordable time) 4 LCD Enhancer * 5 Storage media (Built-in memory (8GB (SMXF33(2)BP/LP/RP/SP only)/16GB (SMXF34(0)BP/LP/RP/SP only)) or memory card) 6 Battery info. (Remaining battery level/time) 7 Movie image resolution 8 Anti-Shake (HDIS) 9 Wind Cut 10 Back Light 11 Fader * 12 Zoom (Optical zoom/Intelli-zoom / Digital zoom) 13 Date/Time 14 Time Zone 15 Digital Effect 16 Manual Shutter */ C.Nite * 17 Manual Exposure * 18 Manual Focus * / Face Detection * 19 White Balance 20...
... [ ] (recording)) 3 Time counter (movie recording time: remaining recordable time) 4 LCD Enhancer * 5 Storage media (Built-in memory (8GB (SMXF33(2)BP/LP/RP/SP only)/16GB (SMXF34(0)BP/LP/RP/SP only)) or memory card) 6 Battery info. (Remaining battery level/time) 7 Movie image resolution 8 Anti-Shake (HDIS) 9 Wind Cut 10 Back Light 11 Fader * 12 Zoom (Optical zoom/Intelli-zoom / Digital zoom) 13 Date/Time 14 Time Zone 15 Digital Effect 16 Manual Shutter */ C.Nite * 17 Manual Exposure * 18 Manual Focus * / Face Detection * 19 White Balance 20...

User Manual
Page 38
... memory camcorder. This is convenient during playback. • See page 87 to adjust brightness and colour of the hinge that connects the LCD screen to make a selection when selecting movie or photo images or menus. 1. Open up / down , left / right. 2. preparation ADJUSTING THE LCD SCREEN 1. WARNING USING THE MENU BUTTON 1. Set the desired mode by pressing the MODE button. 2. Rotate it facing out. MENU button does not operate in the EASY Q mode. • Using the OK button...
... memory camcorder. This is convenient during playback. • See page 87 to adjust brightness and colour of the hinge that connects the LCD screen to make a selection when selecting movie or photo images or menus. 1. Open up / down , left / right. 2. preparation ADJUSTING THE LCD SCREEN 1. WARNING USING THE MENU BUTTON 1. Set the desired mode by pressing the MODE button. 2. Rotate it facing out. MENU button does not operate in the EASY Q mode. • Using the OK button...
User Manual
Page 47
... switch down. • Due to change In File Allocation System and physical specifications, SDHC memory card can be used , they may fail to the direction of files recorded on its operation manual. The following capacity: 512MB ~ 16GB Terminals • Compatible recording media - Protection tab (512MB ~16GB) • For movie recording, use a SDHC memory card and MMC plus. (If needed, buy such products with this memory camcorder, you use a SDHC memory card...
... switch down. • Due to change In File Allocation System and physical specifications, SDHC memory card can be used , they may fail to the direction of files recorded on its operation manual. The following capacity: 512MB ~ 16GB Terminals • Compatible recording media - Protection tab (512MB ~16GB) • For movie recording, use a SDHC memory card and MMC plus. (If needed, buy such products with this memory camcorder, you use a SDHC memory card...

User Manual
Page 51
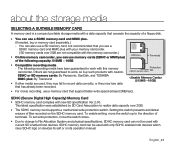
... memory card using the memory camcorder. • Movie ( or photo) images recorded by this memory camcorder. Perform the formatting directly on this memory camcorder. Memory cards of bigger than 16GB in capacity may not work properly. • The memory card that is used to store a movie can cause unwritable area, which may result in the order of "TV Super Fine", "TV Fine", "TV Normal", "Web&Mobile"). English_45 Some cards may stop with a message of "Low speed card...
... memory card using the memory camcorder. • Movie ( or photo) images recorded by this memory camcorder. Perform the formatting directly on this memory camcorder. Memory cards of bigger than 16GB in capacity may not work properly. • The memory card that is used to store a movie can cause unwritable area, which may result in the order of "TV Super Fine", "TV Fine", "TV Normal", "Web&Mobile"). English_45 Some cards may stop with a message of "Low speed card...
User Manual
Page 52
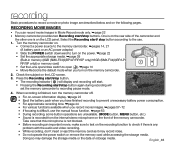
... not operate the power switch or remove the memory card while accessing the storage media. RECORDING MOVIE IMAGES • You can record movie images in memory (8GB (SMX-F33(2)BP/LP/RP/SP only)/16GB (SMX-F34(0)BP/LP/ RP/SP only)) or memory card) • Set the Lens open ( ). ➥page 10 • Movie Record is the default mode when you turn the memory camcorder off. • For on-screen information display. ➥page 23 • Eject the battery pack when you record movie images...
... not operate the power switch or remove the memory card while accessing the storage media. RECORDING MOVIE IMAGES • You can record movie images in memory (8GB (SMX-F33(2)BP/LP/RP/SP only)/16GB (SMX-F34(0)BP/LP/ RP/SP only)) or memory card) • Set the Lens open ( ). ➥page 10 • Movie Record is the default mode when you turn the memory camcorder off. • For on-screen information display. ➥page 23 • Eject the battery pack when you record movie images...
User Manual
Page 54
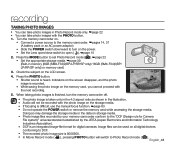
...)/16GB (SMX-F34(0)BP/ LP/RP/SP only)) or memory card) 3. Doing so may damage the storage media or the data on the LCD screen. 99999 4. Indicators on the screen disappear, and the photo image is recorded. • While saving the photo image on the power. • Set the Lens open/close switch to DCF. • The recorded photo image size is 800X600. • In Movie Record mode ( ), pressing PHOTO button will not be used on all digital devices conforming to open ( ). ➥...
...)/16GB (SMX-F34(0)BP/ LP/RP/SP only)) or memory card) 3. Doing so may damage the storage media or the data on the LCD screen. 99999 4. Indicators on the screen disappear, and the photo image is recorded. • While saving the photo image on the power. • Set the Lens open/close switch to DCF. • The recorded photo image size is 800X600. • In Movie Record mode ( ), pressing PHOTO button will not be used on all digital devices conforming to open ( ). ➥...

User Manual
Page 56
...view recorded movie and photo images in thumbnail index view and play them in thumbnail view only. 99999 Photo Select English_50 CHANGING THE PLAYBACK MODE • Pressing the MODE button changes the operation mode to Video Record( ),Photo record( ),and Video/Photo Play ( )mode in turn. • According to selected recording mode,recordings will be stored in video or photo thumbnail index view. • To switch between video and photo thumbnails in the Video/Photo Play mode,press the MENU button and use the control button to select "Play Mode"->"Video" or "Photo".Setting the Play...
...view recorded movie and photo images in thumbnail index view and play them in thumbnail view only. 99999 Photo Select English_50 CHANGING THE PLAYBACK MODE • Pressing the MODE button changes the operation mode to Video Record( ),Photo record( ),and Video/Photo Play ( )mode in turn. • According to selected recording mode,recordings will be stored in video or photo thumbnail index view. • To switch between video and photo thumbnails in the Video/Photo Play mode,press the MENU button and use the control button to select "Play Mode"->"Video" or "Photo".Setting the Play...
User Manual
Page 57
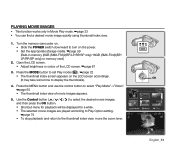
... display the thumbnails). 4. Use the Control button ( / / / ) to the thumbnail index view, move the zoom lever. OK Photo English_51 Open the LCD screen. • Adjust brightness or colour of movie images appears. 5. MENU • The selected movie images are played according to Play Option setting. ➥page 74 • To stop playback and return to select the desired movie images, and then press the OK button. • Shortcut menu for playback will be displayed for a while. Turn the memory camcorder...
... display the thumbnails). 4. Use the Control button ( / / / ) to the thumbnail index view, move the zoom lever. OK Photo English_51 Open the LCD screen. • Adjust brightness or colour of movie images appears. 5. MENU • The selected movie images are played according to Play Option setting. ➥page 74 • To stop playback and return to select the desired movie images, and then press the OK button. • Shortcut menu for playback will be displayed for a while. Turn the memory camcorder...
User Manual
Page 64
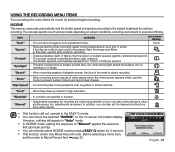
.... Before selecting a menu item, set the desired shooting functions using menus. • This function will appear in a wedding or on -screen display "Auto" - When recording snowy scenes of subject portrait face, etc. Prevents overexposure of other places where the whole screen appears white, use this case, use the Auto mode for shooting are made automatically, but you can setup the menu items for movie (or photo) images recording. when strong light strikes the subject...
.... Before selecting a menu item, set the desired shooting functions using menus. • This function will appear in a wedding or on -screen display "Auto" - When recording snowy scenes of subject portrait face, etc. Prevents overexposure of other places where the whole screen appears white, use this case, use the Auto mode for shooting are made automatically, but you can setup the menu items for movie (or photo) images recording. when strong light strikes the subject...

User Manual
Page 67
... not directly shining into the lens. • This function works only Movie Record mode. item Contents "Auto" The memory camcorder automatically sets the appropriate aperture value. The adjusted value is fixed at 1/50 second. Before selecting a menu item, set the shutter speed manually. The flickering that usually appear when shooting a TV screen become narrower. 1/120 1/250, 1/500, 1/1000 The shutter speed is applied right after pressing the Control button ( / ) to adjust the shutter speed...
... not directly shining into the lens. • This function works only Movie Record mode. item Contents "Auto" The memory camcorder automatically sets the appropriate aperture value. The adjusted value is fixed at 1/50 second. Before selecting a menu item, set the shutter speed manually. The flickering that usually appear when shooting a TV screen become narrower. 1/120 1/250, 1/500, 1/1000 The shutter speed is applied right after pressing the Control button ( / ) to adjust the shutter speed...

User Manual
Page 72
... functions : "Mosaic", "Mirror", "Stepprinting" (Digital Effect). If you can select the desired LCD display aspect ratio for recording or playback (16:9 Wide/4:3 aspect ratio). "Web & Mobile" Movie images recorded in the 640x480 resolution at super-fine image quality. Before selecting a menu item, set the mode to use the standard display aspect ratio of 16:9 aspect ratio. However, the better the resolution is, the more memory...
... functions : "Mosaic", "Mirror", "Stepprinting" (Digital Effect). If you can select the desired LCD display aspect ratio for recording or playback (16:9 Wide/4:3 aspect ratio). "Web & Mobile" Movie images recorded in the 640x480 resolution at super-fine image quality. Before selecting a menu item, set the mode to use the standard display aspect ratio of 16:9 aspect ratio. However, the better the resolution is, the more memory...

User Manual
Page 103
... later) and Windows 2000. Execute the procedure in "VIEWING THE CONTENTS OF STORAGE MEDIA." ➥page 95 • The folders in the PC. The movie images recorded on the PC Use the provided software (CyberLink MediaShow4) to play back those. 1. Playing Back Files on your memory camcorder may not be played back in memory (8GB (SMX-F33(2)BP/ LP/RP/SP only)/16GB (SMX-F34(0)BP/LP/RP...
... later) and Windows 2000. Execute the procedure in "VIEWING THE CONTENTS OF STORAGE MEDIA." ➥page 95 • The folders in the PC. The movie images recorded on the PC Use the provided software (CyberLink MediaShow4) to play back those. 1. Playing Back Files on your memory camcorder may not be played back in memory (8GB (SMX-F33(2)BP/ LP/RP/SP only)/16GB (SMX-F34(0)BP/LP/RP...
User Manual
Page 113
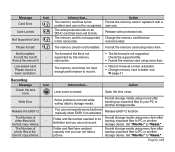
... "Reset." Release write protection tab. Informs that ... Format the memory card using menu item after backup important files to faster one . The memory card has some functions manually when EASY Q is not supported by this camcorder. Set "File No." Change the memory card that we recommended. Format storage media using menu item. Folder and files have enough performance to its limitation and you can not record. Message Card Error Icon Card Locked Not Supported Card Please format! Open the lens...
... "Reset." Release write protection tab. Informs that ... Format the memory card using menu item after backup important files to faster one . The memory card has some functions manually when EASY Q is not supported by this camcorder. Set "File No." Change the memory card that we recommended. Format storage media using menu item. Folder and files have enough performance to its limitation and you can not record. Message Card Error Icon Card Locked Not Supported Card Please format! Open the lens...


