User Guide
Page 2
...touch dangerous voltage points or short-out parts that may exclude the refer ence to the presence of the monitor should follow Samsung's instructions and should be walked on this monitor near water for example, near a bathtub, wash bowl, kitchen sink or laun dry tub, in ... monitor. 17.Servicing : Do not attempt to . 10.Installation : Do not install near or over a radiator or heat register. Refer all servicing to persons. A monitor that is operated. 2. Use only with the monitor. If you to the presence of any kind into a grounding type power outlet. USER'S MANUAL ...
...touch dangerous voltage points or short-out parts that may exclude the refer ence to the presence of the monitor should follow Samsung's instructions and should be walked on this monitor near water for example, near a bathtub, wash bowl, kitchen sink or laun dry tub, in ... monitor. 17.Servicing : Do not attempt to . 10.Installation : Do not install near or over a radiator or heat register. Refer all servicing to persons. A monitor that is operated. 2. Use only with the monitor. If you to the presence of any kind into a grounding type power outlet. USER'S MANUAL ...
User Guide
Page 3
...manual, may be sure the service technician has used replacement parts specified by the party responsible for a class A digital device, pursuant to radio communications. Information to user Changes or modifications not expressly approved by Samsung or have fallen into the monitor. a. If the monitor... radiate radio frequency energy and, if not installed and used in a commercial environment. USER'S MANUAL 19.Damage Requiring Service : Unplug this monitor from the U.S. If the monitor has been dropped or the cabinet has been damaged. These limits are designed to primary...
...manual, may be sure the service technician has used replacement parts specified by the party responsible for a class A digital device, pursuant to radio communications. Information to user Changes or modifications not expressly approved by Samsung or have fallen into the monitor. a. If the monitor... radiate radio frequency energy and, if not installed and used in a commercial environment. USER'S MANUAL 19.Damage Requiring Service : Unplug this monitor from the U.S. If the monitor has been dropped or the cabinet has been damaged. These limits are designed to primary...
User Guide
Page 4
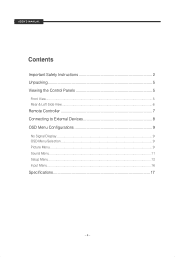
USER'S MANUAL Contents Important Safety Instructions 2 Unpacking 5 Viewing the Control Panels 5 Front View...5 Rear & Left Side View...6 Remote Controller 7 Connecting to External Devices 8 OSD Menu Configurations 9 No Signal Display...9 OSD Menu Selection ...9 Picture Menu ...9 Sound Menu...11 Setup Menu ...12 Input Menu ...16 Specifications 17 - 4 -
USER'S MANUAL Contents Important Safety Instructions 2 Unpacking 5 Viewing the Control Panels 5 Front View...5 Rear & Left Side View...6 Remote Controller 7 Connecting to External Devices 8 OSD Menu Configurations 9 No Signal Display...9 OSD Menu Selection ...9 Picture Menu ...9 Sound Menu...11 Setup Menu ...12 Input Menu ...16 Specifications 17 - 4 -

User Guide
Page 5
.... / FREEZE/AUTO Decrease the level of active function, and selects OSD menu. TFT-LCD MONITOR REMOTE & BATTERIES VGA SIGNAL CABLE POWER CORD USER'S MANUAL USER'S MANUAL CD Viewing the Control Panels Front View IR Sensor Remote controller sensor. The power is turned on. USER'S MANUAL Unpacking Remove the package cover and place the product on a flat and secure...
.... / FREEZE/AUTO Decrease the level of active function, and selects OSD menu. TFT-LCD MONITOR REMOTE & BATTERIES VGA SIGNAL CABLE POWER CORD USER'S MANUAL USER'S MANUAL CD Viewing the Control Panels Front View IR Sensor Remote controller sensor. The power is turned on. USER'S MANUAL Unpacking Remove the package cover and place the product on a flat and secure...
User Guide
Page 6
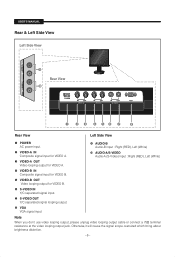
... brightness distortion. - 6 - AUDIO-B Audio-B input : Right (RED), Left (White) AUDIO-A/S-VIDEO Audio-A (S-Video) input : Right (RED), Left (White) VIDEO-B IN Composite signal input for VIDEO A. USER'S MANUAL Rear & Left Side View Left Side View Rear View Rear View Left Side View POWER AC power input. S-VIDEO OUT Y/C separated signal looping output. VIDEO...
... brightness distortion. - 6 - AUDIO-B Audio-B input : Right (RED), Left (White) AUDIO-A/S-VIDEO Audio-A (S-Video) input : Right (RED), Left (White) VIDEO-B IN Composite signal input for VIDEO A. USER'S MANUAL Rear & Left Side View Left Side View Rear View Rear View Left Side View POWER AC power input. S-VIDEO OUT Y/C separated signal looping output. VIDEO...
User Guide
Page 7
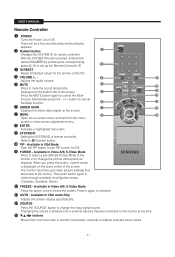
USER'S MANUAL Remote Controller POWER Turns the Power On or Off. There will be a few seconds delay before display appears. MUTE Press to circle through available reconfigured modes. ( Dynamic, Standard, Movie) FREEZE - Available in external devices that are connected to the monitor at the factory. ...menu item to change the input signal source. SYSTEM ID Setting the SYSTEM ID of the monitor or to another horizontally, vertically or adjusts selected menu values. - 7 - The monitor has three auto matic picture settings that are preset at the time. / buttons Moves from...
USER'S MANUAL Remote Controller POWER Turns the Power On or Off. There will be a few seconds delay before display appears. MUTE Press to circle through available reconfigured modes. ( Dynamic, Standard, Movie) FREEZE - Available in external devices that are connected to the monitor at the factory. ...menu item to change the input signal source. SYSTEM ID Setting the SYSTEM ID of the monitor or to another horizontally, vertically or adjusts selected menu values. - 7 - The monitor has three auto matic picture settings that are preset at the time. / buttons Moves from...
User Guide
Page 8
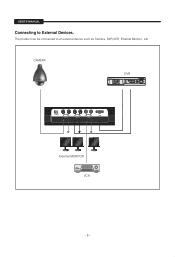
CAMERA DVR External MONITOR VCR - 8 - USER'S MANUAL Connecting to an external device such as Camera, DVR,VCR, External Monitor, etc. The product can be connected to External Devices.
CAMERA DVR External MONITOR VCR - 8 - USER'S MANUAL Connecting to an external device such as Camera, DVR,VCR, External Monitor, etc. The product can be connected to External Devices.
User Guide
Page 9
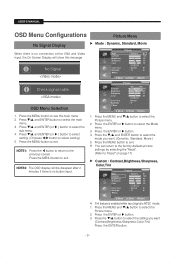
... : 10 Move Enter Return 1. Press the ENTER or button. 4. Press / and ENTER button to exit . Press the ENTER or button to select the sub menu. 4. USER'S MANUAL OSD Menu Configurations Picture Menu No Signal Display When there is NTSC mode. 1. Press / and ENTER (or ) button to select the Mode menu. 3. Press the...
... : 10 Move Enter Return 1. Press the ENTER or button. 4. Press / and ENTER button to exit . Press the ENTER or button to select the sub menu. 4. USER'S MANUAL OSD Menu Configurations Picture Menu No Signal Display When there is NTSC mode. 1. Press / and ENTER (or ) button to select the Mode menu. 3. Press the...
User Guide
Page 10
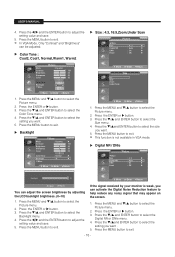
...select the Backlight menu. 4. Press the MENU button to select the Picture menu. 2. Press the MENU and / button to exit. - 10 - USER'S MANUAL 4. Color Tone : Cool2, Cool1, Normal,Warm1, Warm2 Mode Contrast Brightness Sharpness Color Tint Color Tone Backlight More Picture : Dynamic 100 45 50 55...be adjusted. In VGA Mode, Only "Contrast" and "Brightness" can adjust the screen brightness by your monitor is not available in VGA mode. If the signal received by adjusting the LCD backlight brightness. (0~10) 1. Press the / and ENTER button to select the Size menu . 4....
...select the Backlight menu. 4. Press the MENU button to select the Picture menu. 2. Press the MENU and / button to exit. - 10 - USER'S MANUAL 4. Color Tone : Cool2, Cool1, Normal,Warm1, Warm2 Mode Contrast Brightness Sharpness Color Tint Color Tone Backlight More Picture : Dynamic 100 45 50 55...be adjusted. In VGA Mode, Only "Contrast" and "Brightness" can adjust the screen brightness by your monitor is not available in VGA mode. If the signal received by adjusting the LCD backlight brightness. (0~10) 1. Press the / and ENTER button to select the Size menu . 4....
User Guide
Page 11
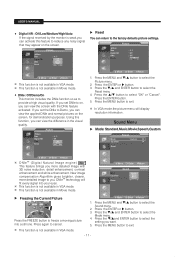
...can view the difference in VGA mode. This function is not available in the visual quality. USER'S MANUAL • Digital NR : Off/Low/Medium/High/Auto If the signal received by the monitor is weak,you . Press the ENTER or button. 3. New image compensation Algorithm gives brighter,...: Off : Off : OK Cancel Move Enter Return This function is not available in Movie mode. • DNIe: Off/Demo/On This monitor includes the DNIe function so as to you can view the screen with 3D noise reduction, detail enhancement, contrast enhancement and white enhancement. This function...
...can view the difference in VGA mode. This function is not available in the visual quality. USER'S MANUAL • Digital NR : Off/Low/Medium/High/Auto If the signal received by the monitor is weak,you . Press the ENTER or button. 3. New image compensation Algorithm gives brighter,...: Off : Off : OK Cancel Move Enter Return This function is not available in Movie mode. • DNIe: Off/Demo/On This monitor includes the DNIe function so as to you can view the screen with 3D noise reduction, detail enhancement, contrast enhancement and white enhancement. This function...
User Guide
Page 12
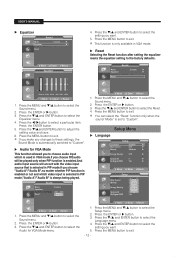
.... 4. Press the / and ENTER button to select the Equalizer menu. 4. Sound Mode : Custom Equalizer Audio for VGA Mode : Off Reset Audio A Audio B Move Enter Return 1. USER'S MANUAL Equalizer Sound Mode : Custom Equalizer Audio for VGA Mode menu.
.... 4. Press the / and ENTER button to select the Equalizer menu. 4. Sound Mode : Custom Equalizer Audio for VGA Mode : Off Reset Audio A Audio B Move Enter Return 1. USER'S MANUAL Equalizer Sound Mode : Custom Equalizer Audio for VGA Mode menu.
User Guide
Page 13
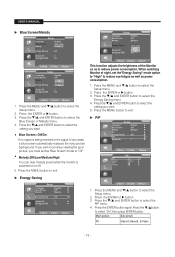
...the setting you must set the"Energy Saving" mode option to "High" to reduce eye fatigue as well as to select the setting you want . 5. USER'S MANUAL Blue Screen/Melody Setup Language Blue Screen Melody PC Energy Saving PIP System ID No Signal OSD : English : Off : On : Off : 1 : ... On Move Enter Return 1. Press the MENU and / button to select the Setup menu. 2. Press the / and ENTER button to reduce power consumption. When watching Monitor at night, set the "Blue Screen" mode to select the PIP menu. 4. Main picture Sub picture PC Video A,Video B, S-Video - 13 - Press the ...
...the setting you must set the"Energy Saving" mode option to "High" to reduce eye fatigue as well as to select the setting you want . 5. USER'S MANUAL Blue Screen/Melody Setup Language Blue Screen Melody PC Energy Saving PIP System ID No Signal OSD : English : Off : On : Off : 1 : ... On Move Enter Return 1. Press the MENU and / button to select the Setup menu. 2. Press the / and ENTER button to reduce power consumption. When watching Monitor at night, set the "Blue Screen" mode to select the PIP menu. 4. Main picture Sub picture PC Video A,Video B, S-Video - 13 - Press the ...
User Guide
Page 14
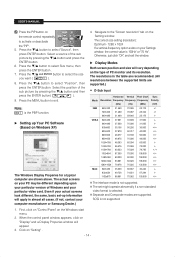
.... Press the / button to select Size menu, then press the ENTER button . 7. Select the position of PC monitor and its resolution. The actual screens on your computer manufacturer or Samsung Dealer.) 4. The set -up Your PC Software (Based on "Setting" . - 14 - Press the / and... SOG is the PBP function. When the control panel window appears, click on the remote control repeatedly to activate or deactivate the "PIP". 5. USER'S MANUAL Press the PIP button on "Display" and a Display Properies window will appear. 3. The resolutions in almost all cases. (If not, contact...
.... Press the / button to select Size menu, then press the ENTER button . 7. Select the position of PC monitor and its resolution. The actual screens on your computer manufacturer or Samsung Dealer.) 4. The set -up Your PC Software (Based on "Setting" . - 14 - Press the / and... SOG is the PBP function. When the control panel window appears, click on the remote control repeatedly to activate or deactivate the "PIP". 5. USER'S MANUAL Press the PIP button on "Display" and a Display Properies window will appear. 3. The resolutions in almost all cases. (If not, contact...
User Guide
Page 15
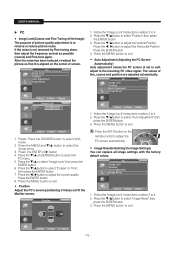
... or "Fine", then press the ENTER button. 7. After the noise has been reduced, re-adjust the picture so that it does not fit the Monitor screen. Press the / button to select the PC menu. 5. Press the ENTER button. 8. Press the MENU button to select "Position",then press the ...the PC screen of set to selfadjust to remove or reduce picture noise. PC Image Lock Position Auto Adjustment Image Reset Move Enter Return 1. USER'S MANUAL PC • Image Lock(Coarse and Fine Tuning of the Image) The purpose of picture quality adjustment is to the incoming PC video signal...
... or "Fine", then press the ENTER button. 7. After the noise has been reduced, re-adjust the picture so that it does not fit the Monitor screen. Press the / button to select the PC menu. 5. Press the ENTER button. 8. Press the MENU button to select "Position",then press the ...the PC screen of set to selfadjust to remove or reduce picture noise. PC Image Lock Position Auto Adjustment Image Reset Move Enter Return 1. USER'S MANUAL PC • Image Lock(Coarse and Fine Tuning of the Image) The purpose of picture quality adjustment is to the incoming PC video signal...
User Guide
Page 16
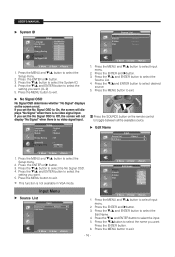
USER'S MANUAL System ID Setup Language : 0 Blue Screen Melody PC : 1 : 2 3 4 Energy Saving : 5 PIP 6 System ID : 7 No Signal OSD : 8 9 Move Enter Return 1. Press the ENTER and button. 3. Press ...
USER'S MANUAL System ID Setup Language : 0 Blue Screen Melody PC : 1 : 2 3 4 Energy Saving : 5 PIP 6 System ID : 7 No Signal OSD : 8 9 Move Enter Return 1. Press the ENTER and button. 3. Press ...
User Guide
Page 17
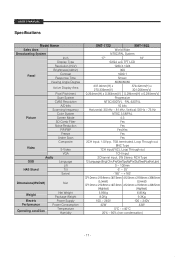
USER'S MANUAL Specifications Model Name Sales Area Broadcasting System Inch Display Type Resolution (HxV) Brightness(cd/m2) ...Tilt Swivel Dimensions(WxDxH) Net Weight Electric Performance Operating condition Net Weight Package Weight Power Supply Power Consumption Temperature Humidity SMT-1722 SMT-1922 World Wide NTSC/PAL System 17" 19" SXGA a-Si TFT LCD 1280 X 1024 300 1000:1 5msec 80/80/80/80 337.92mm(H) x 376.32mm(H) x 270.336mm(V)... (Hightest) 5.95Kg 6.85Kg 8.0Kg 9.3Kg 100 ~ 240V 100 ~ 240V 42W 42W 0°C - +40°C 20% - 90% (non-condensation) - 17 -
USER'S MANUAL Specifications Model Name Sales Area Broadcasting System Inch Display Type Resolution (HxV) Brightness(cd/m2) ...Tilt Swivel Dimensions(WxDxH) Net Weight Electric Performance Operating condition Net Weight Package Weight Power Supply Power Consumption Temperature Humidity SMT-1722 SMT-1922 World Wide NTSC/PAL System 17" 19" SXGA a-Si TFT LCD 1280 X 1024 300 1000:1 5msec 80/80/80/80 337.92mm(H) x 376.32mm(H) x 270.336mm(V)... (Hightest) 5.95Kg 6.85Kg 8.0Kg 9.3Kg 100 ~ 240V 100 ~ 240V 42W 42W 0°C - +40°C 20% - 90% (non-condensation) - 17 -


