User Guide
Page 2
... : All operating and user instructions should use attachments not recommended by Samsung. 9. Attachments : Do not use a mounting accessory recommended by Samsung as they may cause hazards. 7. Accessories : Do not place this monitor during a lightning storm or when it from the wall outlet before the...paying particular attention to cords at plugs, convenience recep tacles, and the point where they exit from the monitor. 14.Lightning : For added protection for this monitor on the monitor. 17.Servicing : Do not attempt to . 10.Installation : Do not install near a swimming pool and the...
... : All operating and user instructions should use attachments not recommended by Samsung. 9. Attachments : Do not use a mounting accessory recommended by Samsung as they may cause hazards. 7. Accessories : Do not place this monitor during a lightning storm or when it from the wall outlet before the...paying particular attention to cords at plugs, convenience recep tacles, and the point where they exit from the monitor. 14.Lightning : For added protection for this monitor on the monitor. 17.Servicing : Do not attempt to . 10.Installation : Do not install near a swimming pool and the...
User Guide
Page 3
...correct the interference at his own expense. These limits are covered by Samsung or have fallen into the monitor. Changes or modifications not expressly approved by a qualified technician to restore the monitor to rain or water. This booklet was prepared by the party responsible ...case the user will be required to radio communications. special handling may cause undesired operation. Adjust only those controls that the monitor is likely to cause harmful interference in proper operating condition. This device complies with Canadian ICES-003. "Perchlorate Material - ...
...correct the interference at his own expense. These limits are covered by Samsung or have fallen into the monitor. Changes or modifications not expressly approved by a qualified technician to restore the monitor to rain or water. This booklet was prepared by the party responsible ...case the user will be required to radio communications. special handling may cause undesired operation. Adjust only those controls that the monitor is likely to cause harmful interference in proper operating condition. This device complies with Canadian ICES-003. "Perchlorate Material - ...

User Guide
Page 5
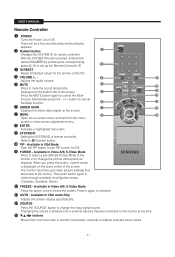
... picture function in the VGA mode when you press the Auto button with the main system. Also, Activates PIP function in the installation location. TFT-LCD MONITOR REMOTE & BATTERIES VGA SIGNAL CABLE POWER CORD USER'S MANUAL USER'S MANUAL CD Viewing the Control Panels Front View IR Sensor Remote controller sensor. MENU Activates...
... picture function in the VGA mode when you press the Auto button with the main system. Also, Activates PIP function in the installation location. TFT-LCD MONITOR REMOTE & BATTERIES VGA SIGNAL CABLE POWER CORD USER'S MANUAL USER'S MANUAL CD Viewing the Control Panels Front View IR Sensor Remote controller sensor. MENU Activates...
User Guide
Page 7
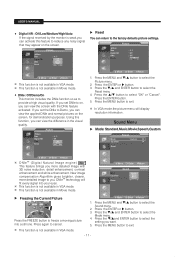
...cancel the Mute function. or + button to mute the sound temporarily. Refer to cancel the Mute function.Alternatively press the - PIP - The monitor has three auto matic picture settings that are preset at the time. / buttons Moves from the menu screen or close screen adjustment menu. Changing ...PIP button to freeze the screen. SYSTEM ID Setting the SYSTEM ID of the screen. Available in external devices that are connected to the monitor at the factory. AUTO - SOURCE Press the 'SOURCE' button to set up the Remote Controller ID ID RESET Resets 01(default value)...
...cancel the Mute function. or + button to mute the sound temporarily. Refer to cancel the Mute function.Alternatively press the - PIP - The monitor has three auto matic picture settings that are preset at the time. / buttons Moves from the menu screen or close screen adjustment menu. Changing ...PIP button to freeze the screen. SYSTEM ID Setting the SYSTEM ID of the screen. Available in external devices that are connected to the monitor at the factory. AUTO - SOURCE Press the 'SOURCE' button to set up the Remote Controller ID ID RESET Resets 01(default value)...
User Guide
Page 8
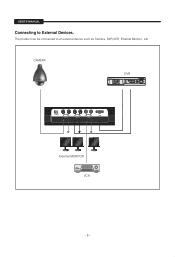
USER'S MANUAL Connecting to an external device such as Camera, DVR,VCR, External Monitor, etc. The product can be connected to External Devices. CAMERA DVR External MONITOR VCR - 8 -
USER'S MANUAL Connecting to an external device such as Camera, DVR,VCR, External Monitor, etc. The product can be connected to External Devices. CAMERA DVR External MONITOR VCR - 8 -
User Guide
Page 10
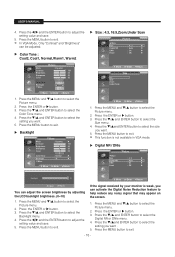
... More Size Digital NR DNle Reset Picture : 4 :3 : Auto : On : OK Backlight 10 Move Enter Return Adjust Return You can adjust the screen brightness by your monitor is not available in VGA mode. Press the MENU button to select the Size menu . 4. If the signal received by adjusting the... LCD backlight brightness. (0~10) 1. Press the / and ENTER button to exit. Press the MENU button to select the Color Tone menu . 4. Press the MENU button to ...
... More Size Digital NR DNle Reset Picture : 4 :3 : Auto : On : OK Backlight 10 Move Enter Return Adjust Return You can adjust the screen brightness by your monitor is not available in VGA mode. Press the MENU button to select the Size menu . 4. If the signal received by adjusting the... LCD backlight brightness. (0~10) 1. Press the / and ENTER button to exit. Press the MENU button to select the Color Tone menu . 4. Press the MENU button to ...
User Guide
Page 11
... button to exit. Press the ENTER or button. 3. This function is not available in Movie mode. • DNIe: Off/Demo/On This monitor includes the DNIe function so as to on the screen. If you set DNIe to provide a high visual quality. Press the ENTER or button.... DNIeTM technology will display resolution information . USER'S MANUAL • Digital NR : Off/Low/Medium/High/Auto If the signal received by the monitor is weak,you can view the difference in VGA mode. Using this function, you can activate this feature to the factory defaults picture settings. Press...
... button to exit. Press the ENTER or button. 3. This function is not available in Movie mode. • DNIe: Off/Demo/On This monitor includes the DNIe function so as to on the screen. If you set DNIe to provide a high visual quality. Press the ENTER or button.... DNIeTM technology will display resolution information . USER'S MANUAL • Digital NR : Off/Low/Medium/High/Auto If the signal received by the monitor is weak,you can view the difference in VGA mode. Using this function, you can activate this feature to the factory defaults picture settings. Press...
User Guide
Page 13
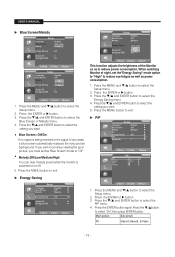
... ID No Signal OSD : English : Off : Medium : Off Low Medium : 0 High : On Auto Move Enter Return This function adjusts the brightness of the Monitor so as power consumption. 1. USER'S MANUAL Blue Screen/Melody Setup Language Blue Screen Melody PC Energy Saving PIP System ID No Signal OSD : English : Off...you must set the"Energy Saving" mode option to "High" to reduce eye fatigue as well as to select the setting you want . 5. When watching Monitor at night, set the "Blue Screen" mode to select the PIP menu. 4. Press the MENU and / button to select the Setup menu. 2. Main ...
... ID No Signal OSD : English : Off : Medium : Off Low Medium : 0 High : On Auto Move Enter Return This function adjusts the brightness of the Monitor so as power consumption. 1. USER'S MANUAL Blue Screen/Melody Setup Language Blue Screen Melody PC Energy Saving PIP System ID No Signal OSD : English : Off...you must set the"Energy Saving" mode option to "High" to reduce eye fatigue as well as to select the setting you want . 5. When watching Monitor at night, set the "Blue Screen" mode to select the PIP menu. 4. Press the MENU and / button to select the Setup menu. 2. Main ...
User Guide
Page 14
... to the "Screen resolution" tab on the Setting window. Even if your computer manufacturer or Samsung Dealer.) 4. The correct size setting (resolution): Optimum- 1280 x 1024 If a vertical-frequency option exists on your particular version of PC monitor and its resolution. Press the MENU button to activate or deactivate the "PIP". 5. The actual...
... to the "Screen resolution" tab on the Setting window. Even if your computer manufacturer or Samsung Dealer.) 4. The correct size setting (resolution): Optimum- 1280 x 1024 If a vertical-frequency option exists on your particular version of PC monitor and its resolution. Press the MENU button to activate or deactivate the "PIP". 5. The actual...
User Guide
Page 15
... MENU and / button to select the PC menu. 5. After the noise has been reduced, re-adjust the picture so that it does not fit the Monitor screen. Press the / button to adjust the screen quality. Press the ENTER button. 4. PC Image Lock Position Auto Adjustment Image Reset Move Enter Coarse Fine...
... MENU and / button to select the PC menu. 5. After the noise has been reduced, re-adjust the picture so that it does not fit the Monitor screen. Press the / button to adjust the screen quality. Press the ENTER button. 4. PC Image Lock Position Auto Adjustment Image Reset Move Enter Coarse Fine...


