User Guide
Page 2
USER'S MANUAL IMPORTANT SAFETY INSTRUCTIONS CAUTION RISK OF ELECTRIC SHOCK DO NOT OPEN CAUTION : TO REDUCE THE RISK OF ELECTRIC SHOCK, DO NOT REMOVE REAR COVER. Heed Warnings : All warnings on an unstable cart, stand, tripod, bracket or table. Any mounting of power supply to your installation site, consult your obsolete outlet. If you are not likely to service this can result in...
USER'S MANUAL IMPORTANT SAFETY INSTRUCTIONS CAUTION RISK OF ELECTRIC SHOCK DO NOT OPEN CAUTION : TO REDUCE THE RISK OF ELECTRIC SHOCK, DO NOT REMOVE REAR COVER. Heed Warnings : All warnings on an unstable cart, stand, tripod, bracket or table. Any mounting of power supply to your installation site, consult your obsolete outlet. If you are not likely to service this can result in...
User Guide
Page 3
... original parts. Operation is available from the wall outlet and refer servicing to qualified service personnel under the following the operating instructions. This booklet was prepared by the party responsible for a Class A digital device, pursuant to Part 15 of Industry Canada. Information to user Changes or modifications not expressly approved by the Federal Communications Commission. When the power-supply cord or plug is...
... original parts. Operation is available from the wall outlet and refer servicing to qualified service personnel under the following the operating instructions. This booklet was prepared by the party responsible for a Class A digital device, pursuant to Part 15 of Industry Canada. Information to user Changes or modifications not expressly approved by the Federal Communications Commission. When the power-supply cord or plug is...
User Guide
Page 4
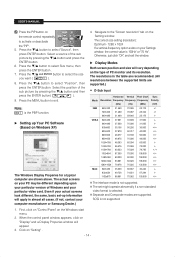
USER'S MANUAL Contents Important Safety Instructions 2 Unpacking 5 Viewing the Control Panels 5 Front View...5 Rear & Left Side View...6 Remote Controller 7 Connecting to External Devices 8 OSD Menu Configurations 9 No Signal Display...9 OSD Menu Selection ...9 Picture Menu ...9 Sound Menu...11 Setup Menu ...12 Input Menu ...16 Specifications 17 - 4 -
USER'S MANUAL Contents Important Safety Instructions 2 Unpacking 5 Viewing the Control Panels 5 Front View...5 Rear & Left Side View...6 Remote Controller 7 Connecting to External Devices 8 OSD Menu Configurations 9 No Signal Display...9 OSD Menu Selection ...9 Picture Menu ...9 Sound Menu...11 Setup Menu ...12 Input Menu ...16 Specifications 17 - 4 -

User Guide
Page 5
...power is no OSD menu on the screen. Still picture function in the VGA mode when you press the Auto button with blue when the power is turned on. Also, activates Auto adjustment function in Video mode when there is turned off by pressing the power switch again and the power LED goes off . TFT-LCD MONITOR REMOTE & BATTERIES VGA SIGNAL CABLE POWER CORD USER'S MANUAL USER'S MANUAL CD Viewing the Control Panels Front View IR Sensor Remote controller sensor. ENTER / SOURCE Selects input source, activates a highlighted menu item. (POWER) ON/OFF Turns the power on or off . Check...
...power is no OSD menu on the screen. Still picture function in the VGA mode when you press the Auto button with blue when the power is turned on. Also, activates Auto adjustment function in Video mode when there is turned off by pressing the power switch again and the power LED goes off . TFT-LCD MONITOR REMOTE & BATTERIES VGA SIGNAL CABLE POWER CORD USER'S MANUAL USER'S MANUAL CD Viewing the Control Panels Front View IR Sensor Remote controller sensor. ENTER / SOURCE Selects input source, activates a highlighted menu item. (POWER) ON/OFF Turns the power on or off . Check...
User Guide
Page 6
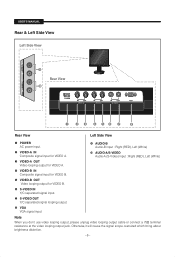
VIDEO-B OUT Video looping output for VIDEO B. S-VIDEO IN Y/C separated signal input. AUDIO-B Audio-B input : Right (RED), Left (White) AUDIO-A/S-VIDEO Audio-A (S-Video) input : Right (RED), Left (White) VIDEO-B IN Composite signal input for VIDEO B. S-VIDEO OUT Y/C separated signal looping output. VIDEO-A IN Composite signal input for VIDEO A. USER'S MANUAL Rear & Left Side View Left Side View Rear View Rear View Left Side View POWER AC power input. VGA VGA signal input Note When you don't use video looping output ,please unplug video looping output cable or connect a ...
VIDEO-B OUT Video looping output for VIDEO B. S-VIDEO IN Y/C separated signal input. AUDIO-B Audio-B input : Right (RED), Left (White) AUDIO-A/S-VIDEO Audio-A (S-Video) input : Right (RED), Left (White) VIDEO-B IN Composite signal input for VIDEO B. S-VIDEO OUT Y/C separated signal looping output. VIDEO-A IN Composite signal input for VIDEO A. USER'S MANUAL Rear & Left Side View Left Side View Rear View Rear View Left Side View POWER AC power input. VGA VGA signal input Note When you don't use video looping output ,please unplug video looping output cable or connect a ...
User Guide
Page 7
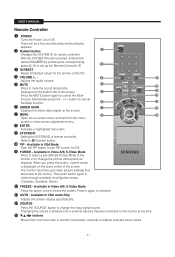
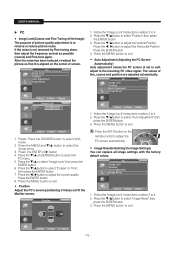
... of the screen. When you press this button, current mode is allowed only in Video A/B, S-Video Mode Press the button once to change the input signal source. Number button Changes the SYSTEM ID for the remote control ID. Changing the source is displayed on the screen. Displayed on -screen menu and exit from one menu item to unfreeze. MENU Open the on the bottom left of remote controller. MUTE Press to Number button. AUTO - Refer to mute the sound temporarily. P.MODE - USER'S MANUAL Remote Controller POWER Turns the Power On...
... of the screen. When you press this button, current mode is allowed only in Video A/B, S-Video Mode Press the button once to change the input signal source. Number button Changes the SYSTEM ID for the remote control ID. Changing the source is displayed on the screen. Displayed on -screen menu and exit from one menu item to unfreeze. MENU Open the on the bottom left of remote controller. MUTE Press to Number button. AUTO - Refer to mute the sound temporarily. P.MODE - USER'S MANUAL Remote Controller POWER Turns the Power On...
User Guide
Page 8
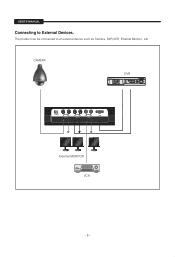
USER'S MANUAL Connecting to an external device such as Camera, DVR,VCR, External Monitor, etc. The product can be connected to External Devices. CAMERA DVR External MONITOR VCR - 8 -
USER'S MANUAL Connecting to an external device such as Camera, DVR,VCR, External Monitor, etc. The product can be connected to External Devices. CAMERA DVR External MONITOR VCR - 8 -
User Guide
Page 9
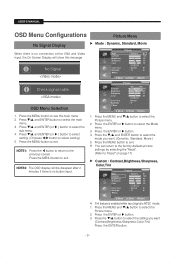
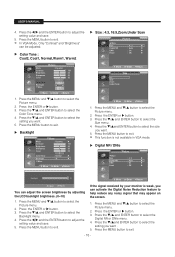
... factory defaults picture settings by selecting the "Reset". (Refer to see the main menu. 2. Press the MENU button to "Reset" on page 11) Custom : Contrast,Brightness,Sharpness, Color,Tint Mode Contrast Brightness Sharpness Color Tint Color Tone Backlight More Picture : Dynamic 100 45 50 55 G 50 R 50 : Normal : 10 Move Enter Return Tint feature is enabled while input signal is NTSC mode. 1. Press the ENTER or button to select the Picture menu. 2. No Signal Check signal cable. Press the MENU...
... factory defaults picture settings by selecting the "Reset". (Refer to see the main menu. 2. Press the MENU button to "Reset" on page 11) Custom : Contrast,Brightness,Sharpness, Color,Tint Mode Contrast Brightness Sharpness Color Tint Color Tone Backlight More Picture : Dynamic 100 45 50 55 G 50 R 50 : Normal : 10 Move Enter Return Tint feature is enabled while input signal is NTSC mode. 1. Press the ENTER or button to select the Picture menu. 2. No Signal Check signal cable. Press the MENU...
User Guide
Page 10
... monitor is not available in VGA mode. Digital NR / DNIe More Size Digital NR DNle Reset Picture : 4 :3 : Auto : On : OK Backlight 10 Move Enter Return Adjust Return You can activate the Digital Noise Reduction feature to help reduce any noisy signal that may appear on the screen. 1. Press the MENU and / button to select the Backlight menu. 4. Press the / and ENTER button to select the Picture menu. 2. If the signal received by adjusting the LCD backlight brightness...
... monitor is not available in VGA mode. Digital NR / DNIe More Size Digital NR DNle Reset Picture : 4 :3 : Auto : On : OK Backlight 10 Move Enter Return Adjust Return You can activate the Digital Noise Reduction feature to help reduce any noisy signal that may appear on the screen. 1. Press the MENU and / button to select the Backlight menu. 4. Press the / and ENTER button to select the Picture menu. 2. If the signal received by adjusting the LCD backlight brightness...
User Guide
Page 11
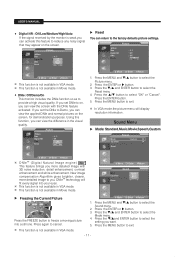
... the factory defaults picture settings. USER'S MANUAL • Digital NR : Off/Low/Medium/High/Auto If the signal received by the monitor is weak,you can view the screen with 3D noise reduction, detail enhancement, contrast enhancement and white enhancement. Press the MENU and / button to reduce any noisy signal that may appear on the screen, for VGA Mode : OfSfpeech Reset Custom Freezing the Current Picture Press the FREEZE button to select the Reset menu . 4.
... the factory defaults picture settings. USER'S MANUAL • Digital NR : Off/Low/Medium/High/Auto If the signal received by the monitor is weak,you can view the screen with 3D noise reduction, detail enhancement, contrast enhancement and white enhancement. Press the MENU and / button to reduce any noisy signal that may appear on the screen, for VGA Mode : OfSfpeech Reset Custom Freezing the Current Picture Press the FREEZE button to select the Reset menu . 4.
User Guide
Page 12
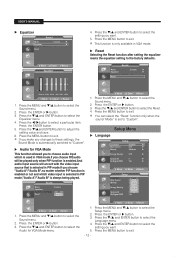
Sound Mode : Custom Equalizer Audio for VGA Mode : Off Reset Audio A Audio B Move Enter Return 1. Press the MENU button to select the Reset. 4. Press the / and ENTER button to exit. Press the MENU button to the factory defaults. Setup Menu Language Setup Language Blue Screen Melody PC Energy Saving PIP System ID No Signal OSD : English : Off : Medium : Off : 1 : On Move Enter Return Setup Language Blue Screen Melody PC Energy Saving PIP System ID No Signal OSD : English : 中国语 Français : Deutsch Espa...
Sound Mode : Custom Equalizer Audio for VGA Mode : Off Reset Audio A Audio B Move Enter Return 1. Press the MENU button to select the Reset. 4. Press the / and ENTER button to exit. Press the MENU button to the factory defaults. Setup Menu Language Setup Language Blue Screen Melody PC Energy Saving PIP System ID No Signal OSD : English : Off : Medium : Off : 1 : On Move Enter Return Setup Language Blue Screen Melody PC Energy Saving PIP System ID No Signal OSD : English : 中国语 Français : Deutsch Espa...
User Guide
Page 13
... Saving" mode option to "High" to select the setting you want . • Blue Screen: Off/On If no signal is being received or the signal is powered on or off. 5. Setup Language Blue Screen Melody PC Energy Saving PIP System ID No Signal OSD : English : Off : Medium : Off Low Medium : 0 High : On Auto Move Enter Return This function adjusts the brightness of the Monitor so as power consumption. 1. Press the MENU and / button...
... Saving" mode option to "High" to select the setting you want . • Blue Screen: Off/On If no signal is being received or the signal is powered on or off. 5. Setup Language Blue Screen Melody PC Energy Saving PIP System ID No Signal OSD : English : Off : Medium : Off Low Medium : 0 High : On Auto Move Enter Return This function adjusts the brightness of the Monitor so as power consumption. 1. Press the MENU and / button...
User Guide
Page 14
Press the / button to the "Screen resolution" tab on the Setting window. Navigate to select "Position", then press the ENTER button. Click on "Display" and a Display Properies window will appear. 3. Press the / and ENTER button to select "Source", then press ENTER button. Separate and Composite modes are supported.) • D-Sub Input Mode Horizontal Vertical Pixel Clock Resolution Frequency Frequency Frequency (kHz) (Hz) (MHz) Sync Polarity (H/V) IBM 640×350 31.469 70.086 25.175 +/- 720...
Press the / button to the "Screen resolution" tab on the Setting window. Navigate to select "Position", then press the ENTER button. Click on "Display" and a Display Properies window will appear. 3. Press the / and ENTER button to select "Source", then press ENTER button. Separate and Composite modes are supported.) • D-Sub Input Mode Horizontal Vertical Pixel Clock Resolution Frequency Frequency Frequency (kHz) (Hz) (MHz) Sync Polarity (H/V) IBM 640×350 31.469 70.086 25.175 +/- 720...
User Guide
Page 15
... image settings with the factory default values. Press the / button to select "Image Reset",then press the ENTER button. 3. Press the / button to adjust the screen quality. Follow the "Image Lock" instructions number 2 to adjust the Vertical-Position. PC Image Lock Position Auto Adjustment Image Reset Move Enter Return 1. Press the MENU button to select the PC menu. 5. PC Image Lock Position Auto Adjustment Image Reset 1. Press the / button to 4. 2. Press the MENU button to 4. 2. Follow the "Image Lock" instructions number 2 to exit. USER'S MANUAL PC • Image Lock...
... image settings with the factory default values. Press the / button to select "Image Reset",then press the ENTER button. 3. Press the / button to adjust the screen quality. Follow the "Image Lock" instructions number 2 to adjust the Vertical-Position. PC Image Lock Position Auto Adjustment Image Reset Move Enter Return 1. Press the MENU button to select the PC menu. 5. PC Image Lock Position Auto Adjustment Image Reset 1. Press the / button to 4. 2. Press the MENU button to 4. 2. Follow the "Image Lock" instructions number 2 to exit. USER'S MANUAL PC • Image Lock...
User Guide
Page 16
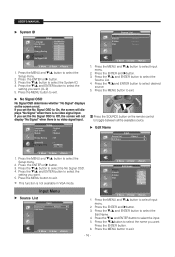
... MENU and / button to select Input menu. 2. If you want .(0~9) 5. Video A Video B S-Video VGA Source List Move Enter Return 1. Press the / and ENTER button to select the setting you set the No Signal OSD to toggle between all the available source. USER'S MANUAL System ID Setup Language : 0 Blue Screen Melody PC : 1 : 2 3 4 Energy Saving : 5 PIP 6 System ID : 7 No Signal OSD : 8 9 Move Enter Return 1. No Signal OSD No Signal OSD determines whether "No Signal" displays on the remote control to Off, the screen will displays "No Signal...
... MENU and / button to select Input menu. 2. If you want .(0~9) 5. Video A Video B S-Video VGA Source List Move Enter Return 1. Press the / and ENTER button to select the setting you set the No Signal OSD to toggle between all the available source. USER'S MANUAL System ID Setup Language : 0 Blue Screen Melody PC : 1 : 2 3 4 Energy Saving : 5 PIP 6 System ID : 7 No Signal OSD : 8 9 Move Enter Return 1. No Signal OSD No Signal OSD determines whether "No Signal" displays on the remote control to Off, the screen will displays "No Signal...
User Guide
Page 17
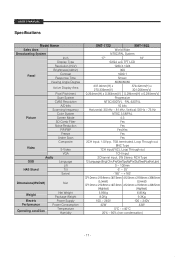
USER'S MANUAL Specifications Model Name Sales Area Broadcasting System Inch Display Type Resolution (HxV) Brightness(cd/m2) Panel Contrast Response Time Viewing Angle Degree Active Display Area Picture Pixel Pitch(mm) Scan System CVBS Resolution A/D bits Scanning frequency Color System Screen Mode 3D Comb Filter Noise Reduction PIP/PBP Freeze Under Scan Composite Video OSD HAS Stand Audio S-Video VGA Language Lift Tilt Swivel Dimensions(WxDxH) Net Weight Electric Performance Operating condition Net Weight Package Weight Power Supply Power Consumption Temperature...
USER'S MANUAL Specifications Model Name Sales Area Broadcasting System Inch Display Type Resolution (HxV) Brightness(cd/m2) Panel Contrast Response Time Viewing Angle Degree Active Display Area Picture Pixel Pitch(mm) Scan System CVBS Resolution A/D bits Scanning frequency Color System Screen Mode 3D Comb Filter Noise Reduction PIP/PBP Freeze Under Scan Composite Video OSD HAS Stand Audio S-Video VGA Language Lift Tilt Swivel Dimensions(WxDxH) Net Weight Electric Performance Operating condition Net Weight Package Weight Power Supply Power Consumption Temperature...


