User Manual (user Manual) (ver.f6) (English)
Page 5
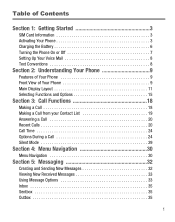
Table of Contents Section 1: Getting Started 3 SIM Card Information 3 Activating Your Phone 3 Charging the Battery 6 Turning the Phone On or Off 7 Setting Up Your Voice Mail 8 Text Conventions 8 Section 2: Understanding Your Phone 9 Features of Your Phone 9 Front View of Your ...
Table of Contents Section 1: Getting Started 3 SIM Card Information 3 Activating Your Phone 3 Charging the Battery 6 Turning the Phone On or Off 7 Setting Up Your Voice Mail 8 Text Conventions 8 Section 2: Understanding Your Phone 9 Features of Your Phone 9 Front View of Your ...
User Manual (user Manual) (ver.f6) (English)
Page 7
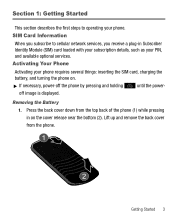
off the phone by pressing and holding until the power- Removing the Battery 1. Activating Your Phone Activating your phone. Lift up and remove the back cover from the top back of the phone (1) while pressing in Subscriber Identity ... necessary, power-off image is displayed. SIM Card Information When you subscribe to operating your phone requires several things: inserting the SIM card, charging the battery, and turning the phone on the cover release near the bottom (2). Press the back cover down from the phone. Getting Started 3
off the phone by pressing and holding until the power- Removing the Battery 1. Activating Your Phone Activating your phone. Lift up and remove the back cover from the top back of the phone (1) while pressing in Subscriber Identity ... necessary, power-off image is displayed. SIM Card Information When you subscribe to operating your phone requires several things: inserting the SIM card, charging the battery, and turning the phone on the cover release near the bottom (2). Press the back cover down from the phone. Getting Started 3
User Manual (user Manual) (ver.f6) (English)
Page 8
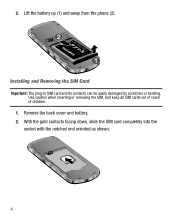
Remove the back cover and battery. 2. Lift the battery up (1) and away from the phone (2). Use caution when inserting or removing the SIM, and keep all SIM cards out of reach of children. 1. With the gold contacts facing down, slide the SIM card completely into the socket with the notched end oriented as shown. 4 Installing and Removing the SIM Card Important!: The plug-in SIM card and its contacts can be easily damaged by scratches or bending. 2.
Remove the back cover and battery. 2. Lift the battery up (1) and away from the phone (2). Use caution when inserting or removing the SIM, and keep all SIM cards out of reach of children. 1. With the gold contacts facing down, slide the SIM card completely into the socket with the notched end oriented as shown. 4 Installing and Removing the SIM Card Important!: The plug-in SIM card and its contacts can be easily damaged by scratches or bending. 2.
User Manual (user Manual) (ver.f6) (English)
Page 9
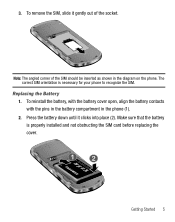
... and not obstructing the SIM card before replacing the cover. Getting Started 5 Make sure that the battery is necessary for your phone to recognize the SIM. Replacing the Battery 1. Press the battery down until it gently out of the SIM should be inserted as shown in the phone (1). 2.... Note: The angled corner of the socket. To reinstall the battery, with the battery cover open, align the battery contacts with the pins in the battery compartment in the diagram on the phone. To remove the SIM, slide it clicks into place (2). 3.
... and not obstructing the SIM card before replacing the cover. Getting Started 5 Make sure that the battery is necessary for your phone to recognize the SIM. Replacing the Battery 1. Press the battery down until it gently out of the SIM should be inserted as shown in the phone (1). 2.... Note: The angled corner of the socket. To reinstall the battery, with the battery cover open, align the battery contacts with the pins in the battery compartment in the diagram on the phone. To remove the SIM, slide it clicks into place (2). 3.
User Manual (user Manual) (ver.f6) (English)
Page 10
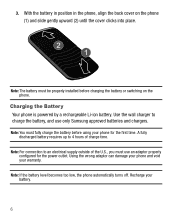
...U.S., you must fully charge the battery before charging the battery or switching on the phone (1) and slide gently upward (2) until the cover clicks into place. A fully discharged battery requires up to charge the battery, and use an adaptor properly... configured for the first time. Using the wrong adaptor can damage your phone and void your battery. 6 Recharge your warranty. Note: If the battery level becomes too low, the phone automatically turns off. Note: You must use only Samsung approved batteries...
...U.S., you must fully charge the battery before charging the battery or switching on the phone (1) and slide gently upward (2) until the cover clicks into place. A fully discharged battery requires up to charge the battery, and use an adaptor properly... configured for the first time. Using the wrong adaptor can damage your phone and void your battery. 6 Recharge your warranty. Note: If the battery level becomes too low, the phone automatically turns off. Note: You must use only Samsung approved batteries...
User Manual (user Manual) (ver.f6) (English)
Page 11
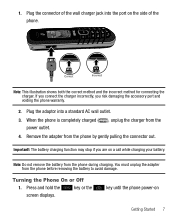
...correct method and the incorrect method for connecting the charger. If you connect the charger incorrectly, you are on a call while charging your battery. Plug the adaptor into the port on Getting Started 7 You must unplug the adapter from the phone by gently pulling the connector out... of the wall charger jack into a standard AC wall outlet. 3. Remove the adapter from the phone before removing the battery to avoid damage. Important!: The battery charging function may stop if you risk damaging the accessory port and voiding the phone warranty. 2. Press and hold the ...
...correct method and the incorrect method for connecting the charger. If you connect the charger incorrectly, you are on a call while charging your battery. Plug the adaptor into the port on Getting Started 7 You must unplug the adapter from the phone by gently pulling the connector out... of the wall charger jack into a standard AC wall outlet. 3. Remove the adapter from the phone before removing the battery to avoid damage. Important!: The battery charging function may stop if you risk damaging the accessory port and voiding the phone warranty. 2. Press and hold the ...
User Manual (user Manual) (ver.f6) (English)
Page 15
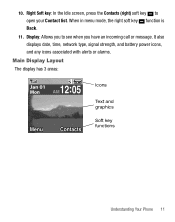
It also displays date, time, network type, signal strength, and battery power icons, and any icons associated with alerts or alarms. Main Display Layout The display has 3 areas: Icons Text and graphics Soft key functions Understanding Your Phone 11 Right Soft key: In the Idle screen, press the Contacts (right) soft key to see when you to open your Contact list. When in menu mode, the right soft key function is Back. 11. 10. Display: Allows you have an incoming call or message.
It also displays date, time, network type, signal strength, and battery power icons, and any icons associated with alerts or alarms. Main Display Layout The display has 3 areas: Icons Text and graphics Soft key functions Understanding Your Phone 11 Right Soft key: In the Idle screen, press the Contacts (right) soft key to see when you to open your Contact list. When in menu mode, the right soft key function is Back. 11. 10. Display: Allows you have an incoming call or message.
User Manual (user Manual) (ver.f6) (English)
Page 16
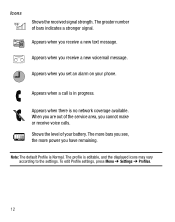
... a new voicemail message. Appears when there is Normal. Note: The default Profile is no network coverage available. Appears when you set an alarm on your battery. The more bars you see, the more power you cannot make or receive voice calls. Icons Shows the received signal strength. When you are out...
... a new voicemail message. Appears when there is Normal. Note: The default Profile is no network coverage available. Appears when you set an alarm on your battery. The more bars you see, the more power you cannot make or receive voice calls. Icons Shows the received signal strength. When you are out...


