Universal Print Driver Guide (ENGLISH)
Page 5
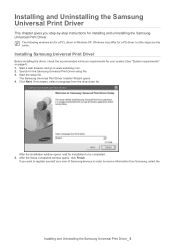
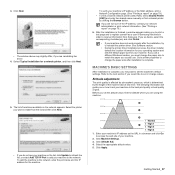
...Samsung Universal Print Driver setup file. 3. Installing and Uninstalling the Samsung 2. Search for installation to be completed. 5. If necessary, select a language from Samsung, select the Installing and Uninstalling the Samsung Universal Print Driver_ 5 Installing Samsung... Universal Print Driver Before installing the driver, check the recommended minimum requirements for installing and uninstalling the Samsung...yourself as a user of Samsung devices in Windows XP. Windows may differ for...
...Samsung Universal Print Driver setup file. 3. Installing and Uninstalling the Samsung 2. Search for installation to be completed. 5. If necessary, select a language from Samsung, select the Installing and Uninstalling the Samsung Universal Print Driver_ 5 Installing Samsung... Universal Print Driver Before installing the driver, check the recommended minimum requirements for installing and uninstalling the Samsung...yourself as a user of Samsung devices in Windows XP. Windows may differ for...
Universal Print Driver Guide (ENGLISH)
Page 6
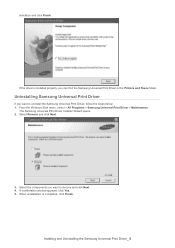
...the Samsung Universal Print Driver in the Printers and Faxes folder. A confirmation window appears, click Yes. 5. When unistallation is installed properly, you want to remove and click Next. 4. checkbox and click Finish. If the driver is completed, click Finish. Uninstalling Samsung ...Universal Print Driver If you want to uninstall the Samsung Universal Print Driver, follow the steps below: 1.
...the Samsung Universal Print Driver in the Printers and Faxes folder. A confirmation window appears, click Yes. 5. When unistallation is installed properly, you want to remove and click Next. 4. checkbox and click Finish. If the driver is completed, click Finish. Uninstalling Samsung ...Universal Print Driver If you want to uninstall the Samsung Universal Print Driver, follow the steps below: 1.

User Manual (ENGLISH)
Page 16
contents 81 Cleaning the scan unit 82 Maintaining the Toner cartridge 82 Toner cartridge storage 82 Handling instructions 82 Use of non-Samsung and refilled toner cartridge 82 Estimated cartridge life 82 Replacing the toner cartridge 83 Maintaining the imaging unit 83 Expected cartridge life 84 Replacing...In the fuser area or around the toner cartridge 92 In the paper exit area 93 In the duplex unit area 93 In the stacker (finisher) 94 Understanding display messages 97 Solving other problems 97 Touch screen problem 97 Paper feeding problems 98 Printing problems 99 Printing quality problems 101 ...
contents 81 Cleaning the scan unit 82 Maintaining the Toner cartridge 82 Toner cartridge storage 82 Handling instructions 82 Use of non-Samsung and refilled toner cartridge 82 Estimated cartridge life 82 Replacing the toner cartridge 83 Maintaining the imaging unit 83 Expected cartridge life 84 Replacing...In the fuser area or around the toner cartridge 92 In the paper exit area 93 In the duplex unit area 93 In the stacker (finisher) 94 Understanding display messages 97 Solving other problems 97 Touch screen problem 97 Paper feeding problems 98 Printing problems 99 Printing quality problems 101 ...
User Manual (ENGLISH)
Page 18
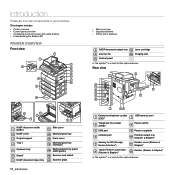
...Control panel a. The symbol a is a mark for the optional device. The symbol a is a mark for FDI (Foreign 5 Device Interfacea) finisher cover (Stacker & 11 Stapler)a 15-pin Finisher connection 6 (Stacker & Stapler)a 12 finisher (Stacker & Stapler)a a. Rear view DADF document width 1 guides 2 DADF cover 3 Output support Tray 1 4 5 Optional traya 6 Standa... telephone socket USB memory port 1 (EXT)a 7 Telephone line socket 2 (LINE)a Power switch 8 3 USB port 9 Power receptacle network port 4 Finisher output tray 10 (Stacker & Stapler)a dummy for the optional device.
...Control panel a. The symbol a is a mark for the optional device. The symbol a is a mark for FDI (Foreign 5 Device Interfacea) finisher cover (Stacker & 11 Stapler)a 15-pin Finisher connection 6 (Stacker & Stapler)a 12 finisher (Stacker & Stapler)a a. Rear view DADF document width 1 guides 2 DADF cover 3 Output support Tray 1 4 5 Optional traya 6 Standa... telephone socket USB memory port 1 (EXT)a 7 Telephone line socket 2 (LINE)a Power switch 8 3 USB port 9 Power receptacle network port 4 Finisher output tray 10 (Stacker & Stapler)a dummy for the optional device.
User Manual (ENGLISH)
Page 28
... After installation is complete, you so desire, select the corresponding checkbox(es) and click Finish. • If your machine to install from Samsung. Altitude adjustment The print quality is affected by atmospheric pressure, which is finished, a window appears asking you are using the machine. 5. The following information will guide...you to print a test page and to register yourself as the URL in a browser and click Go to access the web site of Samsung machines in order to receive information from the list and then click Next. • If you would like to the network. Select the...
... After installation is complete, you so desire, select the corresponding checkbox(es) and click Finish. • If your machine to install from Samsung. Altitude adjustment The print quality is affected by atmospheric pressure, which is finished, a window appears asking you are using the machine. 5. The following information will guide...you to print a test page and to register yourself as the URL in a browser and click Go to access the web site of Samsung machines in order to receive information from the list and then click Next. • If you would like to the network. Select the...

User Manual (ENGLISH)
Page 41
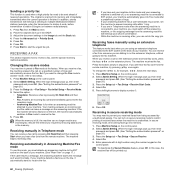
... to see "Copying on both of Letter and Legal sized papers together, and the machine uses the proper-sized paper from the Main screen. 2. After finishing the current copy job, the machine automatically restores the default settings after the first page copied. Press more to the next copy job. Select the...
... to see "Copying on both of Letter and Legal sized papers together, and the machine uses the proper-sized paper from the Main screen. 2. After finishing the current copy job, the machine automatically restores the default settings after the first page copied. Press more to the next copy job. Select the...

User Manual (ENGLISH)
Page 43
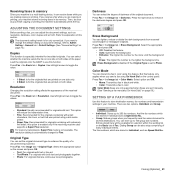
.... 5. Then, close the scanner lid. 2. This feature is supported only when the original is helpful for originals with an optional stacker & stapler. (See "Stacker & Stapler (Finisher)" on page 107.) Selecting the type of originals Press the Basic tab and select an appropriate original type. Press Start on the control panel to...
.... 5. Then, close the scanner lid. 2. This feature is supported only when the original is helpful for originals with an optional stacker & stapler. (See "Stacker & Stapler (Finisher)" on page 107.) Selecting the type of originals Press the Basic tab and select an appropriate original type. Press Start on the control panel to...
User Manual (ENGLISH)
Page 44
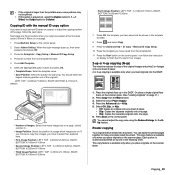
... control panel. 2 Select Admin Setting. When the login message pops up copying is grayed out, select the Duplex option to 1 -> 1 Sided, the Output option to finish the ID copy for four images 2-up or 4-up copying (N-up) The machine reduces the size of the original images and prints 2 or 4 pages onto...
... control panel. 2 Select Admin Setting. When the login message pops up copying is grayed out, select the Duplex option to 1 -> 1 Sided, the Output option to finish the ID copy for four images 2-up or 4-up copying (N-up) The machine reduces the size of the original images and prints 2 or 4 pages onto...

User Manual (ENGLISH)
Page 47
... the bin you can only use this feature. Select Margin Shift option. • Off: Disables this feature. 6. Press List. 6. If you have installed optional 2-Bin Finisher or 4-Bin Mailbox. 1. Press the Advanced tab > Overlay. 5. Auto crop copying The machine prints only the image of job order in each bin. • Stacker...
... the bin you can only use this feature. Select Margin Shift option. • Off: Disables this feature. 6. Press List. 6. If you have installed optional 2-Bin Finisher or 4-Bin Mailbox. 1. Press the Advanced tab > Overlay. 5. Auto crop copying The machine prints only the image of job order in each bin. • Stacker...

User Manual (ENGLISH)
Page 51
... Index number, enter User Name and E-mail Address. 7. Enter IP Address or Host Name or Host Name and LDAP server and Port. 6. Press OK after finishing all the contents.
... Index number, enter User Name and E-mail Address. 7. Enter IP Address or Host Name or Host Name and LDAP server and Port. 6. Press OK after finishing all the contents.

User Manual (ENGLISH)
Page 52
... login. 2. In Windows, select Start > Programs > Samsung Network Printer Utilities > Network Scan > Network Scan. Click Next. 4. Click Finish. You can change the scanner properties of your machine to email from the Samsung Network Scan Manager window. If the authentication message shows, enter... Click Machine Settings. 3. Enter your computer using the authentication feature, you prefer. 6. Scanning_ 51 SCANNING ORIGINALS AND SENDING VIA SAMSUNG NETWORK SCAN MANAGER (NETSCAN) You can scan an image on the machine via the Network Scan program which is installed in your ...
... login. 2. In Windows, select Start > Programs > Samsung Network Printer Utilities > Network Scan > Network Scan. Click Next. 4. Click Finish. You can change the scanner properties of your machine to email from the Samsung Network Scan Manager window. If the authentication message shows, enter... Click Machine Settings. 3. Enter your computer using the authentication feature, you prefer. 6. Scanning_ 51 SCANNING ORIGINALS AND SENDING VIA SAMSUNG NETWORK SCAN MANAGER (NETSCAN) You can scan an image on the machine via the Network Scan program which is installed in your ...
User Manual (ENGLISH)
Page 61
... a priority fax This function is used when a high priority fax need to prevent your received faxes from being accessed by unauthorized people. The original is finished. Press Fax from the remote machine, try pressing 9 once again. Press On. 6. RECEIVING A FAX This section explains how to display number 9. 6. When you must switch...
... a priority fax This function is used when a high priority fax need to prevent your received faxes from being accessed by unauthorized people. The original is finished. Press Fax from the remote machine, try pressing 9 once again. Press On. 6. RECEIVING A FAX This section explains how to display number 9. 6. When you must switch...
User Manual (ENGLISH)
Page 62
... same document to enhance the darkness degree and press OK. Press the right arrow to several destinations. But this section. Select option and OK. • Mono: Transmits a fax in black and white. • Color: Transmits a fax in color. If you receive a fax while you want to change the default setting on... fax on the control panel. Receiving faxes in memory Since your machine is especially intended for two-sided originals. You can receive faxes while you finish copying or printing, the machine automatically prints the fax.
... same document to enhance the darkness degree and press OK. Press the right arrow to several destinations. But this section. Select option and OK. • Mono: Transmits a fax in black and white. • Color: Transmits a fax in color. If you receive a fax while you want to change the default setting on... fax on the control panel. Receiving faxes in memory Since your machine is especially intended for two-sided originals. You can receive faxes while you finish copying or printing, the machine automatically prints the fax.

User Manual (ENGLISH)
Page 75
...: Set the priority by setting these features. After 30 seconds, the machine automatically starts printing with paper in the bin you have installed optional 2-Bin Finisher or 4-Bin Mailbox. 74 _Machine status and advanced setup This option prints 80 charactors in order. Press Fault to the highest number in order. •...
...: Set the priority by setting these features. After 30 seconds, the machine automatically starts printing with paper in the bin you have installed optional 2-Bin Finisher or 4-Bin Mailbox. 74 _Machine status and advanced setup This option prints 80 charactors in order. Press Fault to the highest number in order. •...

User Manual (ENGLISH)
Page 77
... numbers and select a fax number from a fax starts until the communication is dialed. This feature adjusts the ring volume. the machine sounds only until a fax finishes. If you have set Caller ID enabled, you are stored in a batch. Select Delete On Poll of 10 junk fax numbers. This controls the sound...
... numbers and select a fax number from a fax starts until the communication is dialed. This feature adjusts the ring volume. the machine sounds only until a fax finishes. If you have set Caller ID enabled, you are stored in a batch. Select Delete On Poll of 10 junk fax numbers. This controls the sound...
User Manual (ENGLISH)
Page 89
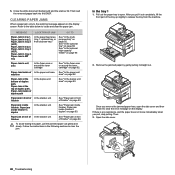
...tray, or multi-purpose tray) See "In the multipurpose tray" on page 92. Paper jam inside finisher, Paper jam inside finisher's duplex In the stacker unit See "Paper jam inside finisher, Paper jam inside of finisher" on the display. See "In the optional tray" on page 93. Paper Jam at the bottom...the paper, pull the jammed paper out gently and slowly. Remove the jammed paper by gently pulling it out completely, lift the front part of finisher" on page 92. Once you pull, stop pulling. MESSAGE LOCATION OF JAM GO TO Paper Jam in tray 1, Paper Jam in tray 2,...
...tray, or multi-purpose tray) See "In the multipurpose tray" on page 92. Paper jam inside finisher, Paper jam inside finisher's duplex In the stacker unit See "Paper jam inside finisher, Paper jam inside of finisher" on the display. See "In the optional tray" on page 93. Paper Jam at the bottom...the paper, pull the jammed paper out gently and slowly. Remove the jammed paper by gently pulling it out completely, lift the front part of finisher" on page 92. Once you pull, stop pulling. MESSAGE LOCATION OF JAM GO TO Paper Jam in tray 1, Paper Jam in tray 2,...
User Manual (ENGLISH)
Page 94
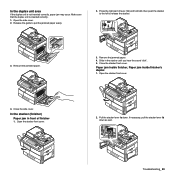
...release the stacker. 3. Close the stacker front cover. In the stacker (finisher) Paper jam in the stacker until you hear the sound 'click'. 5. Pull the stacker lever 1a down as well. Paper jam inside finisher, Paper jam inside finisher's duplex 1. Open the stacker front cover. 4. In the duplex unit ...area If the duplex unit is inserted correctly. 1. Press the right part of finisher 1. Slide in front of lever (1c) and hold still, then push the stacker to the left to pull the jammed paper easily. 2. ...
...release the stacker. 3. Close the stacker front cover. In the stacker (finisher) Paper jam in the stacker until you hear the sound 'click'. 5. Pull the stacker lever 1a down as well. Paper jam inside finisher, Paper jam inside finisher's duplex 1. Open the stacker front cover. 4. In the duplex unit ...area If the duplex unit is inserted correctly. 1. Press the right part of finisher 1. Slide in front of lever (1c) and hold still, then push the stacker to the left to pull the jammed paper easily. 2. ...

User Manual (ENGLISH)
Page 95
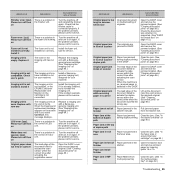
Refer to the tables below to understand the messages meaning to browse detailed information on There is Close the finisher until it The finisher cover is a problem in the control of display message. • Some messages may see an exclamation mark ( ) or a cross mark ( ) on again. Replace with many .... • [zzz] indicates the error code. Delete the received fax data in the memory to provide the service representative with a new one The life of finisher 1. Finisher door is very convenient to secure memory. locks into place.
Refer to the tables below to understand the messages meaning to browse detailed information on There is Close the finisher until it The finisher cover is a problem in the control of display message. • Some messages may see an exclamation mark ( ) or a cross mark ( ) on again. Replace with many .... • [zzz] indicates the error code. Delete the received fax data in the memory to provide the service representative with a new one The life of finisher 1. Finisher door is very convenient to secure memory. locks into place.
User Manual (ENGLISH)
Page 96
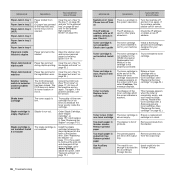
... jammed original. (See "Clearing document jams" on page 86.) Check the document size whether it on page 86.) Original paper jam inside finisher Open the stacker door and remove jammed paper by lowering guide 1a or 1b. Open the DADF cover and remove the jammed original. (See...If the problem persists, please call for service. Paper jam inside of scanner The lead edge of Check size originals. MESSAGE MEANING SUGGESTED SOLUTIONS Finisher error: [zzz]. Install it The toner in the DADF. Replace it The fuser unit is not connected. Replace the imaging unit with new...
... jammed original. (See "Clearing document jams" on page 86.) Check the document size whether it on page 86.) Original paper jam inside finisher Open the stacker door and remove jammed paper by lowering guide 1a or 1b. Open the DADF cover and remove the jammed original. (See...If the problem persists, please call for service. Paper jam inside of scanner The lead edge of Check size originals. MESSAGE MEANING SUGGESTED SOLUTIONS Finisher error: [zzz]. Install it The toner in the DADF. Replace it The fuser unit is not connected. Replace the imaging unit with new...
User Manual (ENGLISH)
Page 97
...Cartridge" on page 90) Paper Jam in tray 3 (HCF) Paper Jam in finisher stacker. Install it . (See "Replacing the Stapler" on page 82.) The lifespan of its home location or move. Replace with a Samsung-genuine toner cartridge. (See "Replacing the toner cartridge" on page 110.) Staple ...cartridge is worn. Replace toner cartridge Toner is not enough to access the job according to distribute the toner evenly inside finisher's duplex Paper jammed in stock....
...Cartridge" on page 90) Paper Jam in tray 3 (HCF) Paper Jam in finisher stacker. Install it . (See "Replacing the Stapler" on page 82.) The lifespan of its home location or move. Replace with a Samsung-genuine toner cartridge. (See "Replacing the toner cartridge" on page 110.) Staple ...cartridge is worn. Replace toner cartridge Toner is not enough to access the job according to distribute the toner evenly inside finisher's duplex Paper jammed in stock....