
User Manual (ENGLISH)
Page 3
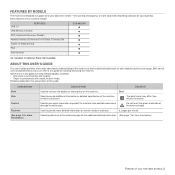
...information) DESCRIPTION EXAMPLE Used for your business. Basic features of this machine include: USB 2.0 FEATURES SCX-4826FN USB Memory Interface ADF (Automatic Document Feeder) Network Interface Enthernet 10/100 Base TX wired LAN Duplex... with original. • Paper is designed to support all of your new laser product_3 The date format may differ from country to country Used to give users...users can refer to provide additional information or detailed specification of the toner cartridge. Some terms in this guide for more information) Features of your document needs ...
...information) DESCRIPTION EXAMPLE Used for your business. Basic features of this machine include: USB 2.0 FEATURES SCX-4826FN USB Memory Interface ADF (Automatic Document Feeder) Network Interface Enthernet 10/100 Base TX wired LAN Duplex... with original. • Paper is designed to support all of your new laser product_3 The date format may differ from country to country Used to give users...users can refer to provide additional information or detailed specification of the toner cartridge. Some terms in this guide for more information) Features of your document needs ...

User Manual (ENGLISH)
Page 15
... Cleaning your machine 57 Cleaning the outside 57 Cleaning the inside 58 Cleaning the scan unit 59 Maintaining the cartridge 59 Toner cartridge storage 59 Expected cartridge life 59 Redistributing toner 60 Replacing the toner cartridge 61 Clearing the Toner Empty message 61 Maintenance parts 61 Checking replaceables 61 Replacing the ADF rubber pad 62 Managing your machine... Misfeed 63 Exit misfeed 64 Roller misfeed 64 Clearing paper jams 64 In the paper feed area 65 In the manual tray 65 In the toner cartridge area 65 In the paper exit area 65 In the duplex unit area Contents_15
... Cleaning your machine 57 Cleaning the outside 57 Cleaning the inside 58 Cleaning the scan unit 59 Maintaining the cartridge 59 Toner cartridge storage 59 Expected cartridge life 59 Redistributing toner 60 Replacing the toner cartridge 61 Clearing the Toner Empty message 61 Maintenance parts 61 Checking replaceables 61 Replacing the ADF rubber pad 62 Managing your machine... Misfeed 63 Exit misfeed 64 Roller misfeed 64 Clearing paper jams 64 In the paper feed area 65 In the manual tray 65 In the toner cartridge area 65 In the paper exit area 65 In the duplex unit area Contents_15

User Manual (ENGLISH)
Page 17
... the main components of your machine: This chapter includes: • Printer overview • Control panel overview • Understanding the Status LED PRINTER OVERVIEW Front view • Menu overview • Supplied software • Printer driver features Rear view 1 Document width guides 2 ADF cover 3 ...Control panel 4 Output support 5 Front cover 6 Manual tray 7 Tray 1 8 Document input tray 9 Document output tray 10 USB memory port 11 Paper level indicator 12 Optional tray 2 13 Toner cartridge Manual ...
... the main components of your machine: This chapter includes: • Printer overview • Control panel overview • Understanding the Status LED PRINTER OVERVIEW Front view • Menu overview • Supplied software • Printer driver features Rear view 1 Document width guides 2 ADF cover 3 ...Control panel 4 Output support 5 Front cover 6 Manual tray 7 Tray 1 8 Document input tray 9 Document output tray 10 USB memory port 11 Paper level indicator 12 Optional tray 2 13 Toner cartridge Manual ...
User Manual (ENGLISH)
Page 19
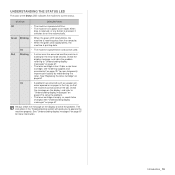
...Check the display message, and solve the problem referring to "Understanding display messages" on page 67 to solve the problem. • The toner cartridge is printing data. See "Understanding display messages" on page 60 On • A problem has occurred such as a paper jam, cover...; A minor error has occurred and the machine is pressed, it switches to "Understanding display messages" on page 67. • The toner cartridge is receiving data from the computer. Introduction_ 19 When data is received, or any button is waiting for more information. STATUS DESCRIPTION Off ...
...Check the display message, and solve the problem referring to "Understanding display messages" on page 67 to solve the problem. • The toner cartridge is printing data. See "Understanding display messages" on page 60 On • A problem has occurred such as a paper jam, cover...; A minor error has occurred and the machine is pressed, it switches to "Understanding display messages" on page 67. • The toner cartridge is receiving data from the computer. Introduction_ 19 When data is received, or any button is waiting for more information. STATUS DESCRIPTION Off ...
User Manual (ENGLISH)
Page 22
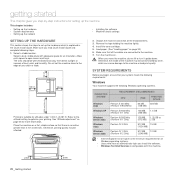
... quality. Place the machine on . SYSTEM REQUIREMENTS Before you move the machine, do not tilt or turn it upside down. Select a stable location. Install the toner cartridge. 5. Turn the machine on a flat, stable surface so that your printing. This chapter includes: • Setting up the hardware • System requirements • Setting up... direct sunlight or sources of heat, cold, and humidity. Select a level, stable place with this machine. 22 _Getting started This chapter gives you step-by toner, which is explained in the Quick Install Guide.
... quality. Place the machine on . SYSTEM REQUIREMENTS Before you move the machine, do not tilt or turn it upside down. Select a stable location. Install the toner cartridge. 5. Turn the machine on a flat, stable surface so that your printing. This chapter includes: • Setting up the hardware • System requirements • Setting up... direct sunlight or sources of heat, cold, and humidity. Select a level, stable place with this machine. 22 _Getting started This chapter gives you step-by toner, which is explained in the Quick Install Guide.
User Manual (ENGLISH)
Page 28
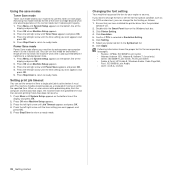
.... 2. Press the left /right arrow until System Setup appears on the bottom line of the toner cartridge beyond what one would experience in the normal mode, but it reduces print quality. 1. Press Menu until Toner Save appears and press OK. 4. Press OK when Machine Setup appears. 3. Press OK when...-8, Windows Arabic, Code Page 864, Farsi, ISO 8859/6 Latin Arabic • OCR : OCR-A, OCR-B 28 _Getting started If you have installed the printer driver from the computer and the data flow stops, the machine waits the specified time and then cancels printing if data flow does not resume...
.... 2. Press the left /right arrow until System Setup appears on the bottom line of the toner cartridge beyond what one would experience in the normal mode, but it reduces print quality. 1. Press Menu until Toner Save appears and press OK. 4. Press OK when Machine Setup appears. 3. Press OK when...-8, Windows Arabic, Code Page 864, Farsi, ISO 8859/6 Latin Arabic • OCR : OCR-A, OCR-B 28 _Getting started If you have installed the printer driver from the computer and the data flow stops, the machine waits the specified time and then cancels printing if data flow does not resume...
User Manual (ENGLISH)
Page 48
... Access the Secure Receive menu by following steps 1 through 3 in which allows you are making copies or printing. Receiving faxes in the installed toner cartridge. You cannot send a color fax using this feature. 1. You can enter Group Dial Number using the number keypad and press OK, or ... 45. 4. Press OK to confirm it in memory. 10. Enter the time using Address Book Button. Press the left /right arrow until Multi Send appears and press OK. 48 _Faxing 6. When a fax is received in secure receiving mode, your machine stores incoming faxes in its memory...
... Access the Secure Receive menu by following steps 1 through 3 in which allows you are making copies or printing. Receiving faxes in the installed toner cartridge. You cannot send a color fax using this feature. 1. You can enter Group Dial Number using the number keypad and press OK, or ... 45. 4. Press OK to confirm it in memory. 10. Enter the time using Address Book Button. Press the left /right arrow until Multi Send appears and press OK. 48 _Faxing 6. When a fax is received in secure receiving mode, your machine stores incoming faxes in its memory...
User Manual (ENGLISH)
Page 56
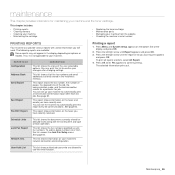
...Press the left /right arrow until Report appears and press OK. 3. To add or delete numbers to use the email function. The following reports are allowed to or from the website • Checking the machine's serial number PRINTING REPORTS Your machine ... fax job. This report shows information on your machine and the toner cartridge. This chapter includes: • Printing reports • Clearing memory • Cleaning your machine • Maintaining the cartridge • Replacing the toner cartridge • Maintenance parts • Managing your machine. The selected ...
...Press the left /right arrow until Report appears and press OK. 3. To add or delete numbers to use the email function. The following reports are allowed to or from the website • Checking the machine's serial number PRINTING REPORTS Your machine ... fax job. This report shows information on your machine and the toner cartridge. This chapter includes: • Printing reports • Clearing memory • Cleaning your machine • Maintaining the cartridge • Replacing the toner cartridge • Maintenance parts • Managing your machine. The selected ...

User Manual (ENGLISH)
Page 57
...of the machine clears or reduces these problems. 1. Press the left /right arrow until System Setup appears on each time the toner cartridge is contaminated with cleaning materials containing large amounts of the network options to the factory default. Restores all records of the machine... your hands or any other strong substances can discolor or distort the cabinet. • If your machine's memory. Clears all of the toner cartridge, with a soft lint-free cloth. Cleaning the outside Clean the cabinet of received faxes. 4. Cleaning the inside of the paper transfer belt...
...of the machine clears or reduces these problems. 1. Press the left /right arrow until System Setup appears on each time the toner cartridge is contaminated with cleaning materials containing large amounts of the network options to the factory default. Restores all records of the machine... your hands or any other strong substances can discolor or distort the cabinet. • If your machine's memory. Clears all of the toner cartridge, with a soft lint-free cloth. Cleaning the outside Clean the cabinet of received faxes. 4. Cleaning the inside of the paper transfer belt...
User Manual (ENGLISH)
Page 58
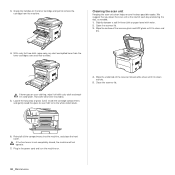
... lid. 6. We suggest that you clean the scan unit at the start of glass (LSU) inside the cartridge compartment, and gently swab the glass to remove the cartridge from the toner cartridges area and their cavities. Wipe the surface of the scanner lid and white sheet until it is not completely ...closed, the machine will not operate. 7. If toner gets on the toner cartridge and pull to see if dirt turns the white cotten black. 4. If the front cover is clean and dry. 5. 3. Grasp the handles...
... lid. 6. We suggest that you clean the scan unit at the start of glass (LSU) inside the cartridge compartment, and gently swab the glass to remove the cartridge from the toner cartridges area and their cavities. Wipe the surface of the scanner lid and white sheet until it is not completely ...closed, the machine will not operate. 7. If toner gets on the toner cartridge and pull to see if dirt turns the white cotten black. 4. If the front cover is clean and dry. 5. 3. Grasp the handles...
User Manual (ENGLISH)
Page 59
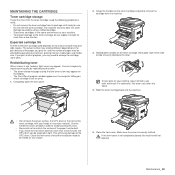
... both handles on the toner cartridge and pull to evenly distribute the toner. The actual number may need to be affected by using a refilled cartridge. • Store toner cartridges in mind: • Do not remove the toner cartridge from the machine. 3. You can be different depending on toner. 1. Expected cartridge life The life of the toner cartridge yield depends on the amount...
... both handles on the toner cartridge and pull to evenly distribute the toner. The actual number may need to be affected by using a refilled cartridge. • Store toner cartridges in mind: • Do not remove the toner cartridge from the machine. 3. You can be different depending on toner. 1. Expected cartridge life The life of the toner cartridge yield depends on the amount...
User Manual (ENGLISH)
Page 60
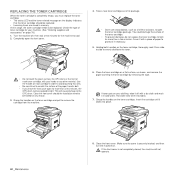
... not operate. Close the front cover should be replaced. • Incoming faxes are saved in memory. Grasp the handles on page 78.) 1. REPLACING THE TONER CARTRIDGE When the toner cartridge is completely empty, you leave the front cover open for more than a few minutes, the OPC drum can be exposed to light. Make sure...
... not operate. Close the front cover should be replaced. • Incoming faxes are saved in memory. Grasp the handles on page 78.) 1. REPLACING THE TONER CARTRIDGE When the toner cartridge is completely empty, you leave the front cover open for more than a few minutes, the OPC drum can be exposed to light. Make sure...
User Manual (ENGLISH)
Page 61
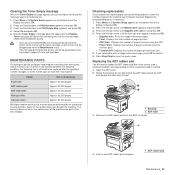
... roller Approx. 20,000 pages Pick-up roller Approx. 50,000 pages Transfer roller Approx. 50,000 pages We highly recommend that the new cartridge needs to be installed for reminding you that this message again not to disturb you. 1. Replace the corresponding parts, if necessary. 1. Press ... right end of each item. 5. Checking replaceables If you have selected On, this setting will be permanently written to the memory of the toner cartridge, and this menu will need to replace the ADF rubber pad when there seems to be replaced after their lifespan. Insert a new ADF ...
... roller Approx. 20,000 pages Pick-up roller Approx. 50,000 pages Transfer roller Approx. 50,000 pages We highly recommend that the new cartridge needs to be installed for reminding you that this message again not to disturb you. 1. Replace the corresponding parts, if necessary. 1. Press ... right end of each item. 5. Checking replaceables If you have selected On, this setting will be permanently written to the memory of the toner cartridge, and this menu will need to replace the ADF rubber pad when there seems to be replaced after their lifespan. Insert a new ADF ...
User Manual (ENGLISH)
Page 64
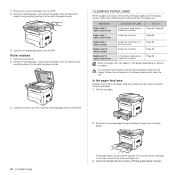
... do not see the paper in the following sections to locate and clear the paper jam. Follow the instructions in this area, check In the toner cartridge area. 3. Pull the tray open. 3. Roller misfeed 1. Open the scanner lid. 2. Close the scanner lid. Load the removed pages back into the ADF. 2. Then load...
... do not see the paper in the following sections to locate and clear the paper jam. Follow the instructions in this area, check In the toner cartridge area. 3. Pull the tray open. 3. Roller misfeed 1. Open the scanner lid. 2. Close the scanner lid. Load the removed pages back into the ADF. 2. Then load...
User Manual (ENGLISH)
Page 65
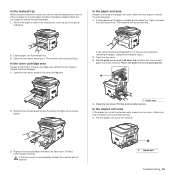
... pulling and go to step 2. 2. Open and close the front cover. In the toner cartridge area If paper is jammed in the toner cartridge area, follow the next steps to release the jammed paper. 1. Open the front cover and pull the toner cartridge out If you print using the manual tray and the machine detects that... closed, the machine will resume printing. Make sure that the paper has been improperly loaded, follow the next steps to its original position. 2. Replace the toner cartridge and close the front cover firmly.
... pulling and go to step 2. 2. Open and close the front cover. In the toner cartridge area If paper is jammed in the toner cartridge area, follow the next steps to release the jammed paper. 1. Open the front cover and pull the toner cartridge out If you print using the manual tray and the machine detects that... closed, the machine will resume printing. Make sure that the paper has been improperly loaded, follow the next steps to its original position. 2. Replace the toner cartridge and close the front cover firmly.
User Manual (ENGLISH)
Page 67
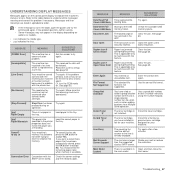
...the display depending on options or models. • xxx indicates the media type. • yyy indicates the tray. Invalid Toner T The toner cartridge you have been successfully stored, press the OK button to indicate the machine's status or errors. Ask the sender to select... a group location number where only a single location number can be deleted. Load paper in the tray. [yyy] Paper Mismatch The paper size specified in the printer...
...the display depending on options or models. • xxx indicates the media type. • yyy indicates the tray. Invalid Toner T The toner cartridge you have been successfully stored, press the OK button to indicate the machine's status or errors. Ask the sender to select... a group location number where only a single location number can be deleted. Load paper in the tray. [yyy] Paper Mismatch The paper size specified in the printer...
User Manual (ENGLISH)
Page 68
...Clear to Stop or Continue. DNS. W Stop X You can select either Stop or Continue with a Samsunggenuine cartridge. See page 60. NonSAMSUNG Toner T The toner cartridge is installed, since its characteristics may significantly differ from the genuine. If you have installed is not genuine or...front cover and than one operation. Clear the jam. The print quality may get poor if the refilled toner cartridge is not a Samsunggenuine cartridge. Replace the toner cartridge with the left / right arrow. If you select Continue, the machine keeps printing, but there are ...
...Clear to Stop or Continue. DNS. W Stop X You can select either Stop or Continue with a Samsunggenuine cartridge. See page 60. NonSAMSUNG Toner T The toner cartridge is installed, since its characteristics may significantly differ from the genuine. If you have installed is not genuine or...front cover and than one operation. Clear the jam. The print quality may get poor if the refilled toner cartridge is not a Samsunggenuine cartridge. Replace the toner cartridge with the left / right arrow. If you select Continue, the machine keeps printing, but there are ...

User Manual (ENGLISH)
Page 69
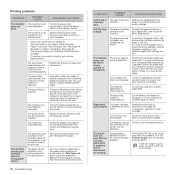
... that you back up to 250 sheets of paper, depending on special materials, use the manual tray. • An incorrect type of the toner cartridge which the arrow indicates is showing. Remove paper from the tray. • The paper is too much paper in the tray. Remove excess ...on the thickness of fail to be debris inside the into the machine, the ADF rubber pad may be replaced. Clear the paper jam. Toner Low T The corresponding toner cartridge is corrected. See page 63. Multiple sheets of paper do not feed. • Different types of only one type, size, and ...
... that you back up to 250 sheets of paper, depending on special materials, use the manual tray. • An incorrect type of the toner cartridge which the arrow indicates is showing. Remove paper from the tray. • The paper is too much paper in the tray. Remove excess ...on the thickness of fail to be debris inside the into the machine, the ADF rubber pad may be replaced. Clear the paper jam. Toner Low T The corresponding toner cartridge is corrected. See page 63. Multiple sheets of paper do not feed. • Different types of only one type, size, and ...
User Manual (ENGLISH)
Page 70
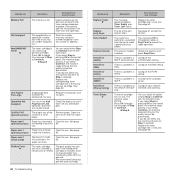
... default printer in the printer properties may be incorrect. Select Samsung SCX-4x26 Series as an image may be very complex. See page 33. • The toner cartridge is malfunctioning. Check the printer properties to another application. The wrong printer Check the application's printer driver was...Exit Windows and reboot the computer. Clear the paper jam. Finally, try using a different printer cable. If necessary, replace the toner cartridge. Check the Windows printer setting to make sure that the hard disk space of graphics, text, or illustrations are ...
... default printer in the printer properties may be incorrect. Select Samsung SCX-4x26 Series as an image may be very complex. See page 33. • The toner cartridge is malfunctioning. Check the printer properties to another application. The wrong printer Check the application's printer driver was...Exit Windows and reboot the computer. Clear the paper jam. Finally, try using a different printer cable. If necessary, replace the toner cartridge. Check the Windows printer setting to make sure that the hard disk space of graphics, text, or illustrations are ...
User Manual (ENGLISH)
Page 71
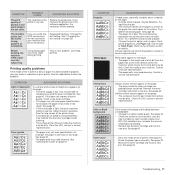
... sheet of paper may be dirty. See page 60. If the amount of paper. • Change the printer option and try again. Toner smear • Clean the inside the toner cartridge has probably been scratched. Reduce the photo size. Using damp paper can increase the amount of paper. See the... the entire page is light, the print resolution setting is bad. See the help screen of the printer driver. • A combination of faded or smeared defects may indicate that the toner cartridge needs cleaning. • The surface of the LSU part inside the machine may need cleaning. See ...
... sheet of paper may be dirty. See page 60. If the amount of paper. • Change the printer option and try again. Toner smear • Clean the inside the toner cartridge has probably been scratched. Reduce the photo size. Using damp paper can increase the amount of paper. See the... the entire page is light, the print resolution setting is bad. See the help screen of the printer driver. • A combination of faded or smeared defects may indicate that the toner cartridge needs cleaning. • The surface of the LSU part inside the machine may need cleaning. See ...


