User Guide
Page 89
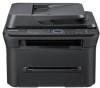
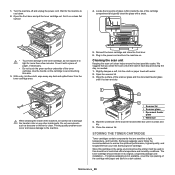
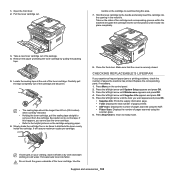
... to avoid touching this should remain in ; Cleaning the scan unit Keeping the scan unit clean helps ensure the best possible copies. Open the scanner lid. 3. While cleaning the inside the top of the toner cartridge. STORING THE TONER CARTRIDGE Toner cartridges contain components that...users follow the recommendations to damage the transfer roller or any dust and spilled toner from your new Samsung toner cartridge. Use the handle on . Reinsert the toner cartridge and close the front door. 6. Set it with a piece of paper, if necessary. • Do not touch the green...
... to avoid touching this should remain in ; Cleaning the scan unit Keeping the scan unit clean helps ensure the best possible copies. Open the scanner lid. 3. While cleaning the inside the top of the toner cartridge. STORING THE TONER CARTRIDGE Toner cartridges contain components that...users follow the recommendations to damage the transfer roller or any dust and spilled toner from your new Samsung toner cartridge. Use the handle on . Reinsert the toner cartridge and close the front door. 6. Set it with a piece of paper, if necessary. • Do not touch the green...
User Guide
Page 91
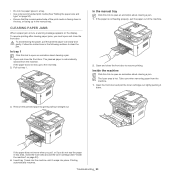
... the cartridge. 5. Troubleshooting_ 91 Pull the toner cartridge out. Hold the toner cartridge by redistributing the remaining toner in the cartridge. Close the front door. Hot water sets toner into the opening in cold water. This chapter gives helpful information for avoiding paper jams • Clearing paper jams • Understanding display messages •...
... the cartridge. 5. Troubleshooting_ 91 Pull the toner cartridge out. Hold the toner cartridge by redistributing the remaining toner in the cartridge. Close the front door. Hot water sets toner into the opening in cold water. This chapter gives helpful information for avoiding paper jams • Clearing paper jams • Understanding display messages •...
User Guide
Page 92
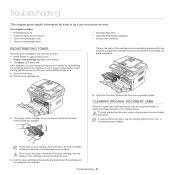
...the document feeder. 2. TIPS FOR AVOIDING PAPER JAMS By selecting the correct media types, most paper jams can be avoided. Troubleshooting_ 92 Open the rear door. 2. If you removed, if any remaining pages from the tray while your machine is below the paper capacity mark on each side...has more than 20 mm curl. 5. Remove any , in the tray" on page 47). • Do not overload the tray. Open the document feeder cover. 3. Close the document feeder cover. Ensure that the adjustable guides are positioned correctly (See "Loading paper in the document feeder. 1 Pressure lever ...
...the document feeder. 2. TIPS FOR AVOIDING PAPER JAMS By selecting the correct media types, most paper jams can be avoided. Troubleshooting_ 92 Open the rear door. 2. If you removed, if any remaining pages from the tray while your machine is below the paper capacity mark on each side...has more than 20 mm curl. 5. Remove any , in the tray" on page 47). • Do not overload the tray. Open the document feeder cover. 3. Close the document feeder cover. Ensure that the adjustable guides are positioned correctly (See "Loading paper in the document feeder. 1 Pressure lever ...
User Guide
Page 93
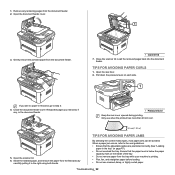
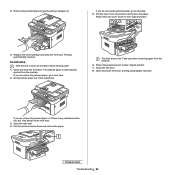
... the print media is automatically ejected from the machine. 1. Printing automatically resumes. If the paper does not exit, go to resume printing. Open and close the front door to the next step. 2. Insert tray 1 back into the machine until it down in the tray, or facing up in the manual... tray. Follow the instructions in this link to open an animation about clearing a jam. Open the front door and pull the toner cartridge out, lightly ...
... the print media is automatically ejected from the machine. 1. Printing automatically resumes. If the paper does not exit, go to resume printing. Open and close the front door to the next step. 2. Insert tray 1 back into the machine until it down in the tray, or facing up in the manual... tray. Follow the instructions in this link to open an animation about clearing a jam. Open the front door and pull the toner cartridge out, lightly ...
User Guide
Page 94
...area is automatically ejected from the machine. 6. Open and close the front door. The jammed paper is hot. Return the pressure levers to the next step. 3. Open the rear door. 4. 2. Close the rear door. 8. Printing automatically resumes. Open and close front door, printing automatically resumes. Gently pull the paper ... 5. In exit area Click this link to next step. 2. Replace the toner cartridge and close the front door. If you do not see the jammed paper, go to open an animation about clearing a jam. 1. Remove the jammed paper by gently pulling it straight...
...area is automatically ejected from the machine. 6. Open and close the front door. The jammed paper is hot. Return the pressure levers to the next step. 3. Open the rear door. 4. 2. Close the rear door. 8. Printing automatically resumes. Open and close front door, printing automatically resumes. Gently pull the paper ... 5. In exit area Click this link to next step. 2. Replace the toner cartridge and close the front door. If you do not see the jammed paper, go to open an animation about clearing a jam. 1. Remove the jammed paper by gently pulling it straight...
User Guide
Page 95
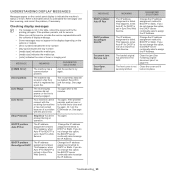
... hour or so for BOOTP is not in SyncThru Web Service. MESSAGE DHCP problem: Auto IP Run DHCP problem Reconfigure BOOTP Document Jam. Remove Jam Door Open. If you call for service. • When you do not change this option, the BOOTP server continually asks to try again. Try again. ...This happens, when Auto IP for BOOTP is registered as a junk fax. Change the IP address assignment method to DHCP or Static. Close the cover until it MEANING The IP address assignment is already engaged. Ask the sender to assign the IP Address. If you do not change...
... hour or so for BOOTP is not in SyncThru Web Service. MESSAGE DHCP problem: Auto IP Run DHCP problem Reconfigure BOOTP Document Jam. Remove Jam Door Open. If you call for service. • When you do not change this option, the BOOTP server continually asks to try again. Try again. ...This happens, when Auto IP for BOOTP is registered as a junk fax. Change the IP address assignment method to DHCP or Static. Close the cover until it MEANING The IP address assignment is already engaged. Ask the sender to assign the IP Address. If you do not change...
User Guide
Page 99
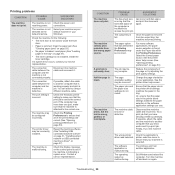
...the page or try a print job. The page orientation setting may be configured incorrectly. See the printer driver help screen (See "Opening printing preferences" on the control panel to ensure that your machine is loaded. Try a print job that the paper size in the .... If possible, attach the cable and the machine to another application. Try printing a job from the wrong paper source. Troubleshooting_ 99 Close the front door. • Paper is defective. Install the toner cartridge. If a system error occurs, contact your application. The connection cable between the...
...the page or try a print job. The page orientation setting may be configured incorrectly. See the printer driver help screen (See "Opening printing preferences" on the control panel to ensure that your machine is loaded. Try a print job that the paper size in the .... If possible, attach the cable and the machine to another application. Try printing a job from the wrong paper source. Troubleshooting_ 99 Close the front door. • Paper is defective. Install the toner cartridge. If a system error occurs, contact your application. The connection cable between the...
User Guide
Page 108
...frequent paper jams or printing problems, check the number of the toner cartridge. 1. handle on your clothing, wipe it from the cartridge. Close the front door. Press the left /right arrow until the item you cannot use the toner cartridge. • Refer to the helpful pictures on the ...until Maintenance appears and press OK. 4. Press Stop/Clear to return to cut the tape. Hot water sets toner into the opening in cold water. Open the front door. 2. If toner gets on the cartridge to distribute the toner evenly inside the cartridge. Carefully pull the tape completely out ...
...frequent paper jams or printing problems, check the number of the toner cartridge. 1. handle on your clothing, wipe it from the cartridge. Close the front door. Press the left /right arrow until the item you cannot use the toner cartridge. • Refer to the helpful pictures on the ...until Maintenance appears and press OK. 4. Press Stop/Clear to return to cut the tape. Hot water sets toner into the opening in cold water. Open the front door. 2. If toner gets on the cartridge to distribute the toner evenly inside the cartridge. Carefully pull the tape completely out ...


