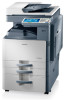
Samsung SCX-8230NA Support and Manuals
Get Help and Manuals for this Samsung item
View All Support Options Below
Free Samsung SCX-8230NA manuals!
Problems with Samsung SCX-8230NA?
Ask a Question
Free Samsung SCX-8230NA manuals!
Problems with Samsung SCX-8230NA?
Ask a Question
Most Recent Samsung SCX-8230NA Questions

Why When Installed A Toner But Yet It Says Toner Is Not Compatible.
Its happen when imaging unit is repace than toner not compatible.
Its happen when imaging unit is repace than toner not compatible.
(Posted by maciuraida 9 years ago)
Popular Samsung SCX-8230NA Manual Pages
Installation Guide Easy Manual Ver.3.00 (English) - Page 4
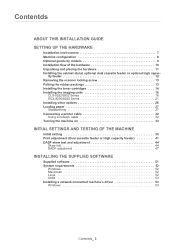
... the rubber packings 13 Installing the toner cartridges 14 Installing the imaging units 16
CLX-9252/9352 Series 16 SCX-8230/8240 Series 21 Installing other options 26 Loading paper 27 Standard tray 27 Connecting a printer cable 32 Using a network cable 32 Turning the machine on 33
INITIAL SETTINGS AND TESTING OF THE MACHINE
Initial setting 35 Print adjustment (Dual...
Installation Guide Easy Manual Ver.3.00 (English) - Page 5
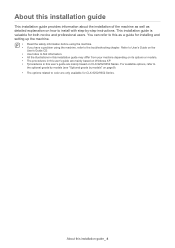
... Series. About this installation guide
1. Refer to User's Guide on the
User's Guide CD. • Use Index to the troubleshooting chapter. This installation guide provides information about the installation of the machine as well as a guide for installing and setting up the machine.
• Read the safety information before using the machine. • If you have a problem using the machine...
Installation Guide Easy Manual Ver.3.00 (English) - Page 6
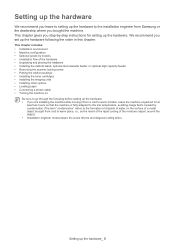
... chapter gives you step-by-step instructions for at
least two hours so that the machine is fully adapted to the site temperature, avoiding image faults caused by models • Installation flow of a metal object brought from Samsung or the dealership where you leave to setting up the hardware to the installation engineer from cold to warm...
Installation Guide Easy Manual Ver.3.00 (English) - Page 10
... by models
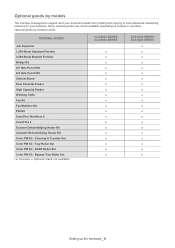
The machine is designed to support all of your document needs from printing and copying to more advanced networking solutions for your business. Bypass Tray Roller Set ( ●: Included, o: Optional, blank: not available)
CLX-9252 SERIES CLX-9352 SERIES
o o o o o o o o o o o o o o o o o o o o
SCX-8230 SERIES SCX-8240 SERIES
o o o o o o o o o o o o o o o o o o o o o
Setting up...
Installation Guide Easy Manual Ver.3.00 (English) - Page 11

... items : Cabinet Stand, Dual Cassette Feeder, or High Capacity Feeder. Set installation location and check included items in the package. Do you refer to the below installation flow to install the hardware.
Install the Finisher.
Connect a power cord to the machine. Install Toner Cartridges and Imaging Units.
Install the machine with the one of the hardware
We recommend you need...
Installation Guide Easy Manual Ver.3.00 (English) - Page 12
...; The appearance of the power cord may differ depending on the country
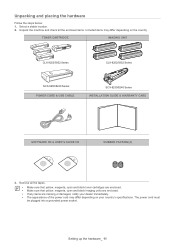
TONER CARTRIDGE
IMAGING UNIT
CLX-9252/9352 Series
CLX-9252/9352 Series
SCX-8230/8240 Series POWER CORD & USB CABLE
SCX-8230/8240 Series INSTALLATION GUIDE & WARRANTY CARD
SOFTWARE CD & USER'S GUIDE CD
RUBBER PACKING(2)
3. Setting up the hardware_ 11
Unpacking and placing the hardware
Follow the steps below...
Installation Guide Easy Manual Ver.3.00 (English) - Page 17
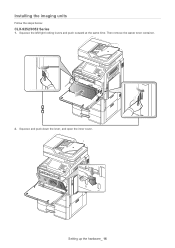
Installing the imaging units
Follow the steps below:
CLX-9252/9352 Series
1. Squeeze and push down the lever, and open the inner cover. Then remove the waste toner container.
2. Setting up the hardware_ 16 Squeeze the left/right locking levers and push outward at the same time.
Installation Guide Easy Manual Ver.3.00 (English) - Page 18

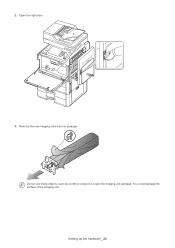
3.
Remove the tape on the handle. Setting up the hardware_ 17 Take the new imaging units out from their packages. Do not use sharp objects, such as a knife or scissors, to open the imaging unit package. You could damage the surface of the imaging unit.
5. Remove the paper protecting the surface of the imaging unit.
4.
Installation Guide Easy Manual Ver.3.00 (English) - Page 20

.... Labels inside the machine identify each imaging unit's position. Setting up the hardware_ 19 Close the inner cover. Hold the handles on the new imaging unit, and push
the imaging unit until it if necessary. 10. Cover it with a
piece of the imaging unit. • To prevent damage, do not expose the imaging unit to protect it locks into place.
11...
Installation Guide Easy Manual Ver.3.00 (English) - Page 23
You could damage the surface of the imaging unit. Remove the new imaging units from its package. Setting up the hardware_ 22
Open the right door.
3. Do not use sharp objects, such as a knife or scissors, to open the imaging unit package. 2.
Installation Guide Easy Manual Ver.3.00 (English) - Page 24

... the hardware_ 23 Hot water sets toner into fabric. • Be careful not to scratch the surface of paper to light for more than a few minutes. If toner gets on your clothing, wipe it off with a
piece of the imaging unit. • To prevent damage, do not expose the imaging unit to protect it with a dry cloth...
Installation Guide Easy Manual Ver.3.00 (English) - Page 25

Remove the paper protecting the surface of the imaging unit. 8. 7. Hold the handles on the new imaging unit, and push the imaging unit until it locks into place
Setting up the hardware_ 24
Installation Guide Easy Manual Ver.3.00 (English) - Page 49
on page 37).
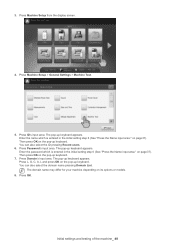
Press Machine Setup from the display screen.
4. Press Machine Setup > General Settings > Machine Test.
5. on page 37). Press Password's input area. Press L, O, C, A, L and ... OK on its options or models.
8. The pop-up keyboard. Press ID's input area. The pop-up keyboard appears. Enter the name which is entered in the initial setting step 6 (See "Press...
Installation Guide Easy Manual Ver.3.00 (English) - Page 52
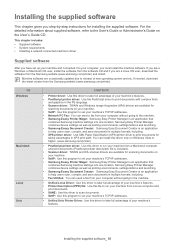
... software from the Samsung website (www.samsung.com/printer). If you are occasionally updated due to take full advantage of new operating system and etc. This chapter gives you step-by-step instructions for taking advantages in multiple formats, including. • Fax Utilities: You can install this driver only on the User's Guide CD.
Installing the supplied software...
Installation Guide Easy Manual Ver.3.00 (English) - Page 60
... 32
F
features
supplied software 51
I
initial setting 35 install
imaging unit 16, 21
optional high capacity feeder 12
optional tray 12 stand 12 toner cartridge 14
L
Linux
supplied softwares 51 system requirements 52
loading
paper in the standard tray 27
M
machine configuration 8 Macintosh
supplied softwares 51 system requirements 52
N
network
driver installation Windows 53
P
placing a machine 11...
Samsung SCX-8230NA Reviews
We have not received any reviews for Samsung yet.