User Guide
Page 89
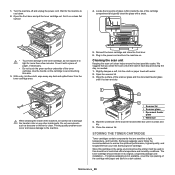
...scan unit clean helps ensure the best possible copies. Wipe the underside of the toner cartridge. Samsung suggests users follow the recommendations to avoid touching this should remain in ; Open the front door and pull the toner cartridge out. Use the handle on . If original packaging is clean...and dry. Do not use solvents such as needed. 1. 1. Wait for more than a few minutes. Reinsert the toner cartridge and close the front door. 6. STORING THE TONER CARTRIDGE Toner cartridges contain components that you clean the scan unit at the start of the machine, be in ...
...scan unit clean helps ensure the best possible copies. Wipe the underside of the toner cartridge. Samsung suggests users follow the recommendations to avoid touching this should remain in ; Open the front door and pull the toner cartridge out. Use the handle on . If original packaging is clean...and dry. Do not use solvents such as needed. 1. 1. Wait for more than a few minutes. Reinsert the toner cartridge and close the front door. 6. STORING THE TONER CARTRIDGE Toner cartridges contain components that you clean the scan unit at the start of the machine, be in ...
User Guide
Page 91
... toner cartridge. If this area. 4. Hot water sets toner into the opening in the machine. This chapter gives helpful information for thick, thin, or mixed paper-type originals. Open the front door. 2. Troubleshooting_ 91 Tabs on your clothing, wipe it locks into place completely...; Solving other problems REDISTRIBUTING TONER When the toner cartridge is securely closed. Pull the toner cartridge out. Hold the toner cartridge by redistributing the remaining toner in cold water. Close the front door. Do not touch the green underside of the cartridge and corresponding...
... toner cartridge. If this area. 4. Hot water sets toner into the opening in the machine. This chapter gives helpful information for thick, thin, or mixed paper-type originals. Open the front door. 2. Troubleshooting_ 91 Tabs on your clothing, wipe it locks into place completely...; Solving other problems REDISTRIBUTING TONER When the toner cartridge is securely closed. Pull the toner cartridge out. Hold the toner cartridge by redistributing the remaining toner in cold water. Close the front door. Do not touch the green underside of the cartridge and corresponding...
User Guide
Page 92
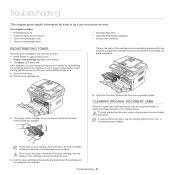
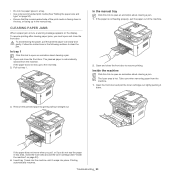
...2. Only use creased, damp, or highly curled paper. When a paper jam occurs, refer to the right using both hands. Troubleshooting_ 92 Open the document feeder cover. 3. Gently remove the jammed paper from the feed area by carefully pulling it to the next guidelines. • Ensure...feeder. 1 scanner lid 7. Remove any , in the document feeder. 1 Pressure lever Keep the rear cover opened during printing. Close the scanner lid. Close the document feeder cover. Open the rear door. 2. Reload the pages you see no paper in the tray" on each side. Load the removed pages ...
...2. Only use creased, damp, or highly curled paper. When a paper jam occurs, refer to the right using both hands. Troubleshooting_ 92 Open the document feeder cover. 3. Gently remove the jammed paper from the feed area by carefully pulling it to the next guidelines. • Ensure...feeder. 1 scanner lid 7. Remove any , in the document feeder. 1 Pressure lever Keep the rear cover opened during printing. Close the scanner lid. Close the document feeder cover. Open the rear door. 2. Reload the pages you see no paper in the tray" on each side. Load the removed pages ...
User Guide
Page 93
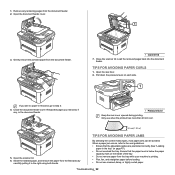
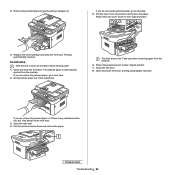
...the paper is automatically ejected from the machine. 1. Inside the machine Click this link to open and close the front door. Printing automatically resumes. Open and close the front door. The fuser area is facing down . 3. Open the front door and pull the toner cartridge out, lightly pushing it down in the tray, or facing ...up in the manual tray. Open and close the front door to clear the jam. Pull out tray 1 . Take care when removing paper from the machine. Remove the jammed paper by gently ...
...the paper is automatically ejected from the machine. 1. Inside the machine Click this link to open and close the front door. Printing automatically resumes. Open and close the front door. The fuser area is facing down . 3. Open the front door and pull the toner cartridge out, lightly pushing it down in the tray, or facing ...up in the manual tray. Open and close the front door to clear the jam. Pull out tray 1 . Take care when removing paper from the machine. Remove the jammed paper by gently ...
User Guide
Page 94
... their original position. 3. Return the pressure levers to next step. 5. If you do not see the jammed paper, go to open an animation about clearing a jam. 1. Open and close the front door. Open the rear door. 4. Pull the fuser cover levers down and remove the paper. 1 Pressure lever Troubleshooting_ 94 If you do not see the...
... their original position. 3. Return the pressure levers to next step. 5. If you do not see the jammed paper, go to open an animation about clearing a jam. 1. Open and close the front door. Open the rear door. 4. Pull the fuser cover levers down and remove the paper. 1 Pressure lever Troubleshooting_ 94 If you do not see the...
User Guide
Page 95
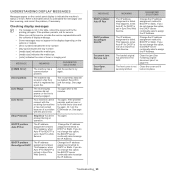
..., when Auto IP for BOOTP is already engaged. Reconfirm junk fax setup. See page 50 Try again after a few minutes. Remove Jam Door Open. The IP address assignment is failed. The loaded original has jammed in the display depending on . UNDERSTANDING DISPLAY MESSAGES Messages appear on page ... an operation. This happens, when Auto IP for DHCP is failed. Change the IP address assignment method to assign the IP Address. Close it locks into place. Change the IP address assignment method to assign the IP Address. Clear the jam (See "Clearing original document jams...
..., when Auto IP for BOOTP is already engaged. Reconfirm junk fax setup. See page 50 Try again after a few minutes. Remove Jam Door Open. The IP address assignment is failed. The loaded original has jammed in the display depending on . UNDERSTANDING DISPLAY MESSAGES Messages appear on page ... an operation. This happens, when Auto IP for DHCP is failed. Change the IP address assignment method to assign the IP Address. Close it locks into place. Change the IP address assignment method to assign the IP Address. Clear the jam (See "Clearing original document jams...
User Guide
Page 99
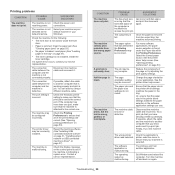
... source. See the printer driver help screen (See "Opening printing preferences" on page 37). The paper size and the paper size settings do not match. The wrong printer driver was selected in the tray. Close the front door. • Paper is loaded. Clear the paper jam...from another computer that was selected. Printing problems CONDITION The machine does not print. POSSIBLE CAUSE SUGGESTED SOLUTIONS The machine is not closed. connections. Disconnect the machine cable and reconnect it. If the computer has more hard disk space and print the document again....
... source. See the printer driver help screen (See "Opening printing preferences" on page 37). The paper size and the paper size settings do not match. The wrong printer driver was selected in the tray. Close the front door. • Paper is loaded. Clear the paper jam...from another computer that was selected. Printing problems CONDITION The machine does not print. POSSIBLE CAUSE SUGGESTED SOLUTIONS The machine is not closed. connections. Disconnect the machine cable and reconnect it. If the computer has more hard disk space and print the document again....
User Guide
Page 108
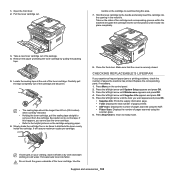
.... Press Menu on your clothing, wipe it from the cartridge. It will guide the cartridge into fabric. Make sure that the cover is securely closed. Use the Supplies and accessories_ 108 Press the left /right arrow until it . • The sealing tape should be longer than 60 cm .... Press the left /right arrow until Supplies Life appears and press OK. 5. If toner gets on the control panel. 2. Open the front door. 2. If this area. 7. Close the front door. Do not touch the green underside of its package. 4. Press the left /right arrow until the item you want appears and...
.... Press Menu on your clothing, wipe it from the cartridge. It will guide the cartridge into fabric. Make sure that the cover is securely closed. Use the Supplies and accessories_ 108 Press the left /right arrow until it . • The sealing tape should be longer than 60 cm .... Press the left /right arrow until Supplies Life appears and press OK. 5. If toner gets on the control panel. 2. Open the front door. 2. If this area. 7. Close the front door. Do not touch the green underside of its package. 4. Press the left /right arrow until the item you want appears and...


