

User Manual (ENGLISH)
Page 4
... the LCD screen from the front. 4) 5) Making a recording with the LCD screen closed . 1) Rotation de l'écran LCD Manipulez l'écran doucement lorsque vous le faites tourner. Direct sunlight can damage the CCD (Charge Coupled Device). La lumière solaire directe peut endommager le dispositif électronique à transfert de charge (CCD). 4 Notices regarding rotation of the hinge that connects the LCD screen to the Camcorder. 1) LCD screen...
... the LCD screen from the front. 4) 5) Making a recording with the LCD screen closed . 1) Rotation de l'écran LCD Manipulez l'écran doucement lorsque vous le faites tourner. Direct sunlight can damage the CCD (Charge Coupled Device). La lumière solaire directe peut endommager le dispositif électronique à transfert de charge (CCD). 4 Notices regarding rotation of the hinge that connects the LCD screen to the Camcorder. 1) LCD screen...
User Manual (ENGLISH)
Page 9
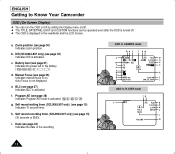
MIC 4. DATE/TIME (STOP) 7. LCD 11. TAPE EJECT (see page 26) 11. LCD (see page 22) Use when ejecting the tape. 7. CUSTOM CUSTOM fonctionne en mode Caméscope. 12. Torche vidéo (SCL906/L907) 9 VIDEO LIGHT 1. LENS 9. REC SEARCH (FF) 5. Lens (see page 55) 3. LIGHT works in CAMERA mode. (SCL906/L907 only) The built-in low-light conditions. 4. It enables recording in video light turns on when LIGHT is pressed. EASY EASY works in CAMERA mode. 9. L'enregistrement en conditions de faible...
MIC 4. DATE/TIME (STOP) 7. LCD 11. TAPE EJECT (see page 26) 11. LCD (see page 22) Use when ejecting the tape. 7. CUSTOM CUSTOM fonctionne en mode Caméscope. 12. Torche vidéo (SCL906/L907) 9 VIDEO LIGHT 1. LENS 9. REC SEARCH (FF) 5. Lens (see page 55) 3. LIGHT works in CAMERA mode. (SCL906/L907 only) The built-in low-light conditions. 4. It enables recording in video light turns on when LIGHT is pressed. EASY EASY works in CAMERA mode. 9. L'enregistrement en conditions de faible...
User Manual (ENGLISH)
Page 14
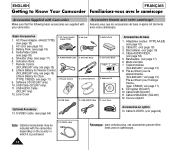
... be included with your camcorder. Battery Pack. (see page 18) 3. Instruction Book. 7. Software CD (SCL907 only) 10. AC cord 5. Mode d'emploi. 7. AC cord. (see page 19) 4. Battery Pack 6. Télécommande. (SCL906/L907, voir page 15) 8. Remote Control 9. Câble AUDIO/VIDEO. (voir page 53) 5. USB Cable (SCL907 only) SSTTOAPRT/ TIMSEERLF DISPLAY STILL RETZUERRNO CROESUENTTER WIDE 11. Couvre-objectif Optional Accessory 13. AUDIO/VIDEO Cable 6. Lithium Batteries 3. S-VIDEO cable 14 Remarque: dans...
... be included with your camcorder. Battery Pack. (see page 18) 3. Instruction Book. 7. Software CD (SCL907 only) 10. AC cord 5. Mode d'emploi. 7. AC cord. (see page 19) 4. Battery Pack 6. Télécommande. (SCL906/L907, voir page 15) 8. Remote Control 9. Câble AUDIO/VIDEO. (voir page 53) 5. USB Cable (SCL907 only) SSTTOAPRT/ TIMSEERLF DISPLAY STILL RETZUERRNO CROESUENTTER WIDE 11. Couvre-objectif Optional Accessory 13. AUDIO/VIDEO Cable 6. Lithium Batteries 3. S-VIDEO cable 14 Remarque: dans...
User Manual (ENGLISH)
Page 32
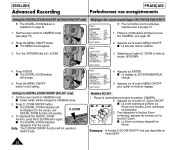
... Setting the DIGITAL ZOOM ON/OFF (SCL903/L906/L907 only) ✤ The DIGITAL ZOOM feature is explained on the screen, and D.ZOOM DIGITAL ZOOM function will not operate in EASY mode. Set the power switch to end setting. Press the MENU ON/OFF button. I Le réglage du ZOOM NUMERIQUE change . 5. Turn the UP/DOWN dial to CAMERA mode. Réglage du zoom numérique (SCL903/L906/L907) MENU LCD ADJUST DIS OFF D.ZOOM OFF WHITE BAL ..........AUTO DISPLAY ON LANGUAGE..........ENGLISH...
... Setting the DIGITAL ZOOM ON/OFF (SCL903/L906/L907 only) ✤ The DIGITAL ZOOM feature is explained on the screen, and D.ZOOM DIGITAL ZOOM function will not operate in EASY mode. Set the power switch to end setting. Press the MENU ON/OFF button. I Le réglage du ZOOM NUMERIQUE change . 5. Turn the UP/DOWN dial to CAMERA mode. Réglage du zoom numérique (SCL903/L906/L907) MENU LCD ADJUST DIS OFF D.ZOOM OFF WHITE BAL ..........AUTO DISPLAY ON LANGUAGE..........ENGLISH...
User Manual (ENGLISH)
Page 43
... clock setting screen will not operate in the camcorder, it to be displayed. Press the DATE/TIME button the required number of times. CLOCK SETTING 7. Remarques: I Si le caméscope ne conserve pas les réglages de l'horloge, cela signifie que la pile au lithium est déchargée. (Voir page 17.) I You cannot conceal the recorded date or time during playback. Notes: I If your recording. Appuyez...
... clock setting screen will not operate in the camcorder, it to be displayed. Press the DATE/TIME button the required number of times. CLOCK SETTING 7. Remarques: I Si le caméscope ne conserve pas les réglages de l'horloge, cela signifie que la pile au lithium est déchargée. (Voir page 17.) I You cannot conceal the recorded date or time during playback. Notes: I If your recording. Appuyez...

User Manual (ENGLISH)
Page 53
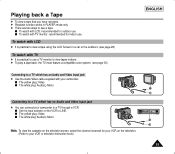
... to view a tape using the LCD Screen in PLAYER mode only. ✤ There are two ways to see a tape; I To watch with LCD: recommended for outdoor use a TV monitor to view tapes indoors. ✤ To play a tape back, the TV must feature a compatible color system. (see page 63) Connecting to a TV which has no Audio and Video input jack ✤ You can connect your camcorder to a TV through a VCR. I The yellow plug: Video I The white plug: Audio...
... to view a tape using the LCD Screen in PLAYER mode only. ✤ There are two ways to see a tape; I To watch with LCD: recommended for outdoor use a TV monitor to view tapes indoors. ✤ To play a tape back, the TV must feature a compatible color system. (see page 63) Connecting to a TV which has no Audio and Video input jack ✤ You can connect your camcorder to a TV through a VCR. I The yellow plug: Video I The white plug: Audio...
User Manual (ENGLISH)
Page 60
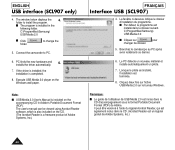
... camcorder to change the 5. folder to install the program. Cliquez deux fois sur l'icône USB Media 2.0 sur le bureau Windows. The user's manual can be viewed using Acrobat Reader software, which is also included on the CD. (The Acrobat Reader is installed in Adobe's Portable Document Format (PDF). I USB Media 2.0 User's Manual is completed. 8. La fenêtre ci-dessous indique le dossier d'installation du programme. C:\Programfiles\Samsung\ USB Media...
... camcorder to change the 5. folder to install the program. Cliquez deux fois sur l'icône USB Media 2.0 sur le bureau Windows. The user's manual can be viewed using Acrobat Reader software, which is also included on the CD. (The Acrobat Reader is installed in Adobe's Portable Document Format (PDF). I USB Media 2.0 User's Manual is completed. 8. La fenêtre ci-dessous indique le dossier d'installation du programme. C:\Programfiles\Samsung\ USB Media...

User Manual (ENGLISH)
Page 45
... select languages among OFF, AUTO-10S, and CONTINUE. 5. Pulse MENU. 3. Pulse ENTER para elegir entre OFF, AUTO-10S y CONTINUE. 5. I El titulo del pais seleccionado aparecera. 8. Press ENTER. At the same time, the camcorder will disappear. I Abra el LCD Screen y ajustelo a su EXIT: MENU gusto. 2. C.RESET 0:00:00 DEMO OFF I el title aparecera en la pantalla por 2 ~ 3 segundos. Set power switch to see comfortably. 2. Pulse START/STOP para...
... select languages among OFF, AUTO-10S, and CONTINUE. 5. Pulse MENU. 3. Pulse ENTER para elegir entre OFF, AUTO-10S y CONTINUE. 5. I El titulo del pais seleccionado aparecera. 8. Press ENTER. At the same time, the camcorder will disappear. I Abra el LCD Screen y ajustelo a su EXIT: MENU gusto. 2. C.RESET 0:00:00 DEMO OFF I el title aparecera en la pantalla por 2 ~ 3 segundos. Set power switch to see comfortably. 2. Pulse START/STOP para...
User Manual (ENGLISH)
Page 3
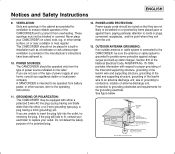
... the National Electrical Code, ANSI/NFPA No. 70-1984, provides information with either a polarized 2-wire AC line plug (a plug having a third (grounding) pin. Notices and Safety Instructions ENGLISH 9. VENTILATION: Slots and openings in wire to an antenna discharge unit, size of grounding to conductors, location of the CAMCORDER and to the operating instructions. 11. POWER SOURCES: The CAMCORDER should be routed so...
... the National Electrical Code, ANSI/NFPA No. 70-1984, provides information with either a polarized 2-wire AC line plug (a plug having a third (grounding) pin. Notices and Safety Instructions ENGLISH 9. VENTILATION: Slots and openings in wire to an antenna discharge unit, size of grounding to conductors, location of the CAMCORDER and to the operating instructions. 11. POWER SOURCES: The CAMCORDER should be routed so...
User Manual (ENGLISH)
Page 6
... Lens Cover ...17 Lithium Battery Installation ...17 Connecting the Power Source...18 s To use the AC Power Adapter ...18 s To use the Battery Pack ...19 Using the Battery Pack...20 s Continuous Recording time table ...20 s Battery Level Display...21 Inserting and Ejecting a Cassette ...22 Basic Recording Making your First Recording ...23 Hints for Stable Image Recording ...25 s Recording with LCD Screen...25 s Recording with Viewfinder...25 Adjusting the LCD...26 Adjusting Focus of the VIEWFINDER ...27 Playing back a tape on the LCD ...28 s Adjusting the LCD...
... Lens Cover ...17 Lithium Battery Installation ...17 Connecting the Power Source...18 s To use the AC Power Adapter ...18 s To use the Battery Pack ...19 Using the Battery Pack...20 s Continuous Recording time table ...20 s Battery Level Display...21 Inserting and Ejecting a Cassette ...22 Basic Recording Making your First Recording ...23 Hints for Stable Image Recording ...25 s Recording with LCD Screen...25 s Recording with Viewfinder...25 Adjusting the LCD...26 Adjusting Focus of the VIEWFINDER ...27 Playing back a tape on the LCD ...28 s Adjusting the LCD...
User Manual (ENGLISH)
Page 10
... your camcorder turned off when you set the power switch to use the viewfinder instead of the LCD when recording for a long time because the LCD uses more than 5 minutes without operation, it . ✤ When the battery reaches the end of its life, please contact your local dealer. Should the battery be dealt with as chemical waste. even if the battery pack or AC power adapter is removed...
... your camcorder turned off when you set the power switch to use the viewfinder instead of the LCD when recording for a long time because the LCD uses more than 5 minutes without operation, it . ✤ When the battery reaches the end of its life, please contact your local dealer. Should the battery be dealt with as chemical waste. even if the battery pack or AC power adapter is removed...
User Manual (ENGLISH)
Page 13
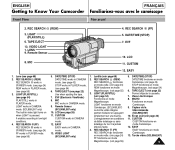
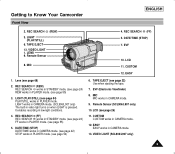
Getting to Know Your Camcorder Front View ENGLISH 2. TAPE EJECT 13. LENS 9. MIC 1. CUSTOM 12. LIGHT (PLAY/STILL) (see page 24) FF works in video light turns on when LIGHT is pressed. EASY 6. MIC MIC works in PLAYER mode. REC SEARCH (REW) 3. Remote Sensor (SCL906/L907 only) 10. LCD (see page 68) 2. VIDEO LIGHT 1. REC SEARCH (FF) REC SEARCH works in STANDBY mode. (see page 54) PLAY/STILL works in CAMERA mode. 9. EVF (Electronic Viewfinder) 8. LIGHT (PLAY/STILL) 6. Remote Sensor 8. DATE/TIME (STOP) 7. LIGHT works in CAMERA mode. (SCL906/L907 only) The...
Getting to Know Your Camcorder Front View ENGLISH 2. TAPE EJECT 13. LENS 9. MIC 1. CUSTOM 12. LIGHT (PLAY/STILL) (see page 24) FF works in video light turns on when LIGHT is pressed. EASY 6. MIC MIC works in PLAYER mode. REC SEARCH (REW) 3. Remote Sensor (SCL906/L907 only) 10. LCD (see page 68) 2. VIDEO LIGHT 1. REC SEARCH (FF) REC SEARCH works in STANDBY mode. (see page 54) PLAY/STILL works in CAMERA mode. 9. EVF (Electronic Viewfinder) 8. LIGHT (PLAY/STILL) 6. Remote Sensor 8. DATE/TIME (STOP) 7. LIGHT works in CAMERA mode. (SCL906/L907 only) The...
User Manual (ENGLISH)
Page 16
... 36) Indicates manual focus is on /off. ✤ The TITLE, DATE/TIME, EASY and CUSTOM functions can be operated even after the OSD is turned off by setting the Display menu on . DIS (SCL906/L907 only) (see page 21) Indicates the power left in the battery. ( ) d. Battery level (see page 35) Indicates DIS is displayed in PLAYER mode r q c Hi8 PLAY p 0:00:25 o Z.RTN u TITLE SEPIA v TAPE! Program AE...
... 36) Indicates manual focus is on /off. ✤ The TITLE, DATE/TIME, EASY and CUSTOM functions can be operated even after the OSD is turned off by setting the Display menu on . DIS (SCL906/L907 only) (see page 21) Indicates the power left in the battery. ( ) d. Battery level (see page 35) Indicates DIS is displayed in PLAYER mode r q c Hi8 PLAY p 0:00:25 o Z.RTN u TITLE SEPIA v TAPE! Program AE...
User Manual (ENGLISH)
Page 38
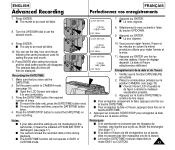
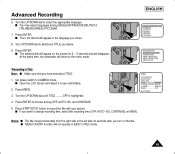
... the MENU ON/OFF button, to start recording. Press the ENTER button, the CUSTOM menu will only appear if these have been set in advance. s Date/Time and Title will appear. MENU LCD ADJUST DIS OFF D.ZOOM OFF WHITE BAL ..........AUTO DISPLAY ON LANGUAGE..........ENGLISH WL REMOCON ....ON NEXT: MENU MENU CUSTOM SET CLOCK SET TITLE SET TITLE OFF D/TITLE COLOR..WHITE C.RESET 0:00:00 DEMO OFF Example: When the CUSTOM SET is highlighted. 4. Press the START/STOP button...
... the MENU ON/OFF button, to start recording. Press the ENTER button, the CUSTOM menu will only appear if these have been set in advance. s Date/Time and Title will appear. MENU LCD ADJUST DIS OFF D.ZOOM OFF WHITE BAL ..........AUTO DISPLAY ON LANGUAGE..........ENGLISH WL REMOCON ....ON NEXT: MENU MENU CUSTOM SET CLOCK SET TITLE SET TITLE OFF D/TITLE COLOR..WHITE C.RESET 0:00:00 DEMO OFF Example: When the CUSTOM SET is highlighted. 4. Press the START/STOP button...
User Manual (ENGLISH)
Page 47
... DATE/TIME function will not operate in the camcorder, it to be reset will then be reset will disappear. Press ENTER. Turn the UP/DOWN dial to record the DATE/TIME on your date and time settings are not maintained in EASY or CUSTOM mode. 43 Press ENTER after setting the minute and the clock setting screen will blink. 10. s To record the date and time, press the DATE/TIME button twice. 4. Set the power switch to be displayed...
... DATE/TIME function will not operate in the camcorder, it to be reset will then be reset will disappear. Press ENTER. Turn the UP/DOWN dial to record the DATE/TIME on your date and time settings are not maintained in EASY or CUSTOM mode. 43 Press ENTER after setting the minute and the clock setting screen will blink. 10. s To record the date and time, press the DATE/TIME button twice. 4. Set the power switch to be displayed...
User Manual (ENGLISH)
Page 49
... may select languages among OFF, AUTO-10S, and CONTINUE. 5. At the same time, the camcorder will appear in EASY or REC mode. 45 Press MENU. 3. ANNIVERSARY CONGRATULATIONS GRADUATION HAPPY BIRTHDAY HAPPY NEW YEAR HAVING FUN Recording a Title Note: s Make sure that you want to record the title with your picture. MENU CUSTOM SET CLOCK SET TITLE SET TITLE CONTINUE D/TITLE COLOR ..WHITE C.RESET 0:00:00 DEMO OFF EXIT...
... may select languages among OFF, AUTO-10S, and CONTINUE. 5. At the same time, the camcorder will appear in EASY or REC mode. 45 Press MENU. 3. ANNIVERSARY CONGRATULATIONS GRADUATION HAPPY BIRTHDAY HAPPY NEW YEAR HAVING FUN Recording a Title Note: s Make sure that you want to record the title with your picture. MENU CUSTOM SET CLOCK SET TITLE SET TITLE CONTINUE D/TITLE COLOR ..WHITE C.RESET 0:00:00 DEMO OFF EXIT...
User Manual (ENGLISH)
Page 57
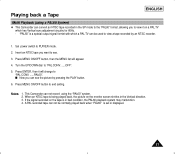
... practical to view a tape using the LCD Screen in PLAYER mode only. ✤ There are two ways to a TV which has no Audio and Video input jack ✤ You can connect your camcorder to your VCR or television instruction book) 53 s To watch with your VCR on the VCR to LINE. s The yellow plug: Video s The white plug: Audio(L)-Mono ENGLISH Connecting to a TV which has an Audio and Video input jack ✤ Use the Audio/Video cable supplied with...
... practical to view a tape using the LCD Screen in PLAYER mode only. ✤ There are two ways to a TV which has no Audio and Video input jack ✤ You can connect your camcorder to your VCR or television instruction book) 53 s To watch with your VCR on the VCR to LINE. s The yellow plug: Video s The white plug: Audio(L)-Mono ENGLISH Connecting to a TV which has an Audio and Video input jack ✤ Use the Audio/Video cable supplied with...
User Manual (ENGLISH)
Page 61
... Vertical direction. 3. Notes: 1. If the signal recorded on the tape is set or displayed. 57 A PAL recorded tape can not be used to view a tape recorded by pressing the PLAY button. 6. "PAL60" is being played back, the picture on a PAL TV which a PAL TV can see . 3. Turn the UP/DOWN dial to end setting. Set power switch to see the picture by an NTSC recorder. 1. Press MENU ON/OFF button, then the MENU list will change to view...
... Vertical direction. 3. Notes: 1. If the signal recorded on the tape is set or displayed. 57 A PAL recorded tape can not be used to view a tape recorded by pressing the PLAY button. 6. "PAL60" is being played back, the picture on a PAL TV which a PAL TV can see . 3. Turn the UP/DOWN dial to end setting. Set power switch to see the picture by an NTSC recorder. 1. Press MENU ON/OFF button, then the MENU list will change to view...
User Manual (ENGLISH)
Page 69
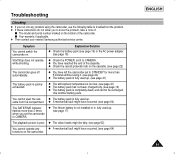
... 64) functions on the cassette. (see page 18) Start/Stop does not operate while shooting. s Your warranty, if applicable. ✤ Then contact your nearest Samsung authorized service center. x You have occurred. (see page 64) The DATE/TIME indicator flashes more than 2 times when you set to STANDBY for more than 5 minutes without using the camcorder, use the following table to troubleshoot the problem. ✤ If these instructions do...
... 64) functions on the cassette. (see page 18) Start/Stop does not operate while shooting. s Your warranty, if applicable. ✤ Then contact your nearest Samsung authorized service center. x You have occurred. (see page 64) The DATE/TIME indicator flashes more than 2 times when you set to STANDBY for more than 5 minutes without using the camcorder, use the following table to troubleshoot the problem. ✤ If these instructions do...
User Manual (ENGLISH)
Page 72
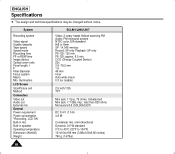
Illumination LCD Screen Size/Picture cell Method Connectors Video out Audio out External mic General Power requirement Power consumption *Recording, LCD ON Built-in mic Built-in speaker Operating temperature Dimension (WxHxD) Weight SCL901/L906/L907 Video: 2 rotary heads Helical scanning FM Audio: FM monaural system NTSC color, EIA standard Hi8 or 8mm SP: 14.345 mm/sec Record: SP only Playback: SP only P6-120: 120 min. CCD (Charge Coupled Device) 22x 3.6~79.2 mm 1.6 46...
Illumination LCD Screen Size/Picture cell Method Connectors Video out Audio out External mic General Power requirement Power consumption *Recording, LCD ON Built-in mic Built-in speaker Operating temperature Dimension (WxHxD) Weight SCL901/L906/L907 Video: 2 rotary heads Helical scanning FM Audio: FM monaural system NTSC color, EIA standard Hi8 or 8mm SP: 14.345 mm/sec Record: SP only Playback: SP only P6-120: 120 min. CCD (Charge Coupled Device) 22x 3.6~79.2 mm 1.6 46...


