
User Manual (user Manual) (ver.f9) (English)
Page 1
R600 BY SAMSUNG (SCH-R600 Series) PORTABLE DUAL-BAND MOBILE PHONE User Manual Please read this manual before operating your phone, and keep it for future reference.
R600 BY SAMSUNG (SCH-R600 Series) PORTABLE DUAL-BAND MOBILE PHONE User Manual Please read this manual before operating your phone, and keep it for future reference.

User Manual (user Manual) (ver.f9) (English)
Page 2
..., you agree that you . No title to or ownership in Korea. Samsung Telecommunications America (STA), LLC Headquarters:Customer Care Center: 1301 E. Do you have questions about your Samsung Mobile Phone? R600.02_CC26_WB_050709_F9 Richardson, TX 75082Plano, TX 75074 Toll Free Tel: 1.888.987....HELP (4357) Internet Address: http://www.samsungusa.com © 2009 Samsung Telecommunications America, LLC is proprietary to , inventions (...
..., you agree that you . No title to or ownership in Korea. Samsung Telecommunications America (STA), LLC Headquarters:Customer Care Center: 1301 E. Do you have questions about your Samsung Mobile Phone? R600.02_CC26_WB_050709_F9 Richardson, TX 75082Plano, TX 75074 Toll Free Tel: 1.888.987....HELP (4357) Internet Address: http://www.samsungusa.com © 2009 Samsung Telecommunications America, LLC is proprietary to , inventions (...

User Manual (user Manual) (ver.f9) (English)
Page 4
...Charging the Battery 5 Activating Your Phone 6 Setting Up Your Voicemail 7 Memory Card (Optional 8 Replacing the Front Folder Cover 9 Section 2: Understanding Your Phone 10 Features of Your Phone 10 Closed View of Your Phone 10 Open View (Front) of Your Phone 11 Command Keys 12 Understanding the... Display Screen 14 Your Phone's Modes 15 Section 3: Menu Navigation 19 Menu Navigation ...
...Charging the Battery 5 Activating Your Phone 6 Setting Up Your Voicemail 7 Memory Card (Optional 8 Replacing the Front Folder Cover 9 Section 2: Understanding Your Phone 10 Features of Your Phone 10 Closed View of Your Phone 10 Open View (Front) of Your Phone 11 Command Keys 12 Understanding the... Display Screen 14 Your Phone's Modes 15 Section 3: Menu Navigation 19 Menu Navigation ...

User Manual (user Manual) (ver.f9) (English)
Page 5
... 83 Accessing Multimedia 83 My Images 83 My Videos 85 Music Player 86 My Ringtones 88 My Sounds 89 Section 12: Tools 92 Accessing Your Phone's Tools 92 Bluetooth 92 Calendar 95 Memo Pad 97 Alarm Clock 98 World Time 99 Calculator 101 Stop Watch 101 Converter 102 Tip Calculator 104...
... 83 Accessing Multimedia 83 My Images 83 My Videos 85 Music Player 86 My Ringtones 88 My Sounds 89 Section 12: Tools 92 Accessing Your Phone's Tools 92 Bluetooth 92 Calendar 95 Memo Pad 97 Alarm Clock 98 World Time 99 Calculator 101 Stop Watch 101 Converter 102 Tip Calculator 104...

User Manual (user Manual) (ver.f9) (English)
Page 6
... Section 15: Health and Safety Information 131 Health and Safety Information 131 Samsung Mobile Products and Recycling 132 UL Certified Travel Adapter 132 Consumer Information on Wireless Phones 133 Road Safety 138 Responsible Listening 140 Operating Environment 142 Using Your Phone Near Other Electronic Devices 142 FCC Hearing-Aid Compatibility (HAC) Regulations for...
... Section 15: Health and Safety Information 131 Health and Safety Information 131 Samsung Mobile Products and Recycling 132 UL Certified Travel Adapter 132 Consumer Information on Wireless Phones 133 Road Safety 138 Responsible Listening 140 Operating Environment 142 Using Your Phone Near Other Electronic Devices 142 FCC Hearing-Aid Compatibility (HAC) Regulations for...

User Manual (user Manual) (ver.f9) (English)
Page 7
...these methods are emphasized. The definitions for activating features, to define terms, and more are as the menus and sub-menus in your phone. Provide quick or innovative methods for quick reference to most features begins on page 131. Example: "...Settings ➔ Call Settings ➔...apart from the rest. Text Conventions This manual provides condensed information about the current feature that you should know before using your Samsung R600 phone by activating your service, setting up your Voicemail, or getting an understanding of how this manual is near the back of ...
...these methods are emphasized. The definitions for activating features, to define terms, and more are as the menus and sub-menus in your phone. Provide quick or innovative methods for quick reference to most features begins on page 131. Example: "...Settings ➔ Call Settings ➔...apart from the rest. Text Conventions This manual provides condensed information about the current feature that you should know before using your Samsung R600 phone by activating your service, setting up your Voicemail, or getting an understanding of how this manual is near the back of ...

User Manual (user Manual) (ver.f9) (English)
Page 8
...bottom end of the proper configuration for the power outlet. Only use an adaptor of your warranty and may invalidate your phone. Important!: You must use Samsung-approved charging devices and batteries. Important!: Use of the display indicates power level. Low battery indicator The battery indicator (... ) in North America, you have two to three minutes before removing the battery from any 120/220 VAC outlet. 1. Samsung accessories are designed to an electrical supply not located in the upper-right corner of other accessories may cause damage. Insert the smaller...
...bottom end of the proper configuration for the power outlet. Only use an adaptor of your warranty and may invalidate your phone. Important!: You must use Samsung-approved charging devices and batteries. Important!: Use of the display indicates power level. Low battery indicator The battery indicator (... ) in North America, you have two to three minutes before removing the battery from any 120/220 VAC outlet. 1. Samsung accessories are designed to an electrical supply not located in the upper-right corner of other accessories may cause damage. Insert the smaller...
User Manual (user Manual) (ver.f9) (English)
Page 9
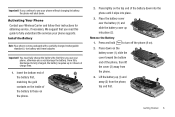
... partially charged rechargeable standard Li-Ion battery and travel adapter. Important!: You must fully charge the battery the first time you use your phone, otherwise you could damage the battery. Place the battery cover over the battery (1) and slide the battery cover up to 4 hours of... the battery down into the phone until it slips into place (2). Important!: If you continue to use your phone without charging its battery, the phone will shut down. Press and hold to those on ). 2. Getting Started 6 Press lightly...
... partially charged rechargeable standard Li-Ion battery and travel adapter. Important!: You must fully charge the battery the first time you use your phone, otherwise you could damage the battery. Place the battery cover over the battery (1) and slide the battery cover up to 4 hours of... the battery down into the phone until it slips into place (2). Important!: If you continue to use your phone without charging its battery, the phone will shut down. Press and hold to those on ). 2. Getting Started 6 Press lightly...

User Manual (user Manual) (ver.f9) (English)
Page 10
...calls, try later when service is necessary. 3. You're now ready to dial Voicemail. Follow the prompts in the second line of your phone is on your phone as shown. 2. In standby mode, press and hold for a network signal. 4. Note: If your carrier's coverage or roaming area,... the No Service icon ( ) appears at a higher power level than one second, the phone will not power off. The phone begins searching for two or more seconds. Setting Up Your Voicemail Voicemail allows callers to leave voice messages, which can use the Voicemail...
...calls, try later when service is necessary. 3. You're now ready to dial Voicemail. Follow the prompts in the second line of your phone is on your phone as shown. 2. In standby mode, press and hold for a network signal. 4. Note: If your carrier's coverage or roaming area,... the No Service icon ( ) appears at a higher power level than one second, the phone will not power off. The phone begins searching for two or more seconds. Setting Up Your Voicemail Voicemail allows callers to leave voice messages, which can use the Voicemail...

User Manual (user Manual) (ver.f9) (English)
Page 11
... own mobile number to dial Voicemail. (For more information, refer to enter your password. You are face up . 2. Place or hold your phone with the rear of the phone facing up , as shown. 3. Replace the microSD cover. Open the microSD cover on page 21.) After connecting, you feel it release. You...Open the microSD cover on the right hand side of the card are prompted to "Making a Call - Make sure that the gold contacts of the phone, as shown, then carefully slide the memory card into place. Carefully press the memory card inward until you feel it click into the memory card...
... own mobile number to dial Voicemail. (For more information, refer to enter your password. You are face up . 2. Place or hold your phone with the rear of the phone facing up , as shown. 3. Replace the microSD cover. Open the microSD cover on page 21.) After connecting, you feel it release. You...Open the microSD cover on the right hand side of the card are prompted to "Making a Call - Make sure that the gold contacts of the phone, as shown, then carefully slide the memory card into place. Carefully press the memory card inward until you feel it click into the memory card...
User Manual (user Manual) (ver.f9) (English)
Page 12
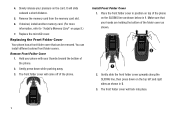
... a front folder cover that your thumbs toward the bottom of the folder cover as shown. 2 2. The front folder cover will come off of the phone on the top left and right sides as shown below in 2. 3. Remove the memory card from the memory card slot. 6. You can be removed.... colored front folder covers. Gently press down on the SLIDING line as shown in 1. Place the front folder cover in position on top of the phone. Install Front Folder Cover 1. Gently slide the front folder cover upwards along the SLIDING line, then press down while pushing away. 3. If desired, ...
... a front folder cover that your thumbs toward the bottom of the folder cover as shown. 2 2. The front folder cover will come off of the phone on the top left and right sides as shown below in 2. 3. Remove the memory card from the memory card slot. 6. You can be removed.... colored front folder covers. Gently press down on the SLIDING line as shown in 1. Place the front folder cover in position on top of the phone. Install Front Folder Cover 1. Gently slide the front folder cover upwards along the SLIDING line, then press down while pushing away. 3. If desired, ...

User Manual (user Manual) (ver.f9) (English)
Page 13
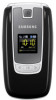
The R600 does not support Bluetooth OBEX profiles. Volume Key - Features of Your Phone Features 1. Understanding Your Phone 10 Lets you adjust the ring volume in use. Closed View of Your Phone • Domestic and international voice and text messaging service (available on participating networks).... microSD™ Memory Card slot Note: The R600™ phone supports the wireless handsfree profile for Bluetooth® v2.0 wireless technology. Section 2: Understanding Your Phone This section outlines some key features of your phone. It also describes the screen format and the...
The R600 does not support Bluetooth OBEX profiles. Volume Key - Features of Your Phone Features 1. Understanding Your Phone 10 Lets you adjust the ring volume in use. Closed View of Your Phone • Domestic and international voice and text messaging service (available on participating networks).... microSD™ Memory Card slot Note: The R600™ phone supports the wireless handsfree profile for Bluetooth® v2.0 wireless technology. Section 2: Understanding Your Phone This section outlines some key features of your phone. It also describes the screen format and the...

User Manual (user Manual) (ver.f9) (English)
Page 14
...signal strength, and so on . 5. Headset Connector - Camera Lens - Media Player Keys - Indicates the status of your phone and takes pictures or records videos, with the phone open or closed , controls music file playback. 6. Main Display - Used to connect an optional wired headset or TTY ...lens of your built-in an optional microSD™ memory card for additional multimedia file storage. 11 Open View (Front) of your phone, including status icons, message indicators, signal strength, and so on . 2. Used to connect charging accessories or any available accessory ...
...signal strength, and so on . 5. Headset Connector - Camera Lens - Media Player Keys - Indicates the status of your phone and takes pictures or records videos, with the phone open or closed , controls music file playback. 6. Main Display - Used to connect an optional wired headset or TTY ...lens of your built-in an optional microSD™ memory card for additional multimedia file storage. 11 Open View (Front) of your phone, including status icons, message indicators, signal strength, and so on . 2. Used to connect charging accessories or any available accessory ...

User Manual (user Manual) (ver.f9) (English)
Page 15
... through menus and applications and to voicemail. 13. Right Soft Key - Earpiece / Speaker - There are in the display. Understanding Your Phone 12 Navigation Key - In Standby mode, lets you speed dial your Voicemail account to navigate through a menu accepts the highlighted choice in...Enter special characters. Perform various functions. 8. Voice Recognition Key - Used to review your phone. 12. Pressing when navigating through menus and applications and to navigate through the phone menu options. Used to select the choice indicated at the bottom left corner of the Main...
... through menus and applications and to voicemail. 13. Right Soft Key - Earpiece / Speaker - There are in the display. Understanding Your Phone 12 Navigation Key - In Standby mode, lets you speed dial your Voicemail account to navigate through a menu accepts the highlighted choice in...Enter special characters. Perform various functions. 8. Voice Recognition Key - Used to review your phone. 12. Pressing when navigating through menus and applications and to navigate through the phone menu options. Used to select the choice indicated at the bottom left corner of the Main...

User Manual (user Manual) (ver.f9) (English)
Page 16
.... • If you enter an incorrect character, briefly press to disconnect a call . Right Soft Key Some functions of recent calls to and from your phone on or off. • Briefly press once to backspace (and delete) the character. • To erase the entire sentence, press and hold the END... key ( ) to turn your phone. • Press twice in standby mode to display a list of the Right soft key ( ) are as follows: • In standby mode, press the Contacts...
.... • If you enter an incorrect character, briefly press to disconnect a call . Right Soft Key Some functions of recent calls to and from your phone on or off. • Briefly press once to backspace (and delete) the character. • To erase the entire sentence, press and hold the END... key ( ) to turn your phone. • Press twice in standby mode to display a list of the Right soft key ( ) are as follows: • In standby mode, press the Contacts...

User Manual (user Manual) (ver.f9) (English)
Page 17
... contains icons that indicate network status, battery power, signal strength, connection type, 2 and more. 2. Display Screen Icons Your R600 phone can show you definitions of the display. Each directional key also acts as call ), and to browse menu items. Camera-Camcorder Key...music file in standby mode), to adjust voice call volume (during a call progress information, messages, and photos. 3. To access the Icon Glossary: Understanding Your Phone 14 Volume Key Use the Volume key ( ) on the Navigation key ( ) to browse menus, sub-menus, and lists. Navigation Key Use the directional...
... contains icons that indicate network status, battery power, signal strength, connection type, 2 and more. 2. Display Screen Icons Your R600 phone can show you definitions of the display. Each directional key also acts as call ), and to browse menu items. Camera-Camcorder Key...music file in standby mode), to adjust voice call volume (during a call progress information, messages, and photos. 3. To access the Icon Glossary: Understanding Your Phone 14 Volume Key Use the Volume key ( ) on the Navigation key ( ) to browse menus, sub-menus, and lists. Navigation Key Use the directional...

User Manual (user Manual) (ver.f9) (English)
Page 18
... situations such as low battery. Example: "New Message" • Error - ᮣ In standby mode, press Menu ( ), then select Settings ➔ Phone Info ➔ Icon Glossary. A list appears showing the icons that can choose to answer a call , the display backlight dims and turns off when no... boxes prompt for action, inform you press any key except or , by pressing only the key, or by pressing any key or open the phone, the backlights come on page 116.) 15 Example: "Sending..." "Connecting..." • Completed - Example: "Low Battery," "Memory Full!" They go...
... situations such as low battery. Example: "New Message" • Error - ᮣ In standby mode, press Menu ( ), then select Settings ➔ Phone Info ➔ Icon Glossary. A list appears showing the icons that can choose to answer a call , the display backlight dims and turns off when no... boxes prompt for action, inform you press any key except or , by pressing only the key, or by pressing any key or open the phone, the backlights come on page 116.) 15 Example: "Sending..." "Connecting..." • Completed - Example: "Low Battery," "Memory Full!" They go...
User Manual (user Manual) (ver.f9) (English)
Page 19
... four digits of your keypad makes when you will see the time, day, and date as well as they are received. Lock Mode When the phone is on page 19.) Enter/Exit Silent Mode Silences the ringers, the alerts, and the tones your telephone number. Press to return to view complete.... Place Calls in Lock Mode, restrictions are T9 Word, Abc, ABC, Symbols, and 123. (For more information, refer to display a list of the phone once it has found service and is in standby mode, new incoming messages automatically appear in talk mode. Use the Navigation key to scroll through ...
... four digits of your keypad makes when you will see the time, day, and date as well as they are received. Lock Mode When the phone is on page 19.) Enter/Exit Silent Mode Silences the ringers, the alerts, and the tones your telephone number. Press to return to view complete.... Place Calls in Lock Mode, restrictions are T9 Word, Abc, ABC, Symbols, and 123. (For more information, refer to display a list of the phone once it has found service and is in standby mode, new incoming messages automatically appear in talk mode. Use the Navigation key to scroll through ...

User Manual (user Manual) (ver.f9) (English)
Page 20
... disappears from the display and the desired ringer value appears, then press SET ( ). The No Ring icon ( ) appears in the display when the phone is in your phone can play music files (MP3, CMX, Midi, AAC, AAC+, and eAAC+), but only if they are : • Vibrate • Low •... key is on page 8. • Entering Music Player Mode: Music Player Mode The Music Player in Vibrate mode. Your phone returns to "Memory Card (Optional)" on the left side of phone. Options are stored in the display, then press SET ( ). When you are satisfied with the setting, press SET (...
... disappears from the display and the desired ringer value appears, then press SET ( ). The No Ring icon ( ) appears in the display when the phone is in your phone can play music files (MP3, CMX, Midi, AAC, AAC+, and eAAC+), but only if they are : • Vibrate • Low •... key is on page 8. • Entering Music Player Mode: Music Player Mode The Music Player in Vibrate mode. Your phone returns to "Memory Card (Optional)" on the left side of phone. Options are stored in the display, then press SET ( ). When you are satisfied with the setting, press SET (...

User Manual (user Manual) (ver.f9) (English)
Page 21
..., refer to "Camera-Camcorder" on page 8. • Entering Video Player Mode: 1. Press the Options soft key to "Camera-Camcorder" on the right side of the phone. • Exiting Camera Mode - A 2-by-2 array of your videos. or - - In standby mode, press Menu ( ), then select Multimedia ➔ Music Player. -... images appears in the display and begins playing the highlighted video. Supported video formats are stored in the My Videos folder in the phone or on the right side of your pictures. Highlight the desired video and press the Play soft key. In standby mode, press ...
..., refer to "Camera-Camcorder" on page 8. • Entering Video Player Mode: 1. Press the Options soft key to "Camera-Camcorder" on the right side of the phone. • Exiting Camera Mode - A 2-by-2 array of your videos. or - - In standby mode, press Menu ( ), then select Multimedia ➔ Music Player. -... images appears in the display and begins playing the highlighted video. Supported video formats are stored in the My Videos folder in the phone or on the right side of your pictures. Highlight the desired video and press the Play soft key. In standby mode, press ...


