
User Manual (user Manual) (English, French)
Page 12
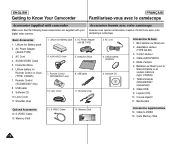
...ès ont été livrés avec votre caméscope numérique. AC Cord 4. Lithium battery for Remote Control or Clock. (TYPE: CR2025) 7. USB cable 9. AC cord 6. Bloc batterie au lithium-ion 2. Câble AUDIO/VIDEO 5. Lens Cover 11. AUDIO/VIDEO Cable 5. Cordon secteur 4. Remote Control (SCD305/D307 only) 8. Software CD 10. Câble USB 9. Memory Stick Accessoires supplémentaire 12. Instruction Book 7. Mode d'emploi 6. Télécommande (SCD305/D307 uniquement) 8. Couvre...
...ès ont été livrés avec votre caméscope numérique. AC Cord 4. Lithium battery for Remote Control or Clock. (TYPE: CR2025) 7. USB cable 9. AC cord 6. Bloc batterie au lithium-ion 2. Câble AUDIO/VIDEO 5. Lens Cover 11. AUDIO/VIDEO Cable 5. Cordon secteur 4. Remote Control (SCD305/D307 only) 8. Software CD 10. Câble USB 9. Memory Stick Accessoires supplémentaire 12. Instruction Book 7. Mode d'emploi 6. Télécommande (SCD305/D307 uniquement) 8. Couvre...

User Manual (user Manual) (English, French)
Page 26
... indicate battery level, is provided on page 25 for Battery Identification A charge mark is actually white in the operating instructions are provided (red and grey)-you may not be displayed as the approximate continuous recording time given in these instructions. ✤ The gray bar shown here to help you actually use the camcorder, the remaining battery time may choose which one indicates charged and which indicates discharged. The recording time...
... indicate battery level, is provided on page 25 for Battery Identification A charge mark is actually white in the operating instructions are provided (red and grey)-you may not be displayed as the approximate continuous recording time given in these instructions. ✤ The gray bar shown here to help you actually use the camcorder, the remaining battery time may choose which one indicates charged and which indicates discharged. The recording time...
User Manual (user Manual) (English, French)
Page 35
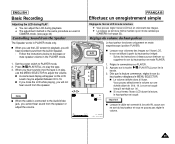
... instructions ci-dessous pour diminuer ou supprimer le son du haut-parleur en mode PLAYER. 0 : 2 3 : 4 7 5 5 min 1. I A volume level display will not hear sound from the built-in the PLAYER mode. 1. ENGLISH Basic Recording Adjusting the LCD during PLAY ✤ You can adjust the LCD during playback. ✤ The adjustment method is the same procedure as used in CAMERA mode. (see page 32) Controlling Sound from the Speaker The Speaker works in PLAYER mode...
... instructions ci-dessous pour diminuer ou supprimer le son du haut-parleur en mode PLAYER. 0 : 2 3 : 4 7 5 5 min 1. I A volume level display will not hear sound from the built-in the PLAYER mode. 1. ENGLISH Basic Recording Adjusting the LCD during PLAY ✤ You can adjust the LCD during playback. ✤ The adjustment method is the same procedure as used in CAMERA mode. (see page 32) Controlling Sound from the Speaker The Speaker works in PLAYER mode...

User Manual (user Manual) (English, Twi)
Page 2
... Record using the Remote Control 20 Lithium Battery Installation 21 Adjusting the Hand Strap 22 Hand strap ...22 Shoulder Strap 22 Attaching the Lens Cover 22 Connecting a Power Source 23 To use the AC Power adapter and DC Cable 23 To select the CAMCORDER mode 23 Using the Lithium Ion Battery Pack 24 Charging the Lithium Ion Battery Pack 24 Table of continuous recording time based on model and battery type ...... 25 Battery level display 26 Inserting and Ejecting a Cassette...
... Record using the Remote Control 20 Lithium Battery Installation 21 Adjusting the Hand Strap 22 Hand strap ...22 Shoulder Strap 22 Attaching the Lens Cover 22 Connecting a Power Source 23 To use the AC Power adapter and DC Cable 23 To select the CAMCORDER mode 23 Using the Lithium Ion Battery Pack 24 Charging the Lithium Ion Battery Pack 24 Table of continuous recording time based on model and battery type ...... 25 Battery level display 26 Inserting and Ejecting a Cassette...
User Manual (user Manual) (English, Twi)
Page 3
... Set the camcorder to CAMERA or PLAYER mode and M.REC or M.PLAY mode 37 Availability of functions in each mode 38 CLOCK SET 39 WL. BALANCE (WHITE BALANCE 44 Zooming In and Out 45 Tele MACRO 45 Digital Zoom 46 DIS (Digital Image Stabilizer 47 DSE (Digital Special Effects) SELECT 48 Selecting an effect 49 REC MODE 50 AUDIO MODE 51 WIND CUT 52 DATE/TIME 53 TV DISPLAY 54 Using Quick Menu 55 Setting the Quick menu 56 SHUTTER SPEED & EXPOSURE 57 SLOW SHUTTER(Low Shutter Speed...
... Set the camcorder to CAMERA or PLAYER mode and M.REC or M.PLAY mode 37 Availability of functions in each mode 38 CLOCK SET 39 WL. BALANCE (WHITE BALANCE 44 Zooming In and Out 45 Tele MACRO 45 Digital Zoom 46 DIS (Digital Image Stabilizer 47 DSE (Digital Special Effects) SELECT 48 Selecting an effect 49 REC MODE 50 AUDIO MODE 51 WIND CUT 52 DATE/TIME 53 TV DISPLAY 54 Using Quick Menu 55 Setting the Quick menu 56 SHUTTER SPEED & EXPOSURE 57 SLOW SHUTTER(Low Shutter Speed...
User Manual (user Manual) (English, Twi)
Page 12
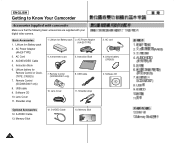
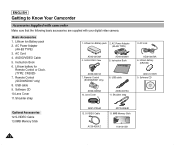
...4. S-VIDEO Cable 13. AC Power Adapter (AA-E8 TYPE) 3. AC Cord 4. Shoulder strap Optional Accessories 12. Lithium battery (CR2025) 9. Lithium battery for Remote Control or Clock. (TYPE: CR2025) 7. Lens Cover 11. AC cord 6. Memory Stick 3. USB cable 9. Software CD 12 Shoulder strap 1. Memory Stick 12. ENGLISH Getting to Know Your Camcorder Accessories Supplied with camcorder Make sure that the following basic accessories are supplied with your digital video camera. Instruction Book 6. Remote Control (SCD305/D307 only) 8. AUDIO/VIDEO Cable 5. Software CD...
...4. S-VIDEO Cable 13. AC Power Adapter (AA-E8 TYPE) 3. AC Cord 4. Shoulder strap Optional Accessories 12. Lithium battery (CR2025) 9. Lithium battery for Remote Control or Clock. (TYPE: CR2025) 7. Lens Cover 11. AC cord 6. Memory Stick 3. USB cable 9. Software CD 12 Shoulder strap 1. Memory Stick 12. ENGLISH Getting to Know Your Camcorder Accessories Supplied with camcorder Make sure that the following basic accessories are supplied with your digital video camera. Instruction Book 6. Remote Control (SCD305/D307 only) 8. AUDIO/VIDEO Cable 5. Software CD...
User Manual (user Manual) (English, Twi)
Page 34
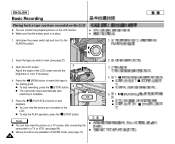
... LCD screen and set the brightness or color if necessary. 4. I I playback. ENGLISH Basic Recording Playing back a tape you wish to view. (see page 71) 34 Hold down the power switch tab and turn it to a TV or VCR. (see page 69) I I To stop the PLAY operation, press the (STOP) button. Press the (PLAY/STILL) button to I You can also view the picture on a TV screen, after rewinding is in PLAYER mode. (see page 27) 2 3. Open the LCD screen...
... LCD screen and set the brightness or color if necessary. 4. I I playback. ENGLISH Basic Recording Playing back a tape you wish to view. (see page 71) 34 Hold down the power switch tab and turn it to a TV or VCR. (see page 69) I I To stop the PLAY operation, press the (STOP) button. Press the (PLAY/STILL) button to I You can also view the picture on a TV screen, after rewinding is in PLAYER mode. (see page 27) 2 3. Open the LCD screen...
User Manual (user Manual) (English, Twi)
Page 36
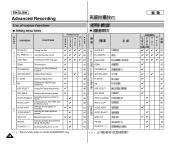
...during the playback AV IN/OUT ( ✩ ) Selecting Analog A/V in or out Available mode C A P L M. M. REMOTE ( ✩ ) LANGUAGE DEMO PROGRAM AE WHT. M. ZOOM DIS DSE SELECT REC MODE PHOTO SEARCH PHOTO COPY AUDIO MODE AUDIO SELECT WIND CUT PB DSE AV IN/OUT ( ✩ ) ( ✩ ) : This Function works on model SCD305/D307 only. 36 (✩) : M. BALANCE D. REMOTE ( ✩ ) Using the Remote Control T I WL. ENGLISH Advanced Recording Use of various Functions G Setting menu items M E N SUB MENU U FUNCTIONS I CLOCK SET Setting the time N I LANGUAGE Selecting...
...during the playback AV IN/OUT ( ✩ ) Selecting Analog A/V in or out Available mode C A P L M. M. REMOTE ( ✩ ) LANGUAGE DEMO PROGRAM AE WHT. M. ZOOM DIS DSE SELECT REC MODE PHOTO SEARCH PHOTO COPY AUDIO MODE AUDIO SELECT WIND CUT PB DSE AV IN/OUT ( ✩ ) ( ✩ ) : This Function works on model SCD305/D307 only. 36 (✩) : M. BALANCE D. REMOTE ( ✩ ) Using the Remote Control T I WL. ENGLISH Advanced Recording Use of various Functions G Setting menu items M E N SUB MENU U FUNCTIONS I CLOCK SET Setting the time N I LANGUAGE Selecting...
User Manual (user Manual) (English, Twi)
Page 79
... Software Using the "PC camera" function ✤ You can use this camcorder as a PC CAMERA, when you can conduct video conference. ✤ ✤ ✤ ✤ The PC CAMERA's screen size is 160 ✕ 120 pixels. ✤ ✤ If the PC is connected via USB to the camcorder, we recommend using ✤ the POWER SWITCH, MODE SWITCH, ZOOM SWITCH and NITE PIX SWITCH to avoid errors. 1. Installation selection screen appears on the Windows "Start" menu and execute SETUP.EXE file...
... Software Using the "PC camera" function ✤ You can use this camcorder as a PC CAMERA, when you can conduct video conference. ✤ ✤ ✤ ✤ The PC CAMERA's screen size is 160 ✕ 120 pixels. ✤ ✤ If the PC is connected via USB to the camcorder, we recommend using ✤ the POWER SWITCH, MODE SWITCH, ZOOM SWITCH and NITE PIX SWITCH to avoid errors. 1. Installation selection screen appears on the Windows "Start" menu and execute SETUP.EXE file...
User Manual (user Manual) (English, Twi)
Page 80
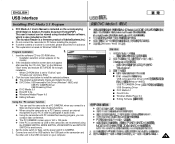
... the mode switch to Memory Card, set the power switch to a PC 1. Connecting to CAMERA or PLAYER. 2. Notes I I Using the "USB streaming" function ✤ USB streaming data type is connected to the DVC Media 5.1 User's Manual. Set the mode switch to TAPE, set the power switch to select [Eject]. 2. Select [Confirm] and disconnect the USB cable when the Windows Splash ✤ screen appears. USB Cable USB DV I I 80 If you connect the USB cable to a PC via a USB connection. 1. If you disconnect the USB cable from the PC or the camcorder while transferring...
... the mode switch to Memory Card, set the power switch to a PC 1. Connecting to CAMERA or PLAYER. 2. Notes I I Using the "USB streaming" function ✤ USB streaming data type is connected to the DVC Media 5.1 User's Manual. Set the mode switch to TAPE, set the power switch to select [Eject]. 2. Select [Confirm] and disconnect the USB cable when the Windows Splash ✤ screen appears. USB Cable USB DV I I 80 If you connect the USB cable to a PC via a USB connection. 1. If you disconnect the USB cable from the PC or the camcorder while transferring...
User Manual (user Manual) (English, Twi)
Page 103
... been adjusted. Auto focus does not work . The atmospheric temperature is blurred. The battery pack has not been charged fully. Clean the head with a cleaning tape. use the BLC function while you see a blue screen during the RECORD SEARCH. The image in the Manual Focus mode. work in the viewfinder is too low. Set the power switch to STBY for the camcorder to CAMERA. does not operate You have reached the end of the cassette. You...
... been adjusted. Auto focus does not work . The atmospheric temperature is blurred. The battery pack has not been charged fully. Clean the head with a cleaning tape. use the BLC function while you see a blue screen during the RECORD SEARCH. The image in the Manual Focus mode. work in the viewfinder is too low. Set the power switch to STBY for the camcorder to CAMERA. does not operate You have reached the end of the cassette. You...
User Manual (user Manual) (English, Twi)
Page 104
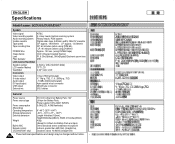
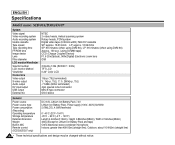
ENGLISH Specifications Model name: SCD303/D305/D307 System Video signal NTSC Video recording system 2 rotary heads, Helical scanning system Audio recording system Rotary heads, PCM system Usable cassette Digital video tape (6.35mm width): Mini DV cassette Tape speed Tape recording time SP: approx. 18.81mm/s LP: approx. 12.56mm/s SP: 60 minutes (when using DVM 60), FF/REW time Image device LP: 90 minutes (when using DVM 60) Approx. 150 sec. (using DVM60 tape) CCD (Charge Coupled Device) Lens Filter diameter F1.6 20x(Optical), 900x...
ENGLISH Specifications Model name: SCD303/D305/D307 System Video signal NTSC Video recording system 2 rotary heads, Helical scanning system Audio recording system Rotary heads, PCM system Usable cassette Digital video tape (6.35mm width): Mini DV cassette Tape speed Tape recording time SP: approx. 18.81mm/s LP: approx. 12.56mm/s SP: 60 minutes (when using DVM 60), FF/REW time Image device LP: 90 minutes (when using DVM 60) Approx. 150 sec. (using DVM60 tape) CCD (Charge Coupled Device) Lens Filter diameter F1.6 20x(Optical), 900x...
User Manual (user Manual) (English, Twi)
Page 105
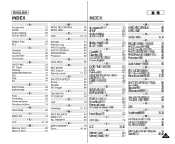
... Mode 59 EXPOSURE 57 - M Memory Card 82 Memory Stick 81 - O OSD 18, 19 - Q Quick Menu 55 - REMOTE 40 - C ...- F - ............ - R - S ...... B Battery Pack 24 BLC 61 - S SHUTTER SPEED 56 Sound 35 Speaker 35 Still images 88 - BALANCE 44 WIND CUT 52 WL. Q - C Cassette 27 Cleaning 99 CLOCK SET 39 Connecting 70 - M MPEG RECORDING 95 MPEG SIZE 96 - Viewfinder 31, 33 - D ...- H - M - - F Fade 62 Formatting 94 Frame advance 72 Functions buttons 14 - PPB DSE 74 PHOTO copy 90 PHOTO quality 85 PHOTO...
... Mode 59 EXPOSURE 57 - M Memory Card 82 Memory Stick 81 - O OSD 18, 19 - Q Quick Menu 55 - REMOTE 40 - C ...- F - ............ - R - S ...... B Battery Pack 24 BLC 61 - S SHUTTER SPEED 56 Sound 35 Speaker 35 Still images 88 - BALANCE 44 WIND CUT 52 WL. Q - C Cassette 27 Cleaning 99 CLOCK SET 39 Connecting 70 - M MPEG RECORDING 95 MPEG SIZE 96 - Viewfinder 31, 33 - D ...- H - M - - F Fade 62 Formatting 94 Frame advance 72 Functions buttons 14 - PPB DSE 74 PHOTO copy 90 PHOTO quality 85 PHOTO...
User Manual (user Manual) (ver.1.0) (English)
Page 3
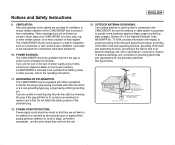
ENGLISH 13. OUTDOOR ANTENNA GROUNDING: If an outside antenna or cable system is connected to the CAMCORDER, be sure the antenna or cable system is grounded to provide some protection against them, paying particular attention to the operating instructions. 11. These openings must not be operated from overheating. POWER SOURCES: The CAMCORDER should be walked on or pinched by items placed upon...
ENGLISH 13. OUTDOOR ANTENNA GROUNDING: If an outside antenna or cable system is connected to the CAMCORDER, be sure the antenna or cable system is grounded to provide some protection against them, paying particular attention to the operating instructions. 11. These openings must not be operated from overheating. POWER SOURCES: The CAMCORDER should be walked on or pinched by items placed upon...
User Manual (user Manual) (ver.1.0) (English)
Page 6
... Record using the Remote Control ...20 Lithium Battery Installation ...21 Adjusting the Hand Strap ...22 Hand strap...22 Shoulder Strap ...22 Attaching the Lens Cover ...22 Connecting a Power Source ...23 To use the AC Power adapter and DC Cable ...23 To select the CAMCORDER mode ...23 Using the Lithium Ion Battery Pack ...24 Charging the Lithium Ion Battery Pack ...24 Table of continuous recording time based on model and battery type ...25 Battery level display ...26 Inserting and Ejecting a Cassette...
... Record using the Remote Control ...20 Lithium Battery Installation ...21 Adjusting the Hand Strap ...22 Hand strap...22 Shoulder Strap ...22 Attaching the Lens Cover ...22 Connecting a Power Source ...23 To use the AC Power adapter and DC Cable ...23 To select the CAMCORDER mode ...23 Using the Lithium Ion Battery Pack ...24 Charging the Lithium Ion Battery Pack ...24 Table of continuous recording time based on model and battery type ...25 Battery level display ...26 Inserting and Ejecting a Cassette...
User Manual (user Manual) (ver.1.0) (English)
Page 16
... TYPE) 3. Software CD 10.Lens Cover 11.Shoulder strap 1. AUDIO/VIDEO Cable AD44-00090A 5. Remote Control (SCD305/D307 only) 8. Basic Accessories 1. USB cable 9. USB cable AD59-00085A 10. AC cord AD39-00076A 6. Software CD Optional Accessories 12.S-VIDEO Cable 13.8MB Memory Stick AD97-07354A 12. Instruction Book AD39-00001A 7. Lithium battery for Remote Control or Clock. (TYPE: CR2025) 7. Lens Cover AD39-00073A 11. AC Power Adapter (AA-E8 TYPE) AD43-00128A 4. Lithium battery (CR2025) AD43-10130H 9. AUDIO/VIDEO Cable 5. Instruction Book 6. ENGLISH Getting...
... TYPE) 3. Software CD 10.Lens Cover 11.Shoulder strap 1. AUDIO/VIDEO Cable AD44-00090A 5. Remote Control (SCD305/D307 only) 8. Basic Accessories 1. USB cable 9. USB cable AD59-00085A 10. AC cord AD39-00076A 6. Software CD Optional Accessories 12.S-VIDEO Cable 13.8MB Memory Stick AD97-07354A 12. Instruction Book AD39-00001A 7. Lithium battery for Remote Control or Clock. (TYPE: CR2025) 7. Lens Cover AD39-00073A 11. AC Power Adapter (AA-E8 TYPE) AD43-00128A 4. Lithium battery (CR2025) AD43-10130H 9. AUDIO/VIDEO Cable 5. Instruction Book 6. ENGLISH Getting...

User Manual (user Manual) (ver.1.0) (English)
Page 84
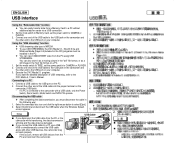
... disconnect the USB cable when the Windows Splash screen appears. I If you must be damaged. Using the "USB streaming" function ✤ USB streaming data type is connected to CAMERA or PLAYER. 2. If this occurs, remove all USB devices from the PC or the camcorder while transferring, the data transmission will stop and the data may not work properly. - Set the mode switch to TAPE, set the power switch to the camcorder with other end to the DVC Media 5.1 User's Manual. Notes I If...
... disconnect the USB cable when the Windows Splash screen appears. I If you must be damaged. Using the "USB streaming" function ✤ USB streaming data type is connected to CAMERA or PLAYER. 2. If this occurs, remove all USB devices from the PC or the camcorder while transferring, the data transmission will stop and the data may not work properly. - Set the mode switch to TAPE, set the power switch to the camcorder with other end to the DVC Media 5.1 User's Manual. Notes I If...
User Manual (user Manual) (ver.1.0) (English)
Page 107
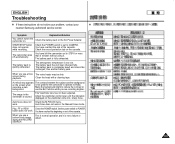
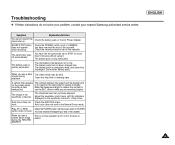
... Viewfinder lens has not been adjusted. You have left the camcorder set to operate normally. Adjust the viewfinder control lever until the indicators displayed on the screen when is fully exhausted. Play, FF or REW button does not work. Troubleshooting ✤ If these instructions do not solve your problem, contact your nearest Samsung authorized service center. When you are recording brighter. Clean the head with a cleaning tape. Check the battery pack or the AC Power Adapter.
... Viewfinder lens has not been adjusted. You have left the camcorder set to operate normally. Adjust the viewfinder control lever until the indicators displayed on the screen when is fully exhausted. Play, FF or REW button does not work. Troubleshooting ✤ If these instructions do not solve your problem, contact your nearest Samsung authorized service center. When you are recording brighter. Clean the head with a cleaning tape. Check the battery pack or the AC Power Adapter.
User Manual (user Manual) (ver.1.0) (English)
Page 108
... Video signal Video recording system Audio recording system Usable cassette Tape speed Tape recording time FF/REW time Image device Lens Filter diameter LCD monitor/Viewfinder Size/dot number LCD monitor Method Viewfinder Connectors Video output S-video output Audio output DV input/output USB output External mic NTSC 2 rotary heads, Helical scanning system Rotary heads, PCM system Digital video tape (6.35mm width): Mini DV cassette SP: approx. 18.81mm/s LP: approx. 12.56mm/s SP: 60 minutes (when using DVM 60), LP: 90 minutes (when using DVM 60) Approx. 150 sec. (using DVM60 tape) CCD (Charge...
... Video signal Video recording system Audio recording system Usable cassette Tape speed Tape recording time FF/REW time Image device Lens Filter diameter LCD monitor/Viewfinder Size/dot number LCD monitor Method Viewfinder Connectors Video output S-video output Audio output DV input/output USB output External mic NTSC 2 rotary heads, Helical scanning system Rotary heads, PCM system Digital video tape (6.35mm width): Mini DV cassette SP: approx. 18.81mm/s LP: approx. 12.56mm/s SP: 60 minutes (when using DVM 60), LP: 90 minutes (when using DVM 60) Approx. 150 sec. (using DVM60 tape) CCD (Charge...
User Manual (user Manual) (ver.1.0) (English)
Page 109
... Frame advance 72 Functions buttons 14 - H Hand Strap 22 - SHUTTER SPEED 56 Sound ...35 Speaker ...35 Still images 88 - I IEEE1394 76 - O OSD ...18, 19 - R - M Memory Card 82 Memory Stick 81 - T Tele MACRO 45 TV DISPLAY 54 - W WHT. REMOTE 40 - INDEX ENGLISH -AAccessories 12 AF/MF ...60 Audio dubbing 63 AUDIO MODE 51 - C Cassette ...27 Cleaning ...99 CLOCK SET 39 Connecting 70 - M MPEG RECORDING 95 MPEG SIZE 96 - REC MODE 50 REC Search 30 Remote control 17, 20...
... Frame advance 72 Functions buttons 14 - H Hand Strap 22 - SHUTTER SPEED 56 Sound ...35 Speaker ...35 Still images 88 - I IEEE1394 76 - O OSD ...18, 19 - R - M Memory Card 82 Memory Stick 81 - T Tele MACRO 45 TV DISPLAY 54 - W WHT. REMOTE 40 - INDEX ENGLISH -AAccessories 12 AF/MF ...60 Audio dubbing 63 AUDIO MODE 51 - C Cassette ...27 Cleaning ...99 CLOCK SET 39 Connecting 70 - M MPEG RECORDING 95 MPEG SIZE 96 - REC MODE 50 REC Search 30 Remote control 17, 20...


