
User Manual (ENGLISH)
Page 3
...cords or plugs, convenient receptacles, and the point where they are provided for the grounding electrode. If the plug still fails to fit, contact your CAMCORDER on a bed, sofa, rug, or other sources, refer to insert the plug fully into the outlet, try reversing the plug. Never place ...in wire to an antenna discharge unit, size of grounding to grounding electrodes and requirements for ventilation to ensure reliable operation of the CAMCORDER and to protect it from battery power, or other similar surface: on the label. If you are not sure of the type of the polarized plug. 12...
...cords or plugs, convenient receptacles, and the point where they are provided for the grounding electrode. If the plug still fails to fit, contact your CAMCORDER on a bed, sofa, rug, or other sources, refer to insert the plug fully into the outlet, try reversing the plug. Never place ...in wire to an antenna discharge unit, size of grounding to grounding electrodes and requirements for ventilation to ensure reliable operation of the CAMCORDER and to protect it from battery power, or other similar surface: on the label. If you are not sure of the type of the polarized plug. 12...
User Manual (ENGLISH)
Page 6
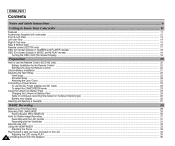
... To use the AC Power adapter and DC Cable ...23 To select the CAMCORDER mode...23 Using the Lithium Ion Battery Pack ...24 Charging the Lithium Ion Battery Pack ...24 Table of continuous recording time based on model and battery type ...25 Battery level display ...26 Inserting and Ejecting a Cassette ...27 BASIC Recording ...28 Making...
... To use the AC Power adapter and DC Cable ...23 To select the CAMCORDER mode...23 Using the Lithium Ion Battery Pack ...24 Charging the Lithium Ion Battery Pack ...24 Table of continuous recording time based on model and battery type ...25 Battery level display ...26 Inserting and Ejecting a Cassette ...27 BASIC Recording ...28 Making...
User Manual (ENGLISH)
Page 11
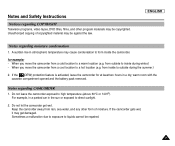
... warm room with the cassette compartment opened and the battery pack removed. for at least two hours in atmospheric temperature may get wet. Do not let the camcorder get damaged. ENGLISH Notes regarding CAMCORDER 1. If the camcorder gets wet, it may cause condensation to outside to...video tapes, DVD titles, films, and other form of copyrighted material may be copyrighted. Unauthorized copying of moisture. When you move the camcorder from a cool location to a warm location (e.g. Notes regarding moisture condensation 1. For example, in a parked car in the sun ...
... warm room with the cassette compartment opened and the battery pack removed. for at least two hours in atmospheric temperature may get wet. Do not let the camcorder get damaged. ENGLISH Notes regarding CAMCORDER 1. If the camcorder gets wet, it may cause condensation to outside to...video tapes, DVD titles, films, and other form of copyrighted material may be copyrighted. Unauthorized copying of moisture. When you move the camcorder from a cool location to a warm location (e.g. Notes regarding moisture condensation 1. For example, in a parked car in the sun ...

User Manual (ENGLISH)
Page 12
...dealer. Make sure that the battery pack is not charged. Dropping the battery pack may damage the video heads. 8 Before using the battery pack, you are not operating it . - It is fitted firmly into place. Notes regarding the battery pack - If your camcorder is in STBY mode without being...more than the LCD when making a long recording, because the LCD uses up more battery power. * When the battery reaches the end of its life, please contact your camcorder turned off to protect against unnecessary battery discharge. - If a square block-shape distorts playback, or only a blue screen is...
...dealer. Make sure that the battery pack is not charged. Dropping the battery pack may damage the video heads. 8 Before using the battery pack, you are not operating it . - It is fitted firmly into place. Notes regarding the battery pack - If your camcorder is in STBY mode without being...more than the LCD when making a long recording, because the LCD uses up more battery power. * When the battery reaches the end of its life, please contact your camcorder turned off to protect against unnecessary battery discharge. - If a square block-shape distorts playback, or only a blue screen is...
User Manual (ENGLISH)
Page 14
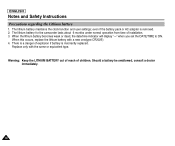
... battery for the camcorder lasts about 6 months under normal operation from time of explosion if battery is incorrectly replaced. There is removed. 2. Replace only with a new one(type CR2025). 4. even if the battery pack or AC adapter is a danger of installation. 3. Should a battery be swallowed, consult a doctor immediately. 10 When this occurs, replace the lithium battery...
... battery for the camcorder lasts about 6 months under normal operation from time of explosion if battery is incorrectly replaced. There is removed. 2. Replace only with a new one(type CR2025). 4. even if the battery pack or AC adapter is a danger of installation. 3. Should a battery be swallowed, consult a doctor immediately. 10 When this occurs, replace the lithium battery...
User Manual (ENGLISH)
Page 16
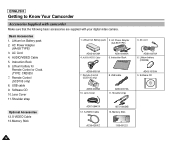
... 12.S-VIDEO Cable 13.Memory Stick AD97-08447A 12. ENGLISH Getting to Know Your Camcorder Accessories Supplied with camcorder Make sure that the following basic accessories are supplied with your digital video camera. Lithium Ion Battery pack 2. AC Power Adapter (AA-E8 TYPE) 3. Lithium battery (CR2025) AD43-10130H 9. AC cord AD39-00076A 6. AUDIO/VIDEO Cable 5.
... 12.S-VIDEO Cable 13.Memory Stick AD97-08447A 12. ENGLISH Getting to Know Your Camcorder Accessories Supplied with camcorder Make sure that the following basic accessories are supplied with your digital video camera. Lithium Ion Battery pack 2. AC Power Adapter (AA-E8 TYPE) 3. Lithium battery (CR2025) AD43-10130H 9. AC cord AD39-00076A 6. AUDIO/VIDEO Cable 5.

User Manual (ENGLISH)
Page 19
... jack 11. External MIC in 14. Zoom lever 2. PHOTO button 4. Slow shutter 8. DV jack 10. Jack Cover 13. Focus adjustment knob 3. S-VIDEO jack 12. LITHIUM Battery Holder 8. USB jack 9. Focus adjustment knob 3. Power switch (CAMERA or PLAYER) 6. Zoom lever 2. START/STOP button 5. Power switch 1. External MIC in 14. LITHIUM...
... jack 11. External MIC in 14. Zoom lever 2. PHOTO button 4. Slow shutter 8. DV jack 10. Jack Cover 13. Focus adjustment knob 3. S-VIDEO jack 12. LITHIUM Battery Holder 8. USB jack 9. Focus adjustment knob 3. Power switch (CAMERA or PLAYER) 6. Zoom lever 2. START/STOP button 5. Power switch 1. External MIC in 14. LITHIUM...
User Manual (ENGLISH)
Page 20
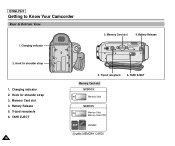
ENGLISH Getting to Know Your Camcorder Rear & Bottom View 1. TAPE EJECT Memory Card slot SCD103 Memory Stick SCD105 Memory Stick Memory Stick PRO SD/MMC (Usable MEMORY CARD) Tripod receptacle 6. Memory Card slot 4. Charging indicator 2. Hook for shoulder strap 1. Memory Card slot 4. Hook for shoulder strap 3. TAPE EJECT 16 5. Charging indicator 3. Battery Release 2. Battery Release 5. Tripod receptacle 6.
ENGLISH Getting to Know Your Camcorder Rear & Bottom View 1. TAPE EJECT Memory Card slot SCD103 Memory Stick SCD105 Memory Stick Memory Stick PRO SD/MMC (Usable MEMORY CARD) Tripod receptacle 6. Memory Card slot 4. Charging indicator 2. Hook for shoulder strap 1. Memory Card slot 4. Hook for shoulder strap 3. TAPE EJECT 16 5. Charging indicator 3. Battery Release 2. Battery Release 5. Tripod receptacle 6.

User Manual (ENGLISH)
Page 22
...PB ZOOM 1.2x 29 MIRROR . . . Tele MACRO (see page 20) 23. DV 26 1 2 : 0 0 A M J A N . 1 0 , 2 0 0 4 [ 1 1 ] 24 11 Battery level (see page 66) 11. Operating mode 20. ENGLISH Getting to Know Your Camcorder OSD (On Screen Display in minutes) 18. NITE PIX (see page 26) 2. Audio recording mode (see page 47) 24...BLC (Back Light Compensation) (see page 75) 30. REMOTE (SCD105 only) 14. USB 13. WL. PHOTO mode 22. DSE (Digital Special Effects) mode (see page 44) 6. White Balance mode (see page 48) 4. Tape Counter 19. Record speed mode 21. Volume...
...PB ZOOM 1.2x 29 MIRROR . . . Tele MACRO (see page 20) 23. DV 26 1 2 : 0 0 A M J A N . 1 0 , 2 0 0 4 [ 1 1 ] 24 11 Battery level (see page 66) 11. Operating mode 20. ENGLISH Getting to Know Your Camcorder OSD (On Screen Display in minutes) 18. NITE PIX (see page 26) 2. Audio recording mode (see page 47) 24...BLC (Back Light Compensation) (see page 75) 30. REMOTE (SCD105 only) 14. USB 13. WL. PHOTO mode 22. DSE (Digital Special Effects) mode (see page 44) 6. White Balance mode (see page 48) 4. Tape Counter 19. Record speed mode 21. Volume...

User Manual (ENGLISH)
Page 24
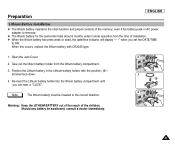
...ADV Timer 3. Press the START/STOP button to CAMERA mode. 2. Set the camcorder to start the timer. - In the last one second of the battery. Self Record using the Remote Control When you insert the lithium battery correctly, following the + and - Press START/STOP again when you want to... recording begins automatically in the LCD. The remote control doesn't work. ✤ Ensure that you use the Remote Control (SCD105 only) Battery Installation for the Remote Control ✤ You need to cancel the Self Timer function before recording, press the SELF TIMER button. 4. You purchase...
...ADV Timer 3. Press the START/STOP button to CAMERA mode. 2. Set the camcorder to start the timer. - In the last one second of the battery. Self Record using the Remote Control When you insert the lithium battery correctly, following the + and - Press START/STOP again when you want to... recording begins automatically in the LCD. The remote control doesn't work. ✤ Ensure that you use the Remote Control (SCD105 only) Battery Installation for the Remote Control ✤ You need to cancel the Self Timer function before recording, press the SELF TIMER button. 4. You purchase...
User Manual (ENGLISH)
Page 25
... set the DATE/TIME to ON. Position the Lithium battery in the correct direction. even if the battery pack or AC power adapter is removed. ✤ The lithium battery for the camcorder lasts about 6 months under normal operation from the lithium battery compartment. 3. Take out the lithium battery holder from the time of installation. ✤ When...
... set the DATE/TIME to ON. Position the Lithium battery in the correct direction. even if the battery pack or AC power adapter is removed. ✤ The lithium battery for the camcorder lasts about 6 months under normal operation from the lithium battery compartment. 3. Take out the lithium battery holder from the time of installation. ✤ When...

User Manual (ENGLISH)
Page 27
...used for indoor recording. - Connect the AC cord to the AC cord. 2. Power Switch ENGLISH To select the CAMCORDER mode ✤ If you want to use this unit as a DSC (Digital Still Camera), set the mode switch to TAPE position. ✤ If you should keep outside the projection of power... source that can be connected to your camcorder. - Connect the DC cable to the DC jack socket of the camcorder. (When the battery is attached on the power...
...used for indoor recording. - Connect the AC cord to the AC cord. 2. Power Switch ENGLISH To select the CAMCORDER mode ✤ If you want to use this unit as a DSC (Digital Still Camera), set the mode switch to TAPE position. ✤ If you should keep outside the projection of power... source that can be connected to your camcorder. - Connect the DC cable to the DC jack socket of the camcorder. (When the battery is attached on the power...

User Manual (ENGLISH)
Page 28
...off , and the charging indicator will still discharge if it is left connected to the camcorder. 2. How often the Zoom function is recommended that the battery is charging. Attach the battery pack to the camcorder. Turn the power switch to flash, showing that you are using. - Power Switch ...Blinking time Once per second Twice per second Three times per second Blinking stops and stays on the camcorder. 4. Notes I Even with the power switched off, the battery pack will start to off for a second Charging rate Less than 50% 50% ~ 75% 75% ~ 90% 90 ...
...off , and the charging indicator will still discharge if it is left connected to the camcorder. 2. How often the Zoom function is recommended that the battery is charging. Attach the battery pack to the camcorder. Turn the power switch to flash, showing that you are using. - Power Switch ...Blinking time Once per second Twice per second Three times per second Blinking stops and stays on the camcorder. 4. Notes I Even with the power switched off, the battery pack will start to off for a second Charging rate Less than 50% 50% ~ 75% 75% ~ 90% 90 ...

User Manual (ENGLISH)
Page 29
...an environment of between 32°F (0°C) and 104°F (40°C). ENGLISH 25 Preparation Using the Lithium Ion Battery Pack Table of continuous recording time based on model and battery type. ✤ If you close the LCD screen, it switches off and the viewfinder switches on usage. Time Charging...ON VIEWFINDER ON Approx. 1hr 30min Approx. 2hr SB-LS220 Approx. 3hr 30min Approx. 3hr 10min Approx. 4hr 10min Notes I Do not put the battery pack near any heat sources (fire or flames, for a long period, even when it is used in a room temperature that is fully recharged. I ...
...an environment of between 32°F (0°C) and 104°F (40°C). ENGLISH 25 Preparation Using the Lithium Ion Battery Pack Table of continuous recording time based on model and battery type. ✤ If you close the LCD screen, it switches off and the viewfinder switches on usage. Time Charging...ON VIEWFINDER ON Approx. 1hr 30min Approx. 2hr SB-LS220 Approx. 3hr 30min Approx. 3hr 10min Approx. 4hr 10min Notes I Do not put the battery pack near any heat sources (fire or flames, for a long period, even when it is used in a room temperature that is fully recharged. I ...

User Manual (ENGLISH)
Page 30
...conditions. Note I The charge mark setting does not affect the battery's charge status. 26 Fully charged a b. 20~40% used b c. 40~80% used c d. 80~95% used (flickers) d (The camcorder will turn off soon, change the battery as soon as the approximate continuous recording time given in the ...grey)-you may not be the same as possible) e ✤ Please refer to the table on the battery pack to help you actually use the camcorder, the remaining battery time may choose which one indicates charged and which indicates discharged. The continuous recording time in these instructions. ...
...conditions. Note I The charge mark setting does not affect the battery's charge status. 26 Fully charged a b. 20~40% used b c. 40~80% used c d. 80~95% used (flickers) d (The camcorder will turn off soon, change the battery as soon as the approximate continuous recording time given in the ...grey)-you may not be the same as possible) e ✤ Please refer to the table on the battery pack to help you actually use the camcorder, the remaining battery time may choose which one indicates charged and which indicates discharged. The continuous recording time in these instructions. ...

User Manual (ENGLISH)
Page 32
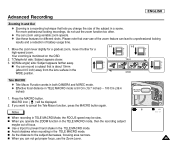
... REC is displayed on the LCD. 28 I STBY is displayed on the LCD monitor or viewfinder. I Make sure the image you want to the camcorder. (see page 23) (A battery pack or a AC power adapter) 1 2 I Insert a cassette. (see page 27) 2. Remove the LENS CAP. 3. To start recording, ...press the START/STOP button. Connect a Power source to record appears on the LCD. will be displayed. I Make sure the battery level indicates that STBY is enough remaining power for your First Recording 1. I Set the mode switch to the CAMERA position. Set the power...
... REC is displayed on the LCD. 28 I STBY is displayed on the LCD monitor or viewfinder. I Make sure the image you want to the camcorder. (see page 23) (A battery pack or a AC power adapter) 1 2 I Insert a cassette. (see page 27) 2. Remove the LENS CAP. 3. To start recording, ...press the START/STOP button. Connect a Power source to record appears on the LCD. will be displayed. I Make sure the battery level indicates that STBY is enough remaining power for your First Recording 1. I Set the mode switch to the CAMERA position. Set the power...

User Manual (ENGLISH)
Page 33
... ENTER button. 4. To exit, press the MENU button. CAM MODE INITIAL SET LANGUAGE SELECT ENGLISH 29 Turn the MENU DIAL to the English when Lithium battery is exhausted or changed. I The menu list will appear. 2. ENGLISH 1. REMOTE LANGUAGE DEMO CAM MODE INITIAL SET CLOCK SET WL.REMOTE LANGUAGE DEMONSTRATION ENGLISH Notes...
... ENTER button. 4. To exit, press the MENU button. CAM MODE INITIAL SET LANGUAGE SELECT ENGLISH 29 Turn the MENU DIAL to the English when Lithium battery is exhausted or changed. I The menu list will appear. 2. ENGLISH 1. REMOTE LANGUAGE DEMO CAM MODE INITIAL SET CLOCK SET WL.REMOTE LANGUAGE DEMONSTRATION ENGLISH Notes...

User Manual (ENGLISH)
Page 34
This Auto Power off automatically. button in STBY mode, your camcorder will switch off feature is left in reverse for more than 5 minutes without being used, it will play it again, push the START/STOP button ... the REC SEARCH -- Note Mosaic shaped distortion may appear on the screen while in STBY mode. ENGLISH Basic Recording When a cassette is loaded and the camcorder is designed to save battery power.
This Auto Power off automatically. button in STBY mode, your camcorder will switch off feature is left in reverse for more than 5 minutes without being used, it will play it again, push the START/STOP button ... the REC SEARCH -- Note Mosaic shaped distortion may appear on the screen while in STBY mode. ENGLISH Basic Recording When a cassette is loaded and the camcorder is designed to save battery power.

User Manual (ENGLISH)
Page 38
Insert the tape you wish to start playback. I The camcorder stops automatically after connecting the camcorder to a TV or VCR. (see page 70) I Various functions are available in place. 1. Press the (PLAY/STILL) button to view. (see page 72) 34 Hold ... can monitor the playback picture on the LCD. Notes I You can view the picture you recorded on the LCD monitor. ✤ Make sure that the battery pack is complete. 4 5. Open the LCD screen. 2 Adjust the angle of the LCD screen and set the brightness or color if necessary. 4. Press the (REW...
Insert the tape you wish to start playback. I The camcorder stops automatically after connecting the camcorder to a TV or VCR. (see page 70) I Various functions are available in place. 1. Press the (PLAY/STILL) button to view. (see page 72) 34 Hold ... can monitor the playback picture on the LCD. Notes I You can view the picture you recorded on the LCD monitor. ✤ Make sure that the battery pack is complete. 4 5. Open the LCD screen. 2 Adjust the angle of the LCD screen and set the brightness or color if necessary. 4. Press the (REW...
User Manual (ENGLISH)
Page 49
.... ✤ Effective focal distance in the TELE MACRO mode. TELE 3. Press the MACRO button. MACRO Icon ( ) will be slow. I When you change the size of battery usage time. 1-1 1-2 1. Please note that is about 10mm (about 0.5 inch) away from the lens surface in a scene. T(Telephoto) side: Subject appears closer. Move the zoom...
.... ✤ Effective focal distance in the TELE MACRO mode. TELE 3. Press the MACRO button. MACRO Icon ( ) will be slow. I When you change the size of battery usage time. 1-1 1-2 1. Please note that is about 10mm (about 0.5 inch) away from the lens surface in a scene. T(Telephoto) side: Subject appears closer. Move the zoom...


