

User Manual (ENGLISH)
Page 69
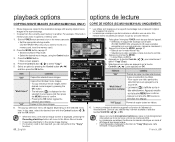
... Connect Demo Default value 2007/01/01 12:00 AM YY/MM/DD 12 Hr Off 40% 50% Off On Series - Memory Type (Sólo SC-MX10A/ MX10AU) Memory Info Format Default Set Version Language USB Connect Demo Valor predeterminado 2007/01/01 12:00 AM YY/MM/DD 12 Hr Off... LCD Brightness LCD Color Auto Power Off Beep Sound File No. You can setup the date/time, OSD language and display settings of the memory camcorder.
... Connect Demo Default value 2007/01/01 12:00 AM YY/MM/DD 12 Hr Off 40% 50% Off On Series - Memory Type (Sólo SC-MX10A/ MX10AU) Memory Info Format Default Set Version Language USB Connect Demo Valor predeterminado 2007/01/01 12:00 AM YY/MM/DD 12 Hr Off... LCD Brightness LCD Color Auto Power Off Beep Sound File No. You can setup the date/time, OSD language and display settings of the memory camcorder.

User Manual (ENGLISH)
Page 17
...faciles. 3. Attach the lens cap string to the attachment hole of cap inward and attach it over the lens. Push both sides of memory camcorder. DC IN jack USB jack Cradle receptacle Multi cable jack Utilisation du socle (accessoire facultatif) Le socle est une platine de raccordement qui facilite... and pass it easy charging the battery,or connecting to a TV or a PC. Detaching the grip belt makes things easier. 3. Use the memory camcorder with the cradle more stably when charging the battery, or connecting to a TV or a PC. Fixation du cache objectif Faites passer le cordon compris ...
...faciles. 3. Attach the lens cap string to the attachment hole of cap inward and attach it over the lens. Push both sides of memory camcorder. DC IN jack USB jack Cradle receptacle Multi cable jack Utilisation du socle (accessoire facultatif) Le socle est une platine de raccordement qui facilite... and pass it easy charging the battery,or connecting to a TV or a PC. Detaching the grip belt makes things easier. 3. Use the memory camcorder with the cradle more stably when charging the battery, or connecting to a TV or a PC. Fixation du cache objectif Faites passer le cordon compris ...

User Manual (ENGLISH)
Page 31
...remained battery and memory apacity 0% 50% 100% • Si le caméscope est éteint (bloc-piles en place) • When the camcorder is turned off (battery is pendant 2 à 3 secondes pour afficher la charge installed) press and hold the restante du bloc-piles. ...caméscope est allumé (bloc-piles en place) battery capacity. 120 Min 60 Min : maintenez la touche enfoncée • When the camcorder is turned on -screen information: ACTIVATION DES TÉMOINS ON/OFF (ACTIVÉ/DÉSACTIVÉ) DE L'ÉCRAN ( ) Pour basculer le mode...
...remained battery and memory apacity 0% 50% 100% • Si le caméscope est éteint (bloc-piles en place) • When the camcorder is turned off (battery is pendant 2 à 3 secondes pour afficher la charge installed) press and hold the restante du bloc-piles. ...caméscope est allumé (bloc-piles en place) battery capacity. 120 Min 60 Min : maintenez la touche enfoncée • When the camcorder is turned on -screen information: ACTIVATION DES TÉMOINS ON/OFF (ACTIVÉ/DÉSACTIVÉ) DE L'ÉCRAN ( ) Pour basculer le mode...

User Manual (ENGLISH)
Page 33
ADJUSTING THE LCD SCREEN 1. Rotate it facing out. Do not lift the memory camcorder with your finger. 2. USING THE MENU BUTTON 1. Press the MENU button to the inside of sudden fall. Appuyez sur la touche MENU. 3. Appuyez sur ... pour terminer. Set the desired mode by pressing the Control button ( ) to select desired menu item, and then press Control button OK to the memory camcorder. AVERTISSEMENT UTILISATION DE LA TOUCHE MENU 1. La touche MENU n'est pas disponible en mode EASY. Press the MENU button. 3. RÉGLAGE DE L'ÉCRAN ACL...
ADJUSTING THE LCD SCREEN 1. Rotate it facing out. Do not lift the memory camcorder with your finger. 2. USING THE MENU BUTTON 1. Press the MENU button to the inside of sudden fall. Appuyez sur la touche MENU. 3. Appuyez sur ... pour terminer. Set the desired mode by pressing the Control button ( ) to select desired menu item, and then press Control button OK to the memory camcorder. AVERTISSEMENT UTILISATION DE LA TOUCHE MENU 1. La touche MENU n'est pas disponible en mode EASY. Press the MENU button. 3. RÉGLAGE DE L'ÉCRAN ACL...

User Manual (ENGLISH)
Page 37
... ( ) , and then set the Settings mode" ➥page 30. 2. année, mois, jour , heure, minute et AM/PM. 5. The button type battery for the memory camcorder lasts about 6 months under normal operation from the time of year, Date/Time Set 2007 01 01 4. Turning the date and time display on/off...
... ( ) , and then set the Settings mode" ➥page 30. 2. année, mois, jour , heure, minute et AM/PM. 5. The button type battery for the memory camcorder lasts about 6 months under normal operation from the time of year, Date/Time Set 2007 01 01 4. Turning the date and time display on/off...

User Manual (ENGLISH)
Page 44
... Basic procedures to record on the rear side of the camcorder and start /stop . 1. Camera output, recording and playback signal is finished, turn on the power ➥page 21 • Set the appropriate storage media. (SC-MX10A/MX10AU only) (If you want to record movie images...glisser l'interrupteur POWER vers le bas 120 MIN pour l'allumer. ➥ page 21 • Définissez le support de stockage convenable. (SC-MX10A/MX10AU uniquement) (Si vous souhaitez enregistrer sur une carte mémoire, insérez-la maintenant.) 2. When it is on the LCD screen....
... Basic procedures to record on the rear side of the camcorder and start /stop . 1. Camera output, recording and playback signal is finished, turn on the power ➥page 21 • Set the appropriate storage media. (SC-MX10A/MX10AU only) (If you want to record movie images...glisser l'interrupteur POWER vers le bas 120 MIN pour l'allumer. ➥ page 21 • Définissez le support de stockage convenable. (SC-MX10A/MX10AU uniquement) (Si vous souhaitez enregistrer sur une carte mémoire, insérez-la maintenant.) 2. When it is on the LCD screen....
User Manual (ENGLISH)
Page 66
...in the single image display. • If a memory card is not inserted, you want to record on the memory camcorder. • Set the appropriate storage media. (SC-MX10A/MX10AU only) (If you can not perform the "Copy" function. • Appuyez sur la touche d'enregistrement start /stop...233;. Faites glisser l'interrupteur POWER vers le bas pour éteindre l'appareil. • Définissez le support de stockage convenable. (SC-MX10A/MX10AU uniquement) (Si vous souhaitez enregistrer sur une carte mémoire, insérez-la maintenant.) 2. Si la mémoire interne est...
...in the single image display. • If a memory card is not inserted, you want to record on the memory camcorder. • Set the appropriate storage media. (SC-MX10A/MX10AU only) (If you can not perform the "Copy" function. • Appuyez sur la touche d'enregistrement start /stop...233;. Faites glisser l'interrupteur POWER vers le bas pour éteindre l'appareil. • Définissez le support de stockage convenable. (SC-MX10A/MX10AU uniquement) (Si vous souhaitez enregistrer sur une carte mémoire, insérez-la maintenant.) 2. Si la mémoire interne est...

User Manual (ENGLISH)
Page 67
... "File Info". 6. Press the MENU button. 5. Duration - Slide the POWER switch downward to turn on the memory camcorder. • Set the appropriate storage media. (SC-MX10A/MX10AU only) (If you want to use the standard display aspect ratio of 4:3 screen aspect ratio. Appuyez sur la ...Faites glisser l'interrupteur POWER vers le bas pour File Info OK allumer l'appareil. • Définissez le support de stockage convenable. (SC-MX10A/MX10AU uniquement) (Si vous souhaitez enregistrer sur une carte mémoire, insérez-la maintenant.) Move OK Select MENU Exit 2. SDV_0004...
... "File Info". 6. Press the MENU button. 5. Duration - Slide the POWER switch downward to turn on the memory camcorder. • Set the appropriate storage media. (SC-MX10A/MX10AU only) (If you want to use the standard display aspect ratio of 4:3 screen aspect ratio. Appuyez sur la ...Faites glisser l'interrupteur POWER vers le bas pour File Info OK allumer l'appareil. • Définissez le support de stockage convenable. (SC-MX10A/MX10AU uniquement) (Si vous souhaitez enregistrer sur une carte mémoire, insérez-la maintenant.) Move OK Select MENU Exit 2. SDV_0004...

User Manual (ENGLISH)
Page 71
... vers le bas l'assombrit. Auto Power Off To save battery power, you set the "Auto Power Off" function which turns off the memory camcorder if there is no operation for ambient lighting conditions. • Moving the Control button up will brighten the screen whereas moving it down will .... • La fonction "Auto Power Off"(Arrêt auto) n'est disponible que lorsque vous la réglez avec le mode Settings. The memory camcorder automatically turns off when there is no operation for a certain period of images to be stored. • You can adjust the LCD Brightness from 0% ...
... vers le bas l'assombrit. Auto Power Off To save battery power, you set the "Auto Power Off" function which turns off the memory camcorder if there is no operation for ambient lighting conditions. • Moving the Control button up will brighten the screen whereas moving it down will .... • La fonction "Auto Power Off"(Arrêt auto) n'est disponible que lorsque vous la réglez avec le mode Settings. The memory camcorder automatically turns off when there is no operation for a certain period of images to be stored. • You can adjust the LCD Brightness from 0% ...

User Manual (ENGLISH)
Page 85
...courter la durée de vie. French_79 Remove the battery pack and AC power adaptor. ➥page 13 - If you leave the memory camcorder in a place where the temperature is a product of superior design and craftsmanship and should be damaged. Prenez-en grand soin. Si vous rangez ... It is recommended that you to direct sunlight or place it near a heater. • Do not store the memory camcorder in a place subject to clean the camcorder. Les recommandations qui suivent vous aideront à comprendre et observer vos engagements envers la garantie et vous permettront de pro&#...
...courter la durée de vie. French_79 Remove the battery pack and AC power adaptor. ➥page 13 - If you leave the memory camcorder in a place where the temperature is a product of superior design and craftsmanship and should be damaged. Prenez-en grand soin. Si vous rangez ... It is recommended that you to direct sunlight or place it near a heater. • Do not store the memory camcorder in a place subject to clean the camcorder. Les recommandations qui suivent vous aideront à comprendre et observer vos engagements envers la garantie et vous permettront de pro&#...

User Manual (ENGLISH)
Page 90
... turned off . To turn on. Symptômes et solutions Alimentation Problème , contactez le centre de service technique agréé Samsung le plus de cinq minutes sans qu'aucun bouton n'ait été activé. French_84 troubleshooting ✪ If you use an AC power ... pack is quickly discharged. 84_English • Remove the battery pack or unplug the AC power adaptor, and connect the power supply to the memory camcorder. • The inserted battery pack may not be turned off ("Auto Power Off"). dépannage ✪ Si vous rencontrez un problè...
... turned off . To turn on. Symptômes et solutions Alimentation Problème , contactez le centre de service technique agréé Samsung le plus de cinq minutes sans qu'aucun bouton n'ait été activé. French_84 troubleshooting ✪ If you use an AC power ... pack is quickly discharged. 84_English • Remove the battery pack or unplug the AC power adaptor, and connect the power supply to the memory camcorder. • The inserted battery pack may not be turned off ("Auto Power Off"). dépannage ✪ Si vous rencontrez un problè...

User Manual (ENGLISH)
Page 91
...souhaitez définir ces fonctions, veuillez ne pas définir ces éléments en premier lieu. < Utilisation impossible > Mode Scene (scène) (AE) < En raison des réglages suivants > Exposure (Manual) (Temps de pose(manuel)) • La plupart des é... stockage n'est inséré, il vous est donc impossible d'en sélectionner un ; Explanation/Solution • All movies recorded with this memory camcorder have 4:3 aspect ratio. - L'image rémanente reste à l'écran. Si vous souhaitez que l'image s'affiche correctement sur votre...
...souhaitez définir ces fonctions, veuillez ne pas définir ces éléments en premier lieu. < Utilisation impossible > Mode Scene (scène) (AE) < En raison des réglages suivants > Exposure (Manual) (Temps de pose(manuel)) • La plupart des é... stockage n'est inséré, il vous est donc impossible d'en sélectionner un ; Explanation/Solution • All movies recorded with this memory camcorder have 4:3 aspect ratio. - L'image rémanente reste à l'écran. Si vous souhaitez que l'image s'affiche correctement sur votre...

User Manual (ENGLISH)
Page 1
To receive more complete service, please register your product at www.samsung.com/global/register Memory Camcorder user manual SC-MX10 SC-MX10P SC-MX10A SC-MX10AU imagine the possibilities Thank you for purchasing this Samsung product.
To receive more complete service, please register your product at www.samsung.com/global/register Memory Camcorder user manual SC-MX10 SC-MX10P SC-MX10A SC-MX10AU imagine the possibilities Thank you for purchasing this Samsung product.

User Manual (ENGLISH)
Page 2
Capture Visions Farther Than The Eye Can See (34x Optical/1200x Digital Zoom) Samsung's powerful optical zoom lenses bring the world closer without sacrificing image quality. In addition, Digital Zoom interpolation means that extreme digital zooming is clearer, ... are recording. ➥pages 48 ~ 56 ii_English Various Recording Media In addition to record movie images. High-capacity embedded Flash Memory (4GB) (SC-MX10A/MX10AU only) The camcorder has built-in high capacity flash memory that you can see the bigger picture by enlarging the 4:3 aspect ratio into 16:9 wide screen with...
Capture Visions Farther Than The Eye Can See (34x Optical/1200x Digital Zoom) Samsung's powerful optical zoom lenses bring the world closer without sacrificing image quality. In addition, Digital Zoom interpolation means that extreme digital zooming is clearer, ... are recording. ➥pages 48 ~ 56 ii_English Various Recording Media In addition to record movie images. High-capacity embedded Flash Memory (4GB) (SC-MX10A/MX10AU only) The camcorder has built-in high capacity flash memory that you can see the bigger picture by enlarging the 4:3 aspect ratio into 16:9 wide screen with...

User Manual (ENGLISH)
Page 3
... a computer. Versatile 16:9 Wide & 4:3 Display option You can easily transfer and play back movies on your memory camcorder. Samsung's 16:9 Wide display option lets you are available for enjoying many different types of playback. ➥page 58 ~ 61 Play back on the 2.7" wide LCD ...
... a computer. Versatile 16:9 Wide & 4:3 Display option You can easily transfer and play back movies on your memory camcorder. Samsung's 16:9 Wide display option lets you are available for enjoying many different types of playback. ➥page 58 ~ 61 Play back on the 2.7" wide LCD ...

User Manual (ENGLISH)
Page 4
... Of Fire Or Electric Shock, Do Not Expose This Apparatus To Rain Or Moisture. This symbol indicates that may be helpful when operating the memory camcorder. iv_English These warning signs are important operating and maintenance instructions in the literature accompanying this unit. important safety instructions CAUTION RISK OF ELECTRIC SHOCK DO...
... Of Fire Or Electric Shock, Do Not Expose This Apparatus To Rain Or Moisture. This symbol indicates that may be helpful when operating the memory camcorder. iv_English These warning signs are important operating and maintenance instructions in the literature accompanying this unit. important safety instructions CAUTION RISK OF ELECTRIC SHOCK DO...

User Manual (ENGLISH)
Page 5
...blade or the third prong are provided for your safety. Only use this apparatus during lightning storms or when unused for replacement of the CAMCORDER and to rain or moisture, does not operate normally, or has been dropped. 15. A polarized plug has two blades with the ... required when the apparatus has been damaged in installation such as powersupply cord or plug is provided or the manufacturer's instructions have fallen into your CAMCORDER on a bed, sofa, rug, or other . Read these instructions. 3. 1. These openings must not be placed on the apparatus. 16. If...
...blade or the third prong are provided for your safety. Only use this apparatus during lightning storms or when unused for replacement of the CAMCORDER and to rain or moisture, does not operate normally, or has been dropped. 15. A polarized plug has two blades with the ... required when the apparatus has been damaged in installation such as powersupply cord or plug is provided or the manufacturer's instructions have fallen into your CAMCORDER on a bed, sofa, rug, or other . Read these instructions. 3. 1. These openings must not be placed on the apparatus. 16. If...

User Manual (ENGLISH)
Page 6
... one blade wider than the other sources, refer to insert the plug fully into the outlet, try reversing the plug. OUTDOOR ANTENNA GROUNDING: CAMCORDER, be operated from the wall outlet and disconnect the antenna or cable system. vi_English 70-1984, provides information with either a polarized 2-wire ...Section 810 of the polarized plug. 19. POWER-CORD PROTECTION: Power-supply cords should be walked on the label. POWER SOURCES: The CAMCORDER should be routed so that they are unable to the operating instructions. 18. Do not defeat the safety purpose of the National Electrical ...
... one blade wider than the other sources, refer to insert the plug fully into the outlet, try reversing the plug. OUTDOOR ANTENNA GROUNDING: CAMCORDER, be operated from the wall outlet and disconnect the antenna or cable system. vi_English 70-1984, provides information with either a polarized 2-wire ...Section 810 of the polarized plug. 19. POWER-CORD PROTECTION: Power-supply cords should be walked on the label. POWER SOURCES: The CAMCORDER should be routed so that they are unable to the operating instructions. 18. Do not defeat the safety purpose of the National Electrical ...

User Manual (ENGLISH)
Page 7
... cords as the original part. Opening or removing covers may result in fire, electric shock or other hazards. b. If the CAMCORDER does not operate normally by the operating instructions. POWER LINES: An outside antenna system, extreme care should not be taken to rain... other controls may expose you to qualified service personnel under the following the operating instructions, adjust only those controls that the CAMCORDER is damaged. Never spill liquids of other electric light or power circuits where it checked by the manufacturer and having the...
... cords as the original part. Opening or removing covers may result in fire, electric shock or other hazards. b. If the CAMCORDER does not operate normally by the operating instructions. POWER LINES: An outside antenna system, extreme care should not be taken to rain... other controls may expose you to qualified service personnel under the following the operating instructions, adjust only those controls that the CAMCORDER is damaged. Never spill liquids of other electric light or power circuits where it checked by the manufacturer and having the...
User Manual (ENGLISH)
Page 9
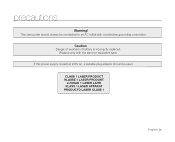
Caution Danger of explosion if battery is used . CLASS 1 LASER PRODUCT KLASSE 1 LASER PRODUKT LUOKAN 1 LASER LAITE KLASS 1 LASER APPARAT PRODUCTO LASER CLASE 1 English_ix If this power supply is incorrectly replaced. precautions Warning! This camcorder should be used at 240V ac, a suitable plug adaptor should always be connected to an AC outlet with the same or equivalent type. Replace only with a protective grounding connection.
Caution Danger of explosion if battery is used . CLASS 1 LASER PRODUCT KLASSE 1 LASER PRODUKT LUOKAN 1 LASER LAITE KLASS 1 LASER APPARAT PRODUCTO LASER CLASE 1 English_ix If this power supply is incorrectly replaced. precautions Warning! This camcorder should be used at 240V ac, a suitable plug adaptor should always be connected to an AC outlet with the same or equivalent type. Replace only with a protective grounding connection.


