

User Manual (ENGLISH)
Page 30
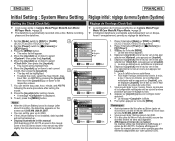
... down to set the date/time. Camera Mode ►System Clock Set Beep Sound ►On Language ►English Demonstration ►On Move OK Select MENU Exit Camera Mode ►System Clock Set Beep Sound Language Demonstration JAN 01 2007 12 : 00 AM Adjust OK Select MENU Exit (sólo SC-DC173(U)/DC175/DC575) 2. Move the [Joystick] up . Pantallas de este manual Display illustrations in this manual OSD illustrations...
... down to set the date/time. Camera Mode ►System Clock Set Beep Sound ►On Language ►English Demonstration ►On Move OK Select MENU Exit Camera Mode ►System Clock Set Beep Sound Language Demonstration JAN 01 2007 12 : 00 AM Adjust OK Select MENU Exit (sólo SC-DC173(U)/DC175/DC575) 2. Move the [Joystick] up . Pantallas de este manual Display illustrations in this manual OSD illustrations...
User Manual (ENGLISH)
Page 30
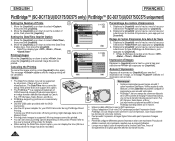
... date/time is not installed, data inputted will appear. 4. Press the [Joystick] after setting the month. 8. Placez l'interrupteur [Power] sur [ (Camera)] ou [ (Player)]. 3. Pour quitter, appuyez sur la touche [MENU]. Move the [Joystick] up or down to set the day, year, hour, minute, and AM/PM following the same procedure after setting minute. A message is displayed. 9. Some of SC-DC175 are used in this manual...
... date/time is not installed, data inputted will appear. 4. Press the [Joystick] after setting the month. 8. Placez l'interrupteur [Power] sur [ (Camera)] ou [ (Player)]. 3. Pour quitter, appuyez sur la touche [MENU]. Move the [Joystick] up or down to set the day, year, hour, minute, and AM/PM following the same procedure after setting minute. A message is displayed. 9. Some of SC-DC175 are used in this manual...
User Manual (ENGLISH)
Page 106
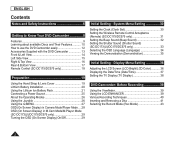
... DVD Camcorder. Use the AC power adapter for details. When setting the Date/Time imprint option, you can set the number of CIPA(Camera & Imaging Products Association), an image transfer standard developed by all printers. Move the [Joystick] up or down to select , then press the [Joystick]. 4. Notes M.Player Mode ►Pict Bridge Print Copies Date/Time 5/10 001 M.Player Mode ►Pict Bridge Print Copies Date/Time...
... DVD Camcorder. Use the AC power adapter for details. When setting the Date/Time imprint option, you can set the number of CIPA(Camera & Imaging Products Association), an image transfer standard developed by all printers. Move the [Joystick] up or down to select , then press the [Joystick]. 4. Notes M.Player Mode ►Pict Bridge Print Copies Date/Time 5/10 001 M.Player Mode ►Pict Bridge Print Copies Date/Time...
User Manual (ENGLISH)
Page 2
... (Remote) (SC-DC175/DC575 only 31 Setting the Beep Sound (Beep Sound 32 Setting the Shutter Sound (Shutter Sound) (SC-DC173(U)/DC175/DC575 only 33 Selecting the OSD Language (Language 34 Viewing the Demonstration (Demonstration 35 Initial Setting : Display Menu Setting 36 Adjusting the LCD Screen (LCD Bright/LCD Color 36 Displaying the Date/Time (Date/Time 37 Setting the TV Display (TV Display 38 DVD Camcorder: Before Recording 39 Using the Viewfinder 39 Using the LCD ENHANCER 39 Various Recording Techniques 40 Inserting and Removing a Disc 41 Selecting the Record Mode (Rec...
... (Remote) (SC-DC175/DC575 only 31 Setting the Beep Sound (Beep Sound 32 Setting the Shutter Sound (Shutter Sound) (SC-DC173(U)/DC175/DC575 only 33 Selecting the OSD Language (Language 34 Viewing the Demonstration (Demonstration 35 Initial Setting : Display Menu Setting 36 Adjusting the LCD Screen (LCD Bright/LCD Color 36 Displaying the Date/Time (Date/Time 37 Setting the TV Display (TV Display 38 DVD Camcorder: Before Recording 39 Using the Viewfinder 39 Using the LCD ENHANCER 39 Various Recording Techniques 40 Inserting and Removing a Disc 41 Selecting the Record Mode (Rec...
User Manual (ENGLISH)
Page 6
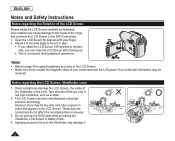
Direct sunlight can close the LCD Screen with your credit card near the LCD panel. These dots are normal and do not affect the recorded picture in color) that connects the LCD Screen to the DVD Camcorder. 1. Take pictures of the sun only in low light conditions, such as illustrated. Do not pick up the DVD Camcorder by holding the Viewfinder, LCD Screen or Battery Pack. 4. Rotate it to the...
Direct sunlight can close the LCD Screen with your credit card near the LCD panel. These dots are normal and do not affect the recorded picture in color) that connects the LCD Screen to the DVD Camcorder. 1. Take pictures of the sun only in low light conditions, such as illustrated. Do not pick up the DVD Camcorder by holding the Viewfinder, LCD Screen or Battery Pack. 4. Rotate it to the...
User Manual (ENGLISH)
Page 22
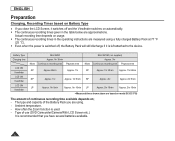
... used. - How often the Zoom function is recommended that you have several batteries available. 22 Type of the Battery Pack you are approximations. Actual recording time depends on ; - The type and capacity of use (DVD Camcorder/Camera/With LCD Screen etc.). ENGLISH Preparation Charging, Recording Times based on Battery Type If you close the LCD Screen, it switches off and the Viewfinder switches on automatically. The continuous recording times given in the operating instructions are measured using...
... used. - How often the Zoom function is recommended that you have several batteries available. 22 Type of the Battery Pack you are approximations. Actual recording time depends on ; - The type and capacity of use (DVD Camcorder/Camera/With LCD Screen etc.). ENGLISH Preparation Charging, Recording Times based on Battery Type If you close the LCD Screen, it switches off and the Viewfinder switches on automatically. The continuous recording times given in the operating instructions are measured using...
User Manual (ENGLISH)
Page 24
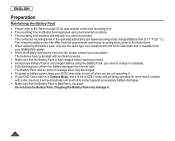
... mode without being operated for approximate continuous recording time. The recording time is fitted firmly into place. The batteries have to be prone to leakage when fully discharged. To preserve battery power, keep your DVD Camcorder turned off when you are measured using the Battery Pack, you need to charge it completely. Fully discharging a Lithium Ion Battery damages the internal cells. Before using a fully charged Battery...
... mode without being operated for approximate continuous recording time. The recording time is fitted firmly into place. The batteries have to be prone to leakage when fully discharged. To preserve battery power, keep your DVD Camcorder turned off when you are measured using the Battery Pack, you need to charge it completely. Fully discharging a Lithium Ion Battery damages the internal cells. Before using a fully charged Battery...

User Manual (ENGLISH)
Page 30
... installed, data inputted will be backed up. Display illustrations in this manual OSD illustrations of the OSD items shown in this manual. To exit, press the [MENU] button. 8 Notes After the Lithium Battery loses its charge (after about 6 months), the date/time appears on your DVD Camcorder. Some of model SC-DC173U are used in this manual may differ slightly from the actual items on the screen...
... installed, data inputted will be backed up. Display illustrations in this manual OSD illustrations of the OSD items shown in this manual. To exit, press the [MENU] button. 8 Notes After the Lithium Battery loses its charge (after about 6 months), the date/time appears on your DVD Camcorder. Some of model SC-DC173U are used in this manual may differ slightly from the actual items on the screen...

User Manual (ENGLISH)
Page 36
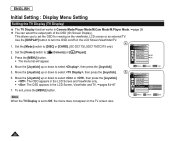
... Crystal Display (LCD) Screen, which enables you to view what you are recording or playing back directly. Depending on the conditions under which you are using the DVD Camcorder (indoors or outdoors for and between ~ . Camera Mode ►Display 6. Set the [Mode] switch to [ (Camera)] or [ (Player)]. Adjust OK Select MENU Exit 36 Move the [Joystick] up or down to select , then press the [Joystick]. LCD Bright - LCD Bright LCD Color 3. Date/Time TV Display 7. LCD Color 1.
... Crystal Display (LCD) Screen, which enables you to view what you are recording or playing back directly. Depending on the conditions under which you are using the DVD Camcorder (indoors or outdoors for and between ~ . Camera Mode ►Display 6. Set the [Mode] switch to [ (Camera)] or [ (Player)]. Adjust OK Select MENU Exit 36 Move the [Joystick] up or down to select , then press the [Joystick]. LCD Bright - LCD Bright LCD Color 3. Date/Time TV Display 7. LCD Color 1.
User Manual (ENGLISH)
Page 38
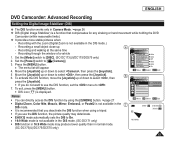
... the [MENU] button. Move the [Joystick] up or down to [DISC] or [CARD]. (SC-DC173(U)/DC175/DC575 only) 4 Camera Mode ►Display 2. Move the [Joystick] up or down to Off, the menu does not appear on the TV screen also. Set the [Mode] switch to select , then press the [Joystick]. 6 Camera Mode 6. Set the [Power] switch to select , then press the [Joystick]. To exit, press the [MENU] button. Date/Time TV Display ►...
... the [MENU] button. Move the [Joystick] up or down to [DISC] or [CARD]. (SC-DC173(U)/DC175/DC575 only) 4 Camera Mode ►Display 2. Move the [Joystick] up or down to Off, the menu does not appear on the TV screen also. Set the [Mode] switch to select , then press the [Joystick]. 6 Camera Mode 6. Set the [Power] switch to select , then press the [Joystick]. To exit, press the [MENU] button. Date/Time TV Display ►...

User Manual (ENGLISH)
Page 42
... battery level is required to play the disc on it. Formatting a new disc is only possible on it . Gently open . 2. Note The Finalize/Format functions are prompted with the message. SP Disc is inserted. Format? Gently push the section marked [PUSH CLOSE] on the disc cover to record on a DVD Recorder that supports VR mode. Refer to remove. 4. To format later, use the menu. page 79 Removing a Disc 1. Push the [OPEN] switch in the direction...
... battery level is required to play the disc on it. Formatting a new disc is only possible on it . Gently open . 2. Note The Finalize/Format functions are prompted with the message. SP Disc is inserted. Format? Gently push the section marked [PUSH CLOSE] on the disc cover to record on a DVD Recorder that supports VR mode. Refer to remove. 4. To format later, use the menu. page 79 Removing a Disc 1. Push the [OPEN] switch in the direction...

User Manual (ENGLISH)
Page 44
... REC mode. ENGLISH PHOTO DVD Camcorder: Basic Recording Making your expected recording time. 4. Use either button for your First Recording 1. To start recording, press the [Record Start/Stop] button. is being recovered, no other on the LCD Screen. 5. Make sure that there is displayed. Make sure the image you press the [Record Start/Stop] button to prevent unnecessary battery power consumption. If the power cable/batteries are displayed on the LCD screen's frame. Remove the Lens Cover. 3. To stop recording, press the [Record...
... REC mode. ENGLISH PHOTO DVD Camcorder: Basic Recording Making your expected recording time. 4. Use either button for your First Recording 1. To start recording, press the [Record Start/Stop] button. is being recovered, no other on the LCD Screen. 5. Make sure that there is displayed. Make sure the image you press the [Record Start/Stop] button to prevent unnecessary battery power consumption. If the power cable/batteries are displayed on the LCD screen's frame. Remove the Lens Cover. 3. To stop recording, press the [Record...
User Manual (ENGLISH)
Page 52
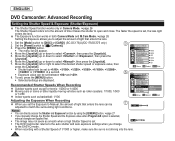
... AE White Balance Digital Effect Shutter Auto Exposure Manual 16:9 Wide ▼ Move OK Select MENU Exit Adjusting the Exposure When Recording When you change the Shutter Speed and the Exposure value when Program AE option is not shining into the lens. 52 ENGLISH DVD Camcorder: Advanced Recording Setting the Shutter Speed & Exposure (Shutter/Exposure) The Shutter Speed function works only in both Camera Mode and M.Cam Mode. page 26 Setting the Exposure allows you manually change to [DISC] or [CARD]. (SC...
... AE White Balance Digital Effect Shutter Auto Exposure Manual 16:9 Wide ▼ Move OK Select MENU Exit Adjusting the Exposure When Recording When you change the Shutter Speed and the Exposure value when Program AE option is not shining into the lens. 52 ENGLISH DVD Camcorder: Advanced Recording Setting the Shutter Speed & Exposure (Shutter/Exposure) The Shutter Speed function works only in both Camera Mode and M.Cam Mode. page 26 Setting the Exposure allows you manually change to [DISC] or [CARD]. (SC...
User Manual (ENGLISH)
Page 57
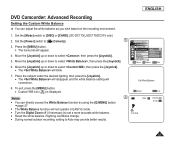
...; Reset the white balance if lighting conditions change. During normal outdoor recording, setting to select , then press the [Joystick]. The will commence. To exit, press the [MENU] button. Custom WB icon ( ) is displayed. Set White Balance 8. Camera Mode ►Camera Program AE White Balance Auto A Digital Effect Indoor Shutter Outdoor Exposure Custom WB 16:9 Wide ▼ Move OK Select MENU Exit 7. ENGLISH DVD Camcorder: Advanced Recording Setting the Custom White Balance You can directly access the White Balance function by...
...; Reset the white balance if lighting conditions change. During normal outdoor recording, setting to select , then press the [Joystick]. The will commence. To exit, press the [MENU] button. Custom WB icon ( ) is displayed. Set White Balance 8. Camera Mode ►Camera Program AE White Balance Auto A Digital Effect Indoor Shutter Outdoor Exposure Custom WB 16:9 Wide ▼ Move OK Select MENU Exit 7. ENGLISH DVD Camcorder: Advanced Recording Setting the Custom White Balance You can directly access the White Balance function by...
User Manual (ENGLISH)
Page 61
... the window of a vehicle 4 Camera Mode ►Camera Program AE ►Auto 1. Set the [Power] switch to [DISC]. (SC-DC173(U)/DC175/DC575 only) 2. Recording and walking at the same time - White Balance ►Auto Digital Effect ►Off Shutter ►Auto 3. To activate the DIS function, move the [Joystick] up or down to select , then press the [Joystick]. Press the [MENU] button. The menu list will appear. 4. To exit, press the [MENU] button...
... the window of a vehicle 4 Camera Mode ►Camera Program AE ►Auto 1. Set the [Power] switch to [DISC]. (SC-DC173(U)/DC175/DC575 only) 2. Recording and walking at the same time - White Balance ►Auto Digital Effect ►Off Shutter ►Auto 3. To activate the DIS function, move the [Joystick] up or down to select , then press the [Joystick]. Press the [MENU] button. The menu list will appear. 4. To exit, press the [MENU] button...
User Manual (ENGLISH)
Page 100
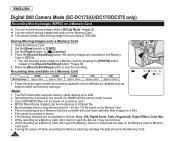
... [Record Start/Stop] button, the moving images are recorded on the Memory Card in M.Cam Mode: DIS, Digital Zoom, Fade, Program AE, Digital Effect, Color Nite. While recording on a Memory Card, don't insert or eject the disc as subject matter and memory card type. Notes The DVD Camcorder supports memory cards ranging up to 2GB per file. Moving images that you recorded are saved in *.avi (avi 1.0) file format on the Memory Card. The moving images on a Memory Card...
... [Record Start/Stop] button, the moving images are recorded on the Memory Card in M.Cam Mode: DIS, Digital Zoom, Fade, Program AE, Digital Effect, Color Nite. While recording on a Memory Card, don't insert or eject the disc as subject matter and memory card type. Notes The DVD Camcorder supports memory cards ranging up to 2GB per file. Moving images that you recorded are saved in *.avi (avi 1.0) file format on the Memory Card. The moving images on a Memory Card...

User Manual (ENGLISH)
Page 110
....0 - Video Codec - The setup screen appears automatically soon after setting . After installing , please restart your computer via a USB cable. - PC Camera/USB Streaming function: DV Driver - PC Camera/USB Streaming driver(Capture Driver) 2. Application Installation - If the is not installed, it is not installed, some functions will be supported.) 1. is required to play movie files recorded by connecting your DVD Camcorder to your PC. If is installed already, there is no need to restart the PC. Installing Driver - Photo...
....0 - Video Codec - The setup screen appears automatically soon after setting . After installing , please restart your computer via a USB cable. - PC Camera/USB Streaming function: DV Driver - PC Camera/USB Streaming driver(Capture Driver) 2. Application Installation - If the is not installed, it is not installed, some functions will be supported.) 1. is required to play movie files recorded by connecting your DVD Camcorder to your PC. If is installed already, there is no need to restart the PC. Installing Driver - Photo...
User Manual (ENGLISH)
Page 113
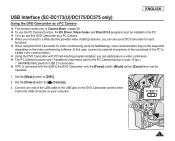
... may not be operated. 1. In this case, connect an external microphone to the soundcard of the USB cable to the USB jack on the DVD Camcorder and the other end to the USB connector on the video conferencing software. ENGLISH USB Interface (SC-DC173(U)/DC175/DC575 only) Using the DVD Camcorder as a PC Camera This function works only in Camera Mode. page 26 To use the PC Camera function, the DV Driver, Video Codec and...
... may not be operated. 1. In this case, connect an external microphone to the soundcard of the USB cable to the USB jack on the DVD Camcorder and the other end to the USB connector on the video conferencing software. ENGLISH USB Interface (SC-DC173(U)/DC175/DC575 only) Using the DVD Camcorder as a PC Camera This function works only in Camera Mode. page 26 To use the PC Camera function, the DV Driver, Video Codec and...
User Manual (ENGLISH)
Page 114
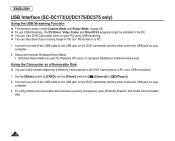
ENGLISH USB Interface (SC-DC173(U)/DC175/DC575 only) Using the USB Streaming Function This function works in both Camera Mode and Player Mode. page 26 To use USB streaming, the DV Driver, Video Codec and DirectX 9.0 programs must be installed in the PC. You can view DVD Camcorder video on your PC using USB streaming. You can also store it as a Removable Disk You can easily transfer data from a Memory Card inserted in...
ENGLISH USB Interface (SC-DC173(U)/DC175/DC575 only) Using the USB Streaming Function This function works in both Camera Mode and Player Mode. page 26 To use USB streaming, the DV Driver, Video Codec and DirectX 9.0 programs must be installed in the PC. You can view DVD Camcorder video on your PC using USB streaming. You can also store it as a Removable Disk You can easily transfer data from a Memory Card inserted in...
User Manual (ENGLISH)
Page 122
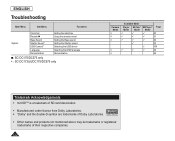
ENGLISH Troubleshooting Main Menu Sub Menu Functions System Clock Set Remote Beep Sound Shutter Sound* USB Connect* Language Demonstration Setting the date/time Using the remote control Setting the Beep sound Setting the Shutter sound Selecting the USB device Selecting the OSD language Demonstration : SC-DC175/DC575 only * : SC-DC173(U)/DC175/DC575 only Camera Mode Available Mode Player M.Cam* Mode Mode M.Player* Page Mode ...
ENGLISH Troubleshooting Main Menu Sub Menu Functions System Clock Set Remote Beep Sound Shutter Sound* USB Connect* Language Demonstration Setting the date/time Using the remote control Setting the Beep sound Setting the Shutter sound Selecting the USB device Selecting the OSD language Demonstration : SC-DC175/DC575 only * : SC-DC173(U)/DC175/DC575 only Camera Mode Available Mode Player M.Cam* Mode Mode M.Player* Page Mode ...


