
User Manual (ENGLISH)
Page 9
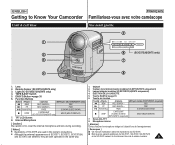
... Switch 5. Capteur de la télécommande (modèles SC-D375(H)/D975 uniquement) 3. Touche de fonction Touche (modèles SC-D375(H)/D975 uniquement) œœ REW REC SEARCH - Remote Sensor (SC-D375(H)/D975 only) 3. Internal Microphone [ Caution ] Be careful not to Know Your Camcorder Front & Left View FRANÇAIS Familiarisez-vous avec votre cam...
... Switch 5. Capteur de la télécommande (modèles SC-D375(H)/D975 uniquement) 3. Touche de fonction Touche (modèles SC-D375(H)/D975 uniquement) œœ REW REC SEARCH - Remote Sensor (SC-D375(H)/D975 only) 3. Internal Microphone [ Caution ] Be careful not to Know Your Camcorder Front & Left View FRANÇAIS Familiarisez-vous avec votre cam...
User Manual (ENGLISH)
Page 11
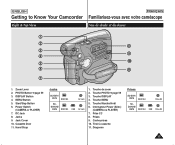
...Power Switch (CAMERA or PLAYER) 7. Cassette Door 11. Interrupteur Power (Alim.) (CAMERA ou PLAYER) 7. Prises 9. Cache-prises 10. Hand Strap Jacks SC-D371/ D372 IEEE1394 AV Jack SCD375(H)/ D975 IEEE1394 USB AV Jack 1. Touche MENU 5. Prise CC 8. Jack Cover 10. Dragonne Prises... SC-D371/ D372 IEEE1394 Prise AV SCD375(H)/ D975 IEEE1394 USB Prise AV 11 Jacks 9. Tiroir à cassette 11. Touche Marche/Arrêt 6. ENGLISH Getting to Know Your Camcorder Right & Top View FRANÇAIS Familiarisez-vous avec votre ...
...Power Switch (CAMERA or PLAYER) 7. Cassette Door 11. Interrupteur Power (Alim.) (CAMERA ou PLAYER) 7. Prises 9. Cache-prises 10. Hand Strap Jacks SC-D371/ D372 IEEE1394 AV Jack SCD375(H)/ D975 IEEE1394 USB AV Jack 1. Touche MENU 5. Prise CC 8. Jack Cover 10. Dragonne Prises... SC-D371/ D372 IEEE1394 Prise AV SCD375(H)/ D975 IEEE1394 USB Prise AV 11 Jacks 9. Tiroir à cassette 11. Touche Marche/Arrêt 6. ENGLISH Getting to Know Your Camcorder Right & Top View FRANÇAIS Familiarisez-vous avec votre ...
User Manual (ENGLISH)
Page 13
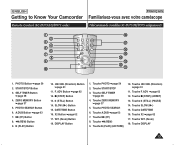
... Direction) Button ➥page 61 11. Touche DATE/TIME 16. ENGLISH Getting to Know Your Camcorder Remote Control (SC-D375(H)/D975 only) FRANÇAIS Familiarisez-vous avec votre caméscope Télécommande (modèles SC-D375(H)/D975 uniquement) ! @ # %$ ^ & * ( ) 8 7 6 5 4 3 2 1 1. ADV Button ➥page 62 12. SLOW (❙√ ) Button 15. DISPLAY Button...
... Direction) Button ➥page 61 11. Touche DATE/TIME 16. ENGLISH Getting to Know Your Camcorder Remote Control (SC-D375(H)/D975 only) FRANÇAIS Familiarisez-vous avec votre caméscope Télécommande (modèles SC-D375(H)/D975 uniquement) ! @ # %$ ^ & * ( ) 8 7 6 5 4 3 2 1 1. ADV Button ➥page 62 12. SLOW (❙√ ) Button 15. DISPLAY Button...

User Manual (ENGLISH)
Page 20
...utilisée qu'avec la fonction QUICK MENU ➥page 46 I Mise au point (Focus) ➥ page 47 Mode M.Player (modèles SC-D375(H)/D975 uniquement) I Setting the Exposure (Exposure)- Press the [L / M] button to select desired mode , 2. Can only be operated by using the QUICK...la touche [Q.MENU]. ✤ QUICK MENU provides easier access to frequently used to access camcorder functions by using the QUICK MENU ➥page 46 I Setting the Focus (Focus) ➥page 47 M.Player Mode (SC-D375(H)/D975 only) I Playing the Moving Images (MPEG) on the Memory Card (M. STBY ...
...utilisée qu'avec la fonction QUICK MENU ➥page 46 I Mise au point (Focus) ➥ page 47 Mode M.Player (modèles SC-D375(H)/D975 uniquement) I Setting the Exposure (Exposure)- Press the [L / M] button to select desired mode , 2. Can only be operated by using the QUICK...la touche [Q.MENU]. ✤ QUICK MENU provides easier access to frequently used to access camcorder functions by using the QUICK MENU ➥page 46 I Setting the Focus (Focus) ➥page 47 M.Player Mode (SC-D375(H)/D975 only) I Playing the Moving Images (MPEG) on the Memory Card (M. STBY ...

User Manual (ENGLISH)
Page 29
...LCD Color) ✤ Adjusting the LCD Screen works in /// modes. ➥page 19 ✤ Your Camcorder is equipped with a 2.5 inch (SC-D371 only) / 2.7 inch wide (SC-D372/D375(H)/D975 only) color Liquid Crystal Display (LCD) Screen, which enables you to view what you are recording... or playing back directly. ✤ Depending on the conditions under which you are using the Camcorder (indoors or outdoors for ...
...LCD Color) ✤ Adjusting the LCD Screen works in /// modes. ➥page 19 ✤ Your Camcorder is equipped with a 2.5 inch (SC-D371 only) / 2.7 inch wide (SC-D372/D375(H)/D975 only) color Liquid Crystal Display (LCD) Screen, which enables you to view what you are recording... or playing back directly. ✤ Depending on the conditions under which you are using the Camcorder (indoors or outdoors for ...

User Manual (ENGLISH)
Page 34
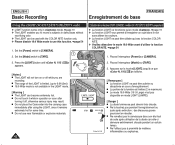
....) Insérez une cassette. ➥page 32 2. Set the [Power] switch to [CAMERA]. 4 I Placez l'interrupteur [Mode] sur [TAPE]. [TAPE]. (modèles SC-D375(H)/ (SC-D375(H)/D975 only) D975 uniquement) Make sure that there is enough remaining power for your First Recording Réalisation de votre premier enregistrement 1. I Open the LCD...d'enregistrement), et s'affichent à l'écran. sur l'écran ACL ou dans le viseur. I Make sure the image you finish the recordings to the Camcorder. 1. Pour commencer l'enregistrement, appuyez sur la touche [Start/Stop].
....) Insérez une cassette. ➥page 32 2. Set the [Power] switch to [CAMERA]. 4 I Placez l'interrupteur [Mode] sur [TAPE]. [TAPE]. (modèles SC-D375(H)/ (SC-D375(H)/D975 only) D975 uniquement) Make sure that there is enough remaining power for your First Recording Réalisation de votre premier enregistrement 1. I Open the LCD...d'enregistrement), et s'affichent à l'écran. sur l'écran ACL ou dans le viseur. I Make sure the image you finish the recordings to the Camcorder. 1. Pour commencer l'enregistrement, appuyez sur la touche [Start/Stop].
User Manual (ENGLISH)
Page 42
...16:9 Wide (16 :9 Large) n'est pas disponible en mode LIGHT (LAMPE). ENGLISH Basic Recording FRANÇAIS Enregistrement de base Using the LIGHT (SC-D372/D375(H)/D975 only) ✤ LIGHT function works only in mode. ➥page 19 ✤ The LIGHT enables you are recording. Set the [Power] switch... après utilisation de la diode car celle-ci demeure extrêmement chaude pendant un certain temps. I Do not place the Camcorder into the carrying case immediately after turning it remains extremely hot for some time. I Ne la touchez pas pendant l'enregistrement ou juste apr...
...16:9 Wide (16 :9 Large) n'est pas disponible en mode LIGHT (LAMPE). ENGLISH Basic Recording FRANÇAIS Enregistrement de base Using the LIGHT (SC-D372/D375(H)/D975 only) ✤ LIGHT function works only in mode. ➥page 19 ✤ The LIGHT enables you are recording. Set the [Power] switch... après utilisation de la diode car celle-ci demeure extrêmement chaude pendant un certain temps. I Do not place the Camcorder into the carrying case immediately after turning it remains extremely hot for some time. I Ne la touchez pas pendant l'enregistrement ou juste apr...

User Manual (ENGLISH)
Page 59
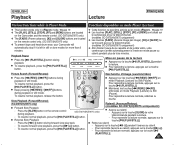
...√Tape Photo Search Photo Copy Audio Select Audio Effect √Sound[1] √Off 1. Placez l'interrupteur de [Mode] sur [TAPE]. (modèles SC-D375(H)/D975 uniquement) 3. Appuyez sur la touche pour sélectionner , puis appuyez sur la touche [OK]. Pour quitter le menu, appuyez sur la touche [I (... 6. Appuyez sur la touche pour sélectionner , puis appuyez sur la touche [OK]. 5. After the still image has been recorded, the Camcorder returns to select , then press the [OK] button. Press the button to its previous mode. I After completing the search, the...
...√Tape Photo Search Photo Copy Audio Select Audio Effect √Sound[1] √Off 1. Placez l'interrupteur de [Mode] sur [TAPE]. (modèles SC-D375(H)/D975 uniquement) 3. Appuyez sur la touche pour sélectionner , puis appuyez sur la touche [OK]. Pour quitter le menu, appuyez sur la touche [I (... 6. Appuyez sur la touche pour sélectionner , puis appuyez sur la touche [OK]. 5. After the still image has been recorded, the Camcorder returns to select , then press the [OK] button. Press the button to its previous mode. I After completing the search, the...
User Manual (ENGLISH)
Page 61
...function works only in mode. ➥page 19 ✤ The [PLAY], [STILL], [STOP], [FF] and [REW] buttons are located on the Camcorder and the remote control. (SC-D375(H)/D975 only) ✤ The [F.ADV] (Frame advance), [X2] and [SLOW] buttons are located on the remote control during playback. - I Pour ...la lecture, appuyez sur la touche PLAY/STILL)]. Press the [SLOW] button on the remote control only. (SC-D375(H)/D975 only) ✤ To prevent tape and head-drum wear, your Camcorder will automatically stop if it is left in still or slow modes for more than 3 minutes. Press the ...
...function works only in mode. ➥page 19 ✤ The [PLAY], [STILL], [STOP], [FF] and [REW] buttons are located on the Camcorder and the remote control. (SC-D375(H)/D975 only) ✤ The [F.ADV] (Frame advance), [X2] and [SLOW] buttons are located on the remote control during playback. - I Pour ...la lecture, appuyez sur la touche PLAY/STILL)]. Press the [SLOW] button on the remote control only. (SC-D375(H)/D975 only) ✤ To prevent tape and head-drum wear, your Camcorder will automatically stop if it is left in still or slow modes for more than 3 minutes. Press the ...

User Manual (ENGLISH)
Page 63
...ne. 5. Set the [Mode] switch to stop the dubbing. 34 5 √ 1. Press the PLAY/STILL)] button to . (SC-D975 only) ➥ page 69 [ Remarques ] I The Camcorder is displayed. Placez l'interrupteur [Power] sur [PLAYER]. 2. Placez l'interrupteur de [Mode] sur [TAPE]. 3. I Pour utiliser une ...vidéo protégée en écriture. I Audio Dubbing icon ( ) is ready for dubbing. 6. Post-sonorisation (modèles SC-D375(H)/D975 uniquement) ✤ La fonction Audio Dubbing (Post-sonorisation) ne peut être activée qu'en mode . ➥page 19 &#...
...ne. 5. Set the [Mode] switch to stop the dubbing. 34 5 √ 1. Press the PLAY/STILL)] button to . (SC-D975 only) ➥ page 69 [ Remarques ] I The Camcorder is displayed. Placez l'interrupteur [Power] sur [PLAYER]. 2. Placez l'interrupteur de [Mode] sur [TAPE]. 3. I Pour utiliser une ...vidéo protégée en écriture. I Audio Dubbing icon ( ) is ready for dubbing. 6. Post-sonorisation (modèles SC-D375(H)/D975 uniquement) ✤ La fonction Audio Dubbing (Post-sonorisation) ne peut être activée qu'en mode . ➥page 19 &#...

User Manual (ENGLISH)
Page 69
...sur la touche [MENU]. Appuyez sur la touche pour sélectionner , puis appuyez sur la touche [OK]. 6. De la même façon the Camcorder. Press the button to [TAPE]. 3. I If is set to , the WindCut Plus function is not available. 2 Player Mode √Record Rec Mode Audio ... SC-D975 uniquement) ✤ AV In/Out function works only in mode. ➥page 19 ✤ AV In/Out setting enables you can send your video or image to external devices to record or play back. 1. Set the [Power] switch to select , then press the [OK] button. 5. I : Select this camcorder ...
...sur la touche [MENU]. Appuyez sur la touche pour sélectionner , puis appuyez sur la touche [OK]. 6. De la même façon the Camcorder. Press the button to [TAPE]. 3. I If is set to , the WindCut Plus function is not available. 2 Player Mode √Record Rec Mode Audio ... SC-D975 uniquement) ✤ AV In/Out function works only in mode. ➥page 19 ✤ AV In/Out setting enables you can send your video or image to external devices to record or play back. 1. Set the [Power] switch to select , then press the [OK] button. 5. I : Select this camcorder ...
User Manual (ENGLISH)
Page 87
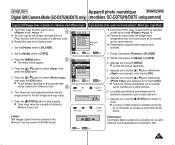
... FRANÇAIS Digital Still Camera Mode (SC-D375(H)/D975 only) (modèles SC-D375(H)/D975 uniquement) Copying Still Images from the cassette to a Memory Card. ✤ Rewind the tape to the desired point. 1. Set the [Power] switch to find still images and copy starts. 7. The Camcorder automatically performs the still image search to...
... FRANÇAIS Digital Still Camera Mode (SC-D375(H)/D975 only) (modèles SC-D375(H)/D975 uniquement) Copying Still Images from the cassette to a Memory Card. ✤ Rewind the tape to the desired point. 1. Set the [Power] switch to find still images and copy starts. 7. The Camcorder automatically performs the still image search to...

User Manual (ENGLISH)
Page 91
...[ Notes ] I The frame rate for all the recommended computer environments mentioned above. I Système I IEEE 1394 is quite simple. - This Camcorder has a 4pin jack. Une connexion DV standard est assez simple. - Si un produit possède une prise DV, vous pouvez transférer ... FRANÇAIS Transfert de données IEEE 1394 Transferring IEEE1394 (i.LINK)-DV Standard Data Connections Connecting to a DV Device (DVD Recorder, Camcorder, etc.) I Le fonctionnement n'est pas garanti pour l'ensemble des configurations du système recommandées ci-dessus. Transfert de donn&#...
...[ Notes ] I The frame rate for all the recommended computer environments mentioned above. I Système I IEEE 1394 is quite simple. - This Camcorder has a 4pin jack. Une connexion DV standard est assez simple. - Si un produit possède une prise DV, vous pouvez transférer ... FRANÇAIS Transfert de données IEEE 1394 Transferring IEEE1394 (i.LINK)-DV Standard Data Connections Connecting to a DV Device (DVD Recorder, Camcorder, etc.) I Le fonctionnement n'est pas garanti pour l'ensemble des configurations du système recommandées ci-dessus. Transfert de donn&#...
User Manual (ENGLISH)
Page 94
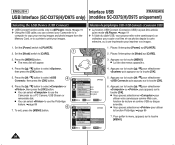
... Interface USB FRANÇAIS USB Interface (SC-D375(H)/D975 only) (modèles SC-D375(H)/D975 uniquement) Selecting the USB Device (USB Connect) ✤ USB Connect function works only in mode. ➥page 19 ✤ Using the USB cable, you can select to use the Camcorder as a PC Camera, USB Stream or ...removable disk. Press the [MENU] button. Press the button to [CARD]. 1. I You can connect your Camcorder to a computer to copy your moving images and photo images from the Memory Card, or to a printer to print your images. I You can select...
... Interface USB FRANÇAIS USB Interface (SC-D375(H)/D975 only) (modèles SC-D375(H)/D975 uniquement) Selecting the USB Device (USB Connect) ✤ USB Connect function works only in mode. ➥page 19 ✤ Using the USB cable, you can select to use the Camcorder as a PC Camera, USB Stream or ...removable disk. Press the [MENU] button. Press the button to [CARD]. 1. I You can connect your Camcorder to a computer to copy your moving images and photo images from the Memory Card, or to a printer to print your images. I You can select...
User Manual (ENGLISH)
Page 95
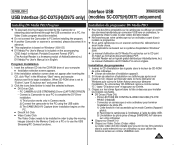
...Appareil photo). 2) Raccordez le caméscope à l'ordinateur à l'aide du câble USB. 3) L'installation du pilote prise d'image SAMSUNG A/V démarre sur votre ordinateur. Click the icons listed below to install the selected software. Pilote LECTURE EN CONTINU & WEB CAM USB (PILOTE...de votre ordinateur. ENGLISH Interface USB FRANÇAIS USB Interface (SC-D375(H)/D975 only) (modèles SC-D375(H)/D975 uniquement) Installing DV Media PRO Program ✤ To play back moving images recorded by the Camcorder or streaming data transferred through the USB connection on a PC, ...
...Appareil photo). 2) Raccordez le caméscope à l'ordinateur à l'aide du câble USB. 3) L'installation du pilote prise d'image SAMSUNG A/V démarre sur votre ordinateur. Click the icons listed below to install the selected software. Pilote LECTURE EN CONTINU & WEB CAM USB (PILOTE...de votre ordinateur. ENGLISH Interface USB FRANÇAIS USB Interface (SC-D375(H)/D975 only) (modèles SC-D375(H)/D975 uniquement) Installing DV Media PRO Program ✤ To play back moving images recorded by the Camcorder or streaming data transferred through the USB connection on a PC, ...
User Manual (ENGLISH)
Page 96
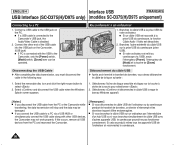
... et reconnectez le caméscope. 96 ENGLISH Interface USB FRANÇAIS USB Interface (SC-D375(H)/D975 only) (modèles SC-D375(H)/D975 uniquement) Connecting to select . 2. Connect a USB cable to the Camcorder's USB jack, the Audio/Video Cable is connected with other end of the USB cable into... the USB jack on the Camcorder. (USB jack) I Si un câble USB est raccordé &#...
... et reconnectez le caméscope. 96 ENGLISH Interface USB FRANÇAIS USB Interface (SC-D375(H)/D975 only) (modèles SC-D375(H)/D975 uniquement) Connecting to select . 2. Connect a USB cable to the Camcorder's USB jack, the Audio/Video Cable is connected with other end of the USB cable into... the USB jack on the Camcorder. (USB jack) I Si un câble USB est raccordé &#...

User Manual (ENGLISH)
Page 23
...243;n [OK]. 5. To exit, press the [MENU] button. [ Notes ] I The month will be highlighted first. 6. OSD illustrations of your camcorder. I Puede definir el año hasta 2037. I Primero aparecerá resaltado el año. 6. Press the [L / M] button to select , then... is displayed. 6 I If the Lithium Battery is automatically recorded onto a tape. Coloque el interruptor [Mode] en [TAPE] o [CARD]. (sólo SC-D375(H)/D975) 3. Para salir, presione el botón [MENU]. [ Notas ] I Para ajustar el reloj, seleccione Year (Año), Month (Mes), Day ...
...243;n [OK]. 5. To exit, press the [MENU] button. [ Notes ] I The month will be highlighted first. 6. OSD illustrations of your camcorder. I Puede definir el año hasta 2037. I Primero aparecerá resaltado el año. 6. Press the [L / M] button to select , then... is displayed. 6 I If the Lithium Battery is automatically recorded onto a tape. Coloque el interruptor [Mode] en [TAPE] o [CARD]. (sólo SC-D375(H)/D975) 3. Para salir, presione el botón [MENU]. [ Notas ] I Para ajustar el reloj, seleccione Year (Año), Month (Mes), Day ...


