
User Manual (ENGLISH)
Page 9
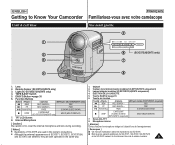
...I Bien que les aspects extérieurs du SC-D371, SC-D372, SC-D375(H) et du SC-D975 varient, ils fonctionnent tous de la même manière. 9 Remote Sensor (SC-D375(H)/D975 only) 3. I Illustrations of SC-D371, SC-D372, SC-D375(H) and SC-D975 are different, they are used in the same... way. 1. Lampe intégrée (modèles SC-D372/D375(H)/D975 uniquement) 4. ÉJECTION DE LA CASSETTE 5. ...
...I Bien que les aspects extérieurs du SC-D371, SC-D372, SC-D375(H) et du SC-D975 varient, ils fonctionnent tous de la même manière. 9 Remote Sensor (SC-D375(H)/D975 only) 3. I Illustrations of SC-D371, SC-D372, SC-D375(H) and SC-D975 are different, they are used in the same... way. 1. Lampe intégrée (modèles SC-D372/D375(H)/D975 uniquement) 4. ÉJECTION DE LA CASSETTE 5. ...
User Manual (ENGLISH)
Page 11
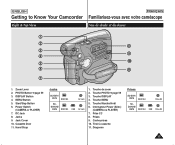
PHOTO Button ➥page 59 3. MENU Button 5. Power Switch (CAMERA or PLAYER) 7. Cassette Door 11. Interrupteur Power (Alim.) (CAMERA ou PLAYER) 7. DC Jack 8. Touche PHOTO ➥page 59 3. Prise CC 8. Cache-prises 10. Zoom Lever 2. Jacks 9. Touche Marche...Familiarisez-vous avec votre caméscope Vue de droite et du dessus ! @ * # ( $ % ) ^ 1 & 1. Touche de zoom 2. Dragonne Prises SC-D371/ D372 IEEE1394 Prise AV SCD375(H)/ D975 IEEE1394 USB Prise AV 11 Jack Cover 10. Touche DISPLAY 4. Tiroir à cassette 11. Touche MENU 5. Prises 9. ...
PHOTO Button ➥page 59 3. MENU Button 5. Power Switch (CAMERA or PLAYER) 7. Cassette Door 11. Interrupteur Power (Alim.) (CAMERA ou PLAYER) 7. DC Jack 8. Touche PHOTO ➥page 59 3. Prise CC 8. Cache-prises 10. Zoom Lever 2. Jacks 9. Touche Marche...Familiarisez-vous avec votre caméscope Vue de droite et du dessus ! @ * # ( $ % ) ^ 1 & 1. Touche de zoom 2. Dragonne Prises SC-D371/ D372 IEEE1394 Prise AV SCD375(H)/ D975 IEEE1394 USB Prise AV 11 Jack Cover 10. Touche DISPLAY 4. Tiroir à cassette 11. Touche MENU 5. Prises 9. ...

User Manual (ENGLISH)
Page 20
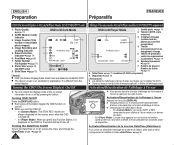
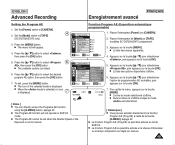
...d'accès aux menus fréquemment utilisés sans avoir à se servir ✤ Functions available using the QUICK MENU are as below: Camera Mode I Setting the Back Light Compensation (BLC) ➥page 57 I Setting the Digital Image Stabilizer (DIS) ➥page 56 Q.MENU de la touche...(Exposure) - Can only be operated by using the QUICK MENU ➥page 46 I Setting the Focus (Focus) ➥page 47 M.Player Mode (SC-D375(H)/D975 only) I Lecture des films (MPEG) sur la carte mémoire (M. STBY SP BLC Off DIS Program AE White Balance Shutter Exposure Focus 0:...
...d'accès aux menus fréquemment utilisés sans avoir à se servir ✤ Functions available using the QUICK MENU are as below: Camera Mode I Setting the Back Light Compensation (BLC) ➥page 57 I Setting the Digital Image Stabilizer (DIS) ➥page 56 Q.MENU de la touche...(Exposure) - Can only be operated by using the QUICK MENU ➥page 46 I Setting the Focus (Focus) ➥page 47 M.Player Mode (SC-D375(H)/D975 only) I Lecture des films (MPEG) sur la carte mémoire (M. STBY SP BLC Off DIS Program AE White Balance Shutter Exposure Focus 0:...
User Manual (ENGLISH)
Page 22
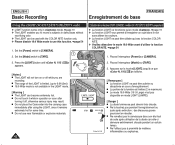
...8. Turning the OSD (On Screen Display) On/Off ✤ You can switch the display mode of the on-screen information to on model SC-D375. In : The STBY, REC modes are based on or off . - d'enregistrement et de chargement d'image 5 6 001 5. Té...Display) in M.Cam Mode 2. I L'écran ci-dessus n'est qu'à titre d'exemple explicatif ; Photo Quality ➥page 74 OSD in M.Cam/M.Player Modes (SC-D375(H)/D975 only) 1. CARD (Memory Card) 4 3 Indicator 3. Image Recording and 8 1111115522 ... Slide Show ➥page 78 [ Notes ] I Désactivation de l'...
...8. Turning the OSD (On Screen Display) On/Off ✤ You can switch the display mode of the on-screen information to on model SC-D375. In : The STBY, REC modes are based on or off . - d'enregistrement et de chargement d'image 5 6 001 5. Té...Display) in M.Cam Mode 2. I L'écran ci-dessus n'est qu'à titre d'exemple explicatif ; Photo Quality ➥page 74 OSD in M.Cam/M.Player Modes (SC-D375(H)/D975 only) 1. CARD (Memory Card) 4 3 Indicator 3. Image Recording and 8 1111115522 ... Slide Show ➥page 78 [ Notes ] I Désactivation de l'...

User Manual (ENGLISH)
Page 25
... Vous pouvez activer ou désactiver la fonction . Press the [MENU] button. Press the [L / M] button to [TAPE] or [CARD]. (SC-D375(H)/D975 only) 3. Pour quitter le menu, appuyez sur la touche [MENU]. 25 Appuyez sur la touche [MENU]. I The menu list will appear. 4.... to [CAMERA] or [PLAYER]. 1 2. Set the [Power] switch to select or , then press the [OK] button. 7. I La liste des menus apparaîtra. 4. Press the [L / M] button to select , then press the [OK] button. 4 5. Placez l'interrupteur [Mode] sur [TAPE] ou [CARD]. (modèles SC-D375(H)/D975 uniquement...
... Vous pouvez activer ou désactiver la fonction . Press the [MENU] button. Press the [L / M] button to [TAPE] or [CARD]. (SC-D375(H)/D975 only) 3. Pour quitter le menu, appuyez sur la touche [MENU]. 25 Appuyez sur la touche [MENU]. I The menu list will appear. 4.... to [CAMERA] or [PLAYER]. 1 2. Set the [Power] switch to select or , then press the [OK] button. 7. I La liste des menus apparaîtra. 4. Press the [L / M] button to select , then press the [OK] button. 4 5. Placez l'interrupteur [Mode] sur [TAPE] ou [CARD]. (modèles SC-D375(H)/D975 uniquement...

User Manual (ENGLISH)
Page 26
... / M] pour sélectionner , puis appuyez sur la touche [OK]. 6. Réglage du son de l'obturateur (Son Obturateur) (modèles SC-D375(H)/D975 uniquement) ✤ La fonction Bruit de l'obturateur peut être activée en modes //. ➥page 19 ✤ Vous pouvez activer ou... désactiver la fonction (Son Obturateur). Placez l'interrupteur [Power] sur [CAMERA] ou [PLAYER]. 2. Appuyez sur la touche [MENU]. I La liste des menus apparaîtra. 4. Press the [L / M] button to select , then...
... / M] pour sélectionner , puis appuyez sur la touche [OK]. 6. Réglage du son de l'obturateur (Son Obturateur) (modèles SC-D375(H)/D975 uniquement) ✤ La fonction Bruit de l'obturateur peut être activée en modes //. ➥page 19 ✤ Vous pouvez activer ou... désactiver la fonction (Son Obturateur). Placez l'interrupteur [Power] sur [CAMERA] ou [PLAYER]. 2. Appuyez sur la touche [MENU]. I La liste des menus apparaîtra. 4. Press the [L / M] button to select , then...

User Manual (ENGLISH)
Page 29
Set the [Power] switch to [TAPE] or [CARD]. (SC-D375(H)/D975 only) 3. Appuyez sur la touche [L / M] pour sélectionner , puis appuyez sur la touche [OK]. 5. Move OK Select MENU Exit 29 Set the [Mode] switch to [CAMERA] or [PLAYER]. 2. Press the [L / M] button to select the ... l'interrupteur [Mode] sur [TAPE] ou [CARD]. (modèles SC-D375(H)/D975 uniquement) 3. I The menu list will appear. 4. I La liste des menus apparaîtra. 4. To exit, press the [MENU] button. Placez l'interrupteur [Power] sur [CAMERA] ou [PLAYER]. 2. Pour quitter le menu, appuyez sur la touche ...
Set the [Power] switch to [TAPE] or [CARD]. (SC-D375(H)/D975 only) 3. Appuyez sur la touche [L / M] pour sélectionner , puis appuyez sur la touche [OK]. 5. Move OK Select MENU Exit 29 Set the [Mode] switch to [CAMERA] or [PLAYER]. 2. Press the [L / M] button to select the ... l'interrupteur [Mode] sur [TAPE] ou [CARD]. (modèles SC-D375(H)/D975 uniquement) 3. I The menu list will appear. 4. I La liste des menus apparaîtra. 4. To exit, press the [MENU] button. Placez l'interrupteur [Power] sur [CAMERA] ou [PLAYER]. 2. Pour quitter le menu, appuyez sur la touche ...

User Manual (ENGLISH)
Page 31
...Display Off On 3. Appuyez sur la touche [L / M] pour sélectionner , puis appuyez sur la touche [OK]. 5. Use the [DISPLAY] button to [CAMERA] or [PLAYER]. 1. I La liste des menus apparaîtra. 4. Set the [Power] switch to turn the OSD on/off on the LCD Screen/...the LCD Screen, Viewfinder and TV. (Connecting to select , then press the [OK] button. 5. Placez l'interrupteur [Mode] sur [TAPE] ou [CARD]. (modèles SC-D375(H)/D975 uniquement) 3. Press the [L / M] button to a TV ➥pages 65~67) - To activate TV Display function, press the [L / M] button to select ...
...Display Off On 3. Appuyez sur la touche [L / M] pour sélectionner , puis appuyez sur la touche [OK]. 5. Use the [DISPLAY] button to [CAMERA] or [PLAYER]. 1. I La liste des menus apparaîtra. 4. Set the [Power] switch to turn the OSD on/off on the LCD Screen/...the LCD Screen, Viewfinder and TV. (Connecting to select , then press the [OK] button. 5. Placez l'interrupteur [Mode] sur [TAPE] ou [CARD]. (modèles SC-D375(H)/D975 uniquement) 3. Press the [L / M] button to a TV ➥pages 65~67) - To activate TV Display function, press the [L / M] button to select ...

User Manual (ENGLISH)
Page 34
... ouverte (position d'enregistrement), et s'affichent à l'écran. I Placez l'interrupteur [Mode] sur [TAPE]. [TAPE]. (modèles SC-D375(H)/ (SC-D375(H)/D975 only) D975 uniquement) Make sure that there is displayed on the LCD Screen. Refermez la languette de protection en écriture pour pouvoir ... par le caméscope. Pour commencer l'enregistrement, appuyez sur la touche [Start/Stop]. I Set the [Mode] switch to [CAMERA]. 4 I If the write protection tab of your choice. ➥page 43 3 témoin apparaît à l'écran. Placez l'interrupteur ...
... ouverte (position d'enregistrement), et s'affichent à l'écran. I Placez l'interrupteur [Mode] sur [TAPE]. [TAPE]. (modèles SC-D375(H)/ (SC-D375(H)/D975 only) D975 uniquement) Make sure that there is displayed on the LCD Screen. Refermez la languette de protection en écriture pour pouvoir ... par le caméscope. Pour commencer l'enregistrement, appuyez sur la touche [Start/Stop]. I Set the [Mode] switch to [CAMERA]. 4 I If the write protection tab of your choice. ➥page 43 3 témoin apparaît à l'écran. Placez l'interrupteur ...

User Manual (ENGLISH)
Page 40
... When the picture has disappeared, press the [Start/Stop] button to stop recording. Placez l'interrupteur [Mode] sur [TAPE]. (modèles SC-D375(H)/D975 uniquement) 3. I The picture and sound gradually disappear (fade out). 6. a. Before recording, press and hold the [FADE] button. ...Press and hold the [FADE] button a. Placez l'interrupteur [Power] sur [CAMERA]. 2. Fade In b. Ouverture en fondu (environ 4 secondes) Release the [FADE] button Set the [Power] switch to [TAPE]. (SC-D375(H)/D975 only) 3. Lorsque vous souhaitez arrêter l'enregistrement, maintenez la...
... When the picture has disappeared, press the [Start/Stop] button to stop recording. Placez l'interrupteur [Mode] sur [TAPE]. (modèles SC-D375(H)/D975 uniquement) 3. I The picture and sound gradually disappear (fade out). 6. a. Before recording, press and hold the [FADE] button. ...Press and hold the [FADE] button a. Placez l'interrupteur [Power] sur [CAMERA]. 2. Fade In b. Ouverture en fondu (environ 4 secondes) Release the [FADE] button Set the [Power] switch to [TAPE]. (SC-D375(H)/D975 only) 3. Lorsque vous souhaitez arrêter l'enregistrement, maintenez la...
User Manual (ENGLISH)
Page 42
... 16:9 Wide mode is not available in dark places without sacrificing color. ✤ The LIGHT can become extremely hot. Placez l'interrupteur [Power] sur [CAMERA]. 3. I The range of the LIGHT is limited. (up to use near flammable or explosive materials. 42 2. Placez l'interrupteur [Mode] sur [TAPE]... 3. ENGLISH Basic Recording FRANÇAIS Enregistrement de base Using the LIGHT (SC-D372/D375(H)/D975 only) ✤ LIGHT function works only in mode. ➥page 19 ✤ The LIGHT enables you are recording. Set the...
... 16:9 Wide mode is not available in dark places without sacrificing color. ✤ The LIGHT can become extremely hot. Placez l'interrupteur [Power] sur [CAMERA]. 3. I The range of the LIGHT is limited. (up to use near flammable or explosive materials. 42 2. Placez l'interrupteur [Mode] sur [TAPE]... 3. ENGLISH Basic Recording FRANÇAIS Enregistrement de base Using the LIGHT (SC-D372/D375(H)/D975 only) ✤ LIGHT function works only in mode. ➥page 19 ✤ The LIGHT enables you are recording. Set the...
User Manual (ENGLISH)
Page 49
...Program AE (Prog.AE) ne peut être activée en mode EASY.Q. Placez l'interrupteur [Power] sur [CAMERA]. 2. Press the button to [TAPE]. (SC-D375(H)/D975 only) 4 Camera Mode √Camera Program AE √Auto White Balance √Auto 1. I When the mode is selected, no icon is displayed....10149;page 20 Exposure is set to [CAMERA]. Set the [Power] switch to manual. Program AE (Prog.AE) à l'aide de la touche I The available options are listed. Placez l'interrupteur de [Mode] sur [TAPE]. (modèles SC-D375(H)/D975 uniquement) 3. Visual Effect √Off...
...Program AE (Prog.AE) ne peut être activée en mode EASY.Q. Placez l'interrupteur [Power] sur [CAMERA]. 2. Press the button to [TAPE]. (SC-D375(H)/D975 only) 4 Camera Mode √Camera Program AE √Auto White Balance √Auto 1. I When the mode is selected, no icon is displayed....10149;page 20 Exposure is set to [CAMERA]. Set the [Power] switch to manual. Program AE (Prog.AE) à l'aide de la touche I The available options are listed. Placez l'interrupteur de [Mode] sur [TAPE]. (modèles SC-D375(H)/D975 uniquement) 3. Visual Effect √Off...

User Manual (ENGLISH)
Page 53
...uniquement) I Après avoir réglé , ou COLOR NITE, le mode , , ou est lancé. Press the button to [TAPE]. (SC-D375(H)/D975 only) 3. Press the [MENU] button. I Digital Zoom is in the Mosaic, Mirror, Emboss2 or Pastel2 mode. lorsque le mode EASY.Q est activ&#...1. Appuyez sur la touche pour sélectionner l'option d'effet visuel souhaitée, puis appuyez sur la touche [OK]. Appuyez sur le bouton [MENU]. Camera Mode Back Program AE Off White Balance Art 6. Placez l'interrupteur de [Mode] sur [TAPE]. (modèles SC-D375(H)/D975 uniquement) 3.
...uniquement) I Après avoir réglé , ou COLOR NITE, le mode , , ou est lancé. Press the button to [TAPE]. (SC-D375(H)/D975 only) 3. Press the [MENU] button. I Digital Zoom is in the Mosaic, Mirror, Emboss2 or Pastel2 mode. lorsque le mode EASY.Q est activ&#...1. Appuyez sur la touche pour sélectionner l'option d'effet visuel souhaitée, puis appuyez sur la touche [OK]. Appuyez sur le bouton [MENU]. Camera Mode Back Program AE Off White Balance Art 6. Placez l'interrupteur de [Mode] sur [TAPE]. (modèles SC-D375(H)/D975 uniquement) 3.

User Manual (ENGLISH)
Page 54
... switch to select , then press the [OK] button. To activate the 16:9 Wide function, press the [... / †] button to [TAPE]. (SC-D375(H)/D975 only) 3. I The menu list will play back naturally only when the TV supports 16:9 aspect ratio. 1. Pour activer la fonction 16 :9 Wide...I Digital Zoom and COLOR NITE is not available in 16:9 Wide will appear. 6 4. I Once Visual Effect or DIS is displayed. œ Camera Mode √Camera Program AE √Auto White Balance √Auto Visual Effect √Off 16:9 Wide √On Macro √Off DIS √Off M Move ...
... switch to select , then press the [OK] button. To activate the 16:9 Wide function, press the [... / †] button to [TAPE]. (SC-D375(H)/D975 only) 3. I The menu list will play back naturally only when the TV supports 16:9 aspect ratio. 1. Pour activer la fonction 16 :9 Wide...I Digital Zoom and COLOR NITE is not available in 16:9 Wide will appear. 6 4. I Once Visual Effect or DIS is displayed. œ Camera Mode √Camera Program AE √Auto White Balance √Auto Visual Effect √Off 16:9 Wide √On Macro √Off DIS √Off M Move ...

User Manual (ENGLISH)
Page 55
Set the [Power] switch to [TAPE] or [CARD]. 4 (SC-D375(H)/D975 only) Camera Mode √Camera Program AE √Auto 3. Set the [Mode] switch to [CAMERA]. 2. To activate the Macro function, press the [... / †] button to select , then White Balance Visual Effect 16:9 ... menus s'affiche. 4. Placez l'interrupteur [Mode] sur [TAPE] ou sur [CARD]. (modèles SC-D375(H)/D975 uniquement) 3. I When you can not get proper focus, use the Macro function, set Camera Mode Back Program AE White Balance the menu to the subject decreases, focusing area narrows. Appuyez sur la...
Set the [Power] switch to [TAPE] or [CARD]. 4 (SC-D375(H)/D975 only) Camera Mode √Camera Program AE √Auto 3. Set the [Mode] switch to [CAMERA]. 2. To activate the Macro function, press the [... / †] button to select , then White Balance Visual Effect 16:9 ... menus s'affiche. 4. Placez l'interrupteur [Mode] sur [TAPE] ou sur [CARD]. (modèles SC-D375(H)/D975 uniquement) 3. I When you can not get proper focus, use the Macro function, set Camera Mode Back Program AE White Balance the menu to the subject decreases, focusing area narrows. Appuyez sur la...

User Manual (ENGLISH)
Page 59
...enregistrement des images figées (photos) n'est pas disponible pendant un enregistrement. Placez l'interrupteur [Power] sur [CAMERA]. 2. Placez l'interrupteur de [Mode] sur [TAPE]. (modèles SC-D375(H)/D975 uniquement) 3. Appuyez sur la touche pour sélectionner , puis appuyez sur la touche [OK]. I ...La progression de la recherche s'affiche à l'écran. Appuyez sur la touche [PHOTO]. Set the [Mode] switch to [TAPE]. (SC-D375(H)/D975 only) 3. Press the button to select , then press the [OK] button. Photo Search SP 0:41:56:10 25min I L'...
...enregistrement des images figées (photos) n'est pas disponible pendant un enregistrement. Placez l'interrupteur [Power] sur [CAMERA]. 2. Placez l'interrupteur de [Mode] sur [TAPE]. (modèles SC-D375(H)/D975 uniquement) 3. Appuyez sur la touche pour sélectionner , puis appuyez sur la touche [OK]. I ...La progression de la recherche s'affiche à l'écran. Appuyez sur la touche [PHOTO]. Set the [Mode] switch to [TAPE]. (SC-D375(H)/D975 only) 3. Press the button to select , then press the [OK] button. Photo Search SP 0:41:56:10 25min I L'...

User Manual (ENGLISH)
Page 76
... 7. To exit, press the [MENU] button. Appuyez sur la touche pour sélectionner , puis appuyez sur la touche [OK]. Placez l'interrupteur [Power] sur [CAMERA]. 2. Press the button to select , 6 then press the [OK] button. 6. file numbering starts from 0001. - : Lorsqu'il n'y a aucun fichier enregistr...to select , Move OK Select MENU Exit 4. ENGLISH Appareil photo numérique FRANÇAIS Digital Still Camera Mode (SC-D375(H)/D975 only) (modèles SC-D375(H)/D975 uniquement) Setting the File Number Réglage du numéro de fichier ✤ File Number setting ...
... 7. To exit, press the [MENU] button. Appuyez sur la touche pour sélectionner , puis appuyez sur la touche [OK]. Placez l'interrupteur [Power] sur [CAMERA]. 2. Press the button to select , 6 then press the [OK] button. 6. file numbering starts from 0001. - : Lorsqu'il n'y a aucun fichier enregistr...to select , Move OK Select MENU Exit 4. ENGLISH Appareil photo numérique FRANÇAIS Digital Still Camera Mode (SC-D375(H)/D975 only) (modèles SC-D375(H)/D975 uniquement) Setting the File Number Réglage du numéro de fichier ✤ File Number setting ...

User Manual (ENGLISH)
Page 78
..., press the [√√ (FWD)] button for the desired photo image. ENGLISH Appareil photo numérique FRANÇAIS Digital Still Camera Mode (SC-D375(H)/D975 only) (modèles SC-D375(H)/D975 uniquement) Viewing Photo Images (JPEG) ✤ This function works only in mode. ➥page 19 You can access , , or functions in...
..., press the [√√ (FWD)] button for the desired photo image. ENGLISH Appareil photo numérique FRANÇAIS Digital Still Camera Mode (SC-D375(H)/D975 only) (modèles SC-D375(H)/D975 uniquement) Viewing Photo Images (JPEG) ✤ This function works only in mode. ➥page 19 You can access , , or functions in...

User Manual (ENGLISH)
Page 80
... être récupérée. 1. Placez l'interrupteur [Power] sur [PLAYER]. 2. ENGLISH Appareil photo numérique FRANÇAIS Digital Still Camera Mode (SC-D375(H)/D975 only) (modèles SC-D375(H)/D975 uniquement) Deleting Photo Images and Moving Images ✤ The Delete function works only in mode. ➥page 19 ✤ You can...
... être récupérée. 1. Placez l'interrupteur [Power] sur [PLAYER]. 2. ENGLISH Appareil photo numérique FRANÇAIS Digital Still Camera Mode (SC-D375(H)/D975 only) (modèles SC-D375(H)/D975 uniquement) Deleting Photo Images and Moving Images ✤ The Delete function works only in mode. ➥page 19 ✤ You can...

User Manual (ENGLISH)
Page 81
.... Press the button to select or 7 , then press the [OK] button. 8. ENGLISH Appareil photo numérique FRANÇAIS Digital Still Camera Mode (SC-D375(H)/D975 only) (modèles SC-D375(H)/D975 uniquement) Deleting All Images at Once 6 ✤ Steps from 1 to delete all files much faster, format the Memory Card after backing...
.... Press the button to select or 7 , then press the [OK] button. 8. ENGLISH Appareil photo numérique FRANÇAIS Digital Still Camera Mode (SC-D375(H)/D975 only) (modèles SC-D375(H)/D975 uniquement) Deleting All Images at Once 6 ✤ Steps from 1 to delete all files much faster, format the Memory Card after backing...


