
User Manual (ENGLISH)
Page 15
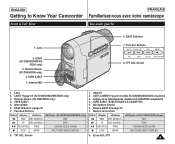
... STOP MF/AF MULTI DISP. (MULTI DISPLAY) 1. ENGLISH Getting to Know Your Camcorder Front & Left View FRANÇAIS Familiarisez-vous avec votre caméscope Vue avant gauche 1. LIGHT (SC-D362/D364/D365 /D366 only) 3. EASY.Q Button 7. Capteur de la télécommande (... 8. Microphone interne 6. LIGHT ➥page 43 (SC-D362/D364/D365/D366 only) 3. Remote Sensor (SC-D364/D366 only) 4. Bouton de fonction Button (modèles SC-D363/D364/D365/D366 uniquement) œœ REW REC SEARCH - TAPE EJECT 5. Remote Sensor (SC-D364/D366 only) 4. EASY.Q Button ➥page...
... STOP MF/AF MULTI DISP. (MULTI DISPLAY) 1. ENGLISH Getting to Know Your Camcorder Front & Left View FRANÇAIS Familiarisez-vous avec votre caméscope Vue avant gauche 1. LIGHT (SC-D362/D364/D365 /D366 only) 3. EASY.Q Button 7. Capteur de la télécommande (... 8. Microphone interne 6. LIGHT ➥page 43 (SC-D362/D364/D365/D366 only) 3. Remote Sensor (SC-D364/D366 only) 4. Bouton de fonction Button (modèles SC-D363/D364/D365/D366 uniquement) œœ REW REC SEARCH - TAPE EJECT 5. Remote Sensor (SC-D364/D366 only) 4. EASY.Q Button ➥page...

User Manual (ENGLISH)
Page 17
... Cover 9. Bouton PHOTO ➥page 57 3. Interrupteur Power (Alim.) (CAMÉRA ou LECTEUR) 7. ENGLISH Getting to Know Your Camcorder Right & Top View FRANÇAIS Familiarisez-vous avec votre caméscope Vue de droite et du dessus 1. Zoom Lever (VOL/...Bouton MENU 5. PHOTO Button 3. Power Switch 7. Hand Strap Hook 1. MENU Button 5. Hand Strap Hook Jacks SC-D263 External IEEE1394 MIC AV Cable SC-D363 External IEEE1394 USB AV MIC Cable SC-D362/ D364/ D365/ External IEEE1394 USB Multi D366 MIC Cable 1. Cache-prises 9. MENU Button 5. Bouton Marche/Arrêt 6....
... Cover 9. Bouton PHOTO ➥page 57 3. Interrupteur Power (Alim.) (CAMÉRA ou LECTEUR) 7. ENGLISH Getting to Know Your Camcorder Right & Top View FRANÇAIS Familiarisez-vous avec votre caméscope Vue de droite et du dessus 1. Zoom Lever (VOL/...Bouton MENU 5. PHOTO Button 3. Power Switch 7. Hand Strap Hook 1. MENU Button 5. Hand Strap Hook Jacks SC-D263 External IEEE1394 MIC AV Cable SC-D363 External IEEE1394 USB AV MIC Cable SC-D362/ D364/ D365/ External IEEE1394 USB Multi D366 MIC Cable 1. Cache-prises 9. MENU Button 5. Bouton Marche/Arrêt 6....
User Manual (ENGLISH)
Page 34
... Select MENU Exit SAMSUNG Camcorder is inserted in the Camcorder. ➥page 32 ✤ Demonstration automatically shows you the major functions that are included with your Camcorder so that there is no tape is ... Placez l'interrupteur [Mode] sur [TAPE] . (modèles SC-D363/D364/D365/D366 uniquement). 3....ou vers le bas pour sélectionner , puis appuyez sur le bouton [OK]. 6. Set the [Power] switch to [TAPE]. (SC-D363/D364/D365/D366 only) 3. Demonstration 28 ✤ La fonction Demonstration (Démonstration) ne peut être utilisée qu'en mode sans qu...
... Select MENU Exit SAMSUNG Camcorder is inserted in the Camcorder. ➥page 32 ✤ Demonstration automatically shows you the major functions that are included with your Camcorder so that there is no tape is ... Placez l'interrupteur [Mode] sur [TAPE] . (modèles SC-D363/D364/D365/D366 uniquement). 3....ou vers le bas pour sélectionner , puis appuyez sur le bouton [OK]. 6. Set the [Power] switch to [TAPE]. (SC-D363/D364/D365/D366 only) 3. Demonstration 28 ✤ La fonction Demonstration (Démonstration) ne peut être utilisée qu'en mode sans qu...

User Manual (ENGLISH)
Page 35
...;cran ACL (Luminosité ACL / Couleur ACL) ✤ Adjusting the ACL Screen works in /// modes. ➥page 19 ✤ Your Camcorder is equipped with a 2.5 inch (SC-D263/D362/D363/ D364) / 2.7 inch wide (SC-D365/D366) color Liquid Crystal Display (ACL) Screen, which enables you to view what you are recording or playing back directly. ✤...
...;cran ACL (Luminosité ACL / Couleur ACL) ✤ Adjusting the ACL Screen works in /// modes. ➥page 19 ✤ Your Camcorder is equipped with a 2.5 inch (SC-D263/D362/D363/ D364) / 2.7 inch wide (SC-D365/D366) color Liquid Crystal Display (ACL) Screen, which enables you to view what you are recording or playing back directly. ✤...
User Manual (ENGLISH)
Page 40
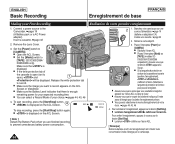
Connect a power source to record. Release the write protection tab to the Camcorder. ➥page 19 (A Battery pack or a AC Power adapter) Insert a cassette. ➥page 32 MERA MERA 2. I You can select a Record Mode of the ...;alisation de votre premier enregistrement 1. To start recording, press the [Start/Stop] button. I Make sure the image you are finished recording to [TAPE]. (SC-D363/D364/ CA D365/D366 only) Make sure that there is displayed on the ACL Screen or Viewfinder. Assurez-vous que le témoin apparaît à K 3 l'é...
Connect a power source to record. Release the write protection tab to the Camcorder. ➥page 19 (A Battery pack or a AC Power adapter) Insert a cassette. ➥page 32 MERA MERA 2. I You can select a Record Mode of the ...;alisation de votre premier enregistrement 1. To start recording, press the [Start/Stop] button. I Make sure the image you are finished recording to [TAPE]. (SC-D363/D364/ CA D365/D366 only) Make sure that there is displayed on the ACL Screen or Viewfinder. Assurez-vous que le témoin apparaît à K 3 l'é...

User Manual (ENGLISH)
Page 41
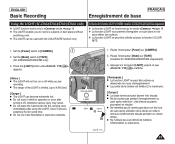
...233;sactivée en COLOR NITE cours d'enregistrement. lorsque vous retirez la batterie. I The Camcorder will not turn the EASY.Q mode off while you want to [TAPE]. (SC-D363/D364/D365/D366 only) 3. Enregistrement facile pour les débutants (Mode EASY.Q) ✤ La ... simplicité. 1. I Digital Zoom, COLOR NITE or Visual Effect is replaced. Placez l'interrupteur [Mode] sur [TAPE]. (modèles SC-D363/D364/D365/D366 uniquement). 3. Appuyez sur le bouton [Start/Stop] pour démarrer PLA l'enregistrement. batterie en place. I In EASY.Q mode,...
...233;sactivée en COLOR NITE cours d'enregistrement. lorsque vous retirez la batterie. I The Camcorder will not turn the EASY.Q mode off while you want to [TAPE]. (SC-D363/D364/D365/D366 only) 3. Enregistrement facile pour les débutants (Mode EASY.Q) ✤ La ... simplicité. 1. I Digital Zoom, COLOR NITE or Visual Effect is replaced. Placez l'interrupteur [Mode] sur [TAPE]. (modèles SC-D363/D364/D365/D366 uniquement). 3. Appuyez sur le bouton [Start/Stop] pour démarrer PLA l'enregistrement. batterie en place. I In EASY.Q mode,...
User Manual (ENGLISH)
Page 49
...D365/D366 only) 3. I The range of the LIGHT is limited. (up to record a subjects in dark places without sacrificing color. ✤ The LIGHT can become extremely hot. I La portée de la lumière est limitée (2 m maximum). [ Danger ] I Do not place the Camcorder... Ne l'utilisez pas à proximité de matières inflammables ou explosives. Placez l'interrupteur [Mode] sur [TAPE] (modèles SC-D363/D364/D365/D366 uniquement). 3. I Do not use near flammable or explosive materials. Set the [Mode] switch to [CAMERA]. 1 2. ENGLISH Basic Recording FRAN...
...D365/D366 only) 3. I The range of the LIGHT is limited. (up to record a subjects in dark places without sacrificing color. ✤ The LIGHT can become extremely hot. I La portée de la lumière est limitée (2 m maximum). [ Danger ] I Do not place the Camcorder... Ne l'utilisez pas à proximité de matières inflammables ou explosives. Placez l'interrupteur [Mode] sur [TAPE] (modèles SC-D363/D364/D365/D366 uniquement). 3. I Do not use near flammable or explosive materials. Set the [Mode] switch to [CAMERA]. 1 2. ENGLISH Basic Recording FRAN...

User Manual (ENGLISH)
Page 63
Set the [Mode] switch to its previous mode. After the still image has been recorded, the Camcorder 4 returns to [TAPE]. (SC-D363/D364/D365/D366 only) 3. Une fois la photo enregistrée, le caméscope revient au mode précédent. ...After a still image is in use . Set the [Power] switch to [TAPE]. (modèles SC-D363/D364/D365/D366 uniquement). (SC-D363/D364/D365/D366 only) 3. Placez l'interrupteur de [Mode] sur [TAPE] (modèles SC-D363/D364/D365/D366 uniquement). 3. Audio Effect √Off 2. still image. 7. En appuyant sur la touche [PHOTO]...
Set the [Mode] switch to its previous mode. After the still image has been recorded, the Camcorder 4 returns to [TAPE]. (SC-D363/D364/D365/D366 only) 3. Une fois la photo enregistrée, le caméscope revient au mode précédent. ...After a still image is in use . Set the [Power] switch to [TAPE]. (modèles SC-D363/D364/D365/D366 uniquement). (SC-D363/D364/D365/D366 only) 3. Placez l'interrupteur de [Mode] sur [TAPE] (modèles SC-D363/D364/D365/D366 uniquement). 3. Audio Effect √Off 2. still image. 7. En appuyant sur la touche [PHOTO]...

User Manual (ENGLISH)
Page 73
...èles SC-D363/D364/D365/D366 uniquement) ERA MERA R ER (SC-D363/D364/D365/D366 only) 4. I Si vous souhaitez interrompre momentanément 14.To stop recording, press the [I (STOP)] button. [ Notes ] I When recording images from a connected VCR, insert a recorded VHS tape into the Camcorder. Allumez le... magnétoscope ou le téléviseur. 5. ENGLISH Playback Lecture FRANÇAIS Setting the AV In/Out (SC-D365/D366 only) Réglage AV In/Out (Ent/Sor AV) (mod&#...
...èles SC-D363/D364/D365/D366 uniquement) ERA MERA R ER (SC-D363/D364/D365/D366 only) 4. I Si vous souhaitez interrompre momentanément 14.To stop recording, press the [I (STOP)] button. [ Notes ] I When recording images from a connected VCR, insert a recorded VHS tape into the Camcorder. Allumez le... magnétoscope ou le téléviseur. 5. ENGLISH Playback Lecture FRANÇAIS Setting the AV In/Out (SC-D365/D366 only) Réglage AV In/Out (Ent/Sor AV) (mod&#...

User Manual (ENGLISH)
Page 81
ENGLISH Digital Still Camera Mode Mode Digital Still Camera (Appareil photo FRANÇAIS (SC-D363/D364/D365/D366 only) numérique) (modèles SC-D363/D364/D365 /D366 uniquement) Protection from accidental erasure. Set the [Mode] switch to protect. 4. Press the [MENU] button... a pas d'images enregistrées sur la carte mémoire, s'affiche. 3. Move the [Zoom] lever up or down to LOCK, you format the Camcorder, all images including protected images will appear. 5. Placez l'interrupteur de [Mode] sur [MEMORY]. I L'icône de protection ( ) s'affiche. √...
ENGLISH Digital Still Camera Mode Mode Digital Still Camera (Appareil photo FRANÇAIS (SC-D363/D364/D365/D366 only) numérique) (modèles SC-D363/D364/D365 /D366 uniquement) Protection from accidental erasure. Set the [Mode] switch to protect. 4. Press the [MENU] button... a pas d'images enregistrées sur la carte mémoire, s'affiche. 3. Move the [Zoom] lever up or down to LOCK, you format the Camcorder, all images including protected images will appear. 5. Placez l'interrupteur de [Mode] sur [MEMORY]. I L'icône de protection ( ) s'affiche. √...

User Manual (ENGLISH)
Page 88
... la copie démarre. 7. ENGLISH Digital Still Camera Mode Mode Digital Still Camera (Appareil photo FRANÇAIS (SC-D363/D364/D365/D366 only) numérique) (modèles SC-D363/D364/D365 /D366 uniquement) Copying Still Images from a Cassette to a Memory Card (Photo Copy) Copie de photos d'une cassette...select , then press the [OK] button. Move the [Zoom] lever up or down to select , then press the [OK] button. 5. The Camcorder automatically performs the still image search to [PLAYER]. Déplacez le bouton de [Zoom] vers le haut ou vers le bas pour sélectionner ,...
... la copie démarre. 7. ENGLISH Digital Still Camera Mode Mode Digital Still Camera (Appareil photo FRANÇAIS (SC-D363/D364/D365/D366 only) numérique) (modèles SC-D363/D364/D365 /D366 uniquement) Copying Still Images from a Cassette to a Memory Card (Photo Copy) Copie de photos d'une cassette...select , then press the [OK] button. Move the [Zoom] lever up or down to select , then press the [OK] button. 5. The Camcorder automatically performs the still image search to [PLAYER]. Déplacez le bouton de [Zoom] vers le haut ou vers le bas pour sélectionner ,...

User Manual (ENGLISH)
Page 90
...on the ACL Screen. ENGLISH Digital Still Camera Mode Mode Digital Still Camera (Appareil photo FRANÇAIS (SC-D363/D364/D365/D366 only) numérique) (modèles SC-D363/D364/D365 /D366 uniquement) Marking Images for the photo image that you select , move the [Zoom] lever up or... Utilisez le câble USB fourni avec le caméscope. I The option may require extended operation time depending on a Memory Card with the Camcorder. To exit, press the [MENU] button. I L'option peut prendre un certain temps en fonction du nombre d'images I Si la fonction Print Mark...
...on the ACL Screen. ENGLISH Digital Still Camera Mode Mode Digital Still Camera (Appareil photo FRANÇAIS (SC-D363/D364/D365/D366 only) numérique) (modèles SC-D363/D364/D365 /D366 uniquement) Marking Images for the photo image that you select , move the [Zoom] lever up or... Utilisez le câble USB fourni avec le caméscope. I The option may require extended operation time depending on a Memory Card with the Camcorder. To exit, press the [MENU] button. I L'option peut prendre un certain temps en fonction du nombre d'images I Si la fonction Print Mark...

User Manual (ENGLISH)
Page 91
... imprimante 1. I : reliez à un ordinateur. Mettez votre imprimante hors tension. Move the [Zoom] lever up or down to [PLAYER]. 2. Turn your Camcorder on . Connecting To a Printer ✤ La fonction PictBridgeTM ne peut être activée qu'en mode . ➥page 19 ✤ En connectant... imprimante. (Pour utiliser la fonction PictBridge, reliez à une imprimante). 8. For direct printing of your stored pictures using a USB cable. ENGLISH PictBridgeTM (SC-D363/D364/D365/D366 only) PictBridgeTM (modèles SC- Mettez votre imprimante sous tension.
... imprimante 1. I : reliez à un ordinateur. Mettez votre imprimante hors tension. Move the [Zoom] lever up or down to [PLAYER]. 2. Turn your Camcorder on . Connecting To a Printer ✤ La fonction PictBridgeTM ne peut être activée qu'en mode . ➥page 19 ✤ En connectant... imprimante. (Pour utiliser la fonction PictBridge, reliez à une imprimante). 8. For direct printing of your stored pictures using a USB cable. ENGLISH PictBridgeTM (SC-D363/D364/D365/D366 only) PictBridgeTM (modèles SC- Mettez votre imprimante sous tension.
User Manual (ENGLISH)
Page 96
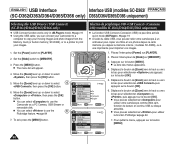
... exit, press the [MENU] button. ENGLISH USB Interface Interface USB (modèles SC-D362/ FRANÇAIS (SC-D362/D363/D364/D365/D366 only) D363/D364/D365/D366 uniquement) Selecting the USB Device (USB Connect) (SC-D363/D364/D365/D366 only) Sélection du périphérique USB (Connexion USB) (mod...èles SC-D363/D364/D365/D366 uniquement) ✤ USB Connect function works only in mode. ➥page 19 ✤ Using the USB cable, you can connect your Camcorder to a computer to copy your images. ✤ La fonction USB ...
... exit, press the [MENU] button. ENGLISH USB Interface Interface USB (modèles SC-D362/ FRANÇAIS (SC-D362/D363/D364/D365/D366 only) D363/D364/D365/D366 uniquement) Selecting the USB Device (USB Connect) (SC-D363/D364/D365/D366 only) Sélection du périphérique USB (Connexion USB) (mod...èles SC-D363/D364/D365/D366 uniquement) ✤ USB Connect function works only in mode. ➥page 19 ✤ Using the USB cable, you can connect your Camcorder to a computer to copy your images. ✤ La fonction USB ...

User Manual (ENGLISH)
Page 97
...click "Run" in Camera mode. 2) Connect the camcorder to the PC using Acrobat Reader software, which is also included on the CD (D:/Support/AcrobatReader/AcroReader51_ENU_full. USB removable Disk Driver (Windows® 98SE only) (SC-D363/D364/D365/D366 only) - I DirectX 9.0 Click I ...SC-D362/D363/D364/D365/D366 only) D363/D364/D365/D366 uniquement) Installing DV Media PRO Program ✤ To play the moving images recorded by the Camcorder or streaming data transferred through the USB connection on a PC, the Video Codec program should be viewed using the USB cable. 3) The SAMSUNG...
...click "Run" in Camera mode. 2) Connect the camcorder to the PC using Acrobat Reader software, which is also included on the CD (D:/Support/AcrobatReader/AcroReader51_ENU_full. USB removable Disk Driver (Windows® 98SE only) (SC-D363/D364/D365/D366 only) - I DirectX 9.0 Click I ...SC-D362/D363/D364/D365/D366 only) D363/D364/D365/D366 uniquement) Installing DV Media PRO Program ✤ To play the moving images recorded by the Camcorder or streaming data transferred through the USB connection on a PC, the Video Codec program should be viewed using the USB cable. 3) The SAMSUNG...

User Manual (ENGLISH)
Page 2
ENGLISH Contents Notes and Safety Instructions 5 Getting to Know Your Camcorder 7 Features...7 Accessories Supplied with Camcorder 8 Front & Left View...9 Left Side View ...10 Right & Top View...11 Rear & Bottom View ...12 Remote Control (SC-D364/D366 only 13 Preparation 14 Using the Hand Strap & Lens Cover 14 ...Using the QUICK MENU...20 OSD (On Screen Display) in Camera/Player Modes 21 OSD (On Screen Display) in M.Cam/M.Player Modes (SC-D363/D364/D365/D366 only).........22 Turning the OSD (On Screen Display) On/Off 22 Initial Setting : System Menu Setting 23 Setting the Clock (Clock ...
ENGLISH Contents Notes and Safety Instructions 5 Getting to Know Your Camcorder 7 Features...7 Accessories Supplied with Camcorder 8 Front & Left View...9 Left Side View ...10 Right & Top View...11 Rear & Bottom View ...12 Remote Control (SC-D364/D366 only 13 Preparation 14 Using the Hand Strap & Lens Cover 14 ...Using the QUICK MENU...20 OSD (On Screen Display) in Camera/Player Modes 21 OSD (On Screen Display) in M.Cam/M.Player Modes (SC-D363/D364/D365/D366 only).........22 Turning the OSD (On Screen Display) On/Off 22 Initial Setting : System Menu Setting 23 Setting the Clock (Clock ...

User Manual (ENGLISH)
Page 4
... Function 94 Using the removable Disk Function (SC-D363/D364/D365/D366 only 94 Maintenance 95 After Finishing a Recording...95 Usable Cassette Tapes...95 Cleaning and Maintaining the Camcorder 96 Using Your Camcorder Abroad ...97 Troubleshooting 98 Troubleshooting...98 Self ...Diagnosis Display ...98 Self Diagnosis Display in M.Cam/M.Player Modes (SC-D363/D364/D365/D366 only 99 Setting menu items...101 Specifications 103 Index 104 PictBridgeTM SC-D363/D364/D365/D366 85 -...
... Function 94 Using the removable Disk Function (SC-D363/D364/D365/D366 only 94 Maintenance 95 After Finishing a Recording...95 Usable Cassette Tapes...95 Cleaning and Maintaining the Camcorder 96 Using Your Camcorder Abroad ...97 Troubleshooting 98 Troubleshooting...98 Self ...Diagnosis Display ...98 Self Diagnosis Display in M.Cam/M.Player Modes (SC-D363/D364/D365/D366 only 99 Setting menu items...101 Specifications 103 Index 104 PictBridgeTM SC-D363/D364/D365/D366 85 -...

User Manual (ENGLISH)
Page 7
...), Memory Stick PRO, MMC and SD. USB 0 I SC-D363/D364/D365/D366 0 I SC-D365/D366 Memory Stick (Duo)/ Memory Stick PRO/ MMC SD 0 I 33 SC- I Various Visual Effects The Visual Effects allow you to give your Camcorder. (SC-D366: 32MB) I IEEE1394 IEEE 1394 i.LINK™ i.LINK DV I D366 I USB USB 0 SC-D362/D363/D364/D365/ 0 PHOTO 0 I 1200 I 1200 0 0 I TFT LCD TFT...
...), Memory Stick PRO, MMC and SD. USB 0 I SC-D363/D364/D365/D366 0 I SC-D365/D366 Memory Stick (Duo)/ Memory Stick PRO/ MMC SD 0 I 33 SC- I Various Visual Effects The Visual Effects allow you to give your Camcorder. (SC-D366: 32MB) I IEEE1394 IEEE 1394 i.LINK™ i.LINK DV I D366 I USB USB 0 SC-D362/D363/D364/D365/ 0 PHOTO 0 I 1200 I 1200 0 0 I TFT LCD TFT...

User Manual (ENGLISH)
Page 9
...5. EASY.Q Button 7. LIGHT ➥page 43 (SC-D362/D364/D365/D366 only) 3. TFT LCD SC-D362/D364/ D365/D366 SC-D364/D366 ➥ 35 - + SC-D363/D364/ D365/D366 S.SHOW MULTI DISP. 9 Internal MIC 6. Function Buttons Button (SC-D363/D364/D365/D366 only) œœ REW REC SEARCH -...Remote Sensor (SC-D364/D366 only) 4. Lens 2. Remote Sensor (SC-D364/D366 only) 4. EASY.Q Button ➥page 35 7. TFT LCD Screen MF/AF MULTI DISP. 1. TAPE EJECT 5. Function Buttons 8. ENGLISH Getting to Know Your Camcorder Front & Left View 1. LIGHT (SC-D362/D364/D365 /D366 ...
...5. EASY.Q Button 7. LIGHT ➥page 43 (SC-D362/D364/D365/D366 only) 3. TFT LCD SC-D362/D364/ D365/D366 SC-D364/D366 ➥ 35 - + SC-D363/D364/ D365/D366 S.SHOW MULTI DISP. 9 Internal MIC 6. Function Buttons Button (SC-D363/D364/D365/D366 only) œœ REW REC SEARCH -...Remote Sensor (SC-D364/D366 only) 4. Lens 2. Remote Sensor (SC-D364/D366 only) 4. EASY.Q Button ➥page 35 7. TFT LCD Screen MF/AF MULTI DISP. 1. TAPE EJECT 5. Function Buttons 8. ENGLISH Getting to Know Your Camcorder Front & Left View 1. LIGHT (SC-D362/D364/D365 /D366 ...

User Manual (ENGLISH)
Page 11
... 11. ENGLISH Getting to Know Your Camcorder Right & Top View 1. Zoom Lever (VOL/Menu Dial) 2. Power Switch 7. PHOTO Button ➥page 57 3. Hand Strap Hook Jacks SC-D263 External IEEE1394 MIC AV Cable SC-D363 External IEEE1394 USB AV MIC Cable SC-D362/ D364/ D365/ External IEEE1394 USB Multi D366 MIC...MENU 5. Zoom Lever (VOL/Menu Dial) 2. DC Jack 8. Jack Cover 9. PHOTO ➥ 57 3. QUICK MENU 4. Jack Cover 9. SC-D263 SC-D363 SC-D362/ D364/ D365/ D366 IEEE1394 AV IEEE1394 USB AV IEEE1394 USB AV 11 QUICK MENU Button 4. MENU Button 5. Jacks 10.
... 11. ENGLISH Getting to Know Your Camcorder Right & Top View 1. Zoom Lever (VOL/Menu Dial) 2. Power Switch 7. PHOTO Button ➥page 57 3. Hand Strap Hook Jacks SC-D263 External IEEE1394 MIC AV Cable SC-D363 External IEEE1394 USB AV MIC Cable SC-D362/ D364/ D365/ External IEEE1394 USB Multi D366 MIC...MENU 5. Zoom Lever (VOL/Menu Dial) 2. DC Jack 8. Jack Cover 9. PHOTO ➥ 57 3. QUICK MENU 4. Jack Cover 9. SC-D263 SC-D363 SC-D362/ D364/ D365/ D366 IEEE1394 AV IEEE1394 USB AV IEEE1394 USB AV 11 QUICK MENU Button 4. MENU Button 5. Jacks 10.


