
User Manual (ENGLISH)
Page 22
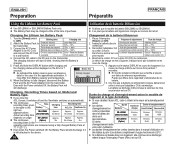
... durée (Option) d'enregistrement réelle varie selon l'utilisation. Connect the AC Power Three times per second Less than 50% the Camcorder. a second Pack and the DC Cable 1. Fréquence de clignotement 2. Deux fois par seconde 3. cours de charge. 5. It may...AD43-00136A) Approx. 1hr 20min Approx. 1hr 20min Approx. 1hr 30min depends on the Camcorder. 4. Charging the Lithium Ion Battery Pack Chargement de la batterie lithium-ion 1. Pack and the AC Power Adapter from Battery capacity and temperature. 0% 50% 100% son datos de referencia aproximados. ...
... durée (Option) d'enregistrement réelle varie selon l'utilisation. Connect the AC Power Three times per second Less than 50% the Camcorder. a second Pack and the DC Cable 1. Fréquence de clignotement 2. Deux fois par seconde 3. cours de charge. 5. It may...AD43-00136A) Approx. 1hr 20min Approx. 1hr 20min Approx. 1hr 30min depends on the Camcorder. 4. Charging the Lithium Ion Battery Pack Chargement de la batterie lithium-ion 1. Pack and the AC Power Adapter from Battery capacity and temperature. 0% 50% 100% son datos de referencia aproximados. ...
User Manual (ENGLISH)
Page 40
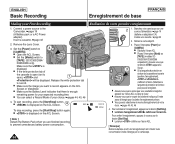
...Vous pouvez sélectionner le mode d'enregistrement de votre choix. ➥pages 44, 45, 46 4. I Set the [Mode] switch to [TAPE]. (SC-D363/D364/ CA D365/D366 only) Make sure that there is displayed on the ACL Screen. 4 REC G SP To stop recording, press the [Start/Stop] ...Battery Pack when you want to save), and 1 will be displayed. I Make sure the image you are finished recording to the Camcorder. ➥page 19 (A Battery pack or a AC Power adapter) Insert a cassette. ➥page 32 MERA MERA 2. Assurez-vous que le témoin apparaît à K 3 ...
...Vous pouvez sélectionner le mode d'enregistrement de votre choix. ➥pages 44, 45, 46 4. I Set the [Mode] switch to [TAPE]. (SC-D363/D364/ CA D365/D366 only) Make sure that there is displayed on the ACL Screen. 4 REC G SP To stop recording, press the [Start/Stop] ...Battery Pack when you want to save), and 1 will be displayed. I Make sure the image you are finished recording to the Camcorder. ➥page 19 (A Battery pack or a AC Power adapter) Insert a cassette. ➥page 32 MERA MERA 2. Assurez-vous que le témoin apparaît à K 3 ...

User Manual (ENGLISH)
Page 8
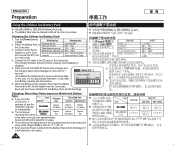
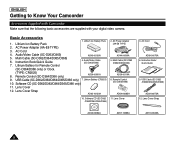
... Power Adapter (AA-E8 TYPE) 5. Lens Cover 0 3. USB Cable (SC-D362 /D363/D364/D365/D366) 12. AA-E8 3. 4. / SC- SC- CD SC- Lithium Ion Battery Pack 2. Lithium Battery (CR2025) 10. Remote Control (SC-D364/D366 only) 9. Remote Control (SC-D364/D366) 11. AC Cord 6. D364/D366 0 CR2025 8. Lens Cover Strap 4. SC-D364/D366 9. Basic Accessories 1. AC Cord 4. Lithium Battery for Remote Control (SC-D364/D366...
... Power Adapter (AA-E8 TYPE) 5. Lens Cover 0 3. USB Cable (SC-D362 /D363/D364/D365/D366) 12. AA-E8 3. 4. / SC- SC- CD SC- Lithium Ion Battery Pack 2. Lithium Battery (CR2025) 10. Remote Control (SC-D364/D366 only) 9. Remote Control (SC-D364/D366) 11. AC Cord 6. D364/D366 0 CR2025 8. Lens Cover Strap 4. SC-D364/D366 9. Basic Accessories 1. AC Cord 4. Lithium Battery for Remote Control (SC-D364/D366...

User Manual (ENGLISH)
Page 15
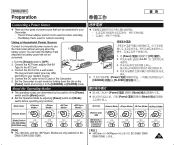
... 1. Should a battery be swallowed, consult a doctor immediately. 1. 2. 3. 0 4. 0 SC-D364/D366 0 2. 0 3. 0 0 0 ( ) 0 ( ) 1. 0 / 0 0 CR2025 0 0 0 0 0 15 Close the Lithium Battery Cover. 1. Warning: Keep the Lithium Battery out of reach of the arrow . 2. Remove the Battery Pack from time of the Camcorder. 2. even if the Battery Pack or AC Power adapter is incorrectly replaced. When this occurs, replace the...
... 1. Should a battery be swallowed, consult a doctor immediately. 1. 2. 3. 0 4. 0 SC-D364/D366 0 2. 0 3. 0 0 0 ( ) 0 ( ) 1. 0 / 0 0 CR2025 0 0 0 0 0 15 Close the Lithium Battery Cover. 1. Warning: Keep the Lithium Battery out of reach of the arrow . 2. Remove the Battery Pack from time of the Camcorder. 2. even if the Battery Pack or AC Power adapter is incorrectly replaced. When this occurs, replace the...
User Manual (ENGLISH)
Page 16
...; ✤ The continuous recording times in the table to blink, showing that the Battery is fully charged, disconnect the Battery Pack and the AC Power Adapter from Battery capacity and temperature. 6. DISPLAY LCD 7 0 100% 0 0 6. 0 Off 0 / LCD LCD 0 1 1 1 SB-LSM80 20 20 30 0 SB-LSM160 3 2 3 0 40 ...second and off and the Viewfinder switches SB-LSM80 Approx. 1hr 20min Approx. 1hr 20min Approx. 1hr 30min ✤ on the Camcorder. Reset the Battery 3. Turn the [Power] switch Blinking time to an AC Cord On for the user, it is the approximate...
...; ✤ The continuous recording times in the table to blink, showing that the Battery is fully charged, disconnect the Battery Pack and the AC Power Adapter from Battery capacity and temperature. 6. DISPLAY LCD 7 0 100% 0 0 6. 0 Off 0 / LCD LCD 0 1 1 1 SB-LSM80 20 20 30 0 SB-LSM160 3 2 3 0 40 ...second and off and the Viewfinder switches SB-LSM80 Approx. 1hr 20min Approx. 1hr 20min Approx. 1hr 30min ✤ on the Camcorder. Reset the Battery 3. Turn the [Power] switch Blinking time to an AC Cord On for the user, it is the approximate...
User Manual (ENGLISH)
Page 19
...] switch and the [Mode] switch. ✤ Set the Operation Mode by holding down the tab on SC- Turn the [Power] switch to the DC jack of the Camcorder. 5. Connect the AC Power adapter (AA-E8 Type) to a wall socket. The plug and wall socket type may differ according to your... Camcorder. - D363/D364/ D365/D366 [ ] I The and the Modes are only enabled on the [Power] switch and turning it to the [CAMERA] or [PLAYER] mode. Mode Name [Power] Switch [Mode] Switch (SC-D363/D364/...
...] switch and the [Mode] switch. ✤ Set the Operation Mode by holding down the tab on SC- Turn the [Power] switch to the DC jack of the Camcorder. 5. Connect the AC Power adapter (AA-E8 Type) to a wall socket. The plug and wall socket type may differ according to your... Camcorder. - D363/D364/ D365/D366 [ ] I The and the Modes are only enabled on the [Power] switch and turning it to the [CAMERA] or [PLAYER] mode. Mode Name [Power] Switch [Mode] Switch (SC-D363/D364/...
User Manual (ENGLISH)
Page 34
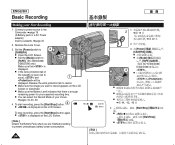
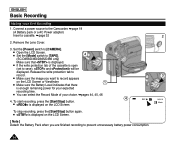
... unnecessary battery power consumption. [ ] 34 R R R 2 1. ➥ 19 0 0 ➥ 32 2. 0 3. [Power] [CAMERA] 0 I LCD 0 I [Mode] - [TAPE] 0 SC D363/D364/ D365/D366 K 3 0 I PLAYE MERA CA I 0 I I ➥ 44/ 45/ 46 0 0 LCD 0 0 4. 0 I / I is displayed on the LCD Screen. 0:00:10 ... 0 [Start/Stop] 0 0 Connect a power source to 4QMUEINCUK [CAMERA]. Set the [Power] switch to the Camcorder. ➥page 19 (A Battery pack or a AC Power adapter) Insert a cassette. ➥page 32 2. I is displayed on the LCD Screen or Viewfinder. To start recording,...
... unnecessary battery power consumption. [ ] 34 R R R 2 1. ➥ 19 0 0 ➥ 32 2. 0 3. [Power] [CAMERA] 0 I LCD 0 I [Mode] - [TAPE] 0 SC D363/D364/ D365/D366 K 3 0 I PLAYE MERA CA I 0 I I ➥ 44/ 45/ 46 0 0 LCD 0 0 4. 0 I / I is displayed on the LCD Screen. 0:00:10 ... 0 [Start/Stop] 0 0 Connect a power source to 4QMUEINCUK [CAMERA]. Set the [Power] switch to the Camcorder. ➥page 19 (A Battery pack or a AC Power adapter) Insert a cassette. ➥page 32 2. I is displayed on the LCD Screen or Viewfinder. To start recording,...
User Manual (ENGLISH)
Page 64
...SC-D362/D364/D365/D366 only) I You may use an S-Video connector on the cable to obtain better quality pictures if you will not hear sound from the Camcorder...connect to a monaural TV, I S-Video 0 SC-D362/D364/ D365/D366 / AV/S 0 64 Audio L...SC-D362/D364/D365/D366 only) AV Cable TV (SC-D263/D363) AV Camcorder 0 2. [Power] [PLAYER] 0 3. [Mode] [TAPE] 0 SC-D363/D364/ D365/D366 4. I I Refer to [PLAYER]. 3. I QMUEINCUK PLAYE CAM [ ] I S-Video S-Video 0 SC-D362/D364...Input Jacks Multi Cable (SC-D362/ D364/D365/D366) AV/ S Camcorder Signal flow QMUEINCUK PLAYE CAM...
...SC-D362/D364/D365/D366 only) I You may use an S-Video connector on the cable to obtain better quality pictures if you will not hear sound from the Camcorder...connect to a monaural TV, I S-Video 0 SC-D362/D364/ D365/D366 / AV/S 0 64 Audio L...SC-D362/D364/D365/D366 only) AV Cable TV (SC-D263/D363) AV Camcorder 0 2. [Power] [PLAYER] 0 3. [Mode] [TAPE] 0 SC-D363/D364/ D365/D366 4. I I Refer to [PLAYER]. 3. I QMUEINCUK PLAYE CAM [ ] I S-Video S-Video 0 SC-D362/D364...Input Jacks Multi Cable (SC-D362/ D364/D365/D366) AV/ S Camcorder Signal flow QMUEINCUK PLAYE CAM...

User Manual (ENGLISH)
Page 68
... Card inwards to [OFF]. ENGLISH Digital Still Camera Mode (SC-D363/D364/D365/D366 only) SC-D363/D364/ D365/D366 Using a Memory Card (Usable Memory Card) (not supplied) ✤ The Memory Card stores and manages photo images recorded by using the Adapter (not supplied). Insert the Memory Card. Open the Memory...in Memory Card ✤ Marking Photo Images with Print RS MMC/Mini SD (SC-D363/D364/D365/D366) ✤ Memory Stick Duo (SC-D365/D366) Memory Stick Duo, RS MMC or Mini SD should be inserted by the Camcorder. ✤ Before inserting or ejecting the Memory Card, set the [Power] ...
... Card inwards to [OFF]. ENGLISH Digital Still Camera Mode (SC-D363/D364/D365/D366 only) SC-D363/D364/ D365/D366 Using a Memory Card (Usable Memory Card) (not supplied) ✤ The Memory Card stores and manages photo images recorded by using the Adapter (not supplied). Insert the Memory Card. Open the Memory...in Memory Card ✤ Marking Photo Images with Print RS MMC/Mini SD (SC-D363/D364/D365/D366) ✤ Memory Stick Duo (SC-D365/D366) Memory Stick Duo, RS MMC or Mini SD should be inserted by the Camcorder. ✤ Before inserting or ejecting the Memory Card, set the [Power] ...
User Manual (ENGLISH)
Page 86
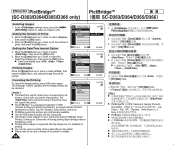
... cancel the image printing, press [OK] button again. Back Print Copies [ Notes ] Date/Time I Use the AC power adapter for printing. Check with the Camcorder. Moving images are commercially available. Setting the Number of the printer for details. 86 2/46 Num. 02 100-0002 2/46...Zoom] lever up or down to select the Date/Time display type, then press the [OK] button. ENGLISH PictBridgeTM PictBridgeTM (SC-D363/D364/D365/D366 only) SC-D363/D364/D365/D366 Selecting Images 1. Move the [Zoom] lever up or down to print. Setting the Date/Time Imprint Option 4....
... cancel the image printing, press [OK] button again. Back Print Copies [ Notes ] Date/Time I Use the AC power adapter for printing. Check with the Camcorder. Moving images are commercially available. Setting the Number of the printer for details. 86 2/46 Num. 02 100-0002 2/46...Zoom] lever up or down to select the Date/Time display type, then press the [OK] button. ENGLISH PictBridgeTM PictBridgeTM (SC-D363/D364/D365/D366 only) SC-D363/D364/D365/D366 Selecting Images 1. Move the [Zoom] lever up or down to print. Setting the Date/Time Imprint Option 4....
User Manual (ENGLISH)
Page 97
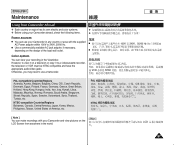
... / / / / / / / / / / / / / 0 / / / / / NTSC / / / / / / / / / 0 [ Note ] [ ] You can make recordings with the supplied AC Power adapter within 100V to 240V, 50/60 Hz. I I Use a commercially available AC jack adapter, if necessary, depending on the LCD Screen from anywhere in the Viewfinder. ENGLISH Maintenance Using Your Camcorder Abroad ✤ Each country or region has its own electric and...
... / / / / / / / / / / / / / 0 / / / / / NTSC / / / / / / / / / 0 [ Note ] [ ] You can make recordings with the supplied AC Power adapter within 100V to 240V, 50/60 Hz. I I Use a commercially available AC jack adapter, if necessary, depending on the LCD Screen from anywhere in the Viewfinder. ENGLISH Maintenance Using Your Camcorder Abroad ✤ Each country or region has its own electric and...

User Manual (ENGLISH)
Page 100
... focus does not work . The tape may be damaged. Check the Battery pack or the AC Power adapter. The Camcorder shuts off automatically. Check the Manual Focus menu. You see page 96). ✤ 0 0 Start/Stop / 0 0 0 / 0 0 0 0 0 0 Samsung / 0 CAMERA0 0 0 STBY 5 0 0 0 0 0 0 0 0 BLC 0 0 0 0 0 0 0 PLAYER ...10020; If these instructions do not solve your problem, contact your nearest Samsung authorized service center. Symptom Explanation/Solution You cannot switch the Camcorder on the Viewfinder come into sharp focus. Check the Power switch is completely...
... focus does not work . The tape may be damaged. Check the Battery pack or the AC Power adapter. The Camcorder shuts off automatically. Check the Manual Focus menu. You see page 96). ✤ 0 0 Start/Stop / 0 0 0 / 0 0 0 0 0 0 Samsung / 0 CAMERA0 0 0 STBY 5 0 0 0 0 0 0 0 0 BLC 0 0 0 0 0 0 0 PLAYER ...10020; If these instructions do not solve your problem, contact your nearest Samsung authorized service center. Symptom Explanation/Solution You cannot switch the Camcorder on the Viewfinder come into sharp focus. Check the Power switch is completely...
User Manual (ENGLISH)
Page 12
... Control (SC-D364/D366) AD59-00085A 11. AC Power Adapter (AA-E8 TYPE) 3. Lithium Battery for Remote Control (SC-D364/D366 only) or Clock. (TYPE: CR2025) 8. Multi Cable (SC-D362 /D364/D365/D366) AD39-00119A 8. Audio/Video Cable (SC-D263/D363) 7. Software CD (SC-D362 /D363/D364/D365/D366) 2. Lens Cover 3. ENGLISH Getting to Know Your Camcorder Accessories Supplied with Camcorder Make...
... Control (SC-D364/D366) AD59-00085A 11. AC Power Adapter (AA-E8 TYPE) 3. Lithium Battery for Remote Control (SC-D364/D366 only) or Clock. (TYPE: CR2025) 8. Multi Cable (SC-D362 /D364/D365/D366) AD39-00119A 8. Audio/Video Cable (SC-D263/D363) 7. Software CD (SC-D362 /D363/D364/D365/D366) 2. Lens Cover 3. ENGLISH Getting to Know Your Camcorder Accessories Supplied with Camcorder Make...

User Manual (ENGLISH)
Page 19
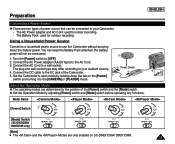
... and preset contents of the Camcorder. 3. Position the Lithium Battery in the Lithium Battery Holder, with the positive ( ) terminal face up . 3. Preparation Lithium Battery Installation Lithium Battery Installation for the Remote Control (SC-D364/D366 only) 1. Open the... Lithium Battery Cover on the rear of the memory; Close the Lithium Battery Cover. ENGLISH Lithium Battery Installation for the Internal Clock QUICK MENU MENU 1. even if the Battery Pack or AC Power adapter is incorrectly replaced. The Lithium Battery for the Camcorder...
... and preset contents of the Camcorder. 3. Position the Lithium Battery in the Lithium Battery Holder, with the positive ( ) terminal face up . 3. Preparation Lithium Battery Installation Lithium Battery Installation for the Remote Control (SC-D364/D366 only) 1. Open the... Lithium Battery Cover on the rear of the memory; Close the Lithium Battery Cover. ENGLISH Lithium Battery Installation for the Internal Clock QUICK MENU MENU 1. even if the Battery Pack or AC Power adapter is incorrectly replaced. The Lithium Battery for the Camcorder...

User Manual (ENGLISH)
Page 20
...or SB-LSM160 Battery Pack only. ✤ The Battery Pack may differ from the Camcorder. Attach the Battery Pack to a wall socket. Charging/Recording Times based on the Camcorder. Connect the AC Power Adapter to an AC Cord and Blinking time Once per second Twice per second Three times per... second Charging rate Less than 50% 50% ~ 75% 75% ~ 90% connect the AC Cord to the Camcorder. 3. Blinking stops and stays on...
...or SB-LSM160 Battery Pack only. ✤ The Battery Pack may differ from the Camcorder. Attach the Battery Pack to a wall socket. Charging/Recording Times based on the Camcorder. Connect the AC Power Adapter to an AC Cord and Blinking time Once per second Twice per second Three times per... second Charging rate Less than 50% 50% ~ 75% 75% ~ 90% connect the AC Cord to the Camcorder. 3. Blinking stops and stays on...
User Manual (ENGLISH)
Page 23
...Mode] switch. ✤ Set the Operation Mode by holding down the tab on SC-D363/ D364/ D365/ D366. You can be consumed. 1. Connect the AC Power adapter (AA-E8 Type) to a wall socket. Power Switch 4. Set the Camcorder to each mode by adjusting [Power] switch and [Mode] switch before operating ... CA 3. Mode Name [Power] Switch PLAY PLAY PLAY PLAY CAM CAM CAM [Mode] Switch (SC-D363/D364/ D365/D366 only) [Note] I The and the Modes are two types of the Camcorder. 5. The plug and wall socket type may differ according to the DC jack of power source ...
...Mode] switch. ✤ Set the Operation Mode by holding down the tab on SC-D363/ D364/ D365/ D366. You can be consumed. 1. Connect the AC Power adapter (AA-E8 Type) to a wall socket. Power Switch 4. Set the Camcorder to each mode by adjusting [Power] switch and [Mode] switch before operating ... CA 3. Mode Name [Power] Switch PLAY PLAY PLAY PLAY CAM CAM CAM [Mode] Switch (SC-D363/D364/ D365/D366 only) [Note] I The and the Modes are two types of the Camcorder. 5. The plug and wall socket type may differ according to the DC jack of power source ...
User Manual (ENGLISH)
Page 38
... when you want to [TAPE]. 4 (SC-D363/D364/D365/D366 only) Make sure that there is open (set to save), and will be displayed. Connect a power source to [CAMERA]. Remove the Lens Cover. 3. Set the [Power] switch to the Camcorder. ➥page 19 (A Battery pack or a AC Power adapter) Insert a cassette. ➥page 32...
... when you want to [TAPE]. 4 (SC-D363/D364/D365/D366 only) Make sure that there is open (set to save), and will be displayed. Connect a power source to [CAMERA]. Remove the Lens Cover. 3. Set the [Power] switch to the Camcorder. ➥page 19 (A Battery pack or a AC Power adapter) Insert a cassette. ➥page 32...

User Manual (ENGLISH)
Page 68
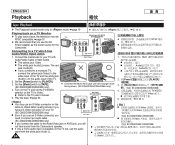
... TV/VIDEO selector on the TV to the audio input of the TV and the white jack (Audio L) to Video. Multi Cable (SC-D362/ D364/D365/D366) Camcorder Connecting to [TAPE]. (SC-D363/D364/D365/D366 only) 4. Set the [Mode] switch to a TV which has Audio/Video Input Jacks 1. I If you connect the cable... connector on your TV with the Audio/Video Cable or Multi Cable. Turn on the TV and set , use the AC Power adapter as the power source for the Camcorder. ENGLISH Playback Tape Playback ✤ The Playback function works only in mode. ➥page 19 Playing back on a TV Monitor TV...
... TV/VIDEO selector on the TV to the audio input of the TV and the white jack (Audio L) to Video. Multi Cable (SC-D362/ D364/D365/D366) Camcorder Connecting to [TAPE]. (SC-D363/D364/D365/D366 only) 4. Set the [Mode] switch to a TV which has Audio/Video Input Jacks 1. I If you connect the cable... connector on your TV with the Audio/Video Cable or Multi Cable. Turn on the TV and set , use the AC Power adapter as the power source for the Camcorder. ENGLISH Playback Tape Playback ✤ The Playback function works only in mode. ➥page 19 Playing back on a TV Monitor TV...

User Manual (ENGLISH)
Page 72
...slot and close the Memory Card Cover. 68 ENGLISH Digital Still Camera Mode (SC-D363/D364/D365/D366 only) Using a Memory Card (Usable Memory Card) (not supplied) ✤ The Memory Card stores and manages photo images recorded by the Camcorder. ✤ Before inserting or ejecting the Memory Card, set the [Power...) Memory Stick (PRO) (SC-D365/D366) Terminals RS MMC/Mini SD (SC-D363/D364/D365/D366) Memory Stick Duo (SC-D365/D366) Memory Stick Duo, RS MMC or Mini SD should be inserted by using the Memory Stick Duo, be careful not to [OFF]. When using the Adapter (not supplied). 1. Open ...
...slot and close the Memory Card Cover. 68 ENGLISH Digital Still Camera Mode (SC-D363/D364/D365/D366 only) Using a Memory Card (Usable Memory Card) (not supplied) ✤ The Memory Card stores and manages photo images recorded by the Camcorder. ✤ Before inserting or ejecting the Memory Card, set the [Power...) Memory Stick (PRO) (SC-D365/D366) Terminals RS MMC/Mini SD (SC-D363/D364/D365/D366) Memory Stick Duo (SC-D365/D366) Memory Stick Duo, RS MMC or Mini SD should be inserted by using the Memory Stick Duo, be careful not to [OFF]. When using the Adapter (not supplied). 1. Open ...

User Manual (ENGLISH)
Page 90
... press the [OK] button, and selected image files will be setup if the printer does not support this option. Check with the Camcorder. I Use the AC power adapter for your Camcorder off during PictBridge Direct Printing. Setting the Date/Time Imprint Option 4. I You can set the number of CIPA (Camera & Imaging Products Association... I The PictBridgeTM is supported. Moving images are commercially available. Move the [Zoom] lever up or down to select , then press the [OK] button. 5. ENGLISH PictBridgeTM (SC-D363/D364/D365/D366 only) Selecting Images 1.
... press the [OK] button, and selected image files will be setup if the printer does not support this option. Check with the Camcorder. I Use the AC power adapter for your Camcorder off during PictBridge Direct Printing. Setting the Date/Time Imprint Option 4. I You can set the number of CIPA (Camera & Imaging Products Association... I The PictBridgeTM is supported. Moving images are commercially available. Move the [Zoom] lever up or down to select , then press the [OK] button. 5. ENGLISH PictBridgeTM (SC-D363/D364/D365/D366 only) Selecting Images 1.


