
User Manual (ENGLISH)
Page 17
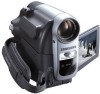
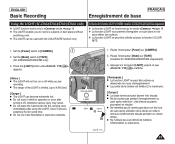
... Jack 8. Hand Strap Hook Jacks SC-D263 External IEEE1394 MIC AV Cable SC-D363 External IEEE1394 USB AV MIC Cable SC-D362/ D364/ D365/ External IEEE1394 USB Multi D366 MIC Cable 1. Hand Strap Hook 1. Jack Cover 9. Bouton de zoom (VOL/molette de menu) 2. Power Switch (CAMERA or PLAYER) 7. Bouton QUICK MENU 4. Zoom Lever (VOL/Menu Dial) 2. QUICK...
... Jack 8. Hand Strap Hook Jacks SC-D263 External IEEE1394 MIC AV Cable SC-D363 External IEEE1394 USB AV MIC Cable SC-D362/ D364/ D365/ External IEEE1394 USB Multi D366 MIC Cable 1. Hand Strap Hook 1. Jack Cover 9. Bouton de zoom (VOL/molette de menu) 2. Power Switch (CAMERA or PLAYER) 7. Bouton QUICK MENU 4. Zoom Lever (VOL/Menu Dial) 2. QUICK...
User Manual (ENGLISH)
Page 22
... 1hr 30min depends on 90% ~ 100% and connect the AC Cord On for a second and off and the Viewfinder switches on the Camcorder. 4. Turn the [Power] switch to an AC Cord Blinking stops and stays on usage. ✤ The continuous SB-LSM160 (Option) Approx. 3hr Approx. 2hr ...ACL for the user, it is fully charged, disconnect the Battery batería. Placez l'interrupteur [Power] sur [Off]. Le the charging status will start to Once per second Less than 50% the Camcorder. Battery Info niveau de charge s'affiche sur l'écran ACL pendant 7 secondes. still discharge. ...
... 1hr 30min depends on 90% ~ 100% and connect the AC Cord On for a second and off and the Viewfinder switches on the Camcorder. 4. Turn the [Power] switch to an AC Cord Blinking stops and stays on usage. ✤ The continuous SB-LSM160 (Option) Approx. 3hr Approx. 2hr ...ACL for the user, it is fully charged, disconnect the Battery batería. Placez l'interrupteur [Power] sur [Off]. Le the charging status will start to Once per second Less than 50% the Camcorder. Battery Info niveau de charge s'affiche sur l'écran ACL pendant 7 secondes. still discharge. ...

User Manual (ENGLISH)
Page 29
... and minute following the same procedure after setting the year. 8. Set the [Power] switch to [TAPE] or [MEMORY]. (SC-D363/D364/D365/D366 only) 3. Placez l'interrupteur [Power] sur [CAMERA] ou [PLAYER]. 2. ZOOM Move OK Select MENU Exit bouton [OK]. 5. Déplacez le bouton de [Zoom] vers le haut ou vers le bas pour sélectionner , puis...
... and minute following the same procedure after setting the year. 8. Set the [Power] switch to [TAPE] or [MEMORY]. (SC-D363/D364/D365/D366 only) 3. Placez l'interrupteur [Power] sur [CAMERA] ou [PLAYER]. 2. ZOOM Move OK Select MENU Exit bouton [OK]. 5. Déplacez le bouton de [Zoom] vers le haut ou vers le bas pour sélectionner , puis...

User Manual (ENGLISH)
Page 31
... sounds a beep. To exit, press the [MENU] button. 6 ERA MERA R ER 1 PLAYE 1. Placez l'interrupteur [Power] sur [CAMERA] ou [PLAYER]. Set the [Power] switch to [TAPE] or [MEMORY]. (SC-D363/D364/D365/D366 only) 3. CA PLAY 2. Pour quitter le menu, appuyez sur le bouton [MENU]. Lorsqu'elle est ré... Back Clock Set Remote Beep Sound Off Language On Demonstration 4. I La liste des menus apparaîtra. Déplacez le bouton de [Zoom] vers le haut ou vers le bas pour sélectionner ou , puis appuyez sur le bouton [OK]. 7. Réglage du signal ...
... sounds a beep. To exit, press the [MENU] button. 6 ERA MERA R ER 1 PLAYE 1. Placez l'interrupteur [Power] sur [CAMERA] ou [PLAYER]. Set the [Power] switch to [TAPE] or [MEMORY]. (SC-D363/D364/D365/D366 only) 3. CA PLAY 2. Pour quitter le menu, appuyez sur le bouton [MENU]. Lorsqu'elle est ré... Back Clock Set Remote Beep Sound Off Language On Demonstration 4. I La liste des menus apparaîtra. Déplacez le bouton de [Zoom] vers le haut ou vers le bas pour sélectionner ou , puis appuyez sur le bouton [OK]. 7. Réglage du signal ...

User Manual (ENGLISH)
Page 32
...;met un son chaque fois que vous appuyez sur le bouton [PHOTO]. Si l'interrupteur [Power] est réglé sur [PLAYER], 3. I La liste des menus apparaîtra. 4. Déplacez le bouton de [Zoom] vers le haut ou vers le bas pour sélectionner , puis appuyez sur le bouton... Setting Réglage du menu System (Système) Setting the Shutter Sound (Shutter Sound) (SC-D363/D364/D365 /D366 only) Réglage du son de l'obturateur (Son Obturateur) (modèles SC-D363/D364/D365/D366 uniquement) ✤ The Shutter Sound function works in both and ✤ La fonction...
...;met un son chaque fois que vous appuyez sur le bouton [PHOTO]. Si l'interrupteur [Power] est réglé sur [PLAYER], 3. I La liste des menus apparaîtra. 4. Déplacez le bouton de [Zoom] vers le haut ou vers le bas pour sélectionner , puis appuyez sur le bouton... Setting Réglage du menu System (Système) Setting the Shutter Sound (Shutter Sound) (SC-D363/D364/D365 /D366 only) Réglage du son de l'obturateur (Son Obturateur) (modèles SC-D363/D364/D365/D366 uniquement) ✤ The Shutter Sound function works in both and ✤ La fonction...
User Manual (ENGLISH)
Page 34
...MENU Exit Camera Mode Back Clock Set Remote Beep Sound Language Demonstration Off On ZOOM Move OK Select MENU Exit SAMSUNG Camcorder is switched Off. 4 1. Placez l'interrupteur [Mode] sur [TAPE] . (modèles SC-D363/D364/D365/D366 uniquement). 3. I La fonction Demonstration (Démonstration) s'active...Déplacez le bouton de [Zoom] vers le haut ou vers le bas pour sélectionner , puis appuyez sur le bouton [OK]. 5. Press the [MENU] button. Move the [Zoom] lever up or down to [TAPE]. (SC-D363/D364/D365/D366 only) 3. Set the [Power] switch to [CAMERA]. 2. ...
...MENU Exit Camera Mode Back Clock Set Remote Beep Sound Language Demonstration Off On ZOOM Move OK Select MENU Exit SAMSUNG Camcorder is switched Off. 4 1. Placez l'interrupteur [Mode] sur [TAPE] . (modèles SC-D363/D364/D365/D366 uniquement). 3. I La fonction Demonstration (Démonstration) s'active...Déplacez le bouton de [Zoom] vers le haut ou vers le bas pour sélectionner , puis appuyez sur le bouton [OK]. 5. Press the [MENU] button. Move the [Zoom] lever up or down to [TAPE]. (SC-D363/D364/D365/D366 only) 3. Set the [Power] switch to [CAMERA]. 2. ...

User Manual (ENGLISH)
Page 35
... [MENU] button. Placez l'interrupteur [Mode] sur [TAPE] ou [MEMORY]. (modèles SC-D363/D364/D365/D366 uniquement). 3. Set the [Power] switch to be recorded. Press the [MENU] button. Move the [Zoom] lever up or down to select , then press the [OK] button. 5. I Adjusting the... ACL Screen works in /// modes. ➥page 19 ✤ Your Camcorder is equipped with a 2.5 inch (SC-D263/D362/D363/ D364) / 2.7 inch wide (SC-D365/D366) color Liquid Crystal Display (ACL) Screen, which you are using the Camcorder (indoors or outdoors for example), you can set values for and between ...
... [MENU] button. Placez l'interrupteur [Mode] sur [TAPE] ou [MEMORY]. (modèles SC-D363/D364/D365/D366 uniquement). 3. Set the [Power] switch to be recorded. Press the [MENU] button. Move the [Zoom] lever up or down to select , then press the [OK] button. 5. I Adjusting the... ACL Screen works in /// modes. ➥page 19 ✤ Your Camcorder is equipped with a 2.5 inch (SC-D263/D362/D363/ D364) / 2.7 inch wide (SC-D365/D366) color Liquid Crystal Display (ACL) Screen, which you are using the Camcorder (indoors or outdoors for example), you can set values for and between ...

User Manual (ENGLISH)
Page 37
... √Off TV Display √On ZOOM Move OK Select MENU Exit 3. Déplacez le bouton de [Zoom] vers le haut ou vers le bas pour sélectionner , puis appuyez sur le bouton [OK]. Set the [Power] switch to [TAPE] or [MEMORY]. (SC-D363/D364/D365/D366 only) 3. Appuyez sur... le bouton [MENU]. Move the [Zoom] lever up or down to select , then press the [OK] button. 6. ENGLISH Réglage ...
... √Off TV Display √On ZOOM Move OK Select MENU Exit 3. Déplacez le bouton de [Zoom] vers le haut ou vers le bas pour sélectionner , puis appuyez sur le bouton [OK]. Set the [Power] switch to [TAPE] or [MEMORY]. (SC-D363/D364/D365/D366 only) 3. Appuyez sur... le bouton [MENU]. Move the [Zoom] lever up or down to select , then press the [OK] button. 6. ENGLISH Réglage ...
User Manual (ENGLISH)
Page 40
...Detach the Battery Pack when you want to [TAPE]. (SC-D363/D364/ CA D365/D366 only) Make sure that there is displayed. I is open (set to 4QMUEINCUK [CAMERA]. Placez l'interrupteur [Power] sur [CAMERA]. I Assurez-vous que la scène que vous souhaitez enregistrer apparaît sur l'&#... assez d'énergie pour la durée d'enregistrement prévue. Release the write protection tab to the Camcorder. ➥page 19 (A Battery pack or a AC Power adapter) Insert a cassette. ➥page 32 MERA MERA 2. Branchez votre caméscope sur une source d'...
...Detach the Battery Pack when you want to [TAPE]. (SC-D363/D364/ CA D365/D366 only) Make sure that there is displayed. I is open (set to 4QMUEINCUK [CAMERA]. Placez l'interrupteur [Power] sur [CAMERA]. I Assurez-vous que la scène que vous souhaitez enregistrer apparaît sur l'&#... assez d'énergie pour la durée d'enregistrement prévue. Release the write protection tab to the Camcorder. ➥page 19 (A Battery pack or a AC Power adapter) Insert a cassette. ➥page 32 MERA MERA 2. Branchez votre caméscope sur une source d'...

User Manual (ENGLISH)
Page 41
... disponibles en mode EASY.Q. I The EASY.Q mode settings are displayed at the same time. 4. lorsque vous retirez la batterie. I Digital Zoom, COLOR NITE or Visual Effect is not available in the I In EASY.Q mode, certain functions are recording. Appuyez à nouveau sur le... 1. Set the [Power] switch to [TAPE]. (SC-D363/D364/D365/D366 only) 3. Set the [Mode] switch to [CAMERA]. 1 2. I The Camcorder will be reset when the Battery Pack is removed from the Camcorder and I n'est pas disponible en mode EASY.Q. (modèles SC-D263/D362/D363/D364 uniquement) 35 ...
... disponibles en mode EASY.Q. I The EASY.Q mode settings are displayed at the same time. 4. lorsque vous retirez la batterie. I Digital Zoom, COLOR NITE or Visual Effect is not available in the I In EASY.Q mode, certain functions are recording. Appuyez à nouveau sur le... 1. Set the [Power] switch to [TAPE]. (SC-D363/D364/D365/D366 only) 3. Set the [Mode] switch to [CAMERA]. 1 2. I The Camcorder will be reset when the Battery Pack is removed from the Camcorder and I n'est pas disponible en mode EASY.Q. (modèles SC-D263/D362/D363/D364 uniquement) 35 ...

User Manual (ENGLISH)
Page 46
... √ PLAYE CA To Stop Recording (use Fade 6 In/Fade Out) 5. Placez l'interrupteur [Mode] sur [TAPE] (modèles SC-D363/D364/D365/D366 uniquement). 3. I L'enregistrement démarre et l'image et le son apparaissent progressivement (ouverture en fondu). I L'image et le...son disparaissent progressivement (fermeture en fondu). 6. Fade Out (Approx. 4 seconds) b. When you wish to [CAMERA]. 2. Set the [Power] switch to stop recording. Placez l'interrupteur [Power] sur [CAMERA]. 2. Fade Out REC G SP REC G SP 0:00:20 60min 0:00:25 60min Pour débuter un ...
... √ PLAYE CA To Stop Recording (use Fade 6 In/Fade Out) 5. Placez l'interrupteur [Mode] sur [TAPE] (modèles SC-D363/D364/D365/D366 uniquement). 3. I L'enregistrement démarre et l'image et le son apparaissent progressivement (ouverture en fondu). I L'image et le...son disparaissent progressivement (fermeture en fondu). 6. Fade Out (Approx. 4 seconds) b. When you wish to [CAMERA]. 2. Set the [Power] switch to stop recording. Placez l'interrupteur [Power] sur [CAMERA]. 2. Fade Out REC G SP REC G SP 0:00:20 60min 0:00:25 60min Pour débuter un ...
User Manual (ENGLISH)
Page 49
...233;sulter. Placez l'interrupteur [Mode] sur [TAPE] (modèles SC-D363/D364/D365/D366 uniquement). 3. I Do not use near flammable or explosive materials. Press the [LIGHT] button until appears. [ Notes ] I Do not place the Camcorder into the carrying case immediately after turning it off while you are 3 ...tui tout de suite après utilisation de la diode car celle-ci demeure extrêmement chaude pendant un certain temps. Set the [Power] switch to [TAPE]. (SC-D363/D364/D365/D366 only) 3. I The range of the LIGHT is limited. (up to 6.6ft (2m)) [ Danger ] I Do...
...233;sulter. Placez l'interrupteur [Mode] sur [TAPE] (modèles SC-D363/D364/D365/D366 uniquement). 3. I Do not use near flammable or explosive materials. Press the [LIGHT] button until appears. [ Notes ] I Do not place the Camcorder into the carrying case immediately after turning it off while you are 3 ...tui tout de suite après utilisation de la diode car celle-ci demeure extrêmement chaude pendant un certain temps. Set the [Power] switch to [TAPE]. (SC-D363/D364/D365/D366 only) 3. I The range of the LIGHT is limited. (up to 6.6ft (2m)) [ Danger ] I Do...

User Manual (ENGLISH)
Page 52
Set the [Mode] switch to [CAMERA]. 2. Press the [MENU] button. 4 4. Set the [Power] switch to [TAPE]. (SC-D363/D364/D365/D366 only) 3. Move the [Zoom] lever up or down to select , then press the [OK] button. 6 7. To activate the Real Stereo function, move the [Zoom] lever up or down to select , then press the [OK] button...
Set the [Mode] switch to [CAMERA]. 2. Press the [MENU] button. 4 4. Set the [Power] switch to [TAPE]. (SC-D363/D364/D365/D366 only) 3. Move the [Zoom] lever up or down to select , then press the [OK] button. 6 7. To activate the Real Stereo function, move the [Zoom] lever up or down to select , then press the [OK] button...

User Manual (ENGLISH)
Page 59
...;AIS Enregistrement avancé Selecting the Visual Effects Choix des effets visuels 1. DIS √Off Digital Zoom √Off 4. et sont disponibles lorsque le mode DIS est activé. 53 Set the [Power] switch to [TAPE]. (SC-D363/D364/D365/D366 only) 3. Set the [Mode] switch to [CAMERA]. 2. I The display mode is set to...
...;AIS Enregistrement avancé Selecting the Visual Effects Choix des effets visuels 1. DIS √Off Digital Zoom √Off 4. et sont disponibles lorsque le mode DIS est activé. 53 Set the [Power] switch to [TAPE]. (SC-D363/D364/D365/D366 only) 3. Set the [Mode] switch to [CAMERA]. 2. I The display mode is set to...

User Manual (ENGLISH)
Page 60
...[CAMERA]. 2. Placez l'interrupteur de [Mode] sur [TAPE]. (modèles SC-D363/D364/D365/D366 uniquement). 3. To activate the 16:9 Wide function, move the [Zoom] White Balance Visual Effect 16:9 Wide Off DIS On Digital Zoom ZOOM Move OK Select MENU Exit 4. ENGLISH Advanced Recording Enregistrement avancé FRANÇAIS...mode. ➥page 19 ✤ Select to record a picture to be released. L'icône sélectionnée s'affiche. I Le zoom numérique n'est pas disponible en mode 16:9 Wide. Set the [Power] switch to [TAPE]. (SC-D363/D364/D365/D366 only) 3.
...[CAMERA]. 2. Placez l'interrupteur de [Mode] sur [TAPE]. (modèles SC-D363/D364/D365/D366 uniquement). 3. To activate the 16:9 Wide function, move the [Zoom] White Balance Visual Effect 16:9 Wide Off DIS On Digital Zoom ZOOM Move OK Select MENU Exit 4. ENGLISH Advanced Recording Enregistrement avancé FRANÇAIS...mode. ➥page 19 ✤ Select to record a picture to be released. L'icône sélectionnée s'affiche. I Le zoom numérique n'est pas disponible en mode 16:9 Wide. Set the [Power] switch to [TAPE]. (SC-D363/D364/D365/D366 only) 3.

User Manual (ENGLISH)
Page 62
... Zooming In and Out with optical zoom. ✤ The picture quality may result in lower picture quality. Move the [Zoom] lever up or down to 1200x when combined with Digital Zoom (Digital Zoom) Zoom avant et arrière à l'aide du zoom numérique (Zoom Num.) ✤ Maximum Digital Zoom ...actif. Appuyez sur le bouton [MENU]. Set the [Power] switch to [TAPE]. (SC-D363/D364/D365/D366 only) 3. I La liste des menus apparaîtra. 4. I The menu list will appear. 4. sont sauvegardés). Déplacez le bouton de [Zoom] vers le haut ou vers le bas afin de ...
... Zooming In and Out with optical zoom. ✤ The picture quality may result in lower picture quality. Move the [Zoom] lever up or down to 1200x when combined with Digital Zoom (Digital Zoom) Zoom avant et arrière à l'aide du zoom numérique (Zoom Num.) ✤ Maximum Digital Zoom ...actif. Appuyez sur le bouton [MENU]. Set the [Power] switch to [TAPE]. (SC-D363/D364/D365/D366 only) 3. I La liste des menus apparaîtra. 4. I The menu list will appear. 4. sont sauvegardés). Déplacez le bouton de [Zoom] vers le haut ou vers le bas afin de ...

User Manual (ENGLISH)
Page 63
...Placez l'interrupteur [Power] sur [CAMERA]. 1. Placez l'interrupteur de [Mode] sur [TAPE] (modèles SC-D363/D364/D365/D366 uniquement). 3. Appuyez sur le bouton [MENU]. 3. Move the [Zoom] lever up or down to select , then press the [OK] button. 6 5. I will flash on automatique (SC-D364/D366 seulement... still image has been recorded, the Camcorder 4 returns to [TAPE]. (SC-D363/D364/D365/D366 only) 3. Appuyez sur le bouton [PHOTO]. Press the REW/FF)] buttons to [TAPE]. (modèles SC-D363/D364/D365/D366 uniquement). (SC-D363/D364/D365/D366 only) 3. still ...
...Placez l'interrupteur [Power] sur [CAMERA]. 1. Placez l'interrupteur de [Mode] sur [TAPE] (modèles SC-D363/D364/D365/D366 uniquement). 3. Appuyez sur le bouton [MENU]. 3. Move the [Zoom] lever up or down to select , then press the [OK] button. 6 5. I will flash on automatique (SC-D364/D366 seulement... still image has been recorded, the Camcorder 4 returns to [TAPE]. (SC-D363/D364/D365/D366 only) 3. Appuyez sur le bouton [PHOTO]. Press the REW/FF)] buttons to [TAPE]. (modèles SC-D363/D364/D365/D366 uniquement). (SC-D363/D364/D365/D366 only) 3. still ...

User Manual (ENGLISH)
Page 68
.... I Le caméscope est prêt pour la post-sonorisation. 6. R ERA 1. Press the PLAY/STILL)] button to connect external sound source input. SC-D263/D363 only) to start dubbing. Placez l'interrupteur de [Mode] sur [TAPE]. 3. Appuyez sur le bouton PLAY/STILL)] pour trouver les codes temps de la...Set the [Mode] switch to the MIC jack or use the Multi-AV Cable (or AV JACK; Press the [A.DUB] button on the Camcorder. 2. Set the [Power] switch to be erased. Press the PLAY/STILL)] button and QMUEINCUK PLAYE find the time frame of the scene to [PLAYER]. I Pour ...
.... I Le caméscope est prêt pour la post-sonorisation. 6. R ERA 1. Press the PLAY/STILL)] button to connect external sound source input. SC-D263/D363 only) to start dubbing. Placez l'interrupteur de [Mode] sur [TAPE]. 3. Appuyez sur le bouton PLAY/STILL)] pour trouver les codes temps de la...Set the [Mode] switch to the MIC jack or use the Multi-AV Cable (or AV JACK; Press the [A.DUB] button on the Camcorder. 2. Set the [Power] switch to be erased. Press the PLAY/STILL)] button and QMUEINCUK PLAYE find the time frame of the scene to [PLAYER]. I Pour ...

User Manual (ENGLISH)
Page 73
...or a gray image will appear on the VCR or TV. 5. I PAUSE apparaît. 12. Set the [Mode] switch to [PLAYER]. 3. Turn on the Camcorder. [ Remarque ] I If is set to or , the WindCut Plus will appear. 7 7. Insérez la cassette vierge, languette de protection rabattue, dans ...12Bit √Off √Out ZOOM Move OK Select MENU Exit Player Mode Back Rec Mode Audio Mode WindCut Plus AV In/Out Out 7. Sélectionnez le programme TV ou lisez la cassette VHS. 13. Placez l'interrupteur [Power] sur [PLAYER]. (modèles SC-D363/D364/D365/D366 uniquement) ERA ...
...or a gray image will appear on the VCR or TV. 5. I PAUSE apparaît. 12. Set the [Mode] switch to [PLAYER]. 3. Turn on the Camcorder. [ Remarque ] I If is set to or , the WindCut Plus will appear. 7 7. Insérez la cassette vierge, languette de protection rabattue, dans ...12Bit √Off √Out ZOOM Move OK Select MENU Exit Player Mode Back Rec Mode Audio Mode WindCut Plus AV In/Out Out 7. Sélectionnez le programme TV ou lisez la cassette VHS. 13. Placez l'interrupteur [Power] sur [PLAYER]. (modèles SC-D363/D364/D365/D366 uniquement) ERA ...
User Manual (ENGLISH)
Page 76
...;Super Fine √Series 1. Memory Memory Card 3. Déplacez le bouton de [Zoom] vers le haut ou vers le bas pour sélectionner , puis appuyez sur le bouton [OK]. ZOOM Move OK Select MENU Exit 6. Set the [Power] switch to [TAPE] or [MEMORY]. 3. I Accédez directement à ...(modèles SC-D363/D364/D365 /D366 uniquement) Selecting the Memory Type (SC-D366 only) ✤ The Memory Type setting works in // modes. ➥page 19 (SC-D366: 32MB) ✤ Images can directly access the Memory Type function using the built-in memory (Int. Move the [Zoom] lever up or ...
...;Super Fine √Series 1. Memory Memory Card 3. Déplacez le bouton de [Zoom] vers le haut ou vers le bas pour sélectionner , puis appuyez sur le bouton [OK]. ZOOM Move OK Select MENU Exit 6. Set the [Power] switch to [TAPE] or [MEMORY]. 3. I Accédez directement à ...(modèles SC-D363/D364/D365 /D366 uniquement) Selecting the Memory Type (SC-D366 only) ✤ The Memory Type setting works in // modes. ➥page 19 (SC-D366: 32MB) ✤ Images can directly access the Memory Type function using the built-in memory (Int. Move the [Zoom] lever up or ...

