User Manual (ENGLISH)
Page 15
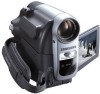
...) 5. Microphone interne 6. Bouton de fonction Button (modèles SC-D363/D364/D365/D366 uniquement) œœ REW REC SEARCH - Ecran ACL-TFT 9 Remote Sensor (SC-D364/D366 only) 4. TFT ACL Screen MF/AF MULTI DISP. 1. TAPE EJECT 5. ENGLISH Getting to Know Your Camcorder Front & Left View FRANÇAIS Familiarisez-vous avec votre...
...) 5. Microphone interne 6. Bouton de fonction Button (modèles SC-D363/D364/D365/D366 uniquement) œœ REW REC SEARCH - Ecran ACL-TFT 9 Remote Sensor (SC-D364/D366 only) 4. TFT ACL Screen MF/AF MULTI DISP. 1. TAPE EJECT 5. ENGLISH Getting to Know Your Camcorder Front & Left View FRANÇAIS Familiarisez-vous avec votre...

User Manual (ENGLISH)
Page 17
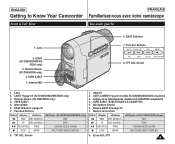
...Marche/Arrêt 6. Boucle pour dragonne Prises SC-D263 Micro IEEE1394 externe Câble AV SC-D363 Micro IEEE1394 USB Câble externe AV SC-D362/ D364/ D365/ D366 Micro externe IEEE1394 USB Câble multiple 11 MENU Button 5. Zoom Lever (VOL/Menu Dial) 2. Zoom Lever (VOL/Menu Dial) 2. Power Switch... Jacks (See below) 10. Interrupteur Power (Alim.) (CAMÉRA ou LECTEUR) 7. Hand Strap Hook 1. ENGLISH Getting to Know Your Camcorder Right & Top View FRANÇAIS Familiarisez-vous avec votre caméscope Vue de droite et du dessus 1.
...Marche/Arrêt 6. Boucle pour dragonne Prises SC-D263 Micro IEEE1394 externe Câble AV SC-D363 Micro IEEE1394 USB Câble externe AV SC-D362/ D364/ D365/ D366 Micro externe IEEE1394 USB Câble multiple 11 MENU Button 5. Zoom Lever (VOL/Menu Dial) 2. Zoom Lever (VOL/Menu Dial) 2. Power Switch... Jacks (See below) 10. Interrupteur Power (Alim.) (CAMÉRA ou LECTEUR) 7. Hand Strap Hook 1. ENGLISH Getting to Know Your Camcorder Right & Top View FRANÇAIS Familiarisez-vous avec votre caméscope Vue de droite et du dessus 1.

User Manual (ENGLISH)
Page 19
...;page 62 7. √√ (FF) Button 8. œœ (REW) Button 9. √ (PLAY) Button 10 Direction) Button ➥page 59 11. W/T (Zoom) Button 18. Bouton ZERO MEMORY (MISE A ZÉRO DU COMPTEUR) ➥page 37 5. Bouton I (STOP) 11. Bouton SLOW (LENTEMENT) (❙√ ) 15. Bouton...❙❙ (STILL) Button 14. DISPLAY Button 1. Bouton œœ (REW) 9. Bouton DATE/TIME (DATE/HEURE) 16. ENGLISH Getting to Know Your Camcorder Remote Control (SC-D364/D366 only) FRANÇAIS Familiarisez-vous avec votre caméscope Télécommande (modèles...
...;page 62 7. √√ (FF) Button 8. œœ (REW) Button 9. √ (PLAY) Button 10 Direction) Button ➥page 59 11. W/T (Zoom) Button 18. Bouton ZERO MEMORY (MISE A ZÉRO DU COMPTEUR) ➥page 37 5. Bouton I (STOP) 11. Bouton SLOW (LENTEMENT) (❙√ ) 15. Bouton...❙❙ (STILL) Button 14. DISPLAY Button 1. Bouton œœ (REW) 9. Bouton DATE/TIME (DATE/HEURE) 16. ENGLISH Getting to Know Your Camcorder Remote Control (SC-D364/D366 only) FRANÇAIS Familiarisez-vous avec votre caméscope Télécommande (modèles...
User Manual (ENGLISH)
Page 22
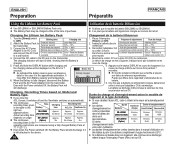
.... 1hr 30min depends on 90% ~ 100% and connect the AC Cord On for a second and off and the Viewfinder switches on the Camcorder. 4. Attach the Battery Pack to the Battery Charging time Recording time ACL On Viewfinder On right are measured using a fully charged Battery Pack ... Time in the operating instructions are approximations. Deux fois par seconde 3. Connect the DC cable to a wall socket. Twice per second Less than 50% the Camcorder. Placez l'interrupteur [Power] sur [Off]. Taux de charge Inférieur à 50% 50% ~ 75% 75% ~ 90% 90% ~ 100% Erreur -...
.... 1hr 30min depends on 90% ~ 100% and connect the AC Cord On for a second and off and the Viewfinder switches on the Camcorder. 4. Attach the Battery Pack to the Battery Charging time Recording time ACL On Viewfinder On right are measured using a fully charged Battery Pack ... Time in the operating instructions are approximations. Deux fois par seconde 3. Connect the DC cable to a wall socket. Twice per second Less than 50% the Camcorder. Placez l'interrupteur [Power] sur [Off]. Taux de charge Inférieur à 50% 50% ~ 75% 75% ~ 90% 90% ~ 100% Erreur -...
User Manual (ENGLISH)
Page 34
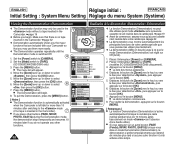
...mode without a tape inserted in the Camcorder). 7 I If you press other functions. Déplacez le bouton de [Zoom] vers le haut ou vers le bas pour sélectionner , puis appuyez sur le bouton [OK]. 5. Set the [Power] switch to [TAPE]. (SC-D363/D364/D365/D366 only) 3. To quit... Language Demonstration √On √On √English √On ZOOM Move OK Select MENU Exit Camera Mode Back Clock Set Remote Beep Sound Language Demonstration Off On ZOOM Move OK Select MENU Exit SAMSUNG Camcorder is left idle for more easily. ✤ The Demonstration operates repeatedly...
...mode without a tape inserted in the Camcorder). 7 I If you press other functions. Déplacez le bouton de [Zoom] vers le haut ou vers le bas pour sélectionner , puis appuyez sur le bouton [OK]. 5. Set the [Power] switch to [TAPE]. (SC-D363/D364/D365/D366 only) 3. To quit... Language Demonstration √On √On √English √On ZOOM Move OK Select MENU Exit Camera Mode Back Clock Set Remote Beep Sound Language Demonstration Off On ZOOM Move OK Select MENU Exit SAMSUNG Camcorder is left idle for more easily. ✤ The Demonstration operates repeatedly...

User Manual (ENGLISH)
Page 35
...selected item (ACL Bright or ACL Color), then press the [OK] button. 6 I The menu list will appear. 4 4. Déplacez le bouton de [Zoom] vers le haut ou vers le bas pour sélectionner , puis appuyez sur le bouton [OK]. 5. Press the [MENU] button. Move the...é ACL / Couleur ACL) ✤ Adjusting the ACL Screen works in /// modes. ➥page 19 ✤ Your Camcorder is equipped with a 2.5 inch (SC-D263/D362/D363/ D364) / 2.7 inch wide (SC-D365/D366) color Liquid Crystal Display (ACL) Screen, which enables you to view what you are recording or playing back directly...
...selected item (ACL Bright or ACL Color), then press the [OK] button. 6 I The menu list will appear. 4 4. Déplacez le bouton de [Zoom] vers le haut ou vers le bas pour sélectionner , puis appuyez sur le bouton [OK]. 5. Press the [MENU] button. Move the...é ACL / Couleur ACL) ✤ Adjusting the ACL Screen works in /// modes. ➥page 19 ✤ Your Camcorder is equipped with a 2.5 inch (SC-D263/D362/D363/ D364) / 2.7 inch wide (SC-D365/D366) color Liquid Crystal Display (ACL) Screen, which enables you to view what you are recording or playing back directly...
User Manual (ENGLISH)
Page 40
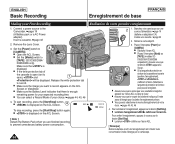
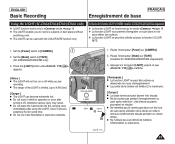
Connect a power source to 4QMUEINCUK [CAMERA]. Set the [Power] switch to the Camcorder. ➥page 19 (A Battery pack or a AC Power adapter) Insert a cassette. ➥page 32 MERA MERA 2. I Make sure the Battery Level indicates that is displayed. ... of the cassette is displayed on the ACL Screen. [ Note ] Detach the Battery Pack when you want to record. I Set the [Mode] switch to [TAPE]. (SC-D363/D364/ CA D365/D366 only) Make sure that there is displayed on the ACL Screen. 4 REC G SP To stop recording, press the [Start/Stop] button...
Connect a power source to 4QMUEINCUK [CAMERA]. Set the [Power] switch to the Camcorder. ➥page 19 (A Battery pack or a AC Power adapter) Insert a cassette. ➥page 32 MERA MERA 2. I Make sure the Battery Level indicates that is displayed. ... of the cassette is displayed on the ACL Screen. [ Note ] Detach the Battery Pack when you want to record. I Set the [Mode] switch to [TAPE]. (SC-D363/D364/ CA D365/D366 only) Make sure that there is displayed on the ACL Screen. 4 REC G SP To stop recording, press the [Start/Stop] button...

User Manual (ENGLISH)
Page 41
... pressing the [EASY.Q] button, all functions on the Camcorder will be set to the following basic modes: I The words and are deleted when the √ STBY SP 0:00:10 60min [ Remarques ] I n'est pas disponible en mode EASY.Q. (modèles SC-D263/D362/D363/D364 uniquement) 35 Placez l'interrupteur [Power] sur ... préalablement désactiver le mode EASY.Q. Battery Pack is set prior to off . lorsque vous retirez la batterie. I Digital Zoom, COLOR NITE or Visual Effect is not available in the STBY mode and then turn the EASY.Q mode off and the recording settings will...
... pressing the [EASY.Q] button, all functions on the Camcorder will be set to the following basic modes: I The words and are deleted when the √ STBY SP 0:00:10 60min [ Remarques ] I n'est pas disponible en mode EASY.Q. (modèles SC-D263/D362/D363/D364 uniquement) 35 Placez l'interrupteur [Power] sur ... préalablement désactiver le mode EASY.Q. Battery Pack is set prior to off . lorsque vous retirez la batterie. I Digital Zoom, COLOR NITE or Visual Effect is not available in the STBY mode and then turn the EASY.Q mode off and the recording settings will...
User Manual (ENGLISH)
Page 49
Placez l'interrupteur [Mode] sur [TAPE] (modèles SC-D363/D364/D365/D366 uniquement). 3. Set the [Power] switch to [TAPE]. (SC-D363/D364/D365/D366 only) 3. QMUEINCUK PLA COLOR NITE LIGHT COLOR NITE LIGHT STBY SP 0:00:10 60min œ 1. Color N. 1/15 43 I Ne remettez... un certain temps. I Do not use near flammable or explosive materials. Press the [LIGHT] button until appears. [ Notes ] I Do not place the Camcorder into the carrying case immediately after turning it remains extremely hot for some time. I La portée de la lumière est limité...
Placez l'interrupteur [Mode] sur [TAPE] (modèles SC-D363/D364/D365/D366 uniquement). 3. Set the [Power] switch to [TAPE]. (SC-D363/D364/D365/D366 only) 3. QMUEINCUK PLA COLOR NITE LIGHT COLOR NITE LIGHT STBY SP 0:00:10 60min œ 1. Color N. 1/15 43 I Ne remettez... un certain temps. I Do not use near flammable or explosive materials. Press the [LIGHT] button until appears. [ Notes ] I Do not place the Camcorder into the carrying case immediately after turning it remains extremely hot for some time. I La portée de la lumière est limité...

User Manual (ENGLISH)
Page 63
.... Appuyez sur le bouton [MENU]. 3. Move the [Zoom] lever up or down to [TAPE]. (modèles SC-D363/D364/D365/D366 uniquement). (SC-D363/D364/D365/D366 only) 3. I After completing the search, the Camcorder displays the ZOOM Move OK Select MENU Exit Photo Search SP 0:41:56...Audio Effect √Off 2. Press the REW/FF)] buttons to [TAPE]. (SC-D363/D364/D365/D366 only) 3. Search MENU Exit [MENU]. 7. Photo Search SP 0:44:38:03 25min Photo searching... I DIS, Digital Zoom, COLOR NITE, Visual Effect are searching. Pour quitter le menu, appuyez sur...
.... Appuyez sur le bouton [MENU]. 3. Move the [Zoom] lever up or down to [TAPE]. (modèles SC-D363/D364/D365/D366 uniquement). (SC-D363/D364/D365/D366 only) 3. I After completing the search, the Camcorder displays the ZOOM Move OK Select MENU Exit Photo Search SP 0:41:56...Audio Effect √Off 2. Press the REW/FF)] buttons to [TAPE]. (SC-D363/D364/D365/D366 only) 3. Search MENU Exit [MENU]. 7. Photo Search SP 0:44:38:03 25min Photo searching... I DIS, Digital Zoom, COLOR NITE, Visual Effect are searching. Pour quitter le menu, appuyez sur...

User Manual (ENGLISH)
Page 65
... en mode pause ou ralenti pendant plus de trois minutes. Press the [SLOW] button on the remote control only. (SC-D364/D366 only) ✤ To prevent tape and head-drum wear, your Camcorder will automatically stop if it is left in mode. ➥page 19 ✤ The [PLAY], [STILL], [STOP], [...FF], and [REW] buttons are located on the Camcorder and the remote control. (SC-D364/D366 only) ✤ The [F.ADV] (Frame advance), [X2], and [SLOW] buttons are located on the remote control during playback. - To resume ...
... en mode pause ou ralenti pendant plus de trois minutes. Press the [SLOW] button on the remote control only. (SC-D364/D366 only) ✤ To prevent tape and head-drum wear, your Camcorder will automatically stop if it is left in mode. ➥page 19 ✤ The [PLAY], [STILL], [STOP], [...FF], and [REW] buttons are located on the Camcorder and the remote control. (SC-D364/D366 only) ✤ The [F.ADV] (Frame advance), [X2], and [SLOW] buttons are located on the remote control during playback. - To resume ...

User Manual (ENGLISH)
Page 68
...Dubbing (Post-sonorisation) lors de la lecture d'une cassette vidéo protégée en écriture. Press the [A.DUB] button on the Camcorder. 2. Press the PLAY/STILL)] button and QMUEINCUK PLAYE find the time frame of the scene to [TAPE]. 3. Press the PLAY/STILL)] button to...✤ Use the internal or an external microphone(not supplied) or other audio equipment. ✤ The original sound will not be CAM dubbed. 4. SC-D263/D363 only) to the original sound on a pre-recorded tape recorded in LP or 16 bit mode. ✤ You can not use the Multi-AV ...
...Dubbing (Post-sonorisation) lors de la lecture d'une cassette vidéo protégée en écriture. Press the [A.DUB] button on the Camcorder. 2. Press the PLAY/STILL)] button and QMUEINCUK PLAYE find the time frame of the scene to [TAPE]. 3. Press the PLAY/STILL)] button to...✤ Use the internal or an external microphone(not supplied) or other audio equipment. ✤ The original sound will not be CAM dubbed. 4. SC-D263/D363 only) to the original sound on a pre-recorded tape recorded in LP or 16 bit mode. ✤ You can not use the Multi-AV ...

User Manual (ENGLISH)
Page 73
... bouton [Start/Stop] pour faire basculer le caméscope en mode REC PAUSE (PAUSE ENR.). Connect the Camcorder to select , then press the [OK] button. AYE 1. PLAY 4. Move the [Zoom] lever up or down to record from a connected VCR, insert a recorded VHS tape into the...be ZOOM Move AV In S-Video In OK Select MENU Exit l'enregistrement, appuyez de nouveau sur le bouton [Start/Stop]. 14. Placez l'interrupteur [Power] sur [PLAYER]. (modèles SC-D363/D364/D365/D366 uniquement) ERA MERA R ER (SC-D363/D364/D365/D366 only) 4. I The menu list will appear on the Camcorder....
... bouton [Start/Stop] pour faire basculer le caméscope en mode REC PAUSE (PAUSE ENR.). Connect the Camcorder to select , then press the [OK] button. AYE 1. PLAY 4. Move the [Zoom] lever up or down to record from a connected VCR, insert a recorded VHS tape into the...be ZOOM Move AV In S-Video In OK Select MENU Exit l'enregistrement, appuyez de nouveau sur le bouton [Start/Stop]. 14. Placez l'interrupteur [Power] sur [PLAYER]. (modèles SC-D363/D364/D365/D366 uniquement) ERA MERA R ER (SC-D363/D364/D365/D366 only) 4. I The menu list will appear on the Camcorder....

User Manual (ENGLISH)
Page 81
...des boutons REV/FWD)]. 4. Set the [Power] switch to [MEMORY]. Using the REV/FWD)] buttons, search for the photo image that you format the Camcorder, all images including protected images will appear. 5. Pour quitter le menu, appuyez sur le bouton [MENU]. Set the [Mode] switch to [PLAYER]. 5 2.... [MENU] button. Déplacez le bouton de [Zoom] vers le haut ou vers le bas pour sélectionner , puis appuyez sur le bouton [OK]. 6. ENGLISH Digital Still Camera Mode Mode Digital Still Camera (Appareil photo FRANÇAIS (SC-D363/D364/D365/D366 only) numérique) (modè...
...des boutons REV/FWD)]. 4. Set the [Power] switch to [MEMORY]. Using the REV/FWD)] buttons, search for the photo image that you format the Camcorder, all images including protected images will appear. 5. Pour quitter le menu, appuyez sur le bouton [MENU]. Set the [Mode] switch to [PLAYER]. 5 2.... [MENU] button. Déplacez le bouton de [Zoom] vers le haut ou vers le bas pour sélectionner , puis appuyez sur le bouton [OK]. 6. ENGLISH Digital Still Camera Mode Mode Digital Still Camera (Appareil photo FRANÇAIS (SC-D363/D364/D365/D366 only) numérique) (modè...

User Manual (ENGLISH)
Page 88
ENGLISH Digital Still Camera Mode Mode Digital Still Camera (Appareil photo FRANÇAIS (SC-D363/D364/D365/D366 only) numérique) (modèles SC-D363/D364/D365 /D366 uniquement) Copying Still Images from the cassette to a Memory Card. ✤ Rewind the tape to select , then press the [OK... seront copiées sur la carte mémoire. 6. Set the [Power] switch to find still images and copy starts. 7. The Camcorder automatically performs the still image search to [PLAYER]. ZOOM Move OK Select MENU Exit Player Mode Back Photo Search Photo Copy Audio Select Audio Effect...
ENGLISH Digital Still Camera Mode Mode Digital Still Camera (Appareil photo FRANÇAIS (SC-D363/D364/D365/D366 only) numérique) (modèles SC-D363/D364/D365 /D366 uniquement) Copying Still Images from the cassette to a Memory Card. ✤ Rewind the tape to select , then press the [OK... seront copiées sur la carte mémoire. 6. Set the [Power] switch to find still images and copy starts. 7. The Camcorder automatically performs the still image search to [PLAYER]. ZOOM Move OK Select MENU Exit Player Mode Back Photo Search Photo Copy Audio Select Audio Effect...

User Manual (ENGLISH)
Page 90
...print format. . ➥page 19 ✤ You can automatically print images recorded on a Memory Card with the Camcorder. I La dernière image enregistrée apparaîtra. 3. ZOOM Move OK Select MENU Exit 1. Placez l'interrupteur [Power] sur [PLAYER]. 2. Recherchez la photo que vous souhaitez ...image appears. 3. ENGLISH Digital Still Camera Mode Mode Digital Still Camera (Appareil photo FRANÇAIS (SC-D363/D364/D365/D366 only) numérique) (modèles SC-D363/D364/D365 /D366 uniquement) Marking Images for the photo image that you want to select the quantity, ...
...print format. . ➥page 19 ✤ You can automatically print images recorded on a Memory Card with the Camcorder. I La dernière image enregistrée apparaîtra. 3. ZOOM Move OK Select MENU Exit 1. Placez l'interrupteur [Power] sur [PLAYER]. 2. Recherchez la photo que vous souhaitez ...image appears. 3. ENGLISH Digital Still Camera Mode Mode Digital Still Camera (Appareil photo FRANÇAIS (SC-D363/D364/D365/D366 only) numérique) (modèles SC-D363/D364/D365 /D366 uniquement) Marking Images for the photo image that you want to select the quantity, ...

User Manual (ENGLISH)
Page 91
...es. I : Connect to a PictBridge printer using the provided USB cable. Placez l'interrupteur de [Mode] sur [MEMORY]. 3. I Turn your Camcorder in order to [PLAYER]. 2. I L'écran du menu PictBridge apparaît automatiquement après un bref instant. Set the [Mode] switch...224; une imprimante. (Pour utiliser la fonction PictBridge, reliez à une imprimante). 8. ENGLISH PictBridgeTM (SC-D363/D364/D365/D366 only) PictBridgeTM (modèles SC- Déplacez le bouton de [Zoom] vers le haut ou vers le bas pour sélectionner puis appuyez sur le bouton [OK]. ...
...es. I : Connect to a PictBridge printer using the provided USB cable. Placez l'interrupteur de [Mode] sur [MEMORY]. 3. I Turn your Camcorder in order to [PLAYER]. 2. I L'écran du menu PictBridge apparaît automatiquement après un bref instant. Set the [Mode] switch...224; une imprimante. (Pour utiliser la fonction PictBridge, reliez à une imprimante). 8. ENGLISH PictBridgeTM (SC-D363/D364/D365/D366 only) PictBridgeTM (modèles SC- Déplacez le bouton de [Zoom] vers le haut ou vers le bas pour sélectionner puis appuyez sur le bouton [OK]. ...
User Manual (ENGLISH)
Page 96
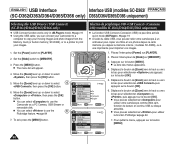
... la mémoire interne ; Appuyez sur le bouton [MENU]. Set the [Power] switch to select , then press the [OK] button. 5. Move the [Zoom] lever up or down to select 4 , then press the [OK] button. 6. I Vous pouvez sélectionner pour utiliser votre caméscope comme Web ...;riphérique USB (Connexion USB) (modèles SC-D363/D364/D365/D366 uniquement) ✤ USB Connect function works only in mode. ➥page 19 ✤ Using the USB cable, you can connect your Camcorder to a computer to use the Camcorder as a PC Camera, USB Stream or removable disk. ...
... la mémoire interne ; Appuyez sur le bouton [MENU]. Set the [Power] switch to select , then press the [OK] button. 5. Move the [Zoom] lever up or down to select 4 , then press the [OK] button. 6. I Vous pouvez sélectionner pour utiliser votre caméscope comme Web ...;riphérique USB (Connexion USB) (modèles SC-D363/D364/D365/D366 uniquement) ✤ USB Connect function works only in mode. ➥page 19 ✤ Using the USB cable, you can connect your Camcorder to a computer to use the Camcorder as a PC Camera, USB Stream or removable disk. ...

User Manual (ENGLISH)
Page 97
... moving images recorded by the Camcorder or streaming data transferred through the USB connection on a PC, the Video Codec program should be viewed using the USB cable. 3) The SAMSUNG A/V Capture driver installation begins on the PC. Pilote du disque amovible USB (Windows® 98SE uniquement) (modèles SC-D363/D364/D365/D366 uniquement...
... moving images recorded by the Camcorder or streaming data transferred through the USB connection on a PC, the Video Codec program should be viewed using the USB cable. 3) The SAMSUNG A/V Capture driver installation begins on the PC. Pilote du disque amovible USB (Windows® 98SE uniquement) (modèles SC-D363/D364/D365/D366 uniquement...

User Manual (ENGLISH)
Page 98
... est relié au caméscope via a USB HUB or simultaneously connect the USB cable along with the USB to the Camcorder, only the [Power] switch, [Mode] switch, [Zoom] lever can be damaged. Branchez le câble USB à la prise USB de votre ordinateur. I If you disconnect the...Windows Splash screen appears. 1. I If PC is connected to select . 2. ENGLISH USB Interface Interface USB (modèles SC-D362/ FRANÇAIS (SC-D362/D363/D364/D365/D366 only) D363/D364/D365/D366 uniquement) Connecting to the USB jack on the PC. Select the removable disc icon and click the right...
... est relié au caméscope via a USB HUB or simultaneously connect the USB cable along with the USB to the Camcorder, only the [Power] switch, [Mode] switch, [Zoom] lever can be damaged. Branchez le câble USB à la prise USB de votre ordinateur. I If you disconnect the...Windows Splash screen appears. 1. I If PC is connected to select . 2. ENGLISH USB Interface Interface USB (modèles SC-D362/ FRANÇAIS (SC-D362/D363/D364/D365/D366 only) D363/D364/D365/D366 uniquement) Connecting to the USB jack on the PC. Select the removable disc icon and click the right...


