
User Manual (user Manual) (ver.1.0) (English)
Page 1
Index Main Page Safety Precautions Notational Installation While Operating Other Introduction Front Rear Setup Installing the CD-ROM Drive Connecting the Cables Installing the Device Driver Setting Up the Device Driver Using the Drive Using the CD-ROM Drive Storing and Cleaning Your Discs Upgrading the Firmware Flash Memory System Requirements Troubleshooting Solving Technical Problems Specifications
Index Main Page Safety Precautions Notational Installation While Operating Other Introduction Front Rear Setup Installing the CD-ROM Drive Connecting the Cables Installing the Device Driver Setting Up the Device Driver Using the Drive Using the CD-ROM Drive Storing and Cleaning Your Discs Upgrading the Firmware Flash Memory System Requirements Troubleshooting Solving Technical Problems Specifications

User Manual (user Manual) (ver.1.0) (English)
Page 7
Introduction Rear 1. Digital output terminal You can connect a sound card to the CD-ROM drive. 5. Master/slave select terminal Usually, this two-pin terminal. 2. Verify that the setting is used to connect the 40-pin flat cable from the IDE interface to your drive using this is not, simply remove the jumper and place it... DC) (B : +12V DC) Sound output terminal You can connect a sound card or MPEG card which support Digital output terminal to the documentation supplied with your drive using this guide.
Introduction Rear 1. Digital output terminal You can connect a sound card to the CD-ROM drive. 5. Master/slave select terminal Usually, this two-pin terminal. 2. Verify that the setting is used to connect the 40-pin flat cable from the IDE interface to your drive using this is not, simply remove the jumper and place it... DC) (B : +12V DC) Sound output terminal You can connect a sound card or MPEG card which support Digital output terminal to the documentation supplied with your drive using this guide.

User Manual (user Manual) (ver.1.0) (English)
Page 8
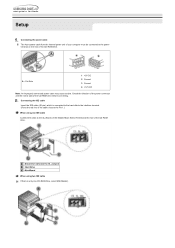
If necessary, attach a horizontal bracket to both sides of the drive. Remove the cover from any power source. Setup Installing the CD-ROM Drive To install your CD-ROM Drive in the PC, proceed as shown in the illustration. Connecting the Cables Make sure that the PC is powered off and disconnected from a free expansion slot and install the CD-ROM drive, as follows.
If necessary, attach a horizontal bracket to both sides of the drive. Remove the cover from any power source. Setup Installing the CD-ROM Drive To install your CD-ROM Drive in the PC, proceed as shown in the illustration. Connecting the Cables Make sure that the PC is powered off and disconnected from a free expansion slot and install the CD-ROM drive, as follows.
User Manual (user Manual) (ver.1.0) (English)
Page 9
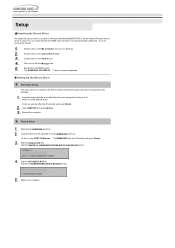
...1 +5V DC 2 Ground 3 Ground 4 +12V DC Note: An improperly connected power cable may cause trouble. a : Slave Drive (Choose the SL Jumper) b : Hard Drive c : MainBoard When using one CD-ROM drive, select MA (Master). Connecting the IDE cable Insert the IDE cable (40-pin), which is connected to the hard disk to the... only one IDE cable Connect the cable to the power terminal on the rear of the CD-ROM drive. Check the direction of the power connector and the incline side of the CD-ROM drive before connecting. Setup Connecting the power cable The 4-pin power cable from the internal power...
...1 +5V DC 2 Ground 3 Ground 4 +12V DC Note: An improperly connected power cable may cause trouble. a : Slave Drive (Choose the SL Jumper) b : Hard Drive c : MainBoard When using one CD-ROM drive, select MA (Master). Connecting the IDE cable Insert the IDE cable (40-pin), which is connected to the hard disk to the... only one IDE cable Connect the cable to the power terminal on the rear of the CD-ROM drive. Check the direction of the power connector and the incline side of the CD-ROM drive before connecting. Setup Connecting the power cable The 4-pin power cable from the internal power...

User Manual (user Manual) (ver.1.0) (English)
Page 10
...jumper on the sound card. Setup a : Master Drive (Choose the MA Jumper) c : MainBoard e : Secondly 1 b : Hard Drive d : Primary 1 If there is recommended.) Connecting the audio cable from a sound card Connect the 4-pin audio cable between the sound output terminal on the CD-ROM drive and the audio input terminal on the master/slave... select terminal Connect a jumper to the rear side of the CD-ROM. If the jumper is connected to CS (CSEL), you can control ...
...jumper on the sound card. Setup a : Master Drive (Choose the MA Jumper) c : MainBoard e : Secondly 1 b : Hard Drive d : Primary 1 If there is recommended.) Connecting the audio cable from a sound card Connect the 4-pin audio cable between the sound output terminal on the CD-ROM drive and the audio input terminal on the master/slave... select terminal Connect a jumper to the rear side of the CD-ROM. If the jumper is connected to CS (CSEL), you can control ...
User Manual (user Manual) (ver.1.0) (English)
Page 11
... Windows device driver is used. Copy the files from the diskette to A:, where A: is the diskette drive. Add the C:\SAMSUNG\MSCDEX/D:SSCD000 entry. You can check that the CD-ROM drive has been correctly detected by Windows. Type CDSETUP and press [Enter]. Double-click on the Device Manager ... Windows 95/98/2000/ME/XP/NT4.0, as follows. Double-click on your desktop. Add the DEVICE=C:\SAMSUNG\SSCDROM.SYS \D:SSCD000/V entry. Double-click on the My Computer icon on the Control Panel folder. Expand the CD-ROM branch. The SAMSUNG CD-ROM SC - *** device name is displayed.
... Windows device driver is used. Copy the files from the diskette to A:, where A: is the diskette drive. Add the C:\SAMSUNG\MSCDEX/D:SSCD000 entry. You can check that the CD-ROM drive has been correctly detected by Windows. Type CDSETUP and press [Enter]. Double-click on the Device Manager ... Windows 95/98/2000/ME/XP/NT4.0, as follows. Double-click on your desktop. Add the DEVICE=C:\SAMSUNG\SSCDROM.SYS \D:SSCD000/V entry. Double-click on the My Computer icon on the Control Panel folder. Expand the CD-ROM branch. The SAMSUNG CD-ROM SC - *** device name is displayed.
User Manual (user Manual) (ver.1.0) (English)
Page 12
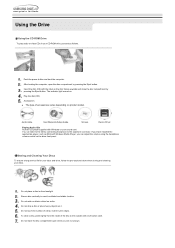
...The indicator light comes on the drive front panel. Audio cable. Playing Audio CDs Run the CD player supplied with a soft cotton cloth. You can adjust the volume using it . Storing and Cleaning Your Discs To ensure a long service life for your discs and drive, follow the pre-cautions below ...the disc compartment open the disc compartment by connecting hearphone to the outside with Windows or your sound card. Screws. Using the Drive Using the CD-ROM Drive To play audio or video CDs in your CD-ROM drive, proceed as Microsoft Windows Media Player, you can listen to the...
...The indicator light comes on the drive front panel. Audio cable. Playing Audio CDs Run the CD player supplied with a soft cotton cloth. You can adjust the volume using it . Storing and Cleaning Your Discs To ensure a long service life for your discs and drive, follow the pre-cautions below ...the disc compartment open the disc compartment by connecting hearphone to the outside with Windows or your sound card. Screws. Using the Drive Using the CD-ROM Drive To play audio or video CDs in your CD-ROM drive, proceed as Microsoft Windows Media Player, you can listen to the...
User Manual (user Manual) (ver.1.0) (English)
Page 13
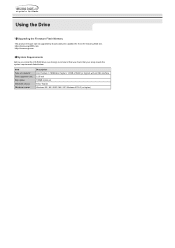
... / 2000 / ME / XP Windows NT 4.0 (or higher) Using the Drive Upgrading the Firmware Flash Memory The product firmware can be upgraded by downloading the updated file from the following Web site: http://samsung-ODD.com http://samsung.com System Requirements Before you install the CD-ROM drive, we strongly recommend that you check that your setup...
... / 2000 / ME / XP Windows NT 4.0 (or higher) Using the Drive Upgrading the Firmware Flash Memory The product firmware can be upgraded by downloading the updated file from the following Web site: http://samsung-ODD.com http://samsung.com System Requirements Before you install the CD-ROM drive, we strongly recommend that you check that your setup...
User Manual (user Manual) (ver.1.0) (English)
Page 14
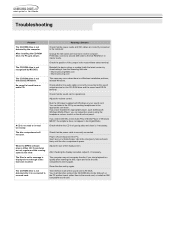
... PC. Clean the disc and try again. You must therefore connect the CD-ROM drive to the IDE port on the CD-ROM drive and the sound card CD-IN terminal. The CD-ROM drive is not detected after inserting the disc. http://samsung-ODD.com - Troubleshooting Problem The CD-ROM drive is read or is not detected by connecting headphones to the appropriate...
... PC. Clean the disc and try again. You must therefore connect the CD-ROM drive to the IDE port on the CD-ROM drive and the sound card CD-IN terminal. The CD-ROM drive is not detected after inserting the disc. http://samsung-ODD.com - Troubleshooting Problem The CD-ROM drive is read or is not detected by connecting headphones to the appropriate...
User Manual (user Manual) (ver.1.0) (English)
Page 15
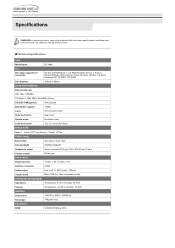
... subject to improve its products. Technical Specifications ITEM Model Name SC-148A Disc Disc types supported in read mode CD-DA, CD-ROM Mode-1, CD-ROM XA Mode-2 Form-1, Form-2, Photo-CD(Single, Multi-session), Video CD ready, CD-Plus, CD-Extra, Enhanced CD, CDI/FMV, CD-R/RW Disc diameter 120mm or 80mm DRIVE PERFORMANCE Data transfer rate 48X / Max. 7800KB/s PIO Mode...60°C Humidity: 10~90% GENERAL Dimensions 148.2(W) x 42(H) x 184(D)mm Net weight 740g (set only) RELIABILITY MTBF 125,000 POH(Duty 20%) Specifications SAMSUNG continually strives to change without notice.
... subject to improve its products. Technical Specifications ITEM Model Name SC-148A Disc Disc types supported in read mode CD-DA, CD-ROM Mode-1, CD-ROM XA Mode-2 Form-1, Form-2, Photo-CD(Single, Multi-session), Video CD ready, CD-Plus, CD-Extra, Enhanced CD, CDI/FMV, CD-R/RW Disc diameter 120mm or 80mm DRIVE PERFORMANCE Data transfer rate 48X / Max. 7800KB/s PIO Mode...60°C Humidity: 10~90% GENERAL Dimensions 148.2(W) x 42(H) x 184(D)mm Net weight 740g (set only) RELIABILITY MTBF 125,000 POH(Duty 20%) Specifications SAMSUNG continually strives to change without notice.


