
User Manual
Page 5
contents using basic functions 20 Turn your phone on and off 20 Use the touch screen 21 Access menus 22 Use widgets 22 Access help information 23 Customise your phone 23 Use basic call functions 24 Send and view messages 26 ...
contents using basic functions 20 Turn your phone on and off 20 Use the touch screen 21 Access menus 22 Use widgets 22 Access help information 23 Customise your phone 23 Use basic call functions 24 Send and view messages 26 ...
User Manual
Page 18
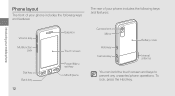
To lock, press the Hold key. introducing your mobile phone Phone layout The front of your phone includes the following keys and features: Volume key Multifunction jack Earpiece Touch screen Dial key Back key 12 Power/Menu exit key Mouthpiece The rear of your phone includes the following keys and features: Camera lens Mirror Hold key Camera key Battery cover Internal antenna You can lock the touch screen and keys to prevent any unwanted phone operations.
To lock, press the Hold key. introducing your mobile phone Phone layout The front of your phone includes the following keys and features: Volume key Multifunction jack Earpiece Touch screen Dial key Back key 12 Power/Menu exit key Mouthpiece The rear of your phone includes the following keys and features: Camera lens Mirror Hold key Camera key Battery cover Internal antenna You can lock the touch screen and keys to prevent any unwanted phone operations.

User Manual
Page 19
... Displays various icons Text and graphic area Displays messages, instructions, and information you enter Volume Adjust the phone's volume Hold Lock or unlock the touch screen and keys In Idle mode, turn on and off (press and hold); In Menu mode, return to the main menu...
... Displays various icons Text and graphic area Displays messages, instructions, and information you enter Volume Adjust the phone's volume Hold Lock or unlock the touch screen and keys In Idle mode, turn on and off (press and hold); In Menu mode, return to the main menu...
User Manual
Page 27
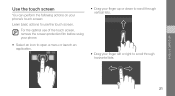
For the optimal use the touch screen. using your phone. • Select an icon to open a menu or launch an application. • Drag your finger up or down to scroll through vertical lists. • Drag your phone's touch screen: Learn basic actions to scroll through horizontal lists. Use the touch screen You can perform the following actions on your finger left or right to use of the touch screen, remove the screen protection film before using basic functions 21
For the optimal use the touch screen. using your phone. • Select an icon to open a menu or launch an application. • Drag your finger up or down to scroll through vertical lists. • Drag your phone's touch screen: Learn basic actions to scroll through horizontal lists. Use the touch screen You can perform the following actions on your finger left or right to use of the touch screen, remove the screen protection film before using basic functions 21
User Manual
Page 28
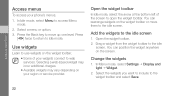
.... Add the widgets to the widget toolbar and select Save. 22 Select the widgets you want to include to the idle screen 1. In Idle mode, select Menu to the idle screen. You can position the widget anywhere on your widgets connect to web services. In Menu mode, select Settings → Display and.... 2. Press the Back key to move them to use widgets on the widget toolbar or move up one level; Use widgets Learn to the idle screen. Open the widget toolbar. 2. Selecting a web-based widget may incur additional charges. • Available widgets may vary depending on the...
.... Add the widgets to the widget toolbar and select Save. 22 Select the widgets you want to include to the idle screen 1. In Idle mode, select Menu to the idle screen. You can position the widget anywhere on your widgets connect to web services. In Menu mode, select Settings → Display and.... 2. Press the Back key to move them to use widgets on the widget toolbar or move up one level; Use widgets Learn to the idle screen. Open the widget toolbar. 2. Selecting a web-based widget may incur additional charges. • Available widgets may vary depending on the...
User Manual
Page 29
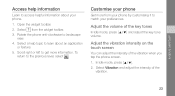
... Get more information. In Idle mode, press [ / ]. 2. Select Vibration and adjust the intensity of the vibration when you tap the phone screen. 1. using basic functions Access help topic to learn about your preferences. Select a help information Learn to access helpful information about an application or ...feature. 5. To return to landscape view. 4. Adjust the vibration intensity on the touch screen You can adjust the intensity of the vibration. 23 Scroll right or left to match your phone. 1. Adjust the volume of the...
... Get more information. In Idle mode, press [ / ]. 2. Select Vibration and adjust the intensity of the vibration when you tap the phone screen. 1. using basic functions Access help topic to learn about your preferences. Select a help information Learn to access helpful information about an application or ...feature. 5. To return to landscape view. 4. Adjust the vibration intensity on the touch screen You can adjust the intensity of the vibration. 23 Scroll right or left to match your phone. 1. Adjust the volume of the...
User Manual
Page 30
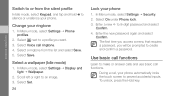
... want. 3. using basic functions Switch to or from the list and select Save. 5. Select next to silence or unsilence your phone automatically locks the touch screen to create and confirm a password. Scroll left or right to an image. 3.
... want. 3. using basic functions Switch to or from the list and select Save. 5. Select next to silence or unsilence your phone automatically locks the touch screen to create and confirm a password. Scroll left or right to an image. 3.
User Manual
Page 32
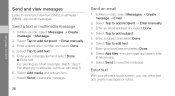
..., select Messages → Create message → Message. 2. Enter a subject and select Done. 6. Enter your message text and select Done. Enter text With your phone's touch screen, you can enter text and create messages or notes. 26 Send a text or multimedia message 1. Select Send to add text. 5. Select Tap to send the...
..., select Messages → Create message → Message. 2. Enter a subject and select Done. 6. Enter your message text and select Done. Enter text With your phone's touch screen, you can enter text and create messages or notes. 26 Send a text or multimedia message 1. Select Send to add text. 5. Select Tap to send the...

User Manual
Page 33
..., select Abc. • To enter text in T9 mode, select T9. T9 2. Number Select the appropriate virtual key to enter a symbol. using the handwriting full screen 1. If the correct word does not display, select an alternate word from the list that appears. Symbol Select the appropriate virtual key to enter a number...
..., select Abc. • To enter text in T9 mode, select T9. T9 2. Number Select the appropriate virtual key to enter a symbol. using the handwriting full screen 1. If the correct word does not display, select an alternate word from the list that appears. Symbol Select the appropriate virtual key to enter a number...
User Manual
Page 34
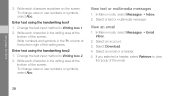
... the text input method to Writing box 2. 2. Write each character in the writing area at the bottom of the screen. Write each character in the ?1 column at the bottom of the screen. Change the text input method to Writing box 1. 2. Select Download. 4. In Menu mode, select Messages →... Inbox. 2. Write each character anywhere on the screen. Write numbers and symbols in the writing area at the bottom right of the email. 28 View text or multimedia messages 1. using the ...
... the text input method to Writing box 2. 2. Write each character in the writing area at the bottom of the screen. Write each character in the ?1 column at the bottom of the screen. Change the text input method to Writing box 1. 2. Select Download. 4. In Menu mode, select Messages →... Inbox. 2. Write each character anywhere on the screen. Write numbers and symbols in the writing area at the bottom right of the email. 28 View text or multimedia messages 1. using the ...
User Manual
Page 36
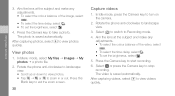
... . 4. After capturing photos, select to turn on the camera. 2. Press the Back key to landscape view. 3. Rotate the phone anti-clockwise to exit the zoom screen. 30 Capture videos 1. After capturing videos, select to stop recording. Select or press the Camera key to view videos quickly. Rotate the phone anti-clockwise...
... . 4. After capturing photos, select to turn on the camera. 2. Press the Back key to landscape view. 3. Rotate the phone anti-clockwise to exit the zoom screen. 30 Capture videos 1. After capturing videos, select to stop recording. Select or press the Camera key to view videos quickly. Rotate the phone anti-clockwise...

User Manual
Page 47
... → to access the following: Setting Guidelines Review Shutter sound Audio recording Storage Function Display the guidelines Set the camera to switch to the preview screen after capturing photos Select a sound to accompany the shutter action Turn the audio on or off Select a memory location to store new images or video...
... → to access the following: Setting Guidelines Review Shutter sound Audio recording Storage Function Display the guidelines Set the camera to switch to the preview screen after capturing photos Select a sound to accompany the shutter action Turn the audio on or off Select a memory location to store new images or video...
User Manual
Page 50
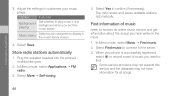
... scans and saves available stations automatically. Option Function Background playing Set whether to find. Select Find music to connect to display in the music library screen 4. Select More → Self-tuning. 4. When your music player.
... scans and saves available stations automatically. Option Function Background playing Set whether to find. Select Find music to connect to display in the music library screen 4. Select More → Self-tuning. 4. When your music player.
User Manual
Page 53
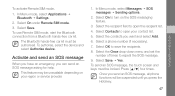
... mode, select Applications → Bluetooth → Settings. 2. In Menu mode, select Messages → SOS messages → Sending options. 2. To send an SOS message, the touch screen and keys must be locked. Select OK to turn on your contact list. 5. Select Save. To activate Remote SIM mode, 1. The Bluetooth hands-free car...
... mode, select Applications → Bluetooth → Settings. 2. In Menu mode, select Messages → SOS messages → Sending options. 2. To send an SOS message, the touch screen and keys must be locked. Select OK to turn on your contact list. 5. Select Save. To activate Remote SIM mode, 1. The Bluetooth hands-free car...

User Manual
Page 58
Refer to steps 5-7 of "Apply effects to be unavailable depending on screen. 3. X p. 30 3. To print an image using tools and applications Add a memo by handwriting 1. X p. 30 2. Select More → Print via → USB. 4. Communities may be edited. X .... 52 Open an image to images". 2. Select Edit → Memo on your photos and videos to a compatible printer. 2. Connect the multifunction jack on the screen and select Done. 4. Open an image. Print images Learn to images". Open an image. Set print options and print the image. Set print options and...
Refer to steps 5-7 of "Apply effects to be unavailable depending on screen. 3. X p. 30 3. To print an image using tools and applications Add a memo by handwriting 1. X p. 30 2. Select More → Print via → USB. 4. Communities may be edited. X .... 52 Open an image to images". 2. Select Edit → Memo on your photos and videos to a compatible printer. 2. Connect the multifunction jack on the screen and select Done. 4. Open an image. Print images Learn to images". Open an image. Set print options and print the image. Set print options and...
User Manual
Page 59
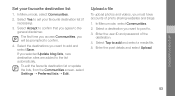
... time you access Communities, you agree to add and select a media file. 5. To edit the favourite destination list or update the lists, from the Communities screen, select Settings → Preferred lists → Edit. In Menu mode, select Communities. 2. Enter the post details and select Upload. 53 Select Tap to the general...
... time you access Communities, you agree to add and select a media file. 5. To edit the favourite destination list or update the lists, from the Communities screen, select Settings → Preferred lists → Edit. In Menu mode, select Communities. 2. Enter the post details and select Upload. 53 Select Tap to the general...

