User Manual
Page 5
... a clean, soft and dry cloth. ‒‒ Do not apply a cleaning agent that contains alcohol, solvent, or surfactant to the monitor. ‒‒ Do not spray water or detergent directly on the product. 4 Wet a soft and dry cloth in so it is finished. 6 Power on the ... the power cord from the product. ――Hold the power cable by the plug and do not touch the cable with your product by Samsung. Caution •• Do not disconnect the power cord while the product is connected unobstructed. ‒‒ The power cord must be disconnected to cut...
... a clean, soft and dry cloth. ‒‒ Do not apply a cleaning agent that contains alcohol, solvent, or surfactant to the monitor. ‒‒ Do not spray water or detergent directly on the product. 4 Wet a soft and dry cloth in so it is finished. 6 Power on the ... the power cord from the product. ――Hold the power cable by the plug and do not touch the cable with your product by Samsung. Caution •• Do not disconnect the power cord while the product is connected unobstructed. ‒‒ The power cord must be disconnected to cut...
User Manual
Page 10
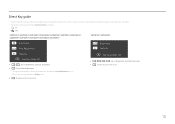
.... • • : Display Function Key Guide. 10 Direct Key guide ――The shortcut button screen (OSD menu) shown below is displayed only when the monitor screen is turned on, the computer resolution changes, or the input source changes. ――The function buttons page shows if Eye Saver Mode is...
.... • • : Display Function Key Guide. 10 Direct Key guide ――The shortcut button screen (OSD menu) shown below is displayed only when the monitor screen is turned on, the computer resolution changes, or the input source changes. ――The function buttons page shows if Eye Saver Mode is...

User Manual
Page 11
...key guide screen. ――Actual models because of functional variation, Function key guide options will appear on the top left corner of your Monitor's feature appears. The items below are not available if the Eye Saver Mode function is locked, Brightness and Contrast can be applied. Return... Icons Description Selects to turn the Monitor off by moving the JOG button in the function key guide screen. Enable/Disable: To lock/unlock the OSD control, press the LEFT...
...key guide screen. ――Actual models because of functional variation, Function key guide options will appear on the top left corner of your Monitor's feature appears. The items below are not available if the Eye Saver Mode function is locked, Brightness and Contrast can be applied. Return... Icons Description Selects to turn the Monitor off by moving the JOG button in the function key guide screen. Enable/Disable: To lock/unlock the OSD control, press the LEFT...
User Manual
Page 12
... mode. ――This menu is not available when Game Mode is enabled. 12 When the monitor displays nothing (i.e. Power saving mode or Non-signal mode), 2 direct keys for 2 seconds Power Off When the monitor displays the Main menu the JOG Button could be used as below . Move to next depth. JOG...
... mode. ――This menu is not available when Game Mode is enabled. 12 When the monitor displays nothing (i.e. Power saving mode or Non-signal mode), 2 direct keys for 2 seconds Power Off When the monitor displays the Main menu the JOG Button could be used as below . Move to next depth. JOG...
User Manual
Page 15
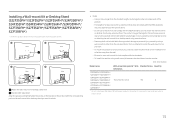
...personal injury caused by using improper screws or attaching the wall-mount kit or desktop stand using excessive force. ‒‒ Samsung shall not be held liable for a wall mount that does not comply with the VESA standards may vary depending on the ... wall, ensure you want to attach. •• Notes ‒‒ Using a screw longer than the one specified or from the monitor. Installing a Wall-mount Kit or Desktop Stand (S22F350FH*/S22F352FH*/S22F354FH*/S24F350FH*/ S24F352FH*/S24F354FH*/S24F356FH*/S24F359FH*/ S27F350FH*/S27F352FH*/S27F354FH*/S27F358FW*/ S27F359FH*) ―...
...personal injury caused by using improper screws or attaching the wall-mount kit or desktop stand using excessive force. ‒‒ Samsung shall not be held liable for a wall mount that does not comply with the VESA standards may vary depending on the ... wall, ensure you want to attach. •• Notes ‒‒ Using a screw longer than the one specified or from the monitor. Installing a Wall-mount Kit or Desktop Stand (S22F350FH*/S22F352FH*/S22F354FH*/S24F350FH*/ S24F352FH*/S24F354FH*/S24F356FH*/S24F359FH*/ S27F350FH*/S27F352FH*/S27F354FH*/S27F358FW*/ S27F359FH*) ―...
User Manual
Page 17
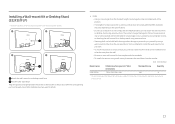
... standards may vary depending on the specifications. ‒‒ Do not use screws that complies with the standards. ‒‒ To install the monitor using a wall mount, disconnect the stand base from the wall. ‒‒ Be sure to use a wall-mount kit that do not ... fall and cause personal injury. Do not attach the wall-mount kit or desktop stand using excessive force. ‒‒ Samsung shall not be installed 10 cm or farther away from the monitor. The product may result in millimeters Standard Screw Quantity S32F351FU* 75.0 x 75.0 (3.0 x 3.0) M4 4 ――...
... standards may vary depending on the specifications. ‒‒ Do not use screws that complies with the standards. ‒‒ To install the monitor using a wall mount, disconnect the stand base from the wall. ‒‒ Be sure to use a wall-mount kit that do not ... fall and cause personal injury. Do not attach the wall-mount kit or desktop stand using excessive force. ‒‒ Samsung shall not be installed 10 cm or farther away from the monitor. The product may result in millimeters Standard Screw Quantity S32F351FU* 75.0 x 75.0 (3.0 x 3.0) M4 4 ――...

User Manual
Page 19
...shown in the figure. There is facing downwards. Tightly fasten the connecting screw at the bottom of the monitor as shown in the direction of damaging the monitor. Installation Attaching the Stand (S22F350FH*/S22F352FH*/S22F354FH*/S24F350FH*/S24F352FH*/S24F354FH*/S24F359FH*/ S27F350FH*/S27F352FH*/S27F354FH*/S27F359FH*/S32F351FU*) &#... back of - Check that the stand neck is facing downwards. ――The exterior may differ depending on the monitor. Caution Do not hold the product upside down on the product. Insert the stand neck into the main body in the figure....
...shown in the figure. There is facing downwards. Tightly fasten the connecting screw at the bottom of the monitor as shown in the direction of damaging the monitor. Installation Attaching the Stand (S22F350FH*/S22F352FH*/S22F354FH*/S24F350FH*/S24F352FH*/S24F354FH*/S24F359FH*/ S27F350FH*/S27F352FH*/S27F354FH*/S27F359FH*/S32F351FU*) &#... back of - Check that the stand neck is facing downwards. ――The exterior may differ depending on the monitor. Caution Do not hold the product upside down on the product. Insert the stand neck into the main body in the figure....
User Manual
Page 20
... down on a flat and stable surface so that the front of the product is facing downwards. ――The exterior may differ depending on the monitor. While holding the stand neck with one hand, pound the other fisted hand down on the product. Turn the connecting screw at the bottom of... damaging the monitor. Place a soft cloth over the table to detach the stand base. - Caution 2 base to separate it in the figure. 20 Caution Do not hold the...
... down on a flat and stable surface so that the front of the product is facing downwards. ――The exterior may differ depending on the monitor. While holding the stand neck with one hand, pound the other fisted hand down on the product. Turn the connecting screw at the bottom of... damaging the monitor. Place a soft cloth over the table to detach the stand base. - Caution 2 base to separate it in the figure. 20 Caution Do not hold the...

User Manual
Page 21
... assembling the product, place the product down on a flat and stable surface so that the screen is facing downwards. Hold the back of the monitor as shown in the figure. Place a soft cloth over the table to protect the 3 product and place the product onto the cloth so that...stand neck is a risk of the product is facing downwards. ――The exterior may differ depending on the monitor. There is firmly connected. Check that the front of damaging the monitor. 21 Push the assembled stand into the stand base in the direction shown in the figure. - Tightly fasten ...
... assembling the product, place the product down on a flat and stable surface so that the screen is facing downwards. Hold the back of the monitor as shown in the figure. Place a soft cloth over the table to protect the 3 product and place the product onto the cloth so that...stand neck is a risk of the product is facing downwards. ――The exterior may differ depending on the monitor. There is firmly connected. Check that the front of damaging the monitor. 21 Push the assembled stand into the stand base in the direction shown in the figure. - Tightly fasten ...

User Manual
Page 22
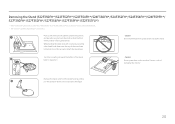
...product 1 and place the product onto the cloth so that the screen is facing downwards. ――The exterior may differ depending on the monitor. Place a soft cloth over the table to in detach the stand as shown in the figure. Remove the stand neck from the stand base... of the stand 2 base to separate it in the direction of the arrow as shown in the figure. - There is a risk of damaging the monitor. 22 Caution Do not hold the product upside down only by pulling 3 it . Removing the Stand (S24F356FH*/S27F358FW*) ――Before assembling the product...
...product 1 and place the product onto the cloth so that the screen is facing downwards. ――The exterior may differ depending on the monitor. Place a soft cloth over the table to in detach the stand as shown in the figure. Remove the stand neck from the stand base... of the stand 2 base to separate it in the direction of the arrow as shown in the figure. - There is a risk of damaging the monitor. 22 Caution Do not hold the product upside down only by pulling 3 it . Removing the Stand (S24F356FH*/S27F358FW*) ――Before assembling the product...
User Manual
Page 25
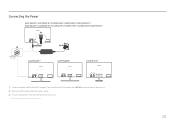
Connecting the Power S22F350FH*/S22F352FH*/S22F354FH*/S24F350FH*/S24F352FH*/ S24F354FH*/S24F359FH*/S27F350FH*/S27F352FH*/S27F354FH*/S27F359FH* 1 2 3 S24F356FH* S27F358FW* S32F351FU* 1 Connect the power cable to turn it on the back of the product. 2 Next, connect the power cable to the power outlet. 3 Press the JOG button on . ――The input voltage is switched automatically. 25 Then, connect the AC/DC adapter to the DC 14V port on the back of the monitor to the AC/DC adapter.
Connecting the Power S22F350FH*/S22F352FH*/S22F354FH*/S24F350FH*/S24F352FH*/ S24F354FH*/S24F359FH*/S27F350FH*/S27F352FH*/S27F354FH*/S27F359FH* 1 2 3 S24F356FH* S27F358FW* S32F351FU* 1 Connect the power cable to turn it on the back of the product. 2 Next, connect the power cable to the power outlet. 3 Press the JOG button on . ――The input voltage is switched automatically. 25 Then, connect the AC/DC adapter to the DC 14V port on the back of the monitor to the AC/DC adapter.
User Manual
Page 27
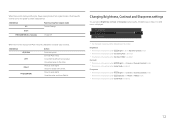
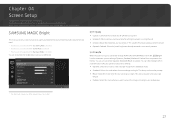
The functions available on the monitor may differ depending on the model. Refer to an optimum picture quality suitable for the working environment. In AV mode When the external input is connected through automatic contrast adjustment. SAMSUNG MAGIC Bright This menu provides an optimum picture... Mode is enabled. ――This menu is not available when Eye Saver Mode is provided. Picture SAMSUNG MAGIC Bright Brightness Contrast Sharpness Color SAMSUNG MAGIC Angle SMAMASGUNI CG Upscale Custom 100 75 60 Set to the actual product. You can customize the ...
The functions available on the monitor may differ depending on the model. Refer to an optimum picture quality suitable for the working environment. In AV mode When the external input is connected through automatic contrast adjustment. SAMSUNG MAGIC Bright This menu provides an optimum picture... Mode is enabled. ――This menu is not available when Eye Saver Mode is provided. Picture SAMSUNG MAGIC Bright Brightness Contrast Sharpness Color SAMSUNG MAGIC Angle SMAMASGUNI CG Upscale Custom 100 75 60 Set to the actual product. You can customize the ...
User Manual
Page 30
...as PlayStation™ or Xbox™ is connected. ――This menu is not available when Eye Saver Mode is enabled. ――When the monitor turns off . ――The function may not be supported depending on the ports provided with the product. ――Changing the screen size is.... ――A digital output device is connected using the HDMI/DP cable. ――The input signal is 480p, 576p, 720p, or 1080p and monitor can display normally (Not every model can only be set when the external input is connected through HDMI/DP and PC/AV Mode is a certification...
...as PlayStation™ or Xbox™ is connected. ――This menu is not available when Eye Saver Mode is enabled. ――When the monitor turns off . ――The function may not be supported depending on the ports provided with the product. ――Changing the screen size is.... ――A digital output device is connected using the HDMI/DP cable. ――The input signal is 480p, 576p, 720p, or 1080p and monitor can display normally (Not every model can only be set when the external input is connected through HDMI/DP and PC/AV Mode is a certification...

User Manual
Page 31
When a 480P or 576P or 720P or 1080P signal is input in AV mode and the monitor can display normally, select Screen Fit to adjust horizontal position in Analog mode only. 31 Configuring Fine Fine-adjust the screen to obtain a vivid picture. &#...
When a 480P or 576P or 720P or 1080P signal is input in AV mode and the monitor can display normally, select Screen Fit to adjust horizontal position in Analog mode only. 31 Configuring Fine Fine-adjust the screen to obtain a vivid picture. &#...

User Manual
Page 32
The functions available on the monitor may differ depending on the model. Return Display Time Set the on the model. Refer to other functions on your product for the menu windows. ...
The functions available on the monitor may differ depending on the model. Return Display Time Set the on the model. Refer to other functions on your product for the menu windows. ...
User Manual
Page 33
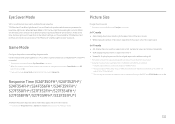
...using the function, contact the Samsung Service Center. 33 If the FreeSync function is solution that eliminates screen tearing without all the usual lag and latency. Decreasing the game setting values might help to the actual product. The functions available on the monitor may flicker when you play ... System FreeSync Eco Saving Plus Off Timer PC/AV Mode Source Detection Key Repeat Time Power LED On Off Off Auto Acceleration Stand-by the monitor manufacturer. Refer to Q & A How can be operated when you encounter any issues when using the FreeSync function, use the HDMI/DP cable...
...using the function, contact the Samsung Service Center. 33 If the FreeSync function is solution that eliminates screen tearing without all the usual lag and latency. Decreasing the game setting values might help to the actual product. The functions available on the monitor may flicker when you play ... System FreeSync Eco Saving Plus Off Timer PC/AV Mode Source Detection Key Repeat Time Power LED On Off Off Auto Acceleration Stand-by the monitor manufacturer. Refer to Q & A How can be operated when you encounter any issues when using the FreeSync function, use the HDMI/DP cable...
User Manual
Page 35
... Off Timer is enabled. •• Off: Deactivate the Eco Saving Plus function. •• Auto: The power consumption will be reduced by the monitor panel. ――This option is not available when MSAMASGUNICGBright is in HDMI/DisplayPort mode and the screen says Check Signal Cable or power saving... power off timer can select PC or AV. Source Detection Select either Auto or Manual as 16:9 or 16:10. ――If the monitor is pressed. 35 Turn Off After: The off after the specified number of hours. ――This option is only available when Off Timer ...
... Off Timer is enabled. •• Off: Deactivate the Eco Saving Plus function. •• Auto: The power consumption will be reduced by the monitor panel. ――This option is not available when MSAMASGUNICGBright is in HDMI/DisplayPort mode and the screen says Check Signal Cable or power saving... power off timer can select PC or AV. Source Detection Select either Auto or Manual as 16:9 or 16:10. ――If the monitor is pressed. 35 Turn Off After: The off after the specified number of hours. ――This option is only available when Off Timer ...
User Manual
Page 37
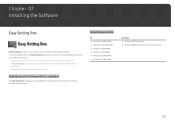
.../64Bit Hardware •• At least 32MB of memory •• At least 60MB of Easy Setting Box, download it from the Samsung Electronics website at http://www.samsung.com. ――The software may not work properly if you do not restart the computer after the installation. ――The Easy... shortcut icon does not appear, press the F5 key. Chapter 07 Installing the Software Easy Setting Box Easy Setting Box enables users to use the monitor by the Graphics Card, Motherboard and the Networking Environment.
.../64Bit Hardware •• At least 32MB of memory •• At least 60MB of Easy Setting Box, download it from the Samsung Electronics website at http://www.samsung.com. ――The software may not work properly if you do not restart the computer after the installation. ――The Easy... shortcut icon does not appear, press the F5 key. Chapter 07 Installing the Software Easy Setting Box Easy Setting Box enables users to use the monitor by the Graphics Card, Motherboard and the Networking Environment.
User Manual
Page 40
... Go to Control Panel Appearance and Themes Display Settings Advanced Monitor, and adjust Refresh rate under Monitor settings. •• Windows ME/2000: Go to Control Panel Display Settings Advanced Monitor, and adjust Refresh rate under Monitor settings. •• Windows Vista: Go to Control...on the PC. 40 Q & A ――Refer to Settings System Display Advanced display settings Display adapter properties Monitor, and adjust Screen refresh rate under Monitor settings. •• Windows 10: Go to the user manual for your PC or graphics card for further ...
... Go to Control Panel Appearance and Themes Display Settings Advanced Monitor, and adjust Refresh rate under Monitor settings. •• Windows ME/2000: Go to Control Panel Display Settings Advanced Monitor, and adjust Refresh rate under Monitor settings. •• Windows Vista: Go to Control...on the PC. 40 Q & A ――Refer to Settings System Display Advanced display settings Display adapter properties Monitor, and adjust Screen refresh rate under Monitor settings. •• Windows 10: Go to the user manual for your PC or graphics card for further ...
User Manual
Page 41
...(1ppm) may be installed and used with any Plug-and-Play compatible systems. Two-way data exchange between the monitor and PC system optimizes the monitor settings. D-SUB, HDMI HDMI (Applicable only to models S32F351FU*) Environmental conditions HDMI, DisplayPort (Applicable only to the ... to improve quality. ――This device is a Class B digital apparatus. ――For detailed device specifications, visit the Samsung Electronics website. (USA only) Dispose unwanted electronics through an approved recycler. This does not affect product performance. ――The above...
...(1ppm) may be installed and used with any Plug-and-Play compatible systems. Two-way data exchange between the monitor and PC system optimizes the monitor settings. D-SUB, HDMI HDMI (Applicable only to models S32F351FU*) Environmental conditions HDMI, DisplayPort (Applicable only to the ... to improve quality. ――This device is a Class B digital apparatus. ――For detailed device specifications, visit the Samsung Electronics website. (USA only) Dispose unwanted electronics through an approved recycler. This does not affect product performance. ――The above...


