Owners Manual
Page 6
.... SAMSUNG's obligations with new or reconditioned parts or products if found to be performed by SAMSUNG under the SAMSUNG brand name are provided on products purchased and used in service problems; SAMSUNG will repair or replace this product was not intended; delivery and installation; incorrect electrical line voltage, fluctuations and surges; Transportation of the product to software products distributed by a SAMSUNG authorized service center. Warranty service can...
.... SAMSUNG's obligations with new or reconditioned parts or products if found to be performed by SAMSUNG under the SAMSUNG brand name are provided on products purchased and used in service problems; SAMSUNG will repair or replace this product was not intended; delivery and installation; incorrect electrical line voltage, fluctuations and surges; Transportation of the product to software products distributed by a SAMSUNG authorized service center. Warranty service can...

Owners Manual
Page 8
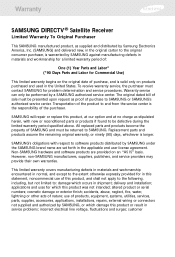
... to TV with RF cable only Connection option B 19 DIRECTV Receiver to TV with A/V cables Connection option C 21 DIRECTV Receiver to TV and VCR with RF cables only Connection option D 23 DIRECTV Receiver to TV and VCR with A/V cables Connection option E 25 DIRECTV Receiver to TV and A/V receiver Connection option F 27 DIRECTV Receiver to TV with Component Video inputs and digital A/V receiver Connecting the VCR control cable (model SIR-S310W only) ..........29 Turning on the DIRECTV Receiver for the first time 29 Adjusting the satellite dish 30 Testing your DIRECTV Receiver 36 Activating...
... to TV with RF cable only Connection option B 19 DIRECTV Receiver to TV with A/V cables Connection option C 21 DIRECTV Receiver to TV and VCR with RF cables only Connection option D 23 DIRECTV Receiver to TV and VCR with A/V cables Connection option E 25 DIRECTV Receiver to TV and A/V receiver Connection option F 27 DIRECTV Receiver to TV with Component Video inputs and digital A/V receiver Connecting the VCR control cable (model SIR-S310W only) ..........29 Turning on the DIRECTV Receiver for the first time 29 Adjusting the satellite dish 30 Testing your DIRECTV Receiver 36 Activating...
Owners Manual
Page 16
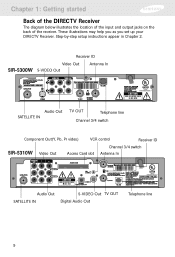
... set up your DIRECTV Receiver. Step-by-step setup instructions appear in Chapter 2. Chapter 1: Getting started Back of the DIRECTV Receiver The diagram below illustrates the location of the input and output jacks on the back of the receiver. Receiver ID Video Out SIR-S300W S-VIDEO Out Antenna In Audio Out SATELLITE IN TV OUT Telephone line Channel 3/4 switch Component Out(Y, Pb, Pr video) VCR control Receiver ID SIR-S310W Video Out Channel 3/4 switch Access Card slot Antenna In Audio Out S-VIDEO Out TV OUT SATELLITE IN Digital Audio Out Telephone line...
... set up your DIRECTV Receiver. Step-by-step setup instructions appear in Chapter 2. Chapter 1: Getting started Back of the DIRECTV Receiver The diagram below illustrates the location of the input and output jacks on the back of the receiver. Receiver ID Video Out SIR-S300W S-VIDEO Out Antenna In Audio Out SATELLITE IN TV OUT Telephone line Channel 3/4 switch Component Out(Y, Pb, Pr video) VCR control Receiver ID SIR-S310W Video Out Channel 3/4 switch Access Card slot Antenna In Audio Out S-VIDEO Out TV OUT SATELLITE IN Digital Audio Out Telephone line...

Owners Manual
Page 17
... allows you to connect your DIRECTV Receiver to an audio receiver that accepts high-quality ("component") video input. Antenna In The cable from an off-air TV antenna (not from the satellite dish connects to this jack connects your DIRECTV Receiver to your TV or VCR. Component Out (Y, Pb, Pr video) (SIR-S310W only) Using standard A/V cables, these jacks connect the DIRECTV Receiver to view DIRECTV® programming). VCR control (SIR-S310W only) The VCR control cable connects to a TV or VCR that accepts S-Video input. S-Video Out This jack connects your TV.
... allows you to connect your DIRECTV Receiver to an audio receiver that accepts high-quality ("component") video input. Antenna In The cable from an off-air TV antenna (not from the satellite dish connects to this jack connects your DIRECTV Receiver to your TV or VCR. Component Out (Y, Pb, Pr video) (SIR-S310W only) Using standard A/V cables, these jacks connect the DIRECTV Receiver to view DIRECTV® programming). VCR control (SIR-S310W only) The VCR control cable connects to a TV or VCR that accepts S-Video input. S-Video Out This jack connects your TV.
Owners Manual
Page 20
...to TV and VCR with A/V cables • Connection option E: DIRECTV Receiver to TV and A/V receiver • Connection option F (SIR-S310W only): DIRECTV Receiver to TV with these pages show the various types of the receiver and the audio/video cable connectors are unfamiliar with Component Video inputs and digital A/V receiver • Connecting the VCR control cable (model SIR-S310W only) • Turning on the DIRECTV Receiver for the first time • Adjusting the satellite dish • Testing your DIRECTV® Receiver. This jack provides monaural sound and a good TV picture. Use...
...to TV and VCR with A/V cables • Connection option E: DIRECTV Receiver to TV and A/V receiver • Connection option F (SIR-S310W only): DIRECTV Receiver to TV with these pages show the various types of the receiver and the audio/video cable connectors are unfamiliar with Component Video inputs and digital A/V receiver • Connecting the VCR control cable (model SIR-S310W only) • Turning on the DIRECTV Receiver for the first time • Adjusting the satellite dish • Testing your DIRECTV® Receiver. This jack provides monaural sound and a good TV picture. Use...

Owners Manual
Page 21
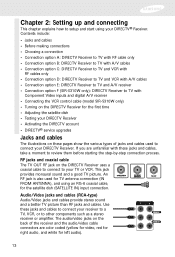
... type phone jacks, please contact your phone company to a phone line. use light to send digital audio data to A/V receivers equipped to tape programs for you can plug in the middle of the night; A continuous land-based phone line connection is in the cable. (This cable carries the video signal only; S-Video jack and cable (cable included with model SIR-S310W only) S-Video cables and jacks are used to connect the DIRECTV Receiver to TVs, VCRs, and other video equipment equipped with component video input...
... type phone jacks, please contact your phone company to a phone line. use light to send digital audio data to A/V receivers equipped to tape programs for you can plug in the middle of the night; A continuous land-based phone line connection is in the cable. (This cable carries the video signal only; S-Video jack and cable (cable included with model SIR-S310W only) S-Video cables and jacks are used to connect the DIRECTV Receiver to TVs, VCRs, and other video equipment equipped with component video input...
Owners Manual
Page 23
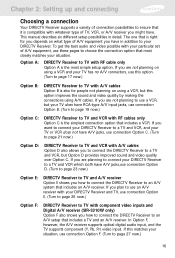
... matches your TV has no A/V connectors, use connection Option C. (Turn to page 21 now.) Option D: DIRECTV Receiver to TV and VCR with A/V cables Option D also allows you to connect the DIRECTV Receiver to an A/V setup that includes a TV and an A/V receiver. In Option F, however, the A/V receiver supports optical digital audio input, and the TV supports component (Y, Pb, Pr) video input. Chapter 2: Setting up and connecting Choosing a connection Your DIRECTV Receiver supports a variety of connection possibilities to ensure that it is compatible with whatever type of...
... matches your TV has no A/V connectors, use connection Option C. (Turn to page 21 now.) Option D: DIRECTV Receiver to TV and VCR with A/V cables Option D also allows you to connect the DIRECTV Receiver to an A/V setup that includes a TV and an A/V receiver. In Option F, however, the A/V receiver supports optical digital audio input, and the TV supports component (Y, Pb, Pr) video input. Chapter 2: Setting up and connecting Choosing a connection Your DIRECTV Receiver supports a variety of connection possibilities to ensure that it is compatible with whatever type of...

Owners Manual
Page 24
... of your DIRECTV Receiver). Chapter 2: Setting up and connecting Connection option A: DIRECTV Receiver to TV with RF cable only If connection option A best matches your needs, follow these steps: 1 Make sure your TV and DIRECTV Receiver are turned off and unplugged. 2 Connect the RG-6 coaxial cable running from your satellite dish to the SATELLITE IN jack on the back of your DIRECTV Receiver. 3 Connect the coaxial cable running from your cable TV system or off-air TV antenna to the...
... of your DIRECTV Receiver). Chapter 2: Setting up and connecting Connection option A: DIRECTV Receiver to TV with RF cable only If connection option A best matches your needs, follow these steps: 1 Make sure your TV and DIRECTV Receiver are turned off and unplugged. 2 Connect the RG-6 coaxial cable running from your satellite dish to the SATELLITE IN jack on the back of your DIRECTV Receiver. 3 Connect the coaxial cable running from your cable TV system or off-air TV antenna to the...

Owners Manual
Page 32
To watch DIRECTV® programming Set your TV and A/V receiver both have S-Video jacks, you can also make the S-Video connections shown in the illustration. Chapter 2: Setting up and connecting Connection option E: DIRECTV Receiver to TV and A/V receiver If connection option E best matches your needs, follow these steps: 1 Make sure your TV, A/V receiver, and DIRECTV Receiver are turned off and unplugged. 2 Connect the RG-6 coaxial cable running from your satellite dish to the SATELLITE IN jack on the back of your...
To watch DIRECTV® programming Set your TV and A/V receiver both have S-Video jacks, you can also make the S-Video connections shown in the illustration. Chapter 2: Setting up and connecting Connection option E: DIRECTV Receiver to TV and A/V receiver If connection option E best matches your needs, follow these steps: 1 Make sure your TV, A/V receiver, and DIRECTV Receiver are turned off and unplugged. 2 Connect the RG-6 coaxial cable running from your satellite dish to the SATELLITE IN jack on the back of your...

Owners Manual
Page 34
... your TV, A/V receiver, and DIRECTV Receiver. To watch DIRECTV® programming Set your TV to the Component Video input mode. (This is a setting on your TV. Next Step Now turn to page 29 to the component video input jacks on your TV usually controlled by a Video, Input, or Mode button. Chapter 2: Setting up and connecting Connection option F (SIR-S310W only): DIRECTV Receiver to TV with Component Video inputs and digital A/V receiver 1 Make sure your TV, A/V receiver, and DIRECTV Receiver are turned off and unplugged. 2 Connect the RG-6 coaxial cable running from your satellite dish to...
... your TV, A/V receiver, and DIRECTV Receiver. To watch DIRECTV® programming Set your TV to the Component Video input mode. (This is a setting on your TV. Next Step Now turn to page 29 to the component video input jacks on your TV usually controlled by a Video, Input, or Mode button. Chapter 2: Setting up and connecting Connection option F (SIR-S310W only): DIRECTV Receiver to TV with Component Video inputs and digital A/V receiver 1 Make sure your TV, A/V receiver, and DIRECTV Receiver are turned off and unplugged. 2 Connect the RG-6 coaxial cable running from your satellite dish to...
Owners Manual
Page 36
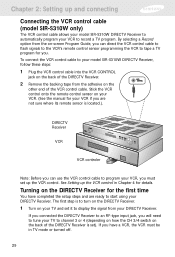
... program your VCR if you are ready to record a TV program. Turning on your TV and set it to program your DIRECTV Receiver. If you connected the DIRECTV Receiver to an RF-type input jack, you will need to tune your TV to channel 3 or 4 (depending on how the CH 3/4 switch on -screen Program Guide, you can use the VCR control cable to display the signal from your DIRECTV Receiver. By selecting a Record option from the adhesive on your VCR. (See the manual...
... program your VCR if you are ready to record a TV program. Turning on your TV and set it to program your DIRECTV Receiver. If you connected the DIRECTV Receiver to an RF-type input jack, you will need to tune your TV to channel 3 or 4 (depending on how the CH 3/4 switch on -screen Program Guide, you can use the VCR control cable to display the signal from your DIRECTV Receiver. By selecting a Record option from the adhesive on your VCR. (See the manual...
Owners Manual
Page 47
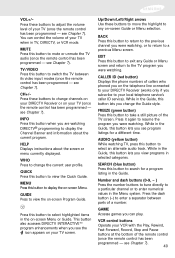
... volume of a number. CALLER ID (red button) Displays the phone numbers of your TV (once the remote control has been programmed - While in TV, DIRECTV, or VCR mode. GAME Accesse games you see program listings for a program listing in the Menu system. This button also accesses DIRECTV INTERACTIVETM program enhancements when you are watching DIRECTV® programming to change the Guide style. FREEZE (green button) Press this button to enter a separator between its video input modes (once the remote control has been programmed - VCR control buttons Operate your TV when in...
... volume of a number. CALLER ID (red button) Displays the phone numbers of your TV (once the remote control has been programmed - While in TV, DIRECTV, or VCR mode. GAME Accesse games you see program listings for a program listing in the Menu system. This button also accesses DIRECTV INTERACTIVETM program enhancements when you are watching DIRECTV® programming to change the Guide style. FREEZE (green button) Press this button to enter a separator between its video input modes (once the remote control has been programmed - VCR control buttons Operate your TV when in...

Owners Manual
Page 56
... the channels and programs it contains. Use the right-arrow button to see future program listings for up to 3 days on model SIR-S300W, or up to 7 days on a channel (rather than a program), use the Grid Guide to get information on SIR-S310W. 2 To move up or down through the channel list a full page at a time, press the CH+ and CH- To return to a specific channel, press the 0-9 number buttons on your remote control...
... the channels and programs it contains. Use the right-arrow button to see future program listings for up to 3 days on model SIR-S300W, or up to 7 days on a channel (rather than a program), use the Grid Guide to get information on SIR-S310W. 2 To move up or down through the channel list a full page at a time, press the CH+ and CH- To return to a specific channel, press the 0-9 number buttons on your remote control...

Owners Manual
Page 59
... the MENU button on your remote control. The Logo Guide appears. 3 Or, you can set the default Guide Style so that the Logo Guide always appears whenever you press the GUIDE button on your remote control. This Banner shows information about the program showing on the highlighted channel. Current time and date The channel currently highlighted. The channel logo list; Chapter 3: Watching TV Using the Logo Guide The Logo Guide displays 21 channel logos and a Channel Banner showing information about the program currently showing...
... the MENU button on your remote control. The Logo Guide appears. 3 Or, you can set the default Guide Style so that the Logo Guide always appears whenever you press the GUIDE button on your remote control. This Banner shows information about the program showing on the highlighted channel. Current time and date The channel currently highlighted. The channel logo list; Chapter 3: Watching TV Using the Logo Guide The Logo Guide displays 21 channel logos and a Channel Banner showing information about the program currently showing...

Owners Manual
Page 60
... remote control. Chapter 3: Watching TV Getting around in the Logo Guide You can use the arrow buttons on your remote control to move up and down , left, or right in the logo list. buttons on your remote control. 3 To move the Logo Guide directly to a specific channel, press the 0-9 number buttons on your remote control to get information about the program currently showing on your DIRECTV Receiver. Here's how: 1 To highlight different program listings in the Logo Guide, use...
... remote control. Chapter 3: Watching TV Getting around in the Logo Guide You can use the arrow buttons on your remote control to move up and down , left, or right in the logo list. buttons on your remote control. 3 To move the Logo Guide directly to a specific channel, press the 0-9 number buttons on your remote control to get information about the program currently showing on your DIRECTV Receiver. Here's how: 1 To highlight different program listings in the Logo Guide, use...
Owners Manual
Page 64
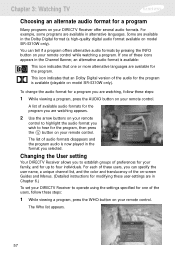
... model SIR-S310W only). If one of the on-screen Guides and Menus. (Detailed instructions for modifying these user-settings are available for the program. The list of the audio for the program is now played in alternative languages. To change the audio format for a program you are watching, follow these users, you wish to operate using the settings specified for one or more alternative languages are in the Dolby Digital format (a high-quality digital audio format...
... model SIR-S310W only). If one of the on-screen Guides and Menus. (Detailed instructions for modifying these user-settings are available for the program. The list of the audio for the program is now played in alternative languages. To change the audio format for a program you are watching, follow these users, you wish to operate using the settings specified for one or more alternative languages are in the Dolby Digital format (a high-quality digital audio format...
Owners Manual
Page 70
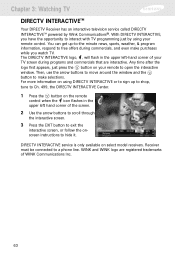
... watch TV. Chapter 3: Watching TV DIRECTV INTERACTIVETM Your DIRECTV Receiver has an interactive television service called DIRECTV INTERACTIVETM powered by using DIRECTV INTERACTIVE or to sign up -to-the minute news, sports, weather, & program information, respond to hide it. Receiver must be connected to interact with TV programming just by Wink Communications®. Any time after the logo first appears, just press the button on your TV screen during...
... watch TV. Chapter 3: Watching TV DIRECTV INTERACTIVETM Your DIRECTV Receiver has an interactive television service called DIRECTV INTERACTIVETM powered by using DIRECTV INTERACTIVE or to sign up -to-the minute news, sports, weather, & program information, respond to hide it. Receiver must be connected to interact with TV programming just by Wink Communications®. Any time after the logo first appears, just press the button on your TV screen during...

Owners Manual
Page 75
... screen in the SETUP menu, you can modify the channel number, the start time and date, the end time and date, the frequency, and (on model SIRS310W) the mode for the timer (whether it is a program reminder or a recording timer). • For timers that timer from the list, then press the button on your remote control to highlight that you scheduled using the on-screen Guide, you can only change the mode setting...
... screen in the SETUP menu, you can modify the channel number, the start time and date, the end time and date, the frequency, and (on model SIRS310W) the mode for the timer (whether it is a program reminder or a recording timer). • For timers that timer from the list, then press the button on your remote control to highlight that you scheduled using the on-screen Guide, you can only change the mode setting...
Owners Manual
Page 100
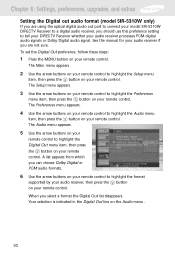
... button on your audio receiver if you are using the optical digital audio out port to connect your model SIR-S310W DIRECTV Receiver to a digital audio receiver, you should use this preference setting to tell your DIRECTV Receiver whether your remote control. Your selection is indicated in the Digital Out line on your audio receiver processes PCM digital audio signals or Dolby Digital audio signal. When you select a format the Digital Out list disappears. The Setup menu appears. 3 Use the arrow buttons on your remote control to highlight the Setup menu...
... button on your audio receiver if you are using the optical digital audio out port to connect your model SIR-S310W DIRECTV Receiver to a digital audio receiver, you should use this preference setting to tell your DIRECTV Receiver whether your remote control. Your selection is indicated in the Digital Out line on your audio receiver processes PCM digital audio signals or Dolby Digital audio signal. When you select a format the Digital Out list disappears. The Setup menu appears. 3 Use the arrow buttons on your remote control to highlight the Setup menu...

Owners Manual
Page 102
... remote control. The list disappears, and the Display Caller IDs menu item on your remote control. The Caller ID menu appears. 4 Use the arrow buttons on your remote control to highlight the Display Caller IDs menu item, then press the button on the Caller ID menu reflects your choice. Chapter 6: Settings, preferences, upgrades, and extras Reviewing and controlling Caller ID The Caller ID item in the SETUP menu allows you to view a list of calls that occur while you are recording a program...
... remote control. The list disappears, and the Display Caller IDs menu item on your remote control. The Caller ID menu appears. 4 Use the arrow buttons on your remote control to highlight the Display Caller IDs menu item, then press the button on the Caller ID menu reflects your choice. Chapter 6: Settings, preferences, upgrades, and extras Reviewing and controlling Caller ID The Caller ID item in the SETUP menu allows you to view a list of calls that occur while you are recording a program...

