User Manual (user Manual) (ver.1.0) (English)
Page 2
...2-1 Installing the Stand 2-2 Connecting with a PC 2-3 Connecting an HDMI cable 2-4 Kensington Lock 2-5 USING THE PRODUCT Setting the Optimal Resolution 3-1 Standard Signal Mode Table 3-2 Standard Signal Mode Table 3-3 Standard Signal Mode Table 3-4 Installing the Device Driver 3-5 Product Operating Buttons 3-6 Using the Screen Adjustment Menu (OSD: On Screen Display) . . . . 3-7 INSTALLING THE SOFTWARE Natural Color 4-1 MagicTune 4-2 MultiScreen 4-3 TROUBLESHOOTING Monitor Self-Diagnosis 5-1 Before Requesting Service 5-2 FAQ 5-3 MORE INFORMATION Specifications 6-1 Power Saving...
...2-1 Installing the Stand 2-2 Connecting with a PC 2-3 Connecting an HDMI cable 2-4 Kensington Lock 2-5 USING THE PRODUCT Setting the Optimal Resolution 3-1 Standard Signal Mode Table 3-2 Standard Signal Mode Table 3-3 Standard Signal Mode Table 3-4 Installing the Device Driver 3-5 Product Operating Buttons 3-6 Using the Screen Adjustment Menu (OSD: On Screen Display) . . . . 3-7 INSTALLING THE SOFTWARE Natural Color 4-1 MagicTune 4-2 MultiScreen 4-3 TROUBLESHOOTING Monitor Self-Diagnosis 5-1 Before Requesting Service 5-2 FAQ 5-3 MORE INFORMATION Specifications 6-1 Power Saving...
User Manual (user Manual) (ver.1.0) (English)
Page 4
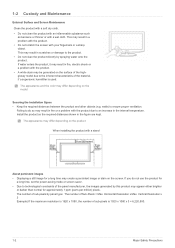
... of sub-pixels is used. When installing the product with the product. • A white stain may result in fire, electric shock or a problem with a stand About persistent images • Displaying a still image for approximately 1 ppm (parts per million) pixels. The number of Sub-Pixels = Max. This may create a persistent image or stain on the surface of the highglossy model due to ensure proper ventilation. Horizontal Resolution x Max...
... of sub-pixels is used. When installing the product with the product. • A white stain may result in fire, electric shock or a problem with a stand About persistent images • Displaying a still image for approximately 1 ppm (parts per million) pixels. The number of Sub-Pixels = Max. This may create a persistent image or stain on the surface of the highglossy model due to ensure proper ventilation. Horizontal Resolution x Max...

User Manual (user Manual) (ver.1.0) (English)
Page 9
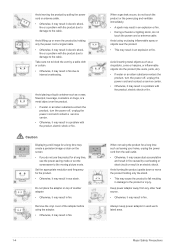
... or lighting occurs, unplug the power cord and under no monitor-exclusive cleansing agent is damaged, turn the power off any alien substances from the cloth before cleaning the product. therefore shake off and unplug the power cord. Usage Related Warning Since a high voltage runs through the product, never disassemble, repair or modify the product yourself. • Otherwise, it . Contact a service center...
... or lighting occurs, unplug the power cord and under no monitor-exclusive cleansing agent is damaged, turn the power off any alien substances from the cloth before cleaning the product. therefore shake off and unplug the power cord. Usage Related Warning Since a high voltage runs through the product, never disassemble, repair or modify the product yourself. • Otherwise, it . Contact a service center...
User Manual (user Manual) (ver.1.0) (English)
Page 10
... in well-ventilated area. Keep power adaptor away from the wall outlet. • Otherwise, it may result in fire. Avoid lifting up or move the product holding only the power cord or signal cable. • Otherwise, it may result in fire due to internal overheating. Caution Displaying a still image for a long time, use the power-saving mode or set the screensaver to the moving...
... in well-ventilated area. Keep power adaptor away from the wall outlet. • Otherwise, it may result in fire. Avoid lifting up or move the product holding only the power cord or signal cable. • Otherwise, it may result in fire due to internal overheating. Caution Displaying a still image for a long time, use the power-saving mode or set the screensaver to the moving...

User Manual (user Manual) (ver.1.0) (English)
Page 16
... graphics card provides DVI Digital output • Connect the [HDMI IN] port of the product to the [DVI] port on your PC using the HDMI to DVI cable. Connect the power cord to a PC, you can turn the product on the rear of the PC with a PC The connecting part may differ depending on the product model. 1. The [HDMI IN] terminal is connected to the adapter and wall socket. (The input voltage is switched automatically...
... graphics card provides DVI Digital output • Connect the [HDMI IN] port of the product to the [DVI] port on your PC using the HDMI to DVI cable. Connect the power cord to a PC, you can turn the product on the rear of the PC with a PC The connecting part may differ depending on the product model. 1. The [HDMI IN] terminal is connected to the adapter and wall socket. (The input voltage is switched automatically...

User Manual (user Manual) (ver.1.0) (English)
Page 19
... Kensington Lock separately. Installing the Product 2-5 Since the shape and usage of the locking device may differ depending on the Monitor( ). 4. Wrap the Kensington lock cable around a large, stationary object such as a desk or chair. 2. Lock the lock( ). • These are general instructions. For exact instructions, see the User Manual supplied with the lock attached through the looped end of the cable with the locking device...
... Kensington Lock separately. Installing the Product 2-5 Since the shape and usage of the locking device may differ depending on the Monitor( ). 4. Wrap the Kensington lock cable around a large, stationary object such as a desk or chair. 2. Lock the lock( ). • These are general instructions. For exact instructions, see the User Manual supplied with the lock attached through the looped end of the cable with the locking device...
User Manual (user Manual) (ver.1.0) (English)
Page 20
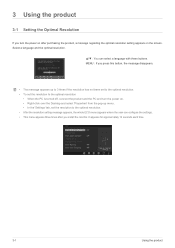
... is turned off, connect the product and the PC and turn the power on after you press this button, the message disappears. • The message appears up menu. • In the 'Settings' tab, set the resolution to the optimal resolution. • After the resolution setting message appears, the whole ECO menu appears where the user can select a language with these buttons. MENU : If you install the monitor. Select a language and the optimal resolution...
... is turned off, connect the product and the PC and turn the power on after you press this button, the message disappears. • The message appears up menu. • In the 'Settings' tab, set the resolution to the optimal resolution. • After the resolution setting message appears, the whole ECO menu appears where the user can select a language with these buttons. MENU : If you install the monitor. Select a language and the optimal resolution...
User Manual (user Manual) (ver.1.0) (English)
Page 26
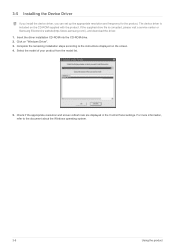
... resolution and screen refresh rate are displayed in the Control Panel settings. Insert the driver installation CD-ROM into the CD-ROM drive. 2. For more information, refer to the instructions displayed on "Windows Driver". 3. 3-5 Installing the Device Driver If you install the device driver, you can set up the appropriate resolution and frequency for the product. The device driver is corrupted, please visit a service center or Samsung Electronics website(http://www.samsung.com/), and download the driver...
... resolution and screen refresh rate are displayed in the Control Panel settings. Insert the driver installation CD-ROM into the CD-ROM drive. 2. For more information, refer to the instructions displayed on "Windows Driver". 3. 3-5 Installing the Device Driver If you install the device driver, you can set up the appropriate resolution and frequency for the product. The device driver is corrupted, please visit a service center or Samsung Electronics website(http://www.samsung.com/), and download the driver...

User Manual (user Manual) (ver.1.0) (English)
Page 27
... OSD, the input signal (Analog/Digital/HDMI) is activated, users can adjust the brightness and contrast and can set up the adjustment function assigned to control the brightness of the screen. ICON MENU ECO ▲/▼ DESCRIPTION Press this button to the [ECO]. Users can set the to prevent the settings from being changed by selecting -> in order to maintain the current settings or to one of the buttons on , a message displaying the selected input signal...
... OSD, the input signal (Analog/Digital/HDMI) is activated, users can adjust the brightness and contrast and can set up the adjustment function assigned to control the brightness of the screen. ICON MENU ECO ▲/▼ DESCRIPTION Press this button to the [ECO]. Users can set the to prevent the settings from being changed by selecting -> in order to maintain the current settings or to one of the buttons on , a message displaying the selected input signal...
User Manual (user Manual) (ver.1.0) (English)
Page 28
... to the power saving function in More Information. For more information on the right of the product are changed in Analog mode. When not using the product for a long time, unplugging the power cord is only available in the Display Properties, the AUTO adjustment function is turned on when the product works normally. Power LED This LED is performed. If the resolution settings are touch-type buttons. • Touch the buttons lightly with...
... to the power saving function in More Information. For more information on the right of the product are changed in Analog mode. When not using the product for a long time, unplugging the power cord is only available in the Display Properties, the AUTO adjustment function is turned on when the product works normally. Power LED This LED is performed. If the resolution settings are touch-type buttons. • Touch the buttons lightly with...

User Manual (user Manual) (ver.1.0) (English)
Page 31
... Samsung Electronics. • - This menu is unavailable when < Angle> is •< Color> Expresses natural colors more clearly without changing the picture quality using this mode. • This mode provides the picture setting appropriate for editing a document and surfing the Internet (text + picture). • This mode provides the picture setting appropriate for playing games that include lots of graphics and that require a fast screen refresh rate. • This mode provides brightness...
... Samsung Electronics. • - This menu is unavailable when < Angle> is •< Color> Expresses natural colors more clearly without changing the picture quality using this mode. • This mode provides the picture setting appropriate for editing a document and surfing the Internet (text + picture). • This mode provides the picture setting appropriate for playing games that include lots of graphics and that require a fast screen refresh rate. • This mode provides brightness...

User Manual (user Manual) (ver.1.0) (English)
Page 34
... only available in Analog mode. • When a 720P, 1080i or 1080P signal is input in AV mode ,select to or . SETUP&RESET Using the product 3-7 PC signals • - The picture is displayed in full screen regardless of the aspect ratio of the OSD. You can adjust the horizontal position of the input signal. • A signal not in HDMI/DVI input mode, the picture is displayed as 16:9 or 16:10. Menu Image Size H-Position V-Position Menu H-Position Menu V-Position Description Supplied for the wide models only such...
... only available in Analog mode. • When a 720P, 1080i or 1080P signal is input in AV mode ,select to or . SETUP&RESET Using the product 3-7 PC signals • - The picture is displayed in full screen regardless of the aspect ratio of the OSD. You can adjust the horizontal position of the input signal. • A signal not in HDMI/DVI input mode, the picture is displayed as 16:9 or 16:10. Menu Image Size H-Position V-Position Menu H-Position Menu V-Position Description Supplied for the wide models only such...
User Manual (user Manual) (ver.1.0) (English)
Page 38
... 10 different images (stages). Users have to the product OSD. The monitor automatically selects an input signal. • - After one decimal place. The number for energy trees will be represented as the energy savings of the PC. Language PC/AV Mode Auto Source The selected language is complete, the initial image will be restored and the number of a tree growing will also be displayed when the...
... 10 different images (stages). Users have to the product OSD. The monitor automatically selects an input signal. • - After one decimal place. The number for energy trees will be represented as the energy savings of the PC. Language PC/AV Mode Auto Source The selected language is complete, the initial image will be restored and the number of a tree growing will also be displayed when the...
User Manual (user Manual) (ver.1.0) (English)
Page 41
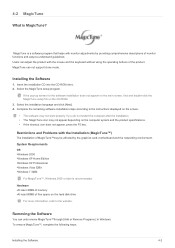
MagicTune is MagicTune? Installing the Software 1. Installing the Software 4-2 4-2 MagicTune What is a software program that helps with monitor adjustments by the graphics card, motherboard and the networking environment. Users can not support clone mode. Insert the installation CD into the CD-ROM drive. 2. Select the MagicTune setup program. Select the installation language and click [Next]. 4. Complete the remaining software installation steps according to the website. Restrictions and Problems with the...
MagicTune is MagicTune? Installing the Software 1. Installing the Software 4-2 4-2 MagicTune What is a software program that helps with monitor adjustments by the graphics card, motherboard and the networking environment. Users can not support clone mode. Insert the installation CD into the CD-ROM drive. 2. Select the MagicTune setup program. Select the installation language and click [Next]. 4. Complete the remaining software installation steps according to the website. Restrictions and Problems with the...
User Manual (user Manual) (ver.1.0) (English)
Page 45
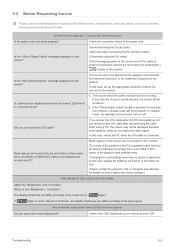
... connected. Is a blank screen displayed and does the power LED blink at the top and bottom of the monitor will turn the product on the screen? If you connect the DVI cable when the PC has booted up the appropriate resolution and the frequency for more than five minutes, Lossless mode will be fixed by the monitor. If the graphics card settings menu has no option to adjust the screen size, update the graphics card driver...
... connected. Is a blank screen displayed and does the power LED blink at the top and bottom of the monitor will turn the product on the screen? If you connect the DVI cable when the PC has booted up the appropriate resolution and the frequency for more than five minutes, Lossless mode will be fixed by the monitor. If the graphics card settings menu has no option to adjust the screen size, update the graphics card driver...
User Manual (user Manual) (ver.1.0) (English)
Page 46
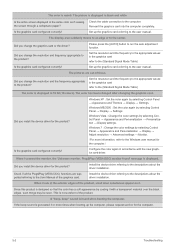
... beep sound is displayed in black and white Is the entire screen displayed in the graphics card refer to the (Standard Signal Mode Table) Set up the graphics card referring to the descriptions about the driver installation. Did you change the resolution and the frequency appropriate to the descriptions about the driver installation. When I look at the exterior edges of -focus. A "beep, beep" sound is displayed. Check the cable connection to the user manual. Set up...
... beep sound is displayed in black and white Is the entire screen displayed in the graphics card refer to the (Standard Signal Mode Table) Set up the graphics card referring to the descriptions about the driver installation. Did you change the resolution and the frequency appropriate to the descriptions about the driver installation. When I look at the exterior edges of -focus. A "beep, beep" sound is displayed. Check the cable connection to the user manual. Set up...
User Manual (user Manual) (ver.1.0) (English)
Page 47
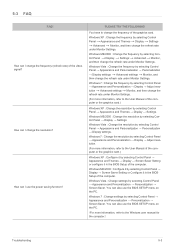
...; Display → Settings → Advanced → Monitor, and then change the frequency of the video signal? You can also use the BIOS SETUP menu on the PC. How can I change the frequency (refresh rate) of the graphics card. How can I change the resolution? You have to change the refresh rate under Monitor Settings. (For more information, refer to the Windows user manual for the computer.) Troubleshooting 5-3 Windows 7 : Change the resolution by selecting Control Panel → Appearance and Themes → Display → Screen Saver Setting...
...; Display → Settings → Advanced → Monitor, and then change the frequency of the video signal? You can also use the BIOS SETUP menu on the PC. How can I change the frequency (refresh rate) of the graphics card. How can I change the resolution? You have to change the refresh rate under Monitor Settings. (For more information, refer to the Windows user manual for the computer.) Troubleshooting 5-3 Windows 7 : Change the resolution by selecting Control Panel → Appearance and Themes → Display → Screen Saver Setting...
User Manual (user Manual) (ver.1.0) (English)
Page 48
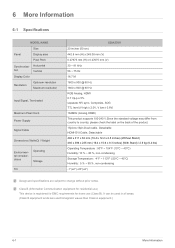
... Information 6-1 Specifications MODEL NAME Size Panel Display area Pixel Pitch Synchronization Horizontal Vertical Display Color Resolution Optimum resolution Maximum resolution Input Signal, Terminated Maximum Pixel Clock Power Supply Signal Cable Dimensions (WxHxD) / Weight Environmental considerations Operating Storage Tilt S20A550H 20 inches (50 cm) 442.8 mm (H) x 249.08 mm (V) 0.27675 mm (H) x 0.27675 mm (V) 30 ~ 81 kHz 56 ~ 75 Hz 16.7 M 1600 x 900 @ 60 Hz 1600 x 900 @ 60 Hz RGB Analog, HDMI 0.7 Vp-p ± 5% separate H/V sync, Composite, SOG...
... Information 6-1 Specifications MODEL NAME Size Panel Display area Pixel Pitch Synchronization Horizontal Vertical Display Color Resolution Optimum resolution Maximum resolution Input Signal, Terminated Maximum Pixel Clock Power Supply Signal Cable Dimensions (WxHxD) / Weight Environmental considerations Operating Storage Tilt S20A550H 20 inches (50 cm) 442.8 mm (H) x 249.08 mm (V) 0.27675 mm (H) x 0.27675 mm (V) 30 ~ 81 kHz 56 ~ 75 Hz 16.7 M 1600 x 900 @ 60 Hz 1600 x 900 @ 60 Hz RGB Analog, HDMI 0.7 Vp-p ± 5% separate H/V sync, Composite, SOG...

User Manual (user Manual) (ver.1.0) (English)
Page 50
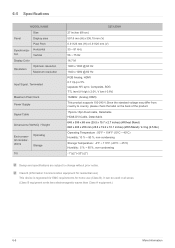
... Information 6-3 Specifications MODEL NAME Size Panel Display area Pixel Pitch Synchronization Horizontal Vertical Display Color Resolution Optimum resolution Maximum resolution Input Signal, Terminated Maximum Pixel Clock Power Supply Signal Cable Dimensions (WxHxD) / Weight Environmental considerations Operating Storage Tilt S23A550H 23 inches (58 cm) 509.76 mm (H) x 286.74 mm (V) 0.2655 mm (H) x 0.2655 mm (V) 30 ~ 81 kHz 56 ~ 75 Hz 16.7 M 1920 x 1080 @ 60 Hz 1920 x 1080 @ 60 Hz RGB Analog, HDMI 0.7 Vp-p ± 5% separate H/V sync, Composite, SOG...
... Information 6-3 Specifications MODEL NAME Size Panel Display area Pixel Pitch Synchronization Horizontal Vertical Display Color Resolution Optimum resolution Maximum resolution Input Signal, Terminated Maximum Pixel Clock Power Supply Signal Cable Dimensions (WxHxD) / Weight Environmental considerations Operating Storage Tilt S23A550H 23 inches (58 cm) 509.76 mm (H) x 286.74 mm (V) 0.2655 mm (H) x 0.2655 mm (V) 30 ~ 81 kHz 56 ~ 75 Hz 16.7 M 1920 x 1080 @ 60 Hz 1920 x 1080 @ 60 Hz RGB Analog, HDMI 0.7 Vp-p ± 5% separate H/V sync, Composite, SOG...
User Manual (user Manual) (ver.1.0) (English)
Page 52
6-5 Specifications MODEL NAME Size Panel Display area Pixel Pitch Synchronization Horizontal Vertical Display Color Resolution Optimum resolution Maximum resolution Input Signal, Terminated Maximum Pixel Clock Power Supply Signal Cable Dimensions (WxHxD) / Weight Environmental considerations Operating Storage Tilt S27A550H 27 inches (68 cm) 597.6 mm (H) x 336.15 mm (V) 0.31125 mm (H) x 0.31125 mm (V) 30 ~ 81 kHz 56 ~ 75 Hz 16.7 M 1920 x 1080 @ 60 Hz 1920 x 1080 @ 60 Hz RGB Analog, HDMI 0.7 Vp-p ± 5% separate H/V sync, Composite, SOG TTL level...
6-5 Specifications MODEL NAME Size Panel Display area Pixel Pitch Synchronization Horizontal Vertical Display Color Resolution Optimum resolution Maximum resolution Input Signal, Terminated Maximum Pixel Clock Power Supply Signal Cable Dimensions (WxHxD) / Weight Environmental considerations Operating Storage Tilt S27A550H 27 inches (68 cm) 597.6 mm (H) x 336.15 mm (V) 0.31125 mm (H) x 0.31125 mm (V) 30 ~ 81 kHz 56 ~ 75 Hz 16.7 M 1920 x 1080 @ 60 Hz 1920 x 1080 @ 60 Hz RGB Analog, HDMI 0.7 Vp-p ± 5% separate H/V sync, Composite, SOG TTL level...


