Samsung PN64D550C1F No Picture
View Results Below
Free Samsung PN64D550C1F manuals!
Problems with Samsung PN64D550C1F?
Ask a Question
Free Samsung PN64D550C1F manuals!
Problems with Samsung PN64D550C1F?
Ask a Question
Related Manual Pages


Similar Questions

Picture Jumping
Hi Could anyone advise on how I can stop the picture jumping it jumps on everyb channel.I have disco...
Hi Could anyone advise on how I can stop the picture jumping it jumps on everyb channel.I have disco...
(Posted by djhodges31 2 years ago)

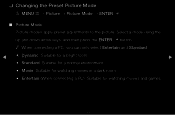
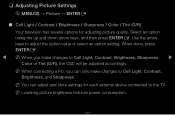
Samsung Tv Picture Quality
how do I adjust my picture settings to get a better quality picture. also how do I access or change ...
how do I adjust my picture settings to get a better quality picture. also how do I access or change ...
(Posted by kovacs29a 9 years ago)

There Is No Picture In My Tv When I Turned It On I Hear Just The Sound
there is no picture im my samsung plazama 50 PH-T5054 I hear just the sound
there is no picture im my samsung plazama 50 PH-T5054 I hear just the sound
(Posted by salemsale 12 years ago)