User Manual (ENGLISH)
Page 1
...Ridgefield Park, NJ 07660-0511 Samsung Electronics Canada Inc., Customer Service 55 Standish Court Mississauga, Ontario L5R 4B2 Canada Samsung Electronique Canada Inc., Service à la Clientèle 55 Standish Court Mississauga, Ontario L5R 4B2 Canada Plasma TV user manual BN68-02221A BN68-02221A...-00 imagine the possibilities Thank you have any questions or comments relating to Samsung products, please contact the SAMSUNG customer care center. To receive more complete service, please...
...Ridgefield Park, NJ 07660-0511 Samsung Electronics Canada Inc., Customer Service 55 Standish Court Mississauga, Ontario L5R 4B2 Canada Samsung Electronique Canada Inc., Service à la Clientèle 55 Standish Court Mississauga, Ontario L5R 4B2 Canada Plasma TV user manual BN68-02221A BN68-02221A...-00 imagine the possibilities Thank you have any questions or comments relating to Samsung products, please contact the SAMSUNG customer care center. To receive more complete service, please...
User Manual (ENGLISH)
Page 3
... require sophisticated technology to produce. This is normal and does not indicate any damage caused by the warranty. Avoid operating the TV at heights under 6500ft. Watching the Plasma TV in the upper part of the product. To prevent this manual to the screen. Warranty Warranty does not cover any defect...known as "screen burn". Damages caused by the above effect are not covered by the difference of light emission on the top of the Plasma TV The top side of the product. After-images on the performance of the product may leave traces of borders displayed on the left, right and...
... require sophisticated technology to produce. This is normal and does not indicate any damage caused by the warranty. Avoid operating the TV at heights under 6500ft. Watching the Plasma TV in the upper part of the product. To prevent this manual to the screen. Warranty Warranty does not cover any defect...known as "screen burn". Damages caused by the above effect are not covered by the difference of light emission on the top of the Plasma TV The top side of the product. After-images on the performance of the product may leave traces of borders displayed on the left, right and...
User Manual (ENGLISH)
Page 4
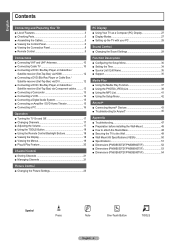
...the Control Panel 6 ■ Viewing the Connection Panel 8 ■ Remote Control 9 Connections ■ Connecting VHF and UHF Antennas 10 ■ Connecting Cable TV 10 ■ Connecting a DVD / Blu-Ray Player or Cable Box / Satellite receiver (Set-Top Box) via HDMI 12 ■ Connecting a DVD ...9632; Troubleshooting 47 ■ Preparation before installing the Wall-Mount 48 ■ How to attach the Stand-Base 48 ■ Securing the TV to the Wall 49 ■ Wall Mount Kit Specifications (VESA 50 ■ Specifications 51 ■ Dimensions (PN50B550T2F/PN50B560T5F 52 ■ ...
...the Control Panel 6 ■ Viewing the Connection Panel 8 ■ Remote Control 9 Connections ■ Connecting VHF and UHF Antennas 10 ■ Connecting Cable TV 10 ■ Connecting a DVD / Blu-Ray Player or Cable Box / Satellite receiver (Set-Top Box) via HDMI 12 ■ Connecting a DVD ...9632; Troubleshooting 47 ■ Preparation before installing the Wall-Mount 48 ■ How to attach the Stand-Base 48 ■ Securing the TV to the Wall 49 ■ Wall Mount Kit Specifications (VESA 50 ■ Specifications 51 ■ Dimensions (PN50B550T2F/PN50B560T5F 52 ■ ...
User Manual (ENGLISH)
Page 5
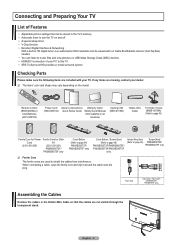
... Instructions / Warranty Card / Quick Setup Guide Safety Guide Manual (Not available in all locations) Cleaning Cloth (BN63-01798B) Holder-Wire Cable TV-Holder / Screw (BN96-10788A) (Refer to shield the cables from interference. Cord AV (3301-001305) (3301-001201) PN58B550T2F/ PN58B560T5F only...page 48) Screw (4ea) PN50B550T2F/ PN50B560T5F only N Ferrite Core The ferrite cores are missing, contact your TV. Connecting and Preparing Your TV List of your PC to this TV. • SRS TruSurround HD provides a virtual surround system. When connecting a cable, open the ferrite core...
... Instructions / Warranty Card / Quick Setup Guide Safety Guide Manual (Not available in all locations) Cleaning Cloth (BN63-01798B) Holder-Wire Cable TV-Holder / Screw (BN96-10788A) (Refer to shield the cables from interference. Cord AV (3301-001305) (3301-001201) PN58B550T2F/ PN58B560T5F only...page 48) Screw (4ea) PN50B550T2F/ PN50B560T5F only N Ferrite Core The ferrite cores are missing, contact your TV. Connecting and Preparing Your TV List of your PC to this TV. • SRS TruSurround HD provides a virtual surround system. When connecting a cable, open the ferrite core...

User Manual (ENGLISH)
Page 6
... remote control. 5 POWER INDICATOR Blinks and turns off when the power is on and lights up in stand-by mode. 6 P (POWER) Press to turn the TV on and off. 7 REMOTE CONTROL SENSOR Aim the remote control towards this button as you would use the ENTERE button on the remote control. 2 MENU... Press to see an on-screen menu of your TV's basic features, including the on the remote control. 4 < CH > Press to increase or decrease the volume. In the on-screen menu, use the < CH > buttons...
... remote control. 5 POWER INDICATOR Blinks and turns off when the power is on and lights up in stand-by mode. 6 P (POWER) Press to turn the TV on and off. 7 REMOTE CONTROL SENSOR Aim the remote control towards this button as you would use the ENTERE button on the remote control. 2 MENU... Press to see an on-screen menu of your TV's basic features, including the on the remote control. 4 < CH > Press to increase or decrease the volume. In the on-screen menu, use the < CH > buttons...

User Manual (ENGLISH)
Page 7
... off when the power is on and lights up in stand-by mode. 6 REMOTE CONTROL SENSOR Aim the remote control towards this spot on the TV. 7 SPEAKERS 8 P POWER Touch the silver sensor below the (P) mark to see an on-screen menu of your... TV's features. 3 + VOL - PN50B560T5F/PN58B560T5F/PN63B590T5F 1 SOURCEE Toggles between all the available input sources (TV, AV1, AV2, Component1, Conponent2, PC, HDMI1, HDMI2/DVI, HDMI3, HDMI4). buttons as you would use the ENTERE button on the remote...
... off when the power is on and lights up in stand-by mode. 6 REMOTE CONTROL SENSOR Aim the remote control towards this spot on the TV. 7 SPEAKERS 8 P POWER Touch the silver sensor below the (P) mark to see an on-screen menu of your... TV's features. 3 + VOL - PN50B560T5F/PN58B560T5F/PN63B590T5F 1 SOURCEE Toggles between all the available input sources (TV, AV1, AV2, Component1, Conponent2, PC, HDMI1, HDMI2/DVI, HDMI3, HDMI4). buttons as you would use the ENTERE button on the remote...

User Manual (ENGLISH)
Page 8
TV Rear Panel TV Side Panel 1 POWER IN Connects the supplied power cord. 2 AUDIO OUT Connect to a Digital Audio component. 3 PC IN [PC] / [AUDIO] Connects to the video and ... that will be used as Blu-Ray/DVD players or a VCR. When using an optional HDMI/DVI adapter, the DVI analog audio inputs on your TV allow you to receive left and right audio from your PC. 4 DVI AUDIO IN (AUDIO-R/L) Connect to the DVI audio output jack of an external...
TV Rear Panel TV Side Panel 1 POWER IN Connects the supplied power cord. 2 AUDIO OUT Connect to a Digital Audio component. 3 PC IN [PC] / [AUDIO] Connects to the video and ... that will be used as Blu-Ray/DVD players or a VCR. When using an optional HDMI/DVI adapter, the DVI analog audio inputs on your TV allow you to receive left and right audio from your PC. 4 DVI AUDIO IN (AUDIO-R/L) Connect to the DVI audio output jack of an external...

User Manual (ENGLISH)
Page 9
... (Music)) d SRS Selects SRS TruSurround HD mode. f MTS Press to select additional channels (digital ^ and analog) being broadcast by bright light. 1 POWER Turns the TV on Samsung recorders with the Anynet+ feature) 4 Press to choose stereo, mono or Separate Audio Program (SAP broadcast). ❑ Installing Batteries in the Channel list and Media...
... (Music)) d SRS Selects SRS TruSurround HD mode. f MTS Press to select additional channels (digital ^ and analog) being broadcast by bright light. 1 POWER Turns the TV on Samsung recorders with the Anynet+ feature) 4 Press to choose stereo, mono or Separate Audio Program (SAP broadcast). ❑ Installing Batteries in the Channel list and Media...

User Manual (ENGLISH)
Page 10
... on the back of the back panel. Connect both antenna leads to the ANT IN terminal on the back of leads that look like this TV is connected to view unscrambled cable channels. ANT IN ANT OUT ANT IN English - 10 Continued... This procedure requires an optional combiner-adaptor (...), you must combine the two antenna signals before connecting the antennas to a Cable Box that Descrambles All Channels 1. If your antenna has a set of the TV. ANT IN 2. Plug the combiner into the ANT IN terminal on the back of this , see "Antennas with 300 Ω Flat Twin Leads" below ....
... on the back of the back panel. Connect both antenna leads to the ANT IN terminal on the back of leads that look like this TV is connected to view unscrambled cable channels. ANT IN ANT OUT ANT IN English - 10 Continued... This procedure requires an optional combiner-adaptor (...), you must combine the two antenna signals before connecting the antennas to a Cable Box that Descrambles All Channels 1. If your antenna has a set of the TV. ANT IN 2. Plug the combiner into the ANT IN terminal on the back of this , see "Antennas with 300 Ω Flat Twin Leads" below ....

User Manual (ENGLISH)
Page 11
... 5. Incoming cable Splitter IN CABLE OUT Cable Box A B RF (A/B) Switch 6. You will need a two-way splitter, an RF (A/B) switch, and four lengths of the TV. Connect the last Antenna cable between the ANT OUT terminal on the cable box and the B-IN terminal on your cable box descrambles only some... terminal might be labeled "ANT IN", "VHF IN" or simply, "IN". Incoming cable Splitter IN CABLE OUT A B RF (A/B) Switch TV Rear ANT IN After you will need to tune your TV to the cable box's output channel, which is connected to the ANT IN terminal on the RF(A/B) switch. Find and...
... 5. Incoming cable Splitter IN CABLE OUT Cable Box A B RF (A/B) Switch 6. You will need a two-way splitter, an RF (A/B) switch, and four lengths of the TV. Connect the last Antenna cable between the ANT OUT terminal on the cable box and the B-IN terminal on your cable box descrambles only some... terminal might be labeled "ANT IN", "VHF IN" or simply, "IN". Incoming cable Splitter IN CABLE OUT A B RF (A/B) Switch TV Rear ANT IN After you will need to tune your TV to the cable box's output channel, which is connected to the ANT IN terminal on the RF(A/B) switch. Find and...

User Manual (ENGLISH)
Page 12
... smaller in size and has the HDCP (High Bandwidth Digital Copy Protection) coding feature installed. DVD/Blu-Ray Player or Cable Box / Satellite receiver TV Rear Panel TV Side Panel 1 HDMI Cable (Not supplied) or N What is HDMI? • HDMI, or high-definition multimedia interface, is an interface that the...; confirm the HDMI version, then request an upgrade. N When using a single cable. • The difference between the HDMI IN 2(DVI) jack on the TV and the DVI jack on the DVD / Blu-Ray Player or Cable Box / Satellite receiver (Set-Top Box). Connect an HDMI Cable between the DVI...
... smaller in size and has the HDCP (High Bandwidth Digital Copy Protection) coding feature installed. DVD/Blu-Ray Player or Cable Box / Satellite receiver TV Rear Panel TV Side Panel 1 HDMI Cable (Not supplied) or N What is HDMI? • HDMI, or high-definition multimedia interface, is an interface that the...; confirm the HDMI version, then request an upgrade. N When using a single cable. • The difference between the HDMI IN 2(DVI) jack on the TV and the DVI jack on the DVD / Blu-Ray Player or Cable Box / Satellite receiver (Set-Top Box). Connect an HDMI Cable between the DVI...
User Manual (ENGLISH)
Page 13
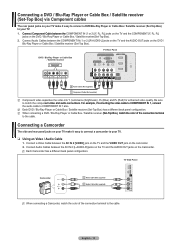
...le��b�e�t�w�e�e�n��th�e� COMPONENT IN (1 or 2) [Y, PB, PR] jacks on the TV and the COMPONENT [Y, PB, PR] jacks on the DVD / Blu-Ray Player or Cable Box / Satellite receiver(Set-Top Box). 2. ...65533;1�,�c�o�n�n��e�c�t the audio cable to the cable. N Each Camcorder has a different back panel configuration. TV Side Panel Camcorder 1 Video Cable (Not supplied) 2 Audio Cable (Not supplied) N When connecting a Camcorder, match the color of the ...
...le��b�e�t�w�e�e�n��th�e� COMPONENT IN (1 or 2) [Y, PB, PR] jacks on the TV and the COMPONENT [Y, PB, PR] jacks on the DVD / Blu-Ray Player or Cable Box / Satellite receiver(Set-Top Box). 2. ...65533;1�,�c�o�n�n��e�c�t the audio cable to the cable. N Each Camcorder has a different back panel configuration. TV Side Panel Camcorder 1 Video Cable (Not supplied) 2 Audio Cable (Not supplied) N When connecting a Camcorder, match the color of the ...
User Manual (ENGLISH)
Page 14
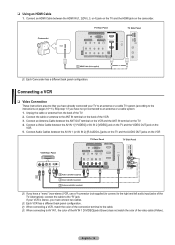
...between the ANT OUT terminal on the VCR and the ANT IN terminal on the VCR. 5. N When connecting to the instructions on the camcorder. TV Rear Panel TV Side Panel Camcorder 1 HDMI Cable (Not supplied) or N Each Camcorder has a different back panel configuration. N Each VCR has a different back ... cable or antenna from the back of the video cable (Yellow). Connect the cable or antenna to the ANT IN terminal on the VCR TV Rear Panel TV Side Panel VCR Rear Panel 5 Audio Cable(Not supplied) 2 4 Video Cable(Not supplied) 3 Antenna cable(Not supplied) N If you must ...
...between the ANT OUT terminal on the VCR and the ANT IN terminal on the VCR. 5. N When connecting to the instructions on the camcorder. TV Rear Panel TV Side Panel Camcorder 1 HDMI Cable (Not supplied) or N Each Camcorder has a different back panel configuration. N Each VCR has a different back ... cable or antenna from the back of the video cable (Yellow). Connect the cable or antenna to the ANT IN terminal on the VCR TV Rear Panel TV Side Panel VCR Rear Panel 5 Audio Cable(Not supplied) 2 4 Video Cable(Not supplied) 3 Antenna cable(Not supplied) N If you must ...
User Manual (ENGLISH)
Page 15
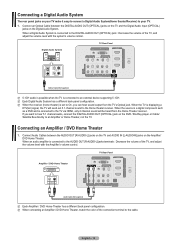
...a different back panel configuration. N Each Digital Audio System has a different back panel configuration. When the TV is connected to the AUDIO OUT [R-AUDIO-L] jacks terminals : Decrease the volume of the TV, and adjust the volume level with the system's volume control. N When connecting an Amplifier / DVD ...Home Theater, match the color of the TV, and adjust the volume level with the Amplifier's volume control. Connecting a Digital Audio System The rear panel jacks on the Amplifier/ ...
...a different back panel configuration. N Each Digital Audio System has a different back panel configuration. When the TV is connected to the AUDIO OUT [R-AUDIO-L] jacks terminals : Decrease the volume of the TV, and adjust the volume level with the system's volume control. N When connecting an Amplifier / DVD ...Home Theater, match the color of the TV, and adjust the volume level with the Amplifier's volume control. Connecting a Digital Audio System The rear panel jacks on the Amplifier/ ...

User Manual (ENGLISH)
Page 16
... connection, you must use the HDMI IN 2(DVI) terminal. Connect a PC Audio Cable between the HDMI IN 2(DVI) jack on the TV and the PC output jack on your computer. 2. TV Rear Panel PC 2 PC Audio Cable (Not supplied) 1 D-Sub Cable (Not supplied) ❑ Using an HDMI/DVI Cable 1. Connect a ...D-Sub Cable between the DVI AUDIO IN [R-AUDIO-L] jack on the TV and the Audio Out jack of the sound card on your computer. Connect a 3.5 mm Stereo plug to 2RCA cable between PC IN [PC] jack on...
... connection, you must use the HDMI IN 2(DVI) terminal. Connect a PC Audio Cable between the HDMI IN 2(DVI) jack on the TV and the PC output jack on your computer. 2. TV Rear Panel PC 2 PC Audio Cable (Not supplied) 1 D-Sub Cable (Not supplied) ❑ Using an HDMI/DVI Cable 1. Connect a ...D-Sub Cable between the DVI AUDIO IN [R-AUDIO-L] jack on the TV and the Audio Out jack of the sound card on your computer. Connect a 3.5 mm Stereo plug to 2RCA cable between PC IN [PC] jack on...

User Manual (ENGLISH)
Page 17
...press "7", then " ",��t�h�e�n���"1". For example, to a channel. For example, for your TV to select stations that the TV has memorized. (The TV must have memorized at least three channels). Press the PRE-CH button. Adjusting the Volume ❑ Using the Volume Buttons 1. ... increase or decrease the volume. ❑ Using the M MUTE Button At any time, you press the CH or CH button, the TV changes channels in sequence. See page 21 to memorize channels. ❑ Using the Number Buttons Press the number buttons to go directly to...
...press "7", then " ",��t�h�e�n���"1". For example, to a channel. For example, for your TV to select stations that the TV has memorized. (The TV must have memorized at least three channels). Press the PRE-CH button. Adjusting the Volume ❑ Using the Volume Buttons 1. ... increase or decrease the volume. ❑ Using the M MUTE Button At any time, you press the CH or CH button, the TV changes channels in sequence. See page 21 to memorize channels. ❑ Using the Number Buttons Press the number buttons to go directly to...

User Manual (ENGLISH)
Page 18
... the motion is detected by the sensor of each function, refer to select your frequently used functions quickly and easily. If you are viewing. 1. TV #1 Fri, Dec 19 2:05 am O Press the INFO button once more detailed description of the remote control, the button backlight will appear. 2.... is turned on the remote control. Viewing the Display The display identifies the current channel and the status of certain picture and sound settings. The TV will not be turned on for a moment. Spillane's Mike Hammer 13-1 Bonocrunch 1:55 am - 2:55 am Next Program Prison Break 2:55 am...
... the motion is detected by the sensor of each function, refer to select your frequently used functions quickly and easily. If you are viewing. 1. TV #1 Fri, Dec 19 2:05 am O Press the INFO button once more detailed description of the remote control, the button backlight will appear. 2.... is turned on the remote control. Viewing the Display The display identifies the current channel and the status of certain picture and sound settings. The TV will not be turned on for a moment. Spillane's Mike Hammer 13-1 Bonocrunch 1:55 am - 2:55 am Next Program Prison Break 2:55 am...
User Manual (ENGLISH)
Page 19
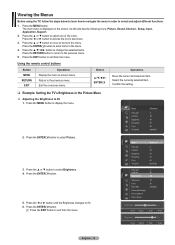
... to return to the previous menu. Return to the previous menu. 5. Confirm the setting. ❑ Example: Setting the TV's Brightness in the menu. Press the ENTERE button. Viewing the Menus Before using the TV, follow the steps below to learn how to navigate the menu in the menu. 4. Its left side has...
... to return to the previous menu. Return to the previous menu. 5. Confirm the setting. ❑ Example: Setting the TV's Brightness in the menu. Press the ENTERE button. Viewing the Menus Before using the TV, follow the steps below to learn how to navigate the menu in the menu. 4. Its left side has...

User Manual (ENGLISH)
Page 20
...button when channel memorization is displayed. Press the ▲ or ▼ button to memorize. Press the ENTERE button. The message Enjoy your TV. is complete. 6. For further details on the remote control. N The Screen Saver is activated if there is no remote control key input...: English : Off : Medium English - 20 Start Enter Plug & Play 3. Air : -DTV Cable : -- Stop Plug & Play Enter Skip Enjoy your TV. N After all of the selected connection. Press the ENTERE button. is displayed. Press the ENTERE button, then Sets the menu language. The message Select the...
...button when channel memorization is displayed. Press the ▲ or ▼ button to memorize. Press the ENTERE button. The message Enjoy your TV. is complete. 6. For further details on the remote control. N The Screen Saver is activated if there is no remote control key input...: English : Off : Medium English - 20 Start Enter Plug & Play 3. Air : -DTV Cable : -- Stop Plug & Play Enter Skip Enjoy your TV. N After all of the selected connection. Press the ENTERE button. is displayed. Press the ENTERE button, then Sets the menu language. The message Select the...

User Manual (ENGLISH)
Page 21
...antenna signal. • Cable: Cable antenna signal. • Auto: Air and Cable antenna signals N STD, HRC and IRC identify various types of cable TV systems. Contact your particular area. N After all current reserved programs. Using the Color buttons with the Channel List • Green (Zoom): ...or ► button, then press the ENTERE button. ❑ Clearing Scrambled Channel (Digital) The Clear Scrambled Channel function is used to the TV (i.e. N If you want to select Stop. This process may differ depending on the remote control to bring up to the name of fine-...
...antenna signal. • Cable: Cable antenna signal. • Auto: Air and Cable antenna signals N STD, HRC and IRC identify various types of cable TV systems. Contact your particular area. N After all current reserved programs. Using the Color buttons with the Channel List • Green (Zoom): ...or ► button, then press the ENTERE button. ❑ Clearing Scrambled Channel (Digital) The Clear Scrambled Channel function is used to the TV (i.e. N If you want to select Stop. This process may differ depending on the remote control to bring up to the name of fine-...


