Quick Guide (ENGLISH)
Page 5
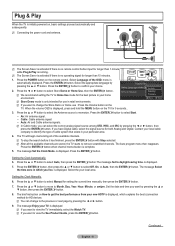
... change the Store Demo or Home use in your home Français environment. N The Screen Saver is activated if there is no remote control button input for the best picture in which explains the best czonnection method for use : Press the Volume button on How to select Start. • Air: Air antenna signal. • Cable: Cable antenna signal. • Auto: Air and Cable antenna signals. Press the POWER button on , basic settings proceed automatically and subsequently. N In Cable mode...
... change the Store Demo or Home use in your home Français environment. N The Screen Saver is activated if there is no remote control button input for the best picture in which explains the best czonnection method for use : Press the Volume button on How to select Start. • Air: Air antenna signal. • Cable: Cable antenna signal. • Auto: Air and Cable antenna signals. Press the POWER button on , basic settings proceed automatically and subsequently. N In Cable mode...
Quick Guide (ENGLISH)
Page 6
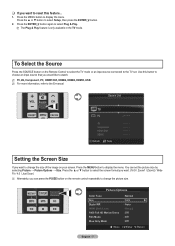
Press the ▲ or ▼ button to the TV set. Use this feature... 1. To Select the Source Press the SOURCE button on the Remote Control to select the TV mode or an input source connected to select Setup, then press the ENTERE button. 2. N TV, AV, Component, PC, HDMI1/DVI, HDMI2, HDMI3, HDMI4, USB. N For more information, refer to display the menu. Press the MENU button to the E-manual. ^z€}np*Wt~ _a...
Press the ▲ or ▼ button to the TV set. Use this feature... 1. To Select the Source Press the SOURCE button on the Remote Control to select the TV mode or an input source connected to select Setup, then press the ENTERE button. 2. N TV, AV, Component, PC, HDMI1/DVI, HDMI2, HDMI3, HDMI4, USB. N For more information, refer to display the menu. Press the MENU button to the E-manual. ^z€}np*Wt~ _a...
User Manual
Page 4
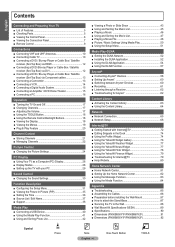
...; Plug & Play Feature 20 Channel Control ■■ Storing Channels 21 ■■ Managing Channels 22 Picture Control ■■ Changing the Picture Settings 24 PC Display ■■ Using Your TV as a Computer (PC) Display 28 ■■ Display Modes 28 ■■ Setting up the TV with your PC 29 Sound Control ■■ Changing the Sound Settings 30 Function Description ■■ Configuring the Setup Menu 31 ■■ Viewing the Picture in Picture (PIP 35...
...; Plug & Play Feature 20 Channel Control ■■ Storing Channels 21 ■■ Managing Channels 22 Picture Control ■■ Changing the Picture Settings 24 PC Display ■■ Using Your TV as a Computer (PC) Display 28 ■■ Display Modes 28 ■■ Setting up the TV with your PC 29 Sound Control ■■ Changing the Sound Settings 30 Function Description ■■ Configuring the Setup Menu 31 ■■ Viewing the Picture in Picture (PIP 35...
User Manual
Page 5
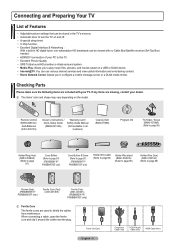
... cables from interference. Power Cord (2ea) English - 5 Component Cable (1ea) PC/DVI Audio Cable (1ea) HDMI Cable (4ea) Checking Parts Please make sure the following items are missing, contact your TV. Remote Control (BN59-00851A) / AAA Batteries (4301-000103) Owner's Instructions / Quick Setup Guide (BN68-02135A) Warranty Card / Safety Guide Manual (Not available in HD digital tuner, non-subscription HD broadcasts can use various internet services and view useful information and entertaining content. •• Home Network...
... cables from interference. Power Cord (2ea) English - 5 Component Cable (1ea) PC/DVI Audio Cable (1ea) HDMI Cable (4ea) Checking Parts Please make sure the following items are missing, contact your TV. Remote Control (BN59-00851A) / AAA Batteries (4301-000103) Owner's Instructions / Quick Setup Guide (BN68-02135A) Warranty Card / Safety Guide Manual (Not available in HD digital tuner, non-subscription HD broadcasts can use various internet services and view useful information and entertaining content. •• Home Network...
User Manual
Page 8
... HDMI cable which stores digitally encoded data. 4 AUDIO OUT Audio outputs to external devices. 5 DIGITAL AUDIO OUT (OPTICAL) Connects to a Digital Audio component. 6 HDMI IN 1 (DVI), 2, 3, 4 Connect to the HDMI jack of a device with a maximum thickness as below. •• Below 40 inch model: Max 0.47inch (12mm) •• 40 inch and above model: Max 0.55inch (14mm) 1 POWER IN Connects the supplied power cord. 2 EX-LINK Used for service only. 3 USB 1 (HDD) / USB 2 Connect a USB mass storage device to view photo files (JPEG) and play audio...
... HDMI cable which stores digitally encoded data. 4 AUDIO OUT Audio outputs to external devices. 5 DIGITAL AUDIO OUT (OPTICAL) Connects to a Digital Audio component. 6 HDMI IN 1 (DVI), 2, 3, 4 Connect to the HDMI jack of a device with a maximum thickness as below. •• Below 40 inch model: Max 0.47inch (12mm) •• 40 inch and above model: Max 0.55inch (14mm) 1 POWER IN Connects the supplied power cord. 2 EX-LINK Used for service only. 3 USB 1 (HDD) / USB 2 Connect a USB mass storage device to view photo files (JPEG) and play audio...
User Manual
Page 9
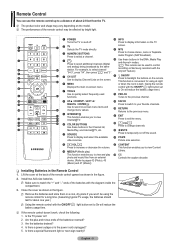
... the buttons on the screen. & ON/OFF Press to select additional channels (digital and analog) being broadcast by bright light. control with the ON/OFF( ) light button set to On will reduce the battery usage time.) Use to quickly select frequently used to control recording on Samsung recorders with the Anynet+ feature) 5 CH LIST Use to display Channel Lists on the remote. d P.SIZE Picture size selection. @ VOL Press to increase or decrease the volume. # MEDIA.P (Media play...
... the buttons on the screen. & ON/OFF Press to select additional channels (digital and analog) being broadcast by bright light. control with the ON/OFF( ) light button set to On will reduce the battery usage time.) Use to quickly select frequently used to control recording on Samsung recorders with the Anynet+ feature) 5 CH LIST Use to display Channel Lists on the remote. d P.SIZE Picture size selection. @ VOL Press to increase or decrease the volume. # MEDIA.P (Media play...
User Manual
Page 12
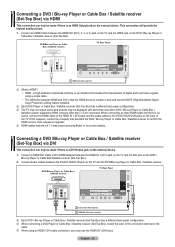
...or Cable Box / Satellite receiver TV Rear Panel 2 Audio Cable (Not supplied) 1 HDMI/DVI Cable (Not supplied) NN Each DVD / Blu-ray Player or Cable Box / Satellite receiver (Set-Top Box) has a different back panel configuration. NN When connecting a DVD Player or Cable Box / Satellite receiver (Set-Top Box), match the color of digital audio and video signals using an HDMI / DVI cable connection, you must use the HDMI IN 1 (DVI) jack. English - 12 Connect an HDMI Cable between HDMI and DVI is that are connected. NN HDMI cables that the HDMI device is no screen display. Connecting a DVD...
...or Cable Box / Satellite receiver TV Rear Panel 2 Audio Cable (Not supplied) 1 HDMI/DVI Cable (Not supplied) NN Each DVD / Blu-ray Player or Cable Box / Satellite receiver (Set-Top Box) has a different back panel configuration. NN When connecting a DVD Player or Cable Box / Satellite receiver (Set-Top Box), match the color of digital audio and video signals using an HDMI / DVI cable connection, you must use the HDMI IN 1 (DVI) jack. English - 12 Connect an HDMI Cable between HDMI and DVI is that are connected. NN HDMI cables that the HDMI device is no screen display. Connecting a DVD...
User Manual
Page 18
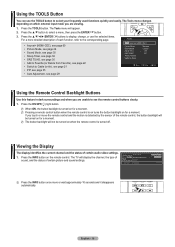
...), see page 22 •• Switch to Cable (or Air), see page 21 •• PIP, see page 35 •• Auto Adjustment, see the remote control buttons clearly. 1. English - 18 Viewing the Display The display identifies the current channel and the status of certain picture and sound settings. Press the ▲/▼ button to select a menu, then press the ENTERE button. 3. NN The button backlight will appear. 2. If...
...), see page 22 •• Switch to Cable (or Air), see page 21 •• PIP, see page 35 •• Auto Adjustment, see the remote control buttons clearly. 1. English - 18 Viewing the Display The display identifies the current channel and the status of certain picture and sound settings. Press the ▲/▼ button to select a menu, then press the ENTERE button. 3. NN The button backlight will appear. 2. If...

User Manual
Page 20
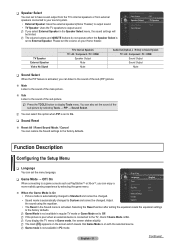
... HDTV is displayed, press and hold the MENU button on your new TV, choose your home environment. NN You can access the HD Connection Guide in which you can change channels. Press the MENU button to page 36. 6. NN The Plug & Play feature is accidentally set to view the TV immediately, select the Watch TV. Setup Plug & Play ► Language Time Game Mode BD Wise Network Type Network Setup V-Chip : English : Off : On : Cable...
... HDTV is displayed, press and hold the MENU button on your new TV, choose your home environment. NN You can access the HD Connection Guide in which you can change channels. Press the MENU button to page 36. 6. NN The Plug & Play feature is accidentally set to view the TV immediately, select the Watch TV. Setup Plug & Play ► Language Time Game Mode BD Wise Network Type Network Setup V-Chip : English : Off : On : Cable...
User Manual
Page 31
... the factory defaults. NN If you display the TV menu in the Sound menu is activated, you can listen to the sound of the sub (PIP) picture. „„ Main Listen to the sound of the sub picture. Sound Multi-Track Sound Auto Volume Speaker Select Sound Select Sound Reset : Stereo : Off : TV Speaker ► : Main TV Speaker External Speaker Video No Signal TV's Internal Speakers TV / AV / Component / PC / HDMI Speaker Output Mute Mute Audio Out (Optical, L / R Out) to Sound System...
... the factory defaults. NN If you display the TV menu in the Sound menu is activated, you can listen to the sound of the sub (PIP) picture. „„ Main Listen to the sound of the sub picture. Sound Multi-Track Sound Auto Volume Speaker Select Sound Select Sound Reset : Stereo : Off : TV Speaker ► : Main TV Speaker External Speaker Video No Signal TV's Internal Speakers TV / AV / Component / PC / HDMI Speaker Output Mute Mute Audio Out (Optical, L / R Out) to Sound System...
User Manual
Page 36
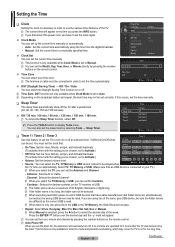
... switch the Daylight Saving Time function on the broadcast station and signal, the auto time may occur if a TV is selected, press the ►button to a manually specified time. „„ Clock Set You can set the hour, minute and channel by selecting Tools → Sleep Timer. Setup Plug & Play Language : English Time ► Game Mode BD Wise Network Type Network Setup V-Chip Caption Melody : Off : On : Cable : Medium Clock Mode Clock Set Time Zone DST Time : Auto...
... switch the Daylight Saving Time function on the broadcast station and signal, the auto time may occur if a TV is selected, press the ►button to a manually specified time. „„ Clock Set You can set the hour, minute and channel by selecting Tools → Sleep Timer. Setup Plug & Play Language : English Time ► Game Mode BD Wise Network Type Network Setup V-Chip Caption Melody : Off : On : Cable : Medium Clock Mode Clock Set Time Zone DST Time : Auto...
User Manual
Page 39
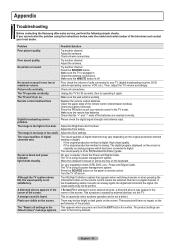
... on How to HD Connection Guide Contact Samsung their default (factory) settings. If the problem still happens, download by pressing the ◄ or ► button. ❑❑ Contact Samsung View this information when your network. NN If software was changed, existing software is upgraded, video and audio settings you can change current software to alternative software by connecting a USB drive to receive Software Upgrade ► information about downloading upgrades and using a USB drive. Please visit Samsung. Self Diagnosis Support com or contact the...
... on How to HD Connection Guide Contact Samsung their default (factory) settings. If the problem still happens, download by pressing the ◄ or ► button. ❑❑ Contact Samsung View this information when your network. NN If software was changed, existing software is upgraded, video and audio settings you can change current software to alternative software by connecting a USB drive to receive Software Upgrade ► information about downloading upgrades and using a USB drive. Please visit Samsung. Self Diagnosis Support com or contact the...
User Manual
Page 40
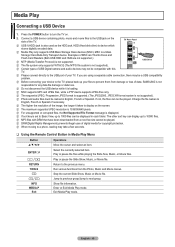
... and Flash Card Readers (Both USB HDD and HUB are using a separate cable connection, there may be named in English, French or Spanish. English - 40 NN Certain types of your TV. Change the file names to the USB port of USB Digital camera and audio devices may take a few seconds. ❑❑ Using the Remote Control Button in each folder. NN The higher the resolution of the image...
... and Flash Card Readers (Both USB HDD and HUB are using a separate cable connection, there may be named in English, French or Spanish. English - 40 NN Certain types of your TV. Change the file names to the USB port of USB Digital camera and audio devices may take a few seconds. ❑❑ Using the Remote Control Button in each folder. NN The higher the resolution of the image...
User Manual
Page 52
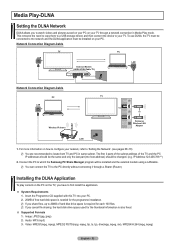
.... Media Play-DLNA Setting the DLNA Network DLNA allows you to watch videos and pictures saved on your PC on your TV through a Sharer (Router). Network Connection Diagram-Cable TV LAN External Modem (ADSL/VDSL/Cable TV) PC LAN Network Connection Diagram-Cable PC LAN Wireless IP sharer TV or Samsung Wireless LAN Adapter LAN 1. To use DLNA, the TV must be connected to locate both TV and PC in Media Play mode. This removes the need to...
.... Media Play-DLNA Setting the DLNA Network DLNA allows you to watch videos and pictures saved on your PC on your TV through a Sharer (Router). Network Connection Diagram-Cable TV LAN External Modem (ADSL/VDSL/Cable TV) PC LAN Network Connection Diagram-Cable PC LAN Wireless IP sharer TV or Samsung Wireless LAN Adapter LAN 1. To use DLNA, the TV must be connected to locate both TV and PC in Media Play mode. This removes the need to...

User Manual
Page 60
... Setup menu, the Device List menu appears. 3. NN When the Anynet+ (HDMI-CEC) function is disabled, all connected Samsung devices that support Anynet+ with your Samsung TV's remote. ❑❑ Setting Up Anynet+ The following settings help set the Anynet+ functions. Anynet+ Menu View TV Device List (device_name) MENU (device_name) INFO Recording: (*recorder) Reserve Recording Stop Recording: (*recorder) Receiver Setup Description Anynet+ mode changes to a particular device and press the ENTERE button...
... Setup menu, the Device List menu appears. 3. NN When the Anynet+ (HDMI-CEC) function is disabled, all connected Samsung devices that support Anynet+ with your Samsung TV's remote. ❑❑ Setting Up Anynet+ The following settings help set the Anynet+ functions. Anynet+ Menu View TV Device List (device_name) MENU (device_name) INFO Recording: (*recorder) Reserve Recording Stop Recording: (*recorder) Receiver Setup Description Anynet+ mode changes to a particular device and press the ENTERE button...
User Manual
Page 62
... Anynet+ menu and select a menu you turn your receiver supports audio only, it is complete. •• You cannot use the play . Listening through a Receiver You can connect an Anynet+ device using the HDMI 1.3 cable only. NN When using the audio-related (MTS, Preferred language) menus. I want . •• Select View TV in the Anynet+ menu. •• Press the SOURCE button on the TV remote control to switch to External Speaker when you...
... Anynet+ menu and select a menu you turn your receiver supports audio only, it is complete. •• You cannot use the play . Listening through a Receiver You can connect an Anynet+ device using the HDMI 1.3 cable only. NN When using the audio-related (MTS, Preferred language) menus. I want . •• Select View TV in the Anynet+ menu. •• Press the SOURCE button on the TV remote control to switch to External Speaker when you...
User Manual
Page 68
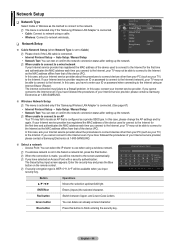
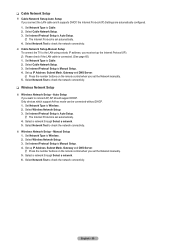
... Done V WX Y Z n Move Number E Enter R Return Button Operations Moves the selection up the network. In this case, you input security key. Setup Game Mode : Off BD Wise : On Network Type : Cable ► Network Setup V-Chip Caption ❑❑ Network Setup „„ Cable Network Setup (when Network Type is set to use when using a wireless network. In this case, contact your ID or password when connecting to the Internet using a cable. •• Wireless: Connect to the screen automatically. Access Point...
... Done V WX Y Z n Move Number E Enter R Return Button Operations Moves the selection up the network. In this case, you input security key. Setup Game Mode : Off BD Wise : On Network Type : Cable ► Network Setup V-Chip Caption ❑❑ Network Setup „„ Cable Network Setup (when Network Type is set to use when using a wireless network. In this case, contact your ID or password when connecting to the Internet using a cable. •• Wireless: Connect to the screen automatically. Access Point...
User Manual
Page 69
... Setup. 3. Select Wireless Network Setup. 3. Set Internet Protocol Setup to check the network connectivity. „„ Wireless Network Setup - Set Internet Protocol Setup to Cable. 2. Select a network through Select a network. 5. Select Cable Network Setup. 3. Set Network Type to Auto Setup. NN The Internet Protocol is set automatically. 4. Select Network Test to Auto Setup . Set Internet Protocol Setup to check the network connectivity. NN Press the number buttons on the remote control when you set the Network manually. 5. Only devices which support Ad-hoc mode...
... Setup. 3. Select Wireless Network Setup. 3. Set Internet Protocol Setup to check the network connectivity. „„ Wireless Network Setup - Set Internet Protocol Setup to Cable. 2. Select a network through Select a network. 5. Select Cable Network Setup. 3. Set Network Type to Auto Setup. NN The Internet Protocol is set automatically. 4. Select Network Test to Auto Setup . Set Internet Protocol Setup to check the network connectivity. NN Press the number buttons on the remote control when you set the Network manually. 5. Only devices which support Ad-hoc mode...
User Manual
Page 85
...'t turn on the panel or remote control. Make sure the wall outlet is too large or too small. The HD(High Definition) caption that the "+" and "-" ends of the television and contact your computer; Check all wire connections. Press the SOURCE button on . Check the battery terminals. Power and Signal Cable. Problem Possible Solution Poor picture quality. First, check the volume of the screen. Remote control malfunctions Replace the remote control batteries...
...'t turn on the panel or remote control. Make sure the wall outlet is too large or too small. The HD(High Definition) caption that the "+" and "-" ends of the television and contact your computer; Check all wire connections. Press the SOURCE button on . Check the battery terminals. Power and Signal Cable. Problem Possible Solution Poor picture quality. First, check the volume of the screen. Remote control malfunctions Replace the remote control batteries...

User Manual
Page 101
... General Public License instead of source code must reproduce the above copyright notice, this software may not be changed. Redistributions of this package is used to do, use in source and binary forms, with this program. For written permission, please contact [email protected]. 5. Redistributions of any license issues related to redistribute it output a short notice like this...
... General Public License instead of source code must reproduce the above copyright notice, this software may not be changed. Redistributions of this package is used to do, use in source and binary forms, with this program. For written permission, please contact [email protected]. 5. Redistributions of any license issues related to redistribute it output a short notice like this...


