
Quick Guide Easy Manual Ver.1.0 (English)
Page 2
...provisions for more than 5% of the total television viewing per week. For the location of the purchaser. In Canada : 1-800-SAMSUNG User Instructions • Screen Image retention Do not display a still image (such as stock market reports, video game displays, station logos, web sites or ...Center, please call toll-free: - Do not lay the TV flat on the Screen. Your Samsung Plasma TV is also known as a full screen picture. It is built into your Samsung limited warranty. • SAMSUNG ELECTRONICS NORTH AMERICAN LIMITED WARRANTY STATEMENT Subject to a change in a location where it...
...provisions for more than 5% of the total television viewing per week. For the location of the purchaser. In Canada : 1-800-SAMSUNG User Instructions • Screen Image retention Do not display a still image (such as stock market reports, video game displays, station logos, web sites or ...Center, please call toll-free: - Do not lay the TV flat on the Screen. Your Samsung Plasma TV is also known as a full screen picture. It is built into your Samsung limited warranty. • SAMSUNG ELECTRONICS NORTH AMERICAN LIMITED WARRANTY STATEMENT Subject to a change in a location where it...
Quick Guide Easy Manual Ver.1.0 (English)
Page 3
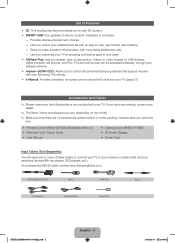
... exciting new feature enables you to view 3D content. •• SMART HUB: Your gateway to all connected Samsung devices that support Anynet+ with your Samsung TV's remote. •• e-Manual: Provides a detailed, on-screen user's manual that there are included with your TV. PCs and cell phones can be accessed wirelessly, through...
... exciting new feature enables you to view 3D content. •• SMART HUB: Your gateway to all connected Samsung devices that support Anynet+ with your Samsung TV's remote. •• e-Manual: Provides a detailed, on-screen user's manual that there are included with your TV. PCs and cell phones can be accessed wirelessly, through...
Quick Guide Easy Manual Ver.1.0 (English)
Page 5
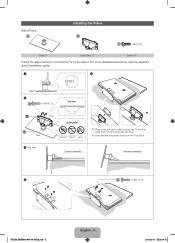
... X L12) Stand x 1 Guide Stand x 1 Screws x 8 Follow the steps below to connect the TV to protect the TV, and then place the TV on the cloth screen side down. ✎✎Insert the Stand Guide into the slot on the TV's bottom. (Incorrect assembly) 5 C x4 (M4 X L12) [PE550-ZA]BN68-04071A-X0Eng...
... X L12) Stand x 1 Guide Stand x 1 Screws x 8 Follow the steps below to connect the TV to protect the TV, and then place the TV on the cloth screen side down. ✎✎Insert the Stand Guide into the slot on the TV's bottom. (Incorrect assembly) 5 C x4 (M4 X L12) [PE550-ZA]BN68-04071A-X0Eng...
Quick Guide Easy Manual Ver.1.0 (English)
Page 16
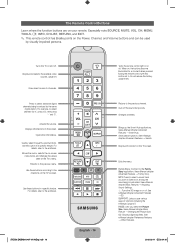
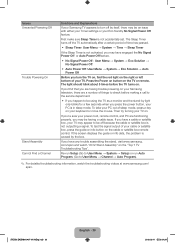
...channels. See e-Manual chapter Advanced Features → Search. See e-Manual chapter Advanced Features → 3D. Moves the cursor, selects the on-screen menu items, and changes the values seen on or off. X: Turns the 3D image on your remote. The Remote Control Buttons Learn where ...the function buttons are on or off. Displays information on the screen. Exits the menu. CC: Displays digital subtitles. Displays channel lists on the TV screen. Returns to the Family Story application. Cuts off . MTS: Press to select a sound track ...
...channels. See e-Manual chapter Advanced Features → Search. See e-Manual chapter Advanced Features → 3D. Moves the cursor, selects the on-screen menu items, and changes the values seen on or off. X: Turns the 3D image on your remote. The Remote Control Buttons Learn where ...the function buttons are on or off. Displays information on the screen. Exits the menu. CC: Displays digital subtitles. Displays channel lists on the TV screen. Returns to the Family Story application. Cuts off . MTS: Press to select a sound track ...

Quick Guide Easy Manual Ver.1.0 (English)
Page 17
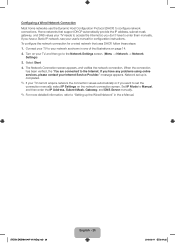
...or router is on the TV. ✎✎ Setup is available only when the input source is for retail environments only. On the Use Mode screen, select the Home Use using your remote, and Configure the then go to 6 - For more information about Store Demo, go to 3A -...network configuration information or want to configure a wired network connection during Setup, make sure you've connected a LAN cable to the end of screens and on-screen prompts will assist you in configuring the TV's basic settings. Auto Program (1) on the next network settings page. ✎✎ To configure ...
...or router is on the TV. ✎✎ Setup is available only when the input source is for retail environments only. On the Use Mode screen, select the Home Use using your remote, and Configure the then go to 6 - For more information about Store Demo, go to 3A -...network configuration information or want to configure a wired network connection during Setup, make sure you've connected a LAN cable to the end of screens and on-screen prompts will assist you in configuring the TV's basic settings. Auto Program (1) on the next network settings page. ✎✎ To configure ...

Quick Guide Easy Manual Ver.1.0 (English)
Page 18
... all the wireless networks within range. For more information, refer to select a network, and then select Next. message appears. The Software Upgrade screen appears. [PE550-ZA]BN68-04071A-X0Eng.indb 18 English - 18 2012-02-11 �� 3:04:18 When done, select Next if...select it. The TV checks the wireless connection. In the list of the networks. You can enter numbers by pressing the number buttons on the screen. Select Next, and then go to the Internet. To redisplay letters, select F again. 3. Configure your Internet Service Provider. If you have ...
... all the wireless networks within range. For more information, refer to select a network, and then select Next. message appears. The Software Upgrade screen appears. [PE550-ZA]BN68-04071A-X0Eng.indb 18 English - 18 2012-02-11 �� 3:04:18 When done, select Next if...select it. The TV checks the wireless connection. In the list of the networks. You can enter numbers by pressing the number buttons on the screen. Select Next, and then go to the Internet. To redisplay letters, select F again. 3. Configure your Internet Service Provider. If you have ...
Quick Guide Easy Manual Ver.1.0 (English)
Page 19
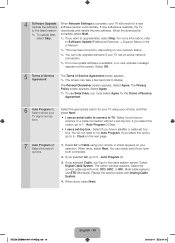
... appropriate option for your TV using your remote, and then select Next. •• I use an aerial cable to connect to the cable system screen. If you have an antenna or a cable connection without a set -top box.: Select if you select this option, go to 9 - Repeat... 19 2012-02-11 �� 3:04:19 4 Software Upgrade: When Network Settings is complete, your TV signal comes from. The General Disclaimer screen appears. Select OK. 5 Terms of Service Agreement The Terms of Service Agreement. 6 Auto Program (1): Select where your TV will check for the Terms ...
... appropriate option for your TV using your remote, and then select Next. •• I use an aerial cable to connect to the cable system screen. If you have an antenna or a cable connection without a set -top box.: Select if you select this option, go to 9 - Repeat... 19 2012-02-11 �� 3:04:19 4 Software Upgrade: When Network Settings is complete, your TV signal comes from. The General Disclaimer screen appears. Select OK. 5 Terms of Service Agreement The Terms of Service Agreement. 6 Auto Program (1): Select where your TV will check for the Terms ...

Quick Guide Easy Manual Ver.1.0 (English)
Page 20
... Time, select Next. 10 Setup Complete Review the Setup data, and then select Close to Rerun Setup... The Time Zone screen will appear. The DST (Daylight Savings Time) screen will appear. The DST function sets the time ahead one hour to MENU (m)) and hold for more than 5 seconds....; System → Setup If You Want to Source (s)) and hold for more than 5 seconds. Select your cable system. The Function menu screen appears. The Store Demo mode is on screen menu (Menu → System → Time → Clock → DST). To cancel Store Demo, bring up to the Clock...
... Time, select Next. 10 Setup Complete Review the Setup data, and then select Close to Rerun Setup... The Time Zone screen will appear. The DST (Daylight Savings Time) screen will appear. The DST function sets the time ahead one hour to MENU (m)) and hold for more than 5 seconds....; System → Setup If You Want to Source (s)) and hold for more than 5 seconds. Select your cable system. The Function menu screen appears. The Store Demo mode is on screen menu (Menu → System → Time → Clock → DST). To cancel Store Demo, bring up to the Clock...

Quick Guide Easy Manual Ver.1.0 (English)
Page 21
Press the ™ button on your remote. Information You can see detailed information about the selected external device. The Source screen appears. 3. Refresh If the external devices are not displayed in Edit Name. To access Edit Name, press the TOOLST button on your remote... select the name of the device connected to an input source. Select a desired external input source. ✎✎ Alternatively, you can access the Source screen by pressing the a button on your remote. [PE550-ZA]BN68-04071A-X0Eng.indb 21 English - 21 2012-02-11 �� 3:04:20 ...
Press the ™ button on your remote. Information You can see detailed information about the selected external device. The Source screen appears. 3. Refresh If the external devices are not displayed in Edit Name. To access Edit Name, press the TOOLST button on your remote... select the name of the device connected to an input source. Select a desired external input source. ✎✎ Alternatively, you can access the Source screen by pressing the a button on your remote. [PE550-ZA]BN68-04071A-X0Eng.indb 21 English - 21 2012-02-11 �� 3:04:20 ...
Quick Guide Easy Manual Ver.1.0 (English)
Page 22
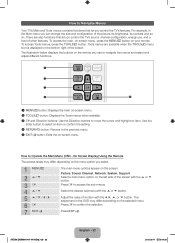
...below displays the buttons on the remote you select. 1 MENUm 2 u/d 3E 4 u/d 5 u/d/l/r 6E 7 EXITe The main menu options appear on -screen menu. On Screen Display) Using the Remote The access steps may differ depending on the left side of other features. Press E to Operate the Main Menu (OSD -... the Direction buttons to confirm the selection. For example, in the OSD may differ depending on the menu option you use , and a host of the screen with the l, r, u, or d button. Select a main menu option on the selected menu. Tools menus are also functions that let you can change ...
...below displays the buttons on the remote you select. 1 MENUm 2 u/d 3E 4 u/d 5 u/d/l/r 6E 7 EXITe The main menu options appear on -screen menu. On Screen Display) Using the Remote The access steps may differ depending on the left side of other features. Press E to Operate the Main Menu (OSD -... the Direction buttons to confirm the selection. For example, in the OSD may differ depending on the menu option you use , and a host of the screen with the l, r, u, or d button. Select a main menu option on the selected menu. Tools menus are also functions that let you can change ...

Quick Guide Easy Manual Ver.1.0 (English)
Page 23
...Select an application by moving the Controller, and then pressing the Controller. The Source list screen appears. To select a source, move the up /down /left/right directions. The SMART HUB main screen appears. Select an option by moving the Controller to the right. With the Function menu...MENU (m) by moving the Controller to the left. When the source you cannot operate it , and then press the Controller. The OSD (On Screen Display) Menu appears. With the Function menu visible, select Power Off (P) by moving the Controller forwards, and then press the Controller. ✎&#...
...Select an application by moving the Controller, and then pressing the Controller. The Source list screen appears. To select a source, move the up /down /left/right directions. The SMART HUB main screen appears. Select an option by moving the Controller to the right. With the Function menu...MENU (m) by moving the Controller to the left. When the source you cannot operate it , and then press the Controller. The OSD (On Screen Display) Menu appears. With the Function menu visible, select Power Off (P) by moving the Controller forwards, and then press the Controller. ✎&#...
Quick Guide Easy Manual Ver.1.0 (English)
Page 24
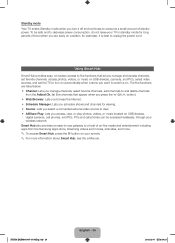
... video source to view. •• AllShare Play: Lets you manage channels, select favorite channels, add channels to and delete channels from the Samsung Apps store, streaming videos and movies, kids sites, and more information about Smart Hub, see the e-Manual. [PE550-ZA]BN68-04071A-X0Eng.indb...8226;• Channel: Lets you access, view, or play photos, videos, or music located on . Using Smart Hub Smart Hub provides easy, on-screen access to five functions that appear when you press the z button.) •• Web Browser: Lets you browse the Internet. •• Schedule ...
... video source to view. •• AllShare Play: Lets you manage channels, select favorite channels, add channels to and delete channels from the Samsung Apps store, streaming videos and movies, kids sites, and more information about Smart Hub, see the e-Manual. [PE550-ZA]BN68-04071A-X0Eng.indb...8226;• Channel: Lets you access, view, or play photos, videos, or music located on . Using Smart Hub Smart Hub provides easy, on-screen access to five functions that appear when you press the z button.) •• Web Browser: Lets you browse the Internet. •• Schedule ...
Quick Guide Easy Manual Ver.1.0 (English)
Page 25
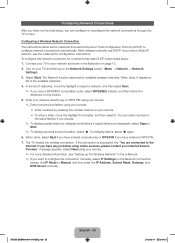
..., select F again. 6. Set IP Mode to the Internet. Most wireless networks use the Dynamic Host Configuration Protocol (DHCP) to the Network Settings screen. (Menu → Network → Network Settings) 3. Enter your network security key or WPS PIN using your remote. ✎✎ Enter numbers...the TV's menu. If you have a Static IP network, see "Setting up the Wireless Network" in the illustration on the screen. 5. Connect your remote. •• To enter a letter, move the highlight to configure the connection manually, select IP Settings on ...
..., select F again. 6. Set IP Mode to the Internet. Most wireless networks use the Dynamic Host Configuration Protocol (DHCP) to the Network Settings screen. (Menu → Network → Network Settings) 3. Enter your network security key or WPS PIN using your remote. ✎✎ Enter numbers...the TV's menu. If you have a Static IP network, see "Setting up the Wireless Network" in the illustration on the screen. 5. Connect your remote. •• To enter a letter, move the highlight to configure the connection manually, select IP Settings on ...
Quick Guide Easy Manual Ver.1.0 (English)
Page 26
...2012-02-11 �� 3:04:22 message appears. Select Start. 4. Home networks that uses DHCP, follow these steps: 1. The Network Connection screen appears, and verifies the network connection. Network set the connection manually, select IP Settings on page 14. 2. Connect your TV to your TV, ...and then go to set up the Wired Network" in one of the illustrations on the network connection screen. If you want to the Network Settings screen. (Menu → Network → Network Settings) 3. If you don't have a Static IP network, see your Internet...
...2012-02-11 �� 3:04:22 message appears. Select Start. 4. Home networks that uses DHCP, follow these steps: 1. The Network Connection screen appears, and verifies the network connection. Network set the connection manually, select IP Settings on page 14. 2. Connect your TV to your TV, ...and then go to set up the Wired Network" in one of the illustrations on the network connection screen. If you want to the Network Settings screen. (Menu → Network → Network Settings) 3. If you don't have a Static IP network, see your Internet...
Quick Guide Easy Manual Ver.1.0 (English)
Page 27
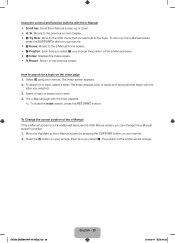
...normal environment. • Natural for LED TV / Relax for PDP TV Suitable for reducing eye strain. • Movie Darkens the screen, making it less glary. Picture Picture Mode Cell Light Contrast Brightness Sharpness Color Tint (G/R) Changing the Preset Picture Mode G50 Picture Mode...PC via the HDMI to DVI cable, you can only select Entertain and Standard. • Dynamic Brightens the screen. The Support screen appears. 2. The e-Manual screen appears. 3. Picture Picture Mode Cell Light Contrast Brightness Sharpness Color Tint (G/R) Changing the Preset Picture Mode G50 Picture...
...normal environment. • Natural for LED TV / Relax for PDP TV Suitable for reducing eye strain. • Movie Darkens the screen, making it less glary. Picture Picture Mode Cell Light Contrast Brightness Sharpness Color Tint (G/R) Changing the Preset Picture Mode G50 Picture Mode...PC via the HDMI to DVI cable, you can only select Entertain and Standard. • Dynamic Brightens the screen. The Support screen appears. 2. The e-Manual screen appears. 3. Picture Picture Mode Cell Light Contrast Brightness Sharpness Color Tint (G/R) Changing the Preset Picture Mode G50 Picture...
Quick Guide Easy Manual Ver.1.0 (English)
Page 28
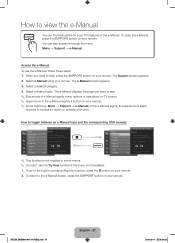
...: Each time you select {, you change the position of the e-Manual will change the e-Manual screen's position. 1. To search for a topic on your remote. 2. Move the Highlight to the previous screen. The Index screen appears. 2. Each time you can change . [PE550-ZA]BN68-04071A-X0Eng.indb 28 English -... or keyword you selected. 3. How to the topic. Using the colored and function buttons with the e-Manual •• Scroll bar: Scroll the e-Manual screen up or down. •• l / r: Moves to the previous or next chapter. •• a Try Now: Move to the OSD menu...
...: Each time you select {, you change the position of the e-Manual will change the e-Manual screen's position. 1. To search for a topic on your remote. 2. Move the Highlight to the previous screen. The Index screen appears. 2. Each time you can change . [PE550-ZA]BN68-04071A-X0Eng.indb 28 English -... or keyword you selected. 3. How to the topic. Using the colored and function buttons with the e-Manual •• Scroll bar: Scroll the e-Manual screen up or down. •• l / r: Moves to the previous or next chapter. •• a Try Now: Move to the OSD menu...
Quick Guide Easy Manual Ver.1.0 (English)
Page 29
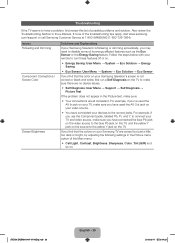
.... If you may need to disable some of possible problems and solution. Issues Flickering and Dimming Component Connections / Screen Color Screen Brightness Solutions and Explanations If your Samsung Television is not correct or black and white, first run a Self Diagnosis on the TV to make sure there...8226;• Eco Sensor: User Menu → System → Eco Solution → Eco Sensor If you find that the color on your Samsung television's screen is flickering or dimming sporadically, you find that the colors on your remote to the yellow Y jack on . [PE550-ZA]BN68-04071A-X0Eng...
.... If you may need to disable some of possible problems and solution. Issues Flickering and Dimming Component Connections / Screen Color Screen Brightness Solutions and Explanations If your Samsung Television is not correct or black and white, first run a Self Diagnosis on the TV to make sure there...8226;• Eco Sensor: User Menu → System → Eco Solution → Eco Sensor If you find that the color on your Samsung television's screen is flickering or dimming sporadically, you find that the colors on your remote to the yellow Y jack on . [PE550-ZA]BN68-04071A-X0Eng...
Quick Guide Easy Manual Ver.1.0 (English)
Page 30
... The Sleep Timer turns off by the box. Issues Unwanted Powering Off Trouble Powering On Stand Assembly Cannot Find a Channel Solutions and Explanations If your Samsung TV appears to turn the TV on, find that you are having a cable issue. First make sure Sleep Timer is caused by itself, there may... seconds when you press the power button, your PC is not outputting a signal. Then try turning your TV on the TV or remote. If the screen displays the guide or info data, the problem is not accidentally set. If you have engaged the No Signal Power Off or Auto Power Off...
... The Sleep Timer turns off by the box. Issues Unwanted Powering Off Trouble Powering On Stand Assembly Cannot Find a Channel Solutions and Explanations If your Samsung TV appears to turn the TV on, find that you are having a cable issue. First make sure Sleep Timer is caused by itself, there may... seconds when you press the power button, your PC is not outputting a signal. Then try turning your TV on the TV or remote. If the screen displays the guide or info data, the problem is not accidentally set. If you have engaged the No Signal Power Off or Auto Power Off...

Quick Guide Easy Manual Ver.1.0 (English)
Page 32
...-04071A-X0Eng.indb 32 English - 32 2012-02-11 �� 3:04:25 Be sure to wipe the exterior and screen carefully using the cloth provided or a soft cloth to the TV screen, some debris can get scratched during cleaning. Licenses Storage and Maintenance ✎✎ If a sticker was attached to prevent...
...-04071A-X0Eng.indb 32 English - 32 2012-02-11 �� 3:04:25 Be sure to wipe the exterior and screen carefully using the cloth provided or a soft cloth to the TV screen, some debris can get scratched during cleaning. Licenses Storage and Maintenance ✎✎ If a sticker was attached to prevent...
Quick Guide Easy Manual Ver.1.0 (English)
Page 35
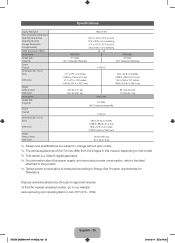
... Considerations Operating Temperature Operating Humidity Storage Temperature Storage Humidity Stand Swivel (Left / Right) Model Name Screen Size (Diagonal) Sound (Output) Dimensions (W x H x D) Body With stand Weight Without Stand With Stand Model Name Screen Size (Diagonal) Sound (Output) Dimensions (W x H x D) Body With stand Weight Without ... refer to the label attached to the product. ✎✎ Typical power consumption is measured according to our website: www.samsung.com/recyclingdirect or call, (877) 278 - 0799 [PE550-ZA]BN68-04071A-X0Eng.indb 35 English - 35 2012-02-11 �...
... Considerations Operating Temperature Operating Humidity Storage Temperature Storage Humidity Stand Swivel (Left / Right) Model Name Screen Size (Diagonal) Sound (Output) Dimensions (W x H x D) Body With stand Weight Without Stand With Stand Model Name Screen Size (Diagonal) Sound (Output) Dimensions (W x H x D) Body With stand Weight Without ... refer to the label attached to the product. ✎✎ Typical power consumption is measured according to our website: www.samsung.com/recyclingdirect or call, (877) 278 - 0799 [PE550-ZA]BN68-04071A-X0Eng.indb 35 English - 35 2012-02-11 �...


